ELICA ESNX43SS Siena installation guide
- Category
- Cooker hoods
- Type
- Siena installation guide

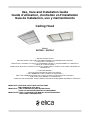
Use, Care and Installation Guide
Guide d’utilisation, d’entretien et d’installation
Guía de instalación, uso y mantenimiento
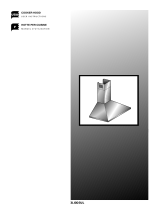
Ceiling Hood
Models
SUT950 – SUT951
*** BEFORE INSTALLATION ***
ENSURE THERE IS NO VISIBLE OR HIDDEN DAMAGE SUSTAINED DURING SHIPPING
*** AVANT DE L’UTILISATION ***
VÉRIFIEZ QUE L’APPAREIL N'A SUBI AUCUN DOMMAGE VISIBLE OU CACHÉ PENDANT LE TRANSPORT
*** ANTES DE LA INSTALACIÓN ***
ASEGURARSE DE QUE EL PRODUCTO NO HAYA SUFRIDO DAÑOS VISIBLES O NO VISIBLES DURANTE EL
TRANSPORTE
*** SHIPPING DAMAGE ***
MUST BE REPORTED WITHIN 5 DAYS OF RECEIPT
*** TOUT DOMMAGE CAUSÉ PENDANT LE TRANSPORT ***
DOIT ÊTRE COMMUNIQUÉ DANS LES 5 JOURS SUIVANT LA RÉCEPTION DE L’APPAREIL
*** CUALQUIER DAÑO DEBIDO AL TRANSPORTE ***
TIENE QUE SER NOTIFICADO
A MÁS TARDAR 5 DÍAS DESPUÉS DE HABER RECIBIDO EL PRODUCTO
IMPORTANT: READ AND SAVE THESE INSTRUCTIONS.
FOR RESIDENTIAL USE ONLY.
IMPORTANT : LIRE ET CONSERVER CES INSTRUCTIONS.
POUR UTILISATION RÉSIDENTIELLE UNIQUEMENT.
IMPORTANTE: LEER Y GUARDAR ESTE MANUAL DE INSTRUCCIONES.
SÓLO PARA USO DOMÉSTICO
Page is loading ...

3
IMPORTANT SAFETY INSTRUCTIONS
WARNING: TO REDUCE THE RISK OF FIRE,
ELECTRIC SHOCK, OR INJURY TO PERSONS,
OBSERVE THE FOLLOWING:
■ Use this unit only in the manner intended by the
manufacturer. If you have questions, contact the
manufacturer.
■ Before servicing or cleaning the unit, switch power
off at service panel and lock the service disconnecting
means to prevent power from being switched on
accidentally. When the service disconnecting means
cannot be locked, securely fasten a prominent warning
device, such as a tag, to the service panel.
■ Installation work and electrical wiring must be done
by qualified person(s) in accordance with all applicable
codes and standards, including fire-rated construction.
■ Do not operate any fan with a damaged cord or plug.
Discard fan or return to an authorized service facility for
examination and/or repair.
■ Sufficient air is needed for proper combustion and
exhausting of gases through the flue (chimney) of fuel
burning equipment to prevent backdrafting. Follow the
heating equipment manufacturer's guideline and safety
standards such as those published by the National Fire
Protection Association (NFPA), the American Society
for Heating, Refrigeration and Air Conditioning
Engineers (ASHRAE), and the local code authorities.
■ When cutting or drilling into wall or ceiling; do not
damage electrical wiring and other utilities.
■ Ducted fans must always be vented outdoors.
CAUTION: For general ventilating use only. Do not use
to exhaust hazardous or explosive materials and
vapors.
CAUTION: To reduce risk of fire and to properly
exhaust air, be sure to duct air outside - do not vent
exhaust air into spaces within walls or ceilings, attics or
into crawl spaces, or garages.
WARNING: TO REDUCE THE RISK OF FIRE, USE
ONLY METAL DUCTWORK.
WARNING: TO REDUCE THE RISK OF A RANGE TOP
GREASE FIRE:
■ Never leave surface units unattended at high settings.
Boilovers cause smoking and greasy spillovers that may
ignite. Heat oils slowly on low or medium settings.
■ Always turn hood ON when cooking at high heat or
when flambeing food (i.e. Crepes Suzette, Cherries
Jubilee, Peppercorn Beef Flambé).
■ Clean ventilating fans frequently. Grease should not be
allowed to accumulate on fan or filter.
■ Use proper pan size. Always use cookware appropriate
for the size of the surface element.
WARNING: TO REDUCE THE RISK OF INJURY TO
PERSONS IN THE EVENT OF A RANGE TOP GREASE
FIRE, OBSERVE THE FOLLOWING:
(a)
■ SMOTHER FLAMES with a close fitting lid, cookie
sheet, or metal tray, then turn off the burner. BE
CAREFUL TO PREVENT BURNS. If the flames do not go
out immediately, EVACUATE AND CALL THE FIRE
DEPARTMENT.
■ NEVER PICK UP A FLAMING PAN - you may be
burned.
■ DO NOT USE WATER, including wet dishcloths or
towels - a violent steam explosion will result.
■ Use an extinguisher ONLY if:
– You know you have a class ABC extinguisher, and you
already know how to operate it.
– The fire is small and contained in the area where it
started. – The fire department is being called.
– You can fight the fire with your back to an exit.
(a)
Based on "Kitchen Fire Safety Tips" published by
NFPA.
■ WARNING: To reduce the risk of fire or electrical
shock, do not use this fan with any solid-state speed
control device.
READ AND SAVE THESE INSTRUCTIONS

4
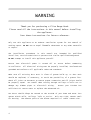
WARNING
Thank you for purchasing a Elica Range Hood.
Please read all the instructions in this manual before installing
the appliance.
Save these instructions for future reference.
Only use this appliance as an exhaust ventilation system for the removal of
cooking vapors. T use to expel flammable substances or any other materials
or vapors.
The installation procedures in this manual are intended for qualified
instal&lers, service technicians or persons with similar qualified background.
attempt to install this appliance yourself.
Ensure that electrical power is turned off at source before commencing
in&stallation. All electrical wiring must be properly installed, insulated and
grounded and conform to all applicable codes and standards.
Make sure all existing duct work is clean of grease build up, or duct work
should be replaced, if necessary, to avoid the possibility of a grease fire.
Check all joints on ductwork to ensure proper connection and all joints should
be properly taped. Be careful when cutting through ceilings or walls not to
damage any hidden pipes or electrical wiring. Ensure your kitchen has
sufficient air return vents to replace the exhausted air.
Fan ducts should always be vented to the outside of your home and never into
spaces within walls, ceilings, lofts or attics. Only use rigid, smooth steel
for ducting. The exhaust point of the blower requires a 6” round connec&tion.

5
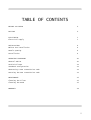
TABLE OF CONTENTS
BEFORE YOU BEGIN 6
DUCTING 6
ELELCTRICAL 7
Electrical supply 7
INSTALLATION 8
Before the installation 8
Panels opening 8
Installation 8
OPERATING PROCEDURE 10
General Advice 10
Techinical Data 11
Standard configuration 11
Generating a new transmission code 11
Learning the new transmission code 11
MAINTENANCE 12
Cleaning the Filter 12
Cleaning the Hood 12
WARRANTY 14

6
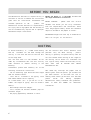
BEFORE YOU BEGIN
The manufacturer declines all responsi&bility in
the event of failure to observe the instructions
given here for installation, maintenance and
suitable operation of the product. The
manufacturer further declines all responsibility
for injury due to negligence and the warranty of
the unit automatically expires due to impro&per
maintenance and/or installation.
BEFORE STARTING – please read this en&tire
document and ensure you are fully conversant
with the require<ments and limitations. These
units weigh approxi&mately 125lbs and therefore
require a minimum of two people to install.
Recommended height from cook top to underside of
hood = 30” for gas, 25” for electric.
DUCTING
If vented externally, 6” / 150mm round ducting
must be available for the hood through the
ceiling, in line with the cen&tral vertical axis
of the range hood.
This unit must have it’s own ductwork. Do not
under any circumstances vent this unit into any
other ductwork or exhaust ducting in the
building.
Furthermore, please read carefully all of the
following installation instructions.
< Use an exhausting pipe whose maxi&mum length
does not exceed 5 meters.
< Limit the no. of elbows in the piping, since
each elbow reduces the air capacity
of 1 linear meter. (Ex.: if you use no. 2 x 90 °
elbows, the length of piping must not exceed 3
meters).
< Avoid abrupt direction changes.
< Use a 150/200 mm constant diameter pipe for
the whole length.
< Use piping approved by standards in force.
Use the shortest most direct ductwork route
possible. Only use metal ducting < plastic
ducting is generally not permit&ted by code. Do
not use flexible metal ducting as the ridges of
the ducting cau&se severe air turbulence and
will signifi&cantly reduce the efficiency of any
hood <THIS TYPE OF DUCTING WILL REDUCE
EFFICIENCY BY 50%.
Vent hoods may interrupt the proper flow of
exhaust gases from fire<places, gas furnaces and
gas water heaters. To mini&mize the risk of
drawing these lethal ga&ses back into the home
please follow the heating equipment
manufacturers safety standards and guidelines.
Refer to NFPA and ASHRAE for additional
information.

7
ELECTRICAL CONNECTION
! ! "" #$ % &%
'(""
Please ensure that the appropriate electri&cal
codes or prevailing local building co&des and
ordinances are adhered to.
Ensure that the electricity supply is
di&sconnected at source. Do not use an
ex&tension cord or adapter plug with this
appliance.
This appliance must be grounded. Con&nect to a
properly grounded branch circuit, protected by a
15 amp circuit breaker.
"")&&'
This appliance requires 120V/60Hz, 3amp
electrical supply – ensure an ap&propriately
qualified person completes the electrical hook<
up. The connection point for the electrical
supply is at the top of the unit, therefore the
electrical supply must be run down from the
ceiling alon&gside the ductwork.
All electrical and venting hook<ups must be in
place before commencing installa&tion of the
hood<fan.

8
INSTALLATION
BEFORE THE INSTALLATION
This models can be used only if connec&ted with
external motors produced by the same
manufacturer.
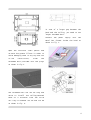
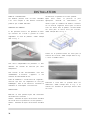
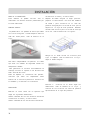
PANELS OPENING
It is possible to open the steel panels, which
cover the grease filters, by slightly pulling on
a side of the panel itself, as shown in Fig. 1.
To achieve the complete opening of panels, you
need to release the safety chains, by using the
appropriate spring catches.
For proper working, it is recommended to install
the appliance at a distance of 2000
< 2100 mm from the floor.
Before starting the appliance installation,
please check that all components are not
damaged, in such a case contact your retailer
and do not carry out installation.
INSTALLATION
Fit a false ceiling with an opening that has the
following dimensions:
SUT950: 1465x965 mm with a minimum
distance of 330 mm between the ceiling and the
false ceiling;
SUT951: 1065x665 mm with a minimum
distance of 330 mm between the ceiling and the
false ceiling.
After having chosen the most suitable po&sition,
prepare the ducting: an air outlet connection
piece, with a diameter of 150 mm to be installed
in the side selected, is provided with the
appliance.
Leave any unused exhaust outlets closed. As
shown in fig.2.
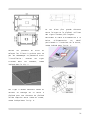
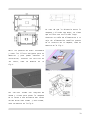
Draw the outline of the hole to house the
ceiling<mounted hood on the solid ceiling as
shown in Fig. 3 according to the model chosen.
Make 4 holes in the ceiling according to the
dimensions as shown in Fig. 4, place the metric
plugs provided in the holes.

9
Open the stainless steel panels and
re&move the grease filters in order to
avoid damaging them in any way and too
al&low installation; screw the
threaded bars provided into the plugs
as shown in fig.5.
The threaded bars are 250 mm long and
serve to install the ceiling<
mounted
hood at a distance from the solid
cei&ling of between 270 mm and 370 mm
as shown in fig. 6.
in case of a larger gap b
etween the
hood and the ceiling, you need to use
longer threaded bars.
Connect the power supply into the
metal box placed inside the hood as
shown in fig. 7.

10
and connect the air outlet pipe.
Do not fix the ducting to the outlet
with screws < use DUCT TAPE;
place the ceiling<
mounted hood into
the niche, the outer edge of the hood
needs to be perfectly flush with the
false ceiling. Insert the plates and
nuts provided on the threaded bars,
making sure to tighten them securely,
as shown in Fig. 8;
refit the grease
filters and filter cover panels.
OPERATING PROCEDURES
Read all the instructions before opera&ting the
appliance. Save these instruc&tions for future
reference.
!"
Ensure that the grease filters are in place.
Without these components, operating blowers
could catch on to hair, fingers and loose
clothing. Keep fan, filters and surfaces clean
of grease and fat. Always turn hood fan ON when
cooking. NEVER leave cooking unattended.
NEVER dispose cigarette ashes, ignitable
substances or any foreign objects into blowers.
Cooking that generates flame is not re&commended
as this hood is equipped with a thermal overload
that will shut down the motor if it senses
excessive heat.
When frying, oil in the pan can easily
overheat and ignite. Heat oil slowly in an
appropriately sized pot (covering the en&tire
burner) to reduce the risk of boiling over and
burning.
In the event of a range top grease fire, observe
the following:
Switch OFF the range hood. Turn off the cook
top then smother flames with a close fitting
lid, cookie sheet or other metal tray. If the
flames do not go out immediately.
EVACUATE AND CALL THE FIRE DEPART&MENT.
Never pick up a flaming pan –
you may be burned.
DO NOT USE WATER inclu&ding wet dishcloths or
towels, as a vio&lent steam explosion may occur.

11
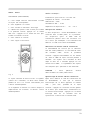
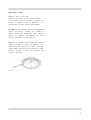
)*+,-)*+.
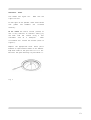
Remote control
A: At every selected function, the led li
ghts on accordingly.
B: To increase the speed.
C: To switch on the lights or to switch them
off.
D: ON/OFF To go from a higher speed back to
first one press twice the but ton: To switch
the hood on or off press once this button.
E: To reduce the speed.
F: To set the timer.
fig. 4
The led on the right side will start (every 5
seconds), the hood will work for 10 minutes at
the selected speed and then it lights
automatically off. If the client increases or
reduced the speed while the timer is on, this
is automatically stopped.
TECHNICAL DATA:
Alkaline battery powered: 12v mod. 23A
Operating frequency: 433.92 Mhz
Combinations: 4096
Max. consumption: 25Ma
Operating temperature: <20° : +55°C
)"
If two cooker hoods<radio control system are
installed in the same room or in the immediate
vicinity, each system may af&fect the operation
of the other, due to the fact that they have the
same code. The&refore it will be necessary to
change the code of one of the radio controls.
#%"
The radio control is supplied by the
ma&nufacturer with default codes stored. If you
want to create a new set of codes, proceed as
follows: press and hold the UP, STOP and DOWN
buttons simulta&neously for 2 seconds. After the
LEDS li&ght up, press the UP and DOWN buttons
within 5 seconds. The LEDS will flash 3 times to
indicate that the process is com&pleted.
! This procedure dele&tes all previously<
stored codes.
/#%"
After changing the transmission code on the
radio control, the cooker hood electronic
control unit must be made to set the new code as
follows: press the main Power Off button on the
coo&ker hood and then restore power to the
electronic control unit. Within the next 15
seconds, press the Light button. This will
ensure the control unit is synchronized with the
new code.

12
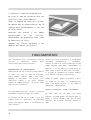
'&0"''
&%%
&"1'2$&"
2%'&"#
# 2 "0" '
&"
&"""0
Filter requires washing indicator: after 30 hours
of use, all the buttons will li&ght up to remind
you that the grease filter should be cleaned.
Follow the instruc&tions for cleaning filters in
this booklet. Once the grease filters have been
cleaned and replaced, reset by pressing the timer
button (F). Do not rely solely on this
indi&cator. Generally, the grease filter should
be washed on a regular basis to avoid grease
filter fires.
The blower should be turned on for ap&proximately
5 minutes before cooking in order to establish air
currents upward through the hood. Use the low
speeds for normal use and the higher speeds for
strong odors and fumes.
MAINTENANCE
The hood<fan should provide many years of trouble
free service provided it is maintained properly.
3
Clean the grease filter either by careful&ly hand
washing, (so as not to dama&ge the filter design)
or, preferably in a dishwasher. Depending on use,
the fil&ters should be cleaned at least every two
weeks in a dishwasher.
If a carbon filter has been fitted this must be
replaced at least every 6 mon&ths as a minimum.
Depending on coo&king style and nature of
cooking (greasy foods, fry’s, curries etc) would
probably require more frequent replacement – if
odors start to manifest themselves when cooking it
is time to replace the carbon filter . We suggest
you retain a spare set. These can be ordered from
the supplier of your range hood.
34
Cleaning of the internal parts should be done with
a clean damp (not excessively wet) cloth
together with regular household detergent. The
external stainless steel ele&ments should be
cleaned with a good qua&lity foaming stainless
steel cleaner. Read the manufacturers directions.
Generally they recommend that the foam be sprayed
onto a clean dry cloth and then applied to the
stainless steel. Allow the foam to react on the
surface for a few minutes and then wipe with a
clean dry cloth.
On the surfaces that are exposed directly to heat
from the cook<top, it is advisable to clean these
on a regular basis to avoid the marks from
becoming baked on.
Do not under any circumstances use an abrasive
type cleaner as this will scratch and damage the
stainless steel finish. Glass components should be
cleaned with a product such as Windex.

13
)*+,-)*+.
Turn blower and lights off. Make sure the
lights are cool.
If new lights do not operate, check fuses and be
sure globes and breakers are in&serted
correctly.
% the entire fixture (socket) as
this is very difficult to reinstall. Gently pry
the bulb from the fixture using a soft
instrument such as a toothpick. Steel
in&struments will scratch the surface (refer to
figure 5).
Replace the appropriate bulb. Check par&ts
brochure or specification sheets on our website.
Wipe both sides of the glass whi&lst it is out.
Re<insert the glass<blocking ring and fasten it.
fig. 5

14
Warranty
ELICA
North America
TWO-YEARS LIMITED WARRANTY
TO OBTAIN SERVICE UNDER WARRANTY
Owner must present proof of original purchase date. Please keep a copy of your dated proof of purchase (sales slip) in order to
obtain service under warranty.
PARTS AND SERVICE WARRANTY
For the period of two (2) years from the date of the original purchase, Elica will provide free of charge, non consumable parts or
components that failed due to manufacturing defects. During these two (2) years limited warranty, Elica will also provide free of
charge, all labor and in-home service to replace any defective parts.
WHAT IS NOT COVERED
• Damage or failure to the product caused by accident or act of God, such as, flood, fire or earthquake.
• Damage or failure caused by modification of the product or use of non-genuine parts.
• Damage or failure to the product caused during delivery, handling or installation.
• Damage or failure to the product caused by operator abuse.
• Damage or failure to the product caused by dwelling fuse replacement or resetting of circuit breakers.
• Damage or failure caused by use of product in a commercial application.
• Service trips to dwelling to provide use or installation guidance.
• Light bulbs, metal or carbon filters and any other consumable part.
• Normal wear of finish.
• Wear to finish due to operator abuse, improper maintenance, use of corrosive or abrasive cleaning products/pads and oven
cleaner products.
WHO IS COVERED
This warranty is extended to the original purchaser for products purchased for ordinary residential use in North America
(Including the United States, Guam, Puerto Rico, US Virgin Islands & Canada).
This warranty is non-transferable and applies only to the original purchaser and does not extend to subsequent owners of the
product. This warranty is made expressly in lieu of all other warranties, expressed or implied, including, but not limited to any
implied warranty of merchantability or fitness for a particular purpose and all other obligations on the part of Elica North
America, provided, however, that if the disclaimer of implied warranties is ineffective under applicable law, the duration of any
implied warranty arising by operation of law shall be limited to two (2) years from the date of original purchase at retail or such
longer period as may be required by applicable law.
This warranty does not cover any special, incidental and/or consequential damages, nor loss of profits, suffered by the original
purchaser, its customers and/or the users of the Products.
WHO TO CONTACT
To obtain Service under Warranty or for any Service Related Question Please Call:
• Elica North America Authorized Service at (888) 732-8018
Or by Writing To:
• Elica North America, Attention Customer Service
6658 156th Avenue SE,
Bellevue, WA 98006 USA
Page is loading ...
Page is loading ...
Page is loading ...
Page is loading ...
Page is loading ...
Page is loading ...
Page is loading ...
Page is loading ...
Page is loading ...
Page is loading ...
Page is loading ...
Page is loading ...
Page is loading ...
Page is loading ...
Page is loading ...
Page is loading ...
Page is loading ...
Page is loading ...
Page is loading ...
Page is loading ...
Page is loading ...
Page is loading ...
Page is loading ...
Page is loading ...
Page is loading ...
Page is loading ...
-
 1
1
-
 2
2
-
 3
3
-
 4
4
-
 5
5
-
 6
6
-
 7
7
-
 8
8
-
 9
9
-
 10
10
-
 11
11
-
 12
12
-
 13
13
-
 14
14
-
 15
15
-
 16
16
-
 17
17
-
 18
18
-
 19
19
-
 20
20
-
 21
21
-
 22
22
-
 23
23
-
 24
24
-
 25
25
-
 26
26
-
 27
27
-
 28
28
-
 29
29
-
 30
30
-
 31
31
-
 32
32
-
 33
33
-
 34
34
-
 35
35
-
 36
36
-
 37
37
-
 38
38
-
 39
39
-
 40
40


ELICA ESNX43SS Siena installation guide
- Category
- Cooker hoods
- Type
- Siena installation guide
Ask a question and I''ll find the answer in the document
Finding information in a document is now easier with AI
in other languages
- français: ELICA ESNX43SS
- español: ELICA ESNX43SS
Related papers
-
ELICA ETB430S1 Install Instructions Toblino
-
-
-
ELICA ECL148S3 Installation guide
-
-
-
ELICA EVL436S2 Installation guide
-
-
-
ELICA ECL630S4 Installation guide
Other documents
-
 arietta DKW001MX36 Installation guide
-
 Elitair 3LI0D3UL User manual
-
Sirius Range Hoods SUT950 Installation Instructions Manual
-
 De Dietrich DHL7173X-01 Owner's manual
-
ROBLIN ATRIUM ASYMETRIQUE Owner's manual
-
-
 De Dietrich DHD1131X Owner's manual
-
ROBLIN LINEAR CENTRALE 1500 Owner's manual
-
Faber Heaven 2.0 120 X Plus User manual
-
 De Dietrich DHL7173X Operating instructions


