Page is loading ...

Before attempting to connect or operate this product,
please read these instructions carefully and save this manual for future use.
The model number is abbreviated in some descriptions in this manual.
Operating Instructions
Network Video Encoder
Model No. WJ-GXE500
WJ-GXE500E
ACT
10BASE-T/100BASE-TX
OPERATE
LINK
SD CARD
ERROR
Network Video Encoder
WJ-GXE500

2
CONTENTS
Preface ........................................................................ 3
About the user manuals .......................................... 3
Trademarks and registered trademarks .................. 3
Abbreviations .......................................................... 3
Viewer software ....................................................... 4
About the network security ..................................... 4
Equipped security functions ................................. 4
Monitor images on a PC .............................................. 5
Monitor images from a single camera ..................... 5
About the "Live" page ............................................. 7
Monitor images from multiple cameras ................. 11
Record images on the SD memory card manually .... 12
Action at an alarm occurrence .................................. 13
Alarm type .......................................................... 13
Action at an alarm occurrence ........................... 13
Transmit images onto an FTP server ......................... 15
Transmit an alarm image at an alarm occurrence
(Alarm image transmission) ................................ 15
Transmit images at a designated interval or
period (FTP periodic image transmission) .......... 15
Save images on the SD memory card when
images have failed to be transmitted using the
FTP periodic image transmission function ......... 16
Display the log list ..................................................... 17
About the log list window ................................... 17
Playback of images on the SD memory card ............ 19
About the playback page ................................... 19
Maintenance of the unit [Maintenance] ..................... 21
Check the system log [System log] ....................... 21
Upgrade the firmware [Upgrade] ........................... 22
Reset the settings/Reboot the unit
[Default reset] ........................................................ 23
Viewing Help .............................................................. 24
Displaying the Help screen .................................... 24
Display the setup menu from a PC ........................... 25
How to display the setup menu ............................ 25
How to operate the setup menu ........................... 26
About the setup menu window ............................. 27
Setup menu and its items ......................................... 28
[Basic] page ............................................................... 30
[Basic] tab ............................................................. 30
[SD memory card] tab ........................................... 31
[Log] tab ................................................................ 33
[Image/Audio] page ................................................... 34
[JPEG/H.264] tab .................................................. 34
[JPEG/MPEG-4] tab .............................................. 37
[Image/Position] tab .............................................. 40
[Audio] tab ............................................................. 41
[Coaxial/RS-485] tab ............................................. 42
[Multi-screen] page .................................................... 44
[Multi-screen setup] tab ........................................ 44
[Alarm] page .............................................................. 45
[Alarm] tab ............................................................. 45
[VMD area] tab ....................................................... 46
[Notification] tab .................................................... 48
[Advanced func.] page .............................................. 49
[XML notification] tab ............................................ 49
[Face detection] tab .............................................. 49
[User mng.] page ....................................................... 50
[User auth.] tab ...................................................... 50
[Host auth.] tab ...................................................... 50
[System] tab .......................................................... 51
[Server] page ............................................................. 52
[Mail] tab ................................................................ 52
[FTP] tab ................................................................ 52
[NTP] tab ............................................................... 53
[Network] page .......................................................... 54
[Network] tab ......................................................... 54
[DDNS] tab ............................................................ 55
[SNMP] tab ............................................................ 56
[FTP img. trans.] tab .............................................. 56
[Schedule] page ......................................................... 57
[Schedule] tab ....................................................... 57
About the displayed system log ................................ 58
Troubleshooting ......................................................... 60
Appendix ................................................................... 68
Possible number of images that can be saved
on the SD memory card (as indications) ............... 68
How the logs and images are saved depending
on the settings for "Alarm" .................................... 69
How the logs and images are saved depending
on the settings for "Manual" ................................. 70
How the logs and images are saved depending
on the settings for "FTP error" .............................. 71
Directory structure of drive B ................................ 72

3
Preface
About the user manuals
There are 2 sets of operating instructions for the WJ-GXE500 (NTSC model), WJ-GXE500E (PAL model) as follows.
• InstallationGuide:Explainshowtoinstallandconnectdevices.
• OperatingInstructions(PDF):Explainshowtoperformthesettingsand how to operate this unit.
Adobe
®
Reader
®
is required to read these operating instructions (PDF) on the provided CD-ROM.
When the Adobe
®
Reader
®
is not installed on the PC, download the latest Adobe
®
Reader
®
from the Adobe web
site and install it.
"WJ-GXE500" shown in the instructions and illustrations used in these operating instructions indicates the
WJ-GXE500, WJ-GXE500E.
The screens used in these operating instructions show the case of NTSC model.
Refer to the readme file on the provided CD-ROM for further information including the dedicated software, its ver-
sion, and compatible cameras.
Trademarks and registered trademarks
• Microsoft,Windows,WindowsVista,InternetExplorer,ActiveXandDirectXareeitherregisteredtrademarksor
trademarks of Microsoft Corporation in the United States and/or other countries.
• Adobe,theAdobelogo,andReaderareeitherregisteredtrademarksortrademarksofAdobeSystems
Incorporated in the United States and/or other countries.
• SDHClogoisatrademark.
• Othernamesofcompaniesandproductscontainedintheseoperatinginstructionsmaybetrademarksorregis-
tered trademarks of their respective owners.
Abbreviations
The following abbreviations are used in these operating instructions.
Microsoft
®
Windows
®
7 Professional (64-bit) and Microsoft
®
Windows
®
7 Professional (32-bit) are described as
Windows 7.
Microsoft
®
Windows Vista
®
Business SP1 (32-bit) is described as Windows Vista.
Microsoft
®
Windows
®
XP Professional SP3 is described as Windows XP.
Windows
®
Internet Explorer
®
8.0, Windows
®
Internet Explorer
®
7.0 and Microsoft
®
Internet Explorer
®
6.0 are
described as Internet Explorer.
SDHC/SD memory card is described as SD card or SD memory card.
4
Viewer software
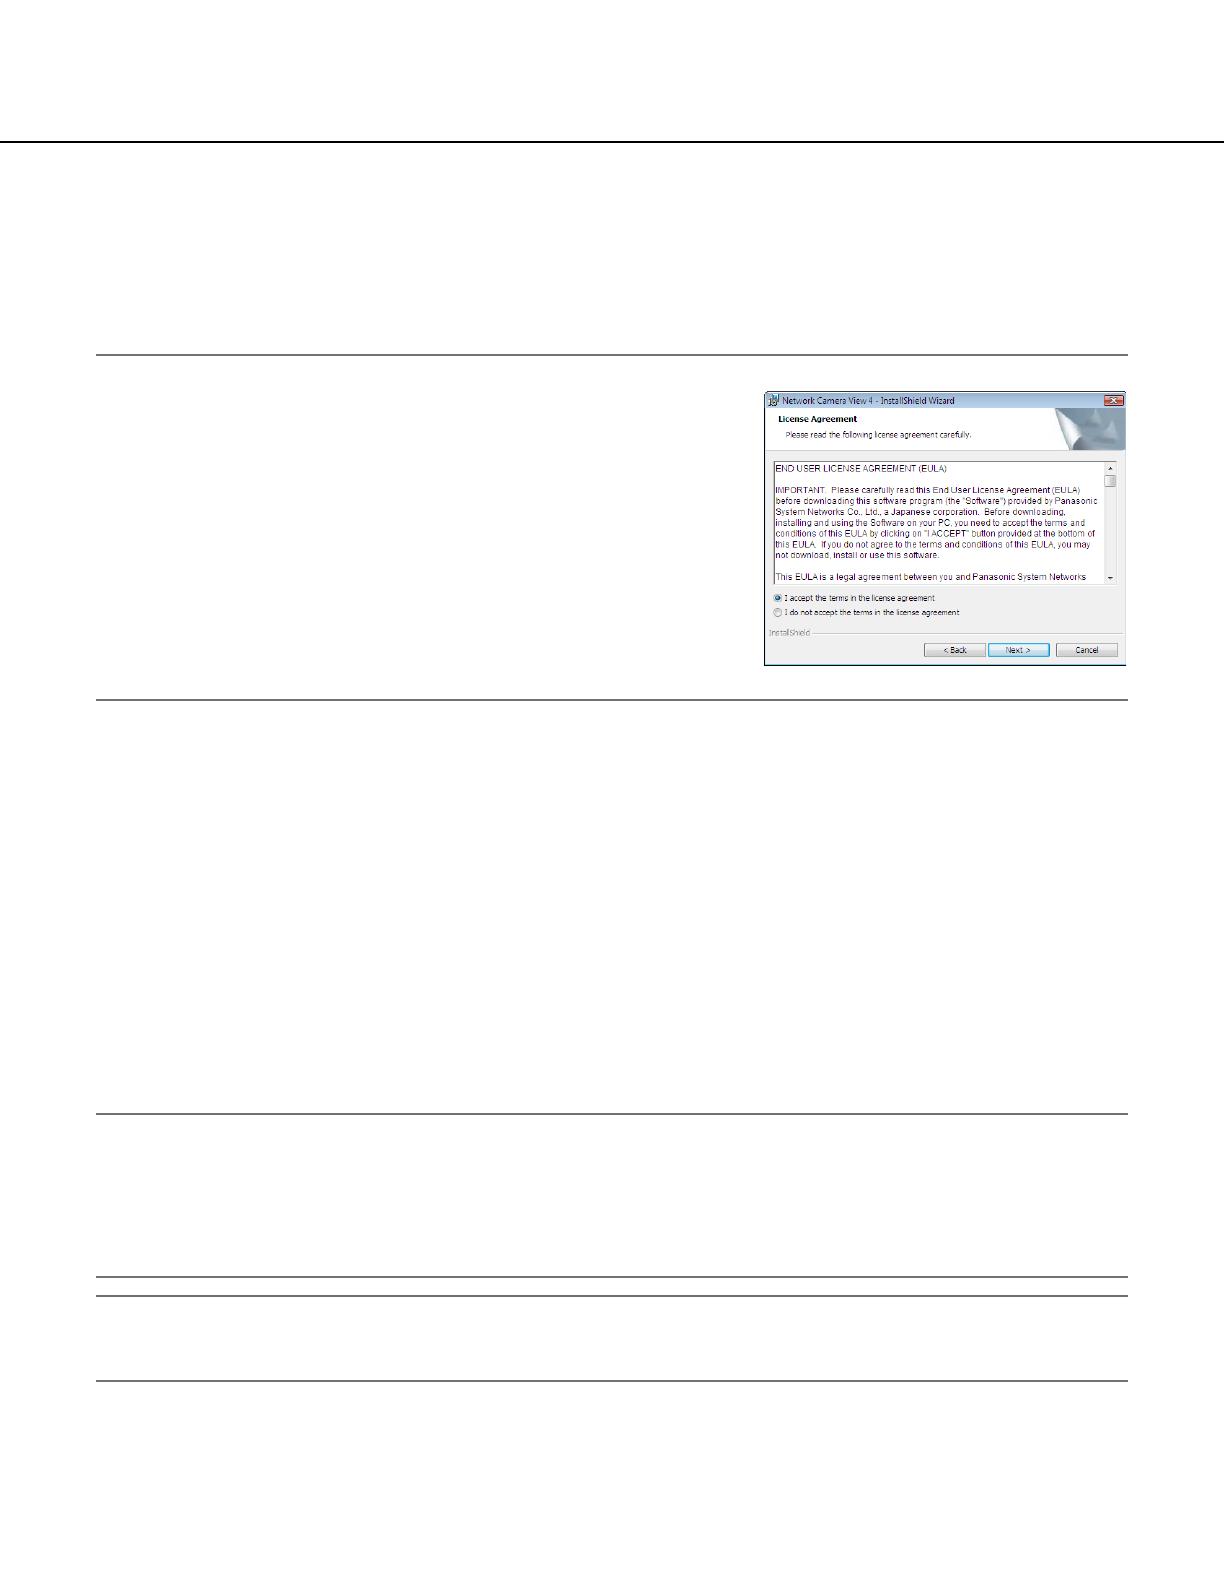
It is necessary to install the viewer software "Network Camera View 4" to display images on a PC.
This software can be installed directly from the network video encoder WJ-GXE500 or WJ-GXE500E (hereinafter,
the unit) or by double clicking "nwcv4setup.exe" on the CD-ROM provided, and then following the on-screen
instructions.
Important:
• Thedefaultsettingof"AutomaticinstallationofViewersoftware"is
"On". Follow the instructions on page 66 when the message is dis-
played on the information bar of the browser.
• Whenthe"Live"pageisdisplayedforthefirsttime,theinstallwiz-
ard of the ActiveX control required to display images from the cam-
erawillbedisplayed.Followtheinstructionsofthewizard.
• Whentheinstallwizardisdisplayedagainevenaftercompleting
the installation of the ActiveX, restart the PC.
• TheviewersoftwareusedoneachPCshouldbelicensedindividu-
ally. The number of installations of the viewer software from the unit
can be checked on the [Upgrade] tab of the "Maintenance" page
(☞ page 22). Refer to your dealer for the software licensing.
About the network security
Equipped security functions
The following security functions are featured in this unit.
q Access restrictions by the host authentication and the user authentication
It is possible to restrict users from accessing the unit by setting the host authentication and/or the user authen-
tication to "On". (☞ Page 50)
w Access restrictions by changing the HTTP port
It is possible to prevent illegal access such as port scanning, etc. by changing the HTTP port number. (☞ Page
54)
Important:
• Leakageofinformationsuchasimagedata,authenticationinformation(usernameandpassword),alarmmail
information, FTP server information, DDNS server information, etc. can happen. Perform the countermeasure
such as the access restriction using the user authentication.
• Aftertheunitisaccessedbytheadministrator,makesuretoclosethebrowserforaddedsecurity.
• Changetheadministratorpasswordperiodicallyforaddedsecurity.
Note:
• Whenuserauthentication(authenticationerror)hasfailedtopass8timeswithin30secondsusingthesameIP
address (PC), access to the unit will be denied for a while.
5
Monitor images on a PC
The following are descriptions of how to monitor images from the camera on a PC.
Monitor images from a single camera
Important:
• WhentheHTTPportnumberischangedfrom"80",
enter"http://IPaddressoftheunit+:(colon)+port
number" in the address box of the browser.
Example:Whentheportnumberissetto"8080"
http://192.168.0.11:8080
• Whentheunitisinalocalnetwork,configurethe
proxy server setting of the web browser (under
"Internet Options…" under "Tools" of the menu bar)
to bypass the proxy server for the local address.
Step 3
Press the [Enter] key on the keyboard.
→ The "Live" page will be displayed. Refer to page 7
for further information about the "Live" page.
When "On" is selected for "User authentication", the
authentication window will be displayed before display-
ing live images for the user name and password entries.
The default user name and password are as follows.
Username: admin
Password: 12345
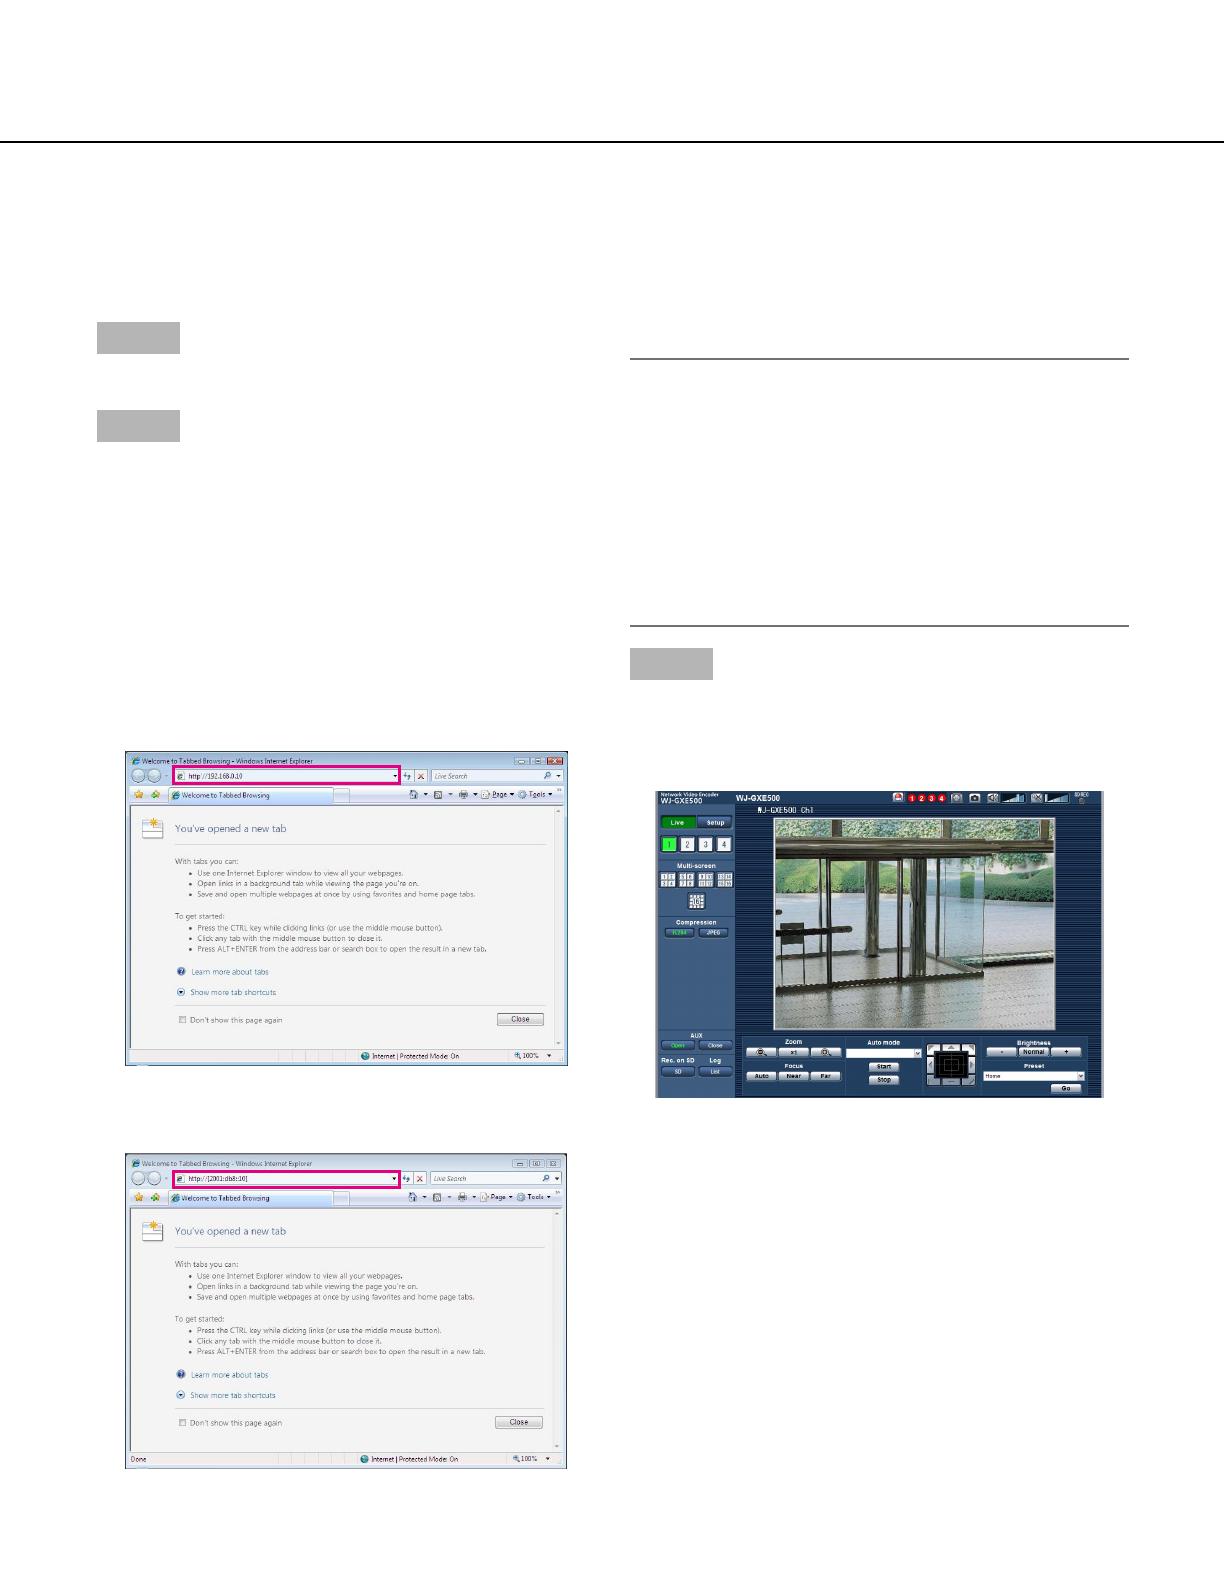
Step 1
Start up the web browser.
Step 2
Enter the IP address designated using the Panasonic
Easy IP Setup software in the address box of the
browser.
Example when entering an IPv4 address:
http://URLregisteredusingIPv4address
http://192.168.0.10/
Example when entering an IPv6 address:
http://URLregisteredusingIPv6address
http://[2001:db8::10]/
<Example of IPv4 access>
<Example of IPv6 access>

6
Important:
• Toenhancethesecurity,changethepasswordfortheuser"admin".Itisrecommendedtochangethispass-
word periodically.
• WhendisplayingmultipleH.264(orMPEG-4)imagesonaPC,imagesmaynotbedisplayeddependingonthe
performance of the PC.
Note:
• When"H.264"isselectedfor"Videoencodingformat",H.264videowillbedisplayed.When"MPEG-4"is
selected, MPEG-4 images will be displayed.
• Whenmultipleusersarereceivingaudio,theframerateofH.264(orMPEG-4)imagesortherefreshintervalof
JPEG images may be lower than the specified value.
• Themaximumnumberofconcurrentaccessuseris14includinguserswhoarereceivingH.264(orMPEG-4)
images and users who is receiving JPEG images. Depending on the set values for "Bandwidth control (bit rate)"
and "Max bit rate (per client) *", the maximum concurrent access number may be less than 14 users. When 14
users are concurrently accessing, the access limit message will be displayed for users who subsequently
attempt to access. When "Multicast" is selected for "Transmission type" of "H.264" (or "MPEG-4"), only the first
user who accessed to monitor H.264 (or MPEG-4) images will be included in the maximum number. The second
and subsequent users who are monitoring H.264 (or MPEG-4) images will not be included in the maximum num-
ber.
• When"On"isselectedfor"H.264transmission"(or"MPEG-4transmission")(☞ pages 34 to 40), H.264 (or
MPEG-4) images will be displayed. When "Off" is selected, a JPEG image will be displayed. It is possible to dis-
play a JPEG image even when "On" is selected for "H.264" (or "MPEG-4 transmission").
• Therefreshintervalmaybecomelongerdependingonanetworkenvironment,PCperformance,photographic
subject, access traffic, etc.
<Refresh interval of JPEG images>
When "Ch1 only" is selected for "Ch selection"
When "On" is selected for "H.264 transmission" (or "MPEG-4 transmission")
• JPEG(VGA,QVGA,D1):15fps(NTSCmodel),12.5fps(PALmodel)
When "Off" is selected for "H.264 transmission" (or "MPEG-4 transmission")
• JPEG(VGA,QVGA,D1):30fps(NTSCmodel),25fps(PALmodel)
When "Ch1-2" is selected for "Ch selection"
When "On" is selected for "H.264 transmission" (or "MPEG-4 transmission")
• JPEG(VGA,QVGA,D1):15fps(NTSCmodel),12.5fps(PALmodel)
When "Off" is selected for "H.264 transmission" (or "MPEG-4 transmission")
• JPEG(VGA,QVGA,D1):15fps(NTSCmodel),12.5fps(PALmodel)
When "Ch1-3" is selected for "Ch selection"
When "On" is selected for "H.264 transmission" (or "MPEG-4 transmission")
• JPEG(VGA,QVGA,D1):10fps(NTSCmodel),8.3fps(PALmodel)
When "Off" is selected for "H.264 transmission" (or "MPEG-4 transmission")
• JPEG(VGA,QVGA,D1):15fps(NTSCmodel),12.5fps(PALmodel)
When "Ch1-4" is selected for "Ch selection"
When "On" is selected for "H.264 transmission" (or "MPEG-4 transmission")
• JPEG(VGA,QVGA):3fps(NTSCmodel),3.1fps(PALmodel)
• JPEG(D1):2fps(NTSCmodel),2.1fps(PALmodel)
When "Off" is selected for "H.264 transmission" (or "MPEG-4 transmission")
• JPEG(VGA,QVGA,D1):15fps(NTSCmodel),12.5fps(PALmodel)

7
About the "Live" page
q [Setup] button (*1)
The button will turn green and the setup menu will
be displayed.
w [Live] button
Display the "Live" page. The button will turn green
and the "Live" page will be displayed.
e [1] to [4] buttons
The button will turn green and the "Live" page of the
corresponding channel will be displayed. It is possi-
ble to select a desired channel by clicking the [1] to
[4] buttons.
r [Multi-screen] buttons
Images from multiple cameras can be displayed on
a multi-screen by registering cameras on the setup
menu. (☞ Page 11)
t [Compression] buttons
[H.264]/[MPEG-4] button: The letters "H.264" (or
"MPEG-4") will turn green and an H.264 (or
MPEG-4) image will be displayed. When "On" is
selected for "H.264 transmission" (or "MPEG-4
transmission") of "H.264(1)" (or "MPEG-4(1)"),
the [H.264] (or [MPEG-4]) button will be dis-
played. (☞ Pages 34 and 37)
[JPEG] button: The letters "JPEG" will turn green
and JPEG image will be displayed.
y [Image capture size] buttons
These buttons will be displayed only when a JPEG
image is displayed.
[VGA] button: The letters "VGA" will turn green and
images in the main area will be displayed in VGA
size.
[QVGA] button:Theletters"QVGA"willturngreen
and images in the main area will be displayed in
QVGAsize.
q
w
e
r
t
y
u
i
o !0 !1 !2 !3
!6 !7 !9!8 @0 @1 @2 @3
@4
!4
!5
8
u [AUX] buttons (*2)
[AUX] button will become available only when "AUX
output" is selected for "Terminal 3" on the setup
menu. (☞ Page 45)
[Open] button: The letters "Open" will turn green
and the status of AUX connector will be open.
[Close] button: The letters "Close" will turn green
and the status of the AUX connector will be
closed.
i [Rec. on SD] button (*2)
This button will be displayed only when "Manual" is
selected for "Save trigger" on the setup menu.
(☞ Page 31)
Click this button to manually record images on the
SD memory card. Refer to page 12 for descriptions
of how to manually record images on the SD memo-
ry card.
o [Log] button (*1)
[List] button will be displayed only when "On" is
selected for "Save logs" on the setup menu.
(☞ page 33) When this button is clicked, the log list
will be displayed and images saved on the SD
memory card can be played. Refer to pages 17 to
20 for further information about the log list and for
how to play images on the SD memory card.
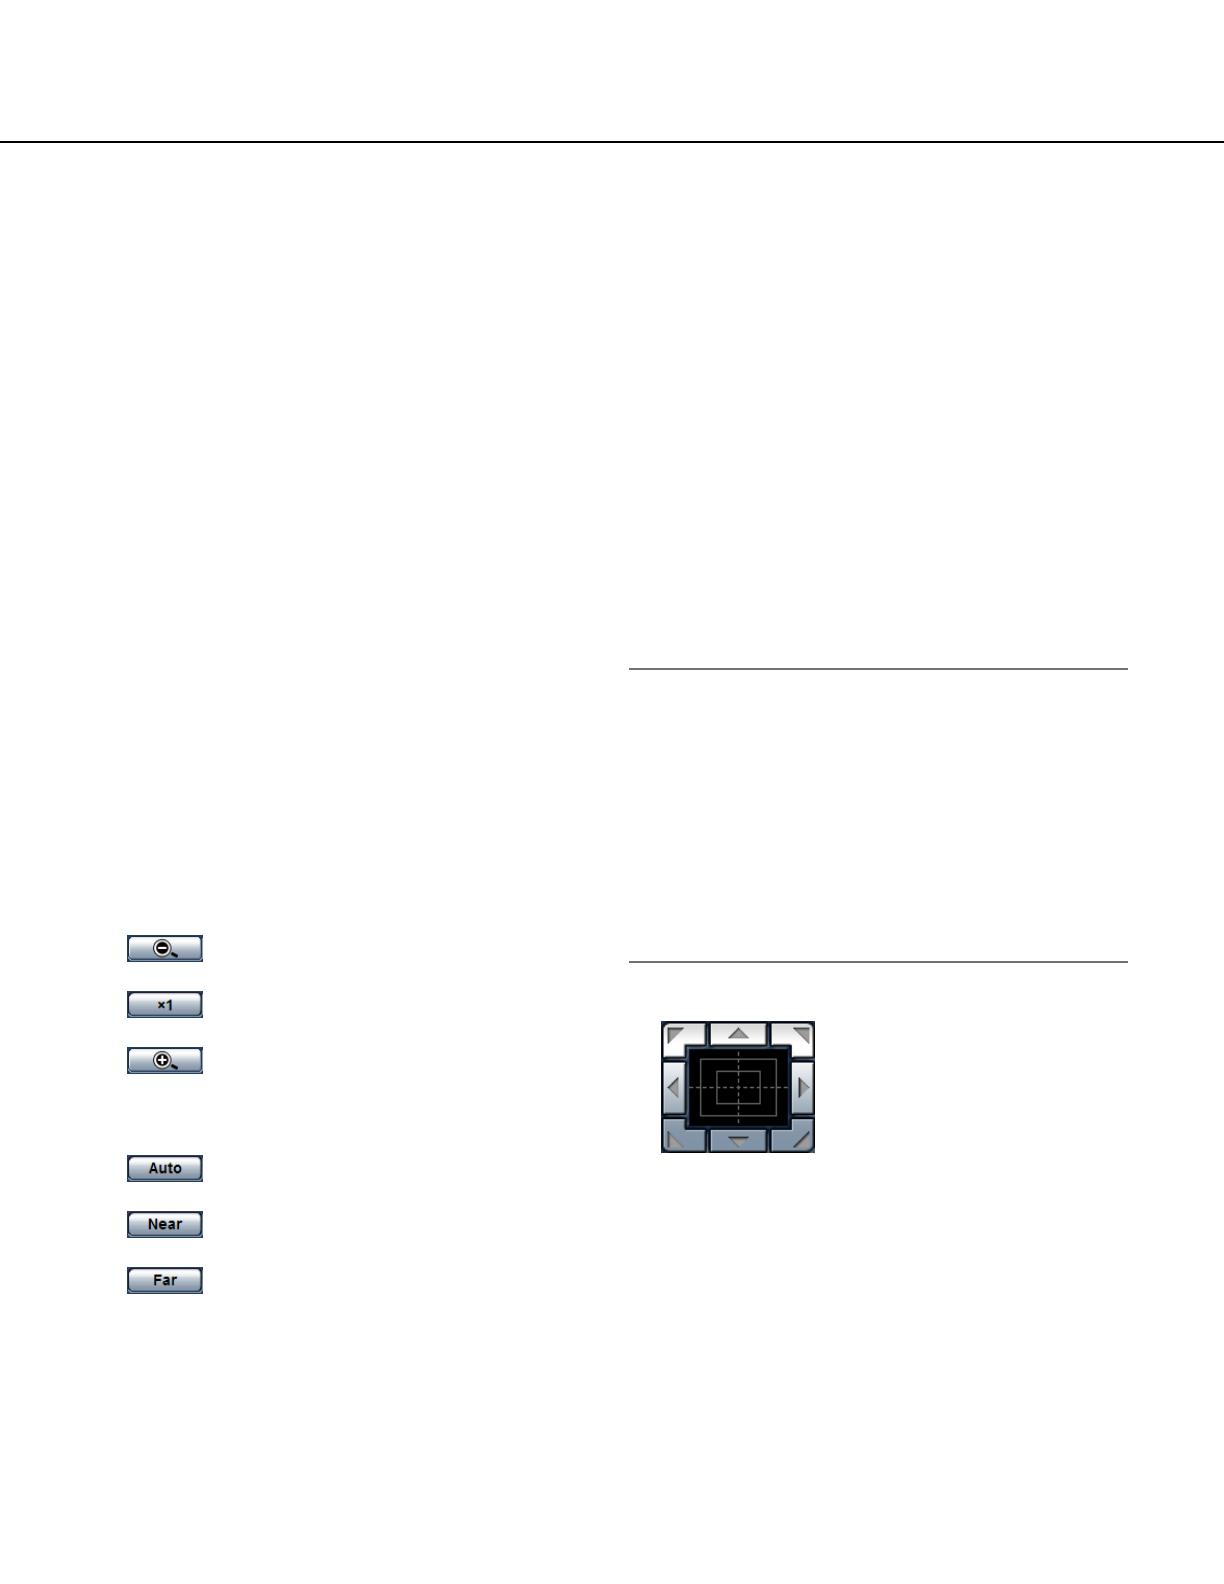
!0 [Zoom] buttons (*2)
:Clickthisbuttontoadjustthezoomratio
to the WIDE side.
:Clickthisbuttontosetthezoomratioto
x1.
:Clickthisbuttontoadjustthezoomratio
to the TELE side.
!1 [Focus] buttons (*2)
:Clickthisbuttontoadjustthefocusauto-
matically.
:Clickthisbuttontoadjustthefocustothe
"Near" side.
:Clickthisbuttontoadjustthefocustothe
"Far" side.
!2 Auto mode (*2)
Select an operation from the pull-down menu and
click the [Start] button. The selected operation will
start.
Click the [Stop] button to stop the operation.
The selected operation will stop when the camera
(panning/tilting/zooming/focusing)isoperated.
Auto track: Performs auto track when the camera
supports auto track (AUTO TRACK).
Auto pan: Automatically pans between the start
position and the end position set in advance.
Evenwhenthecameraisoperatedforzooming
or focusing, the camera continues panning.
Preset position sequence: Automatically moves to
the preset positions orderly (start from the low-
est preset position number).
Patrol 1-4: Operates the camera in accordance with
patrol function settings.
Note:
• Tocheckifthecamerasupportsautotrack,referto
the operating instructions of the camera.
• Toactivateautopan,sort,presetpositionsequence
or patrol 1-4, it is required to perform the settings
on the setup menu of camera in advance. (☞ Page
41)
• WhileacameracontrolledviatheRS-485communi-
cation interface is executing a patrol function, it is
impossible to start another one. Stop the current
patrol function before starting a new one.
!3 Control pad/buttons (*2)
:Left-clickonthecontrolpadto
adjustthehorizontal/vertical
position of the camera (panning/
tilting).
Panning/tilting speed will be
faster if a clicked point gets far-
ther from the center point of the control pad.
It is also possible to pan/tilt the camera by dragging
the mouse. Zoom and focus can be adjusted by
right-clicking. When an upper/lower area of the con-
trol pad is right-clicked, the displayed image will be
zoomedin/outon.Whenaleft/rightareaisright-
clicked, the focus will be adjusted to the Near/Far
side.

9
!4 [Brightness] buttons (*2)
:Thedisplayedimagewillbedarker.
:Theadjustedbrightnesswillreturntothe
default brightness.
:Imagewillbebrighter.
Note:
• Whenthe[Brightness]buttonsareclickedwhilethe
camera is at the preset position, the adjusted bright-
ness will automatically be registered for the current
preset position.
!5 Preset (*2)
Select a preset position from the pull-down menu
and click the [Go] button. The camera will move to
the selected preset position. When "Home" is
selected, the camera will move to the home posi-
tion. To activate preset positions and home position,
it is required to configure the settings on the SETUP
MENU of camera in advance. (☞ Page 41)
!6 Unit title
The unit title entered for "Unit title" on the [Basic]
tab will be displayed. (☞ Page 30)
!7 Camera title
The camera title entered for "Camera title" on the
[Basic] tab will be displayed. (☞ Page 30)
!8 [Alarm occurrence indication] button (*2)
This button will be displayed at an alarm occur-
rence, and the channel of alarm occurrence (one of
q to r buttons) will light. When the button is
clicked, the button will disappear and the alarm out-
put connector will be reset. (☞ Page 13)
!9 [Full screen] button
Images will be displayed on a full screen. To return
to the "Live" page, press the [Esc] key.
@0 [One shot] button
Click this button to take a picture (a still picture).
The picture will be displayed on a newly opened
window. When right-clicking on the displayed
image, the pop-up menu will be displayed. It is pos-
sible to save the image on the PC by selecting
"Save" from the displayed pop-up menu.
When "Print" is selected, printer output is enabled.
@1 [Mic input] button (*3)
Turns on/off the audio reception (hear audio from
the unit on a PC).
This button will be displayed only when "Mic input",
"Interactive(Half-duplex)" or "Interactive(Full-
duplex)" is selected for "Audio transmission/recep-
tion" on the setup menu. (☞ Page 41)
When this button is clicked, the button will turn into
the button and audio from the unit will not be
heard. Audio volume can be adjusted (Low/Middle/
High) by moving the volume cursor .
Note:
• MicinputisavailableonCh1only.
@2 [Audio output] button (*3)
Turns on/off the audio transmission (play audio from
the PC on the unit speaker).
This button will be displayed only when "Audio out-
put", "Interactive(Half-duplex)" or "Interactive(Full-
duplex)" is selected for "Audio transmission/recep-
tion" on the setup menu. (☞ Page 41)
The button will blink during the audio transmission.
When this button is clicked, the button will turn into
the button and audio from the unit will not be
heard. Audio volume can be adjusted (Low/Middle/
High) by moving the volume cursor .
Note:
• AudiooutputisavailableonCh1only.
• Whenauserisusingtheaudiotransmissionfunc-
tion with "Interactive(Half-duplex)" selected, the
[Mic input] button and the [Audio output] button will
be inoperable for the other users. When
"Interactive(Full-duplex)" is selected, the transmis-
sion button is inoperable for other users.
• Possibledurationofaudiotransmissionisupto5
minutes per transmission. When 5 minutes have
passed, audio transmission will automatically stop.
To turn the audio transmission function on, click the
[Audio output] button again.
• Whentheunitisrestarted,theadjustedvolumelevel
(for both the audio transmission and reception) will
return to the level that had been set on the [Audio]
tab on the setup menu. (☞ Page 41)
• Actualvolumelevelwillchangeinthreestepseven
though the volume cursor can be adjusted minutely.

10
@3 SD recording status indicator
The status of the SD recording can be checked with
this indicator.
When the SD recording starts, this indicator will light
red. When the SD recording stops, this indicator will
go off.
This indicator will be displayed only when "Manual"
is selected for "Save trigger" on the setup menu.
(☞ Page 31)
@4 Main area
Images from the camera will be displayed in this
area.
The current time and date will be displayed accord-
ing to the settings configured for "Time display for-
mat" and "Date/time display format". (☞ Page 30)
Click a desired point in the main area on the "Live"
page that is to be the center of the angle of view.
The camera moves to adjust the position in order to
set the clicked point as the center.
*1 Only operable by users whose access level is "1.
Administrator"
*2 Only operable by users whose access level is "1.
Administrator" or "2. Camera control" when "On" is
selected for "User auth." (☞ page 50).
*3 Operable by users who belong to the access level
selected for "Permission level of audio trans./
recep." on the [Audio] tab of the "Image/Audio"
page. Refer to page 50 for further information about
the access level.
Note:
• Whenoperatedbyaloweraccessleveluser,images
displayed on the screen may be changed temporari-
ly. This does not affect operation of the camera.
11
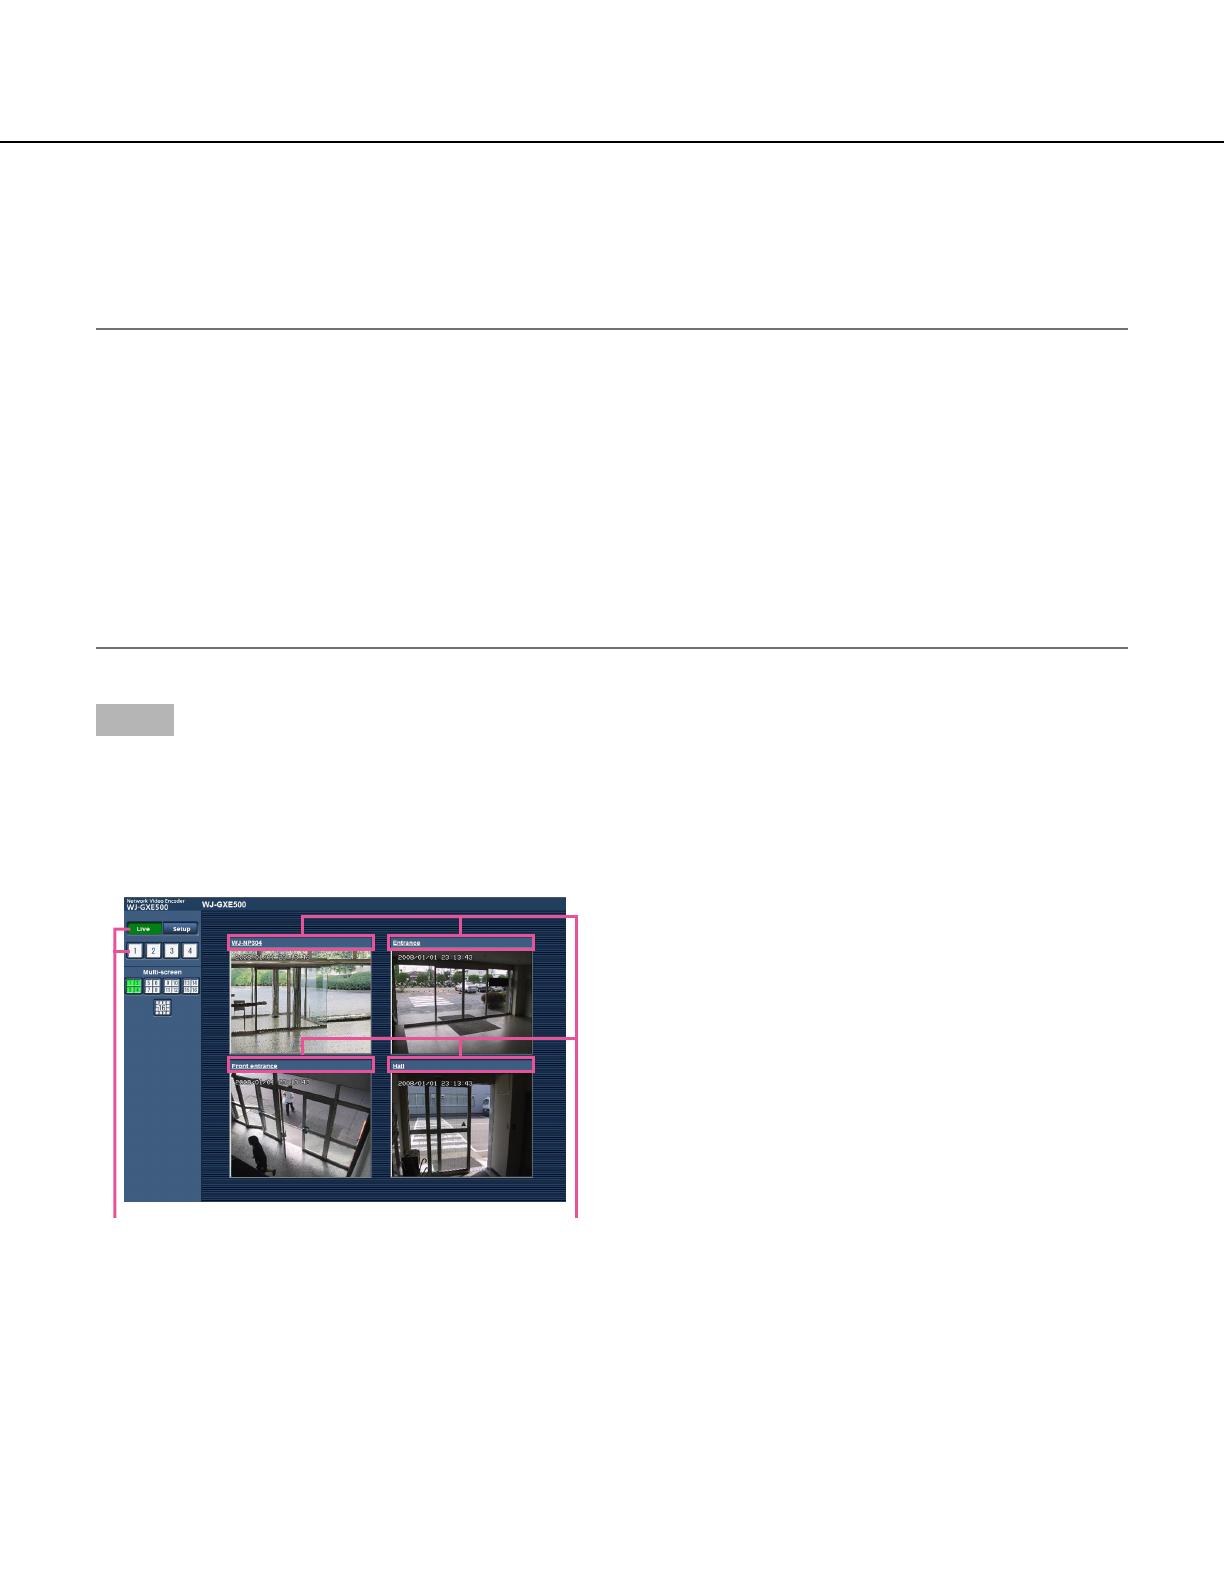
Monitor images from multiple cameras
Images from multiple cameras can be displayed on a multi-screen. Images from 4 cameras (up to 16 cameras) can
be displayed simultaneously. To display images on a multi-screen, it is necessary to register cameras in advance.
4 cameras can be registered as a group and up to 4 groups (16 cameras) can be registered. (☞ Page 44)
Important:
• Whendisplayingimagesona16-screen,panning,tiltingandzoomingoperationsbecomeunavailableforimag-
es from the Panasonic PTZ cameras.
• Whendisplayingimagesona4-screen,panning,tiltingandzoomingoperationsbecomeavailableonlyfor
images from the Panasonic PTZ cameras. Refer to the readme file on the provided CD-ROM for further informa-
tion about the compatible PTZ cameras and their versions.
• OnlyJPEGimagescanbedisplayedonamulti-screen.
• Audiowillnotbeheard.
• WhenthepoweristurnedoffortheEthernetcableisdisconnectedwhiledisplayingimages,displayingimages
on a multi-screen from the "Live" page will become unavailable.
• Regardlessofthesettingsoftheregistereddevice,theimageswillbedisplayedalteredtotheaspectratioof
4:3onamulti-screen.
Step1
Click the desired [Multi-screen] button.
→ Images from the registered cameras will be dis-
played on a selected multi-screen (screen can be
split up to 16 areas). The following are instructions
when displaying on a 4-split screen.
q To display images on a single screen, click the [Live]
button or one of the buttons [1] to [4].
w Click a camera title. Live images from the camera
corresponding to the clicked camera title will be dis-
played on the "Live" page of the newly opened win-
dow.
q w
12
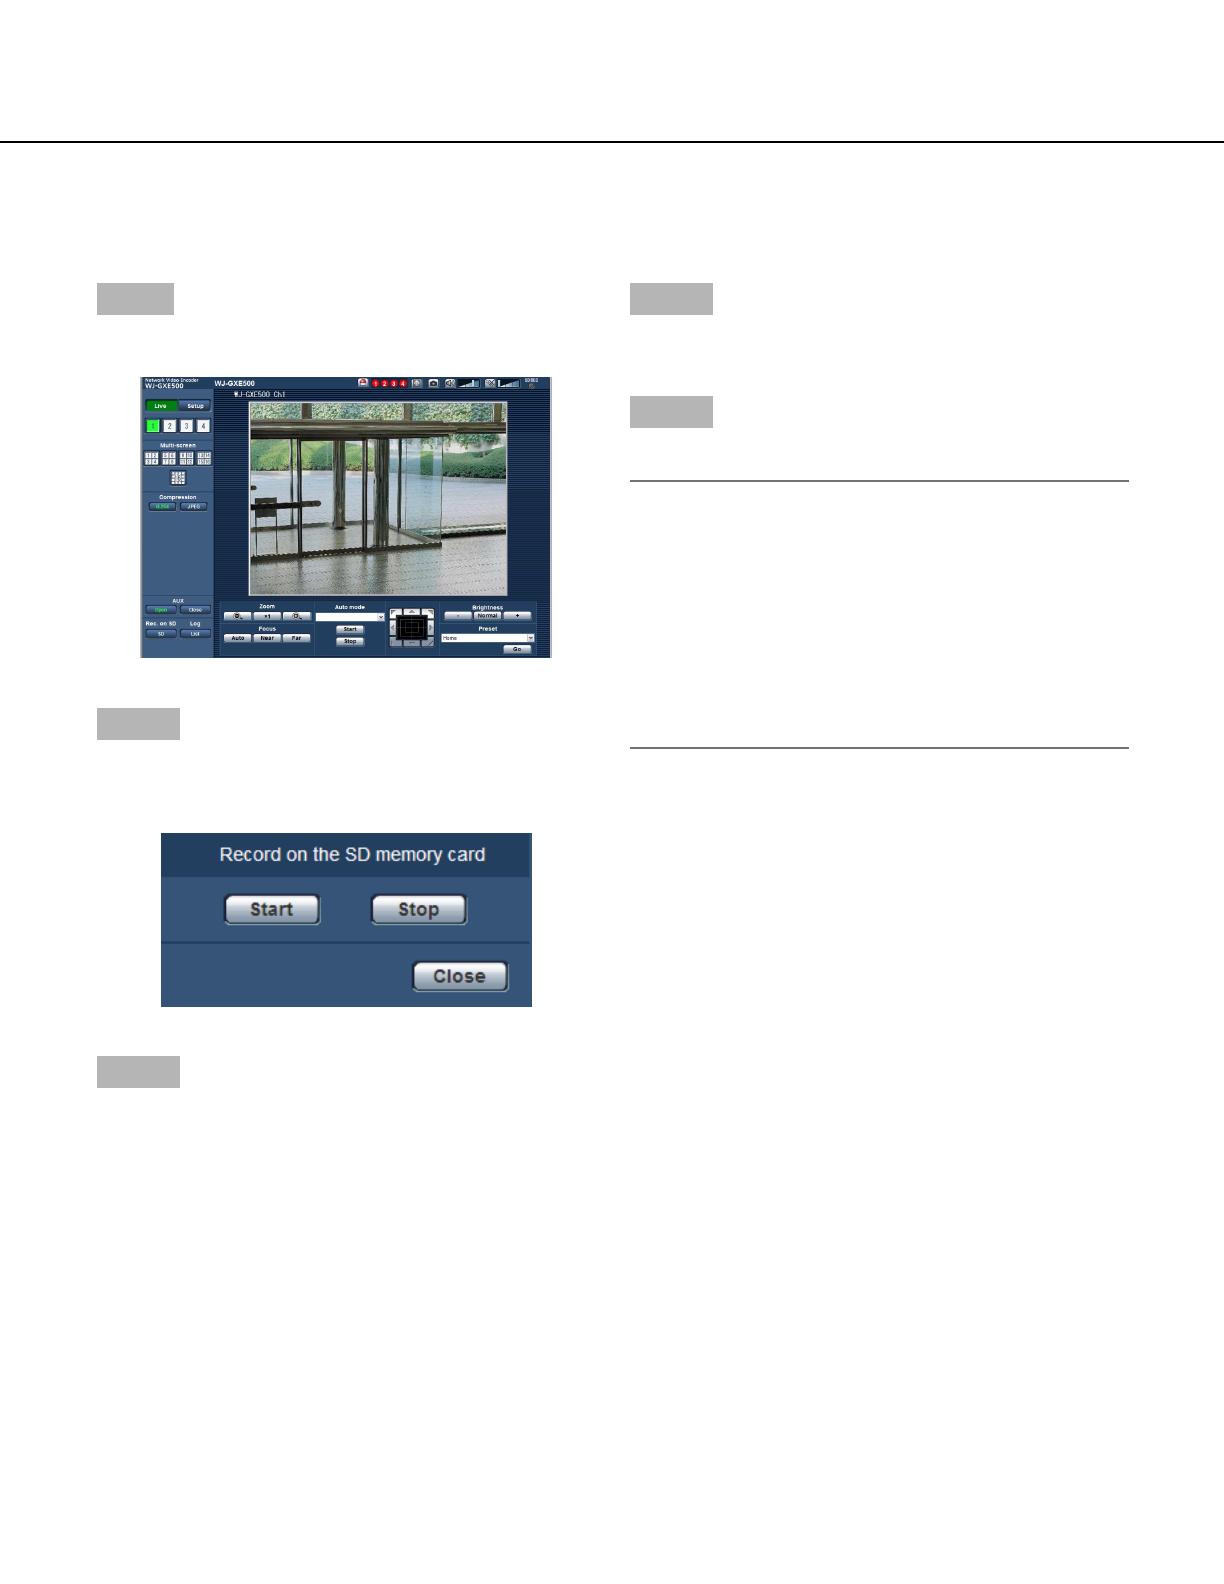
Record images on the SD memory card manually
Images displayed on the "Live" page can be recorded on the SD memory card manually.
This button is operable only when "Manual" is selected for "Save trigger" on the setup menu. (☞ Page 31)
Images recorded on the SD memory card can be copied onto the PC. (☞ Page 19)
Step1
Display the "Live" page. (☞ Page 5)
Step 2
Click the [SD] button in the "Rec. on SD" box.
→ The SD recording window will open.
Step 3
Click the [Start] button to start recording images on the
SD memory card.
The SD recording status indicator will light red while
images are being recorded on the SD memory card.
(☞ Page 7)
→ The save interval (frame rate) can be configured on
the [SD memory card] tab of the "Basic" page.
(☞ Page 31)
Step 4
Click the [Stop] button to stop saving images on the SD
memory card.
Step 5
Click the [Close] button to close the window.
Note:
• Thedestinationdirectorytowhichdataaretobe
saved will be a fixed directory on Drive B. Refer to
the "Directory structure of drive B" section (☞ page
72).
It is possible to obtain image data saved on Drive B
by clicking the [Execute] button of "Access img." on
the [SD memory card] tab and by logging in the unit
to access images from the user authentication win-
dow.

13
Action at an alarm occurrence
The alarm action (action at an alarm occurrence) will be performed when the following alarms occur.
Alarm type
Terminal alarm: When connecting an alarm device such as a sensor to the EXT I/O terminals of the unit, the alarm
action will be performed when the connected alarm device is activated. (☞ Page 45)
VMD alarm: When motion is detected in the set VMD area, the alarm action will be performed. (☞ Page 45)
* VMD stands for "Video Motion Detection".
Command alarm: When a Panasonic alarm protocol is received from the connected device via a network, the
alarm action will be performed. (☞ Page 45)
Camera site alarm: When a camera connected to a Video input connector detects an alarm by alarm sensors or
cameras' motion detectors, etc., and the unit receives the alarm input signal from the camera, the alarm action
will be performed. (☞ Page 45)
Video loss: When the loss of video input signals is detected due to coaxial cable disconnections or camera trou-
bles, the alarm action will be performed. (☞ Page 45)
Action at an alarm occurrence
• Displaythe[Alarm occurrence indication] button on the "Live" page. (☞ Page 7)
The alarm occurrence indication button will be displayed on the "Live" page at an alarm occurrence.
Important:
• When"Polling(30sec)"isselectedfor"Alarmstatusupdatemode"(☞ page 30), the [Alarm occurrence indica-
tion] button will be refreshed in 30-second intervals. For this reason, it may take a maximum of 30 seconds until
the [Alarm occurrence indication] button is displayed on the "Live" page at an alarm occurrence.
• Notifyofalarmoccurrencestothedeviceconnectedtothealarmconnector
Itispossibletooutputsignalsfromthealarmconnectorontherearoftheunitandsoundthebuzzerwhenan
alarm occurs.
The settings for the alarm output can be configured on the [Alarm] tab of the "Alarm" page. (☞ Page 45)
• SaveimagesontheSDmemorycard
When an alarm occurs, images will be saved on the SD memory card. The settings to save images on the SD
memory card can be configured on the [SD memory card] tab of the "Basic" page. (☞ Page 31)
• Transmitanimageontoaserverautomatically
An alarm image can be transmitted at an alarm occurrence to the server designated in advance. The settings
required to transmit an alarm image to a server can be configured on the [Alarm] tab of the "Alarm" page and
the [FTP] tab of the "Server" page (☞ pages 45 and 52).
Important:
• Select"FTPerror"for"Savetrigger"onthe[SDmemorycard]tabwhenusingtheSDmemorycard.When
"Alarm input" or "Manual" is selected for "Save trigger", an alarm image will not be transmitted at an alarm
occurrence to the FTP server. (☞ Page 31)

14
• Notifyofalarmoccurrencesbye-mail
Alarm mail (alarm occurrence notification) can be sent at an alarm occurrence to the e-mail addresses registered
in advance.
The settings for alarm mail can be configured in the "Mail notification" section of the [Notification] tab of the
"Alarm" page and the [Mail] tab of the "Server" page (☞ pages 48 and 52).
• NotifyofalarmoccurrencestothedesignatedIPaddresses(Panasonicalarmprotocolnotification)
This function is available only when a Panasonic device, such as the network disk recorder, is connected to the
system. When "On" is selected for "Panasonic alarm protocol notification", the connected Panasonic device will
be notified that the unit is in the alarm state. The settings for Panasonic alarm protocol can be configured in the
Panasonic alarm protocol section of the [Notification] tab of the "Alarm" page. (☞ Page 48)

15
Transmit images onto an FTP server
Images can be transmitted to an FTP server. By configuring the following settings, transmission of images captured
at an alarm occurrence or captured at a designated interval to an FTP server will become available.
Important:
• Whenusingthisfunction,settheusernameandthepasswordtoaccesstheFTPservertorestrictuserswho
can log into the FTP server.
• TotransmitimagestotheFTPserver,select"Notuse"for"SDmemorycard",orselect"FTPerror"for"Save
trigger" on the [SD memory card] tab of the "Basic" page. (☞ Page 31)
Transmit an alarm image at an alarm occurrence (Alarm image transmission)
An alarm image can be transmitted at an alarm occurrence to the FTP server. To transmit alarm images to an FTP
server, it is necessary to configure the settings in advance.
The settings for the FTP server can be configured on the [FTP] tab of the "Server" page. (☞ Page 52)
The alarm image transmission function can be turned on/off on the [Alarm] tab of the "Alarm" page. (☞ Page 45)
Note:
• Dependingonthenetworktraffic,thenumberofthetransmittedimagesmaynotreachthesetnumberofimages
to be transmitted.
• AlarmimagesfailedtobetransmittedtotheFTPserveratanalarmoccurrencewillnotbesavedontheSD
memory card.
Transmit images at a designated interval or period (FTP periodic image trans-
mission)
Images can be transmitted at a designated interval or period. To transmit images at a designated interval or period,
it is necessary to configure the settings in advance.
The settings for the FTP server can be configured on the [FTP] tab of the "Server" page. (☞ Page 52)
It is possible to determine whether or not to use the FTP periodic image transmission function and to configure the
settings relating to alarm images and the schedule on the [FTP img. trans.] tab of the "Network" page. (☞ Page 56)
Note:
• Dependingonthelinespeedorthetraffic,imagesmaynotbetransmittedatthedesignatedinterval.
• When"On"isselectedforboththealarmimagetransmissionfunctionandtheFTPperiodicimagetransmission
function, the alarm image transmission function will be given priority over the FTP periodic image transmission
function. Therefore, images may not be transmitted at the interval designated on the "FTP periodic image trans-
mission" setting.

16
Save images on the SD memory card when images have failed to be transmit-
ted using the FTP periodic image transmission function
Images that have failed to be transmitted using the FTP periodic image transmission can be saved automatically on
the SD memory card. Images saved on the SD memory card can be obtained from the [SD memory card] tab of the
"Basic" page. (☞ Page 31)
To use the SD memory recording function featured in Panasonic’s network disk recorder, select "Off" for "FTP peri-
odic image transmission" (☞ page 56) and "FTP error" for "Save trigger" (☞ page 31).
We make no guarantee for any damages of files on the SD memory card incurred by malfunction or error occur-
rence in files saved in the SD memory card regardless of what the cause may be.
Note:
• Dependingonthesettingsandstatusofuse,notallimagesfailedintheFTPperiodictransmissionmaynotbe
saved on the SD memory card.

17
Display the log list
The logs will be displayed in the following list forms.
• Alarmlog: Logsofthealarmoccurrencessuchastimeanddateofthealarmoccurrencesandthe
alarm type will be displayed.
• Manuallog: LogsfiledwhenimageshavebeenmanuallyrecordedontheSDmemorycardwillbedis-
played.
• FTPtrans.errorlog: LogsfiledwhentheFTPperiodicimagetransmissionfunctionhasfailedwillbedisplayed.
Each log list can be displayed only when "On" is selected for "Save logs" on the [Log] tab of the "Basic" page
(☞ page 33) respectively.
Step1
Display the "Live" page. (☞ Page 5)
Step 2
Click the [List] button.
→ The log list will be displayed in a newly opened win-
dow (log list window).
Important:
• Onlyasingleusercanoperatetheloglistwindow.
Other users cannot access the log list window.
Note:
• When"Notuse"isselectedfor"SDmemorycard",
the error log list of manual saving and the FTP peri-
odic image transmission function will not be dis-
played.
Step 3
Click the desired log type listed below "Log" to display
the log list.
→ The log list of the selected log type will be dis-
played.
Note:
• WhensavedimagesareontheSDmemorycard,
clicking the time and date of the alarm occurrence
will display the respective images. (☞ Page 19)
About the log list window
[Number of the listed logs]
Total number of the logs of the selected log type and a
number of the log being displayed on the top of the log
list will be displayed.
Note:
• Enterthedesiredlognumberandpressthe[Enter]
key on the keyboard. The log of the designated
number will be displayed on the top of the log list.
[Top] button
Click this button to display the log listed at the top.
[Prev. page] button
Click this button to display the previous page of the log
list.
Number of
the listed
logs

18
Note:
• Whenthemousebuttonishelddownwhileplacing
the mouse pointer on the [Prev. page] button, the
displayed log number will be decremented.
When the mouse button is released, the decrement
of the log number will stop and the log number dis-
played at the moment when the mouse button is
released will be the top of the currently displayed
page.
[Next page] button
Click this button to display the next page of the log list.
Note:
• Whenthemousebuttonishelddownwhileplacing
the mouse pointer on the [Next page] button, the
displayed log number will be incremented.
When the mouse button is released, the decrement
of the log number will stop and the log number dis-
played at the moment when the mouse button is
released will be the top of the currently displayed
page.
[Last] button
Click this button to display the log listed at the bottom.
[Time & date]
Time and date when each log has been filed will be dis-
played.
Note:
• When"Off"isselectedfor"Timedisplayformat"(☞
page 30), time and date of alarm occurrence will be
displayed in 24-hour format.
• Therecordingtimingoflogsareasfollows.
Alarm log: Alarm occurrence time and date will be
filed as a log.
Manual log: Time and date when recording of
images onto the SD memory card started will be
filed as a log. When recording are performed
sequentially, logs will be filed every one hour.
FTP trans. error log: Logs will be filed every one
hour.
[Ch]
The channel will be displayed.
[Event]
The event type will be displayed.
The event types will be displayed only when displaying
the alarm log list.
TRM1: Alarm by alarm input to Terminal 1
TRM2: Alarm by alarm input to Terminal 2
TRM3: Alarm by alarm input to Terminal 3
VMD: Alarm by VMD alarm
COM: Alarm by command alarm
CAM: Alarm by camera site alarm
LOSS: Alarm at a video loss occurrence
[SD memory card]
Available capacity and the original capacity of the SD
memory card will be displayed.
The displayed descriptions are the same descriptions
displayed as "Remaining capacity" on the [SD memory
card] tab. (☞ Page 31)
[Delete] button
Click this button to delete the currently displayed log
list.
When using the SD memory card, images associated
with the log list will also be deleted.
Important:
• WhenmanyimagesaresavedontheSDmemory
card, it will take some time to complete the deletion.
• Intheprocessofthedeletion,onlylogswillbe
saved, and it is impossible to save images newly.
• Donotturnoffthepoweroftheunituntilthedele-
tion is complete.
When the power of the unit is turned off in the pro-
cess of the deletion, some images may remain on
the SD memory card.
In this case, click the [Delete] button on the same
log list window used to delete the logs.
[Download] button
Click this button to download all logs of the selected
log list as a file onto the PC.
[Close] button
Click this button to close the log list window.

19
Playback of images on the SD memory card
When clicking a time and date listed on the log list window, the "Live" page will turn to the "Playback" page.
When images associated with the clicked time and date are on the SD memory card, the first image of them will be
displayed.
Important:
• Refreshintervalofimagesmaybecomeslowduringplaybackordownload.
• WhenmanyimagesaresavedontheSDmemorycard,itmaytaketimetodisplayimagesonthe"Playback"
page.
• EvenwhenthesizeoftheimagessavedontheSDmemorycardis"QVGA",theimageswillbeplayedinVGA
sizeonthe"Playback"page.
Therefore, images may look coarse on the "Playback" window.
• WhenplayingimagesbyselectinganFTPerrorlogontheloglist,imagesmaynotbeplayedinorderofimages
recorded on the SD memory card if they have been recorded on the SD memory card with selected value for the
"Transmission interval" setting on the [FTP img. trans.] tab is "1 min" or less. (☞ Page 56)
About the playback page
Number of images
When clicking a time and date listed on the log list win-
dow, total number of images associated with the
clicked time and date, and the number of the currently
displayed image will be displayed.
Note:
• Enterthedesirednumberofimageandpressthe
[Enter] key on the keyboard. The image of the des-
ignated number will be displayed.
[Ch No.]
Select the channel number to play back images from
the "FTP trans. error log" list.
[REW] button
When this button is clicked, images will be played at
high speed in reverse sequential order.
Each time the button is clicked, the playback speed will
change.
When the [PLAY] button or the [REV PLAY] button is
clicked during fast playback/fast reverse playback,
playback speed will return to the normal playback
speed.
[REV PLAY] button
Images will be played in reverse sequential order.
[PLAY] button
Images will be played in sequential order.
Number of images

20
[FF] button
When this button is clicked, images will be played at
high speed in sequential order.
Each time the button is clicked, the playback speed will
change.
When the [PLAY] button or the [REV PLAY] button is
clicked during fast playback/fast reverse playback,
playback speed will return to the normal playback
speed.
[TOP] button
The first image will be displayed.
[PREV. IMAGE] button
The previous frame will be displayed and paused when
this button is clicked during playback.
Each time this button is clicked during pausing, the
frame previous to the currently displayed frame will be
displayed.
Note:
• Whenthemousebuttonisbeingheldwhileplacing
the mouse pointer on this button, the displayed
image number will be decremented.
When the mouse button is released, the decrement-
ing of the image number will stop and the image
corresponding to the currently displayed number
will be displayed.
[PAUSE] button
Playback will be paused when this button is clicked
during playback. Playback will resume when this button
is clicked during pausing.
[STOP] button
Playback will stop and the "Playback" window will turn
to the "Live" page.
[NEXT IMAGE] button
The next frame will be displayed and paused when this
button is clicked during playback.
Each time this button is clicked during pausing, the
frame next to the currently displayed frame will be dis-
played.
Note:
• Whenthemousebuttonishelddownwhilethe
mouse pointer is on this button, the image number
will be incremented.
When the mouse button is released, the increment
of the image number will stop and the image num-
ber displayed at the moment when the mouse but-
ton is released will be displayed.
[LAST] button
The last image will be displayed.
■ Browse
[Start] button
The selected image will be downloaded onto the PC.
Before downloading images, designate the destination
directory in advance. (☞ Page 33)
The following window will be displayed when the [Start]
button is clicked.
Select the image to be downloaded, and then click the
[OK] button.
All: All images saved at the selected time and date will
be downloaded.
Current image: Only the currently displayed image will
be downloaded.
Download range: Images in the designated range of
number of images will be downloaded.
Note:
• Whendownloadingimagesfromthe"FTPtrans.
error log" list, only images from the channels select-
ed for "Ch No." are available.
• Whenthe[Cancel]buttonisclickedintheprocess
of the download, the download will be canceled.
In this case, images already downloaded before
clicking the [Cancel] button will be saved on the PC.
[Browse] button
When successfully logged in after the user authentica-
tion process, a folder on the SD memory card in which
images are saved will be displayed.
/