Navman iCN 600series User manual
- Category
- Navigators
- Type
- User manual

iCN 600 series
with Smart
TM
Version 3.0
User Manual
US / Canada Edition

2
iCN 600 series | User Manual
Contents
1. Introduction ............................................................ 3
2. iCN Features .......................................................... 4
3. Memory Card ......................................................... 6
4. Turning your iCN On and Off ................................. 7
5. Position in a Vehicle ............................................... 8
6. Main Menu Screen .............................................. 10
7. Screen Keyboard ................................................ 10
8. GPS Status ......................................................... 11
9. Setting your Destination ...................................... 12
10. Avoiding an Area ................................................. 17
11. Viewing Your Route ............................................ 18
12. Map Screen Pop-up Menu ................................. 21
13. Route Demonstrator ........................................... 22
14. Favorites & Shortcuts .......................................... 23
15. Settings ............................................................... 25
16. Smart
Desktop ................................................ 30
17. Updating your iCN .............................................. 31
18. Installing Maps Using Smart
Desktop ............. 32
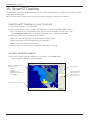
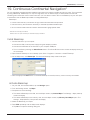
19. Continuous Continental Navigation ..................... 33
20. Smart
Desktop Advanced Features ................ 35
21. Accessories ........................................................ 38

3
iCN 600 series | User Manual
1. Introduction
Whether you travel in your own country, or overseas, the iCN will direct you to your destination without the need for map
books and second-hand instructions.
The Global Positioning System is available free of charge, at any time, and is accurate to within 5 m (15 ft). Your iCN
map provides street level detail for door-to-door navigation, including Points Of Interest (POIs) such as accomodation,
railway stations and airports.
Use this guide to learn how to operate it effectively and safely, plus find out all of the different features available to you.
GPS and GPS Signals
The Global Positioning System (GPS) is a network of satellites that transmit accurate time and position information
worldwide. GPS receivers receive signals from these satellites, and use the information to determine an exact
location. Satellites orbit the Earth at around 12,000 miles. While a GPS receiver can detect signals from up to 12
satellites at anytime, only three are needed to provide a position or “fix” (latitude and longitude) for vehicle navigation
systems.
The iCN GPS antenna receives GPS signals. To receive GPS signals, ensure the iCN is outdoors, or in a vehicle
outdoors, and the GPS antenna has an unobstructed view of the sky. The iCN can operate in all weather types
except snowfall.
Safety Notice
In a vehicle, it is your sole responsibility to place, secure, and use the iCN in a manner that will not cause accidents,
personal injury or property damage. The user of this product is solely responsible for observing safe driving practices.
It is your sole responsibility that the vehicle mount installation instructions are read carefully, understood, and used
consistent with the laws of operation for each country in which the device is used.
It is your sole responsibility to adhere to the following safety instructions at all times:
• Do not operate the iCN while driving or place the iCN in a position that obstructs the driver’s view
• Do not mount in a way that interferes with airbags or other safety equipment
• Do not leave in view while your vehicle is unattended, especially in strong sunlight or extremely cold
temperatures
• Do not use or handle the iCN when it is hot, leave it to cool out of direct sunlight
Navman disclaim all liability for use of this product in a way that may cause accidents, damage or may violate law.

4
iCN 600 series | User Manual
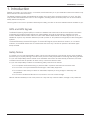
2. iCN Features
It is recommended that you familiarize yourself with the basic operations of your iCN such as using the 8-way toggle
and volume control.
Front Components
Component Description
1 Screen Displays maps and menu options.
2 OK Select the highlighted menu option, text or command.
3 Zoom/Brightness
Change the amount of map area shown, or press and hold to adjust the
screen brightness.
4 ESC
Cancels an action, deletes the last text character, returns to the previous
screen. Hold down to delete a line of text.
5 8-way Toggle Use to scroll up/down and move round a map to select a destination.
6 Page
Change map views, including 3D Map* view. Use to view further screens if
available.
7 Volume
Press to hear the very next instruction, or hold down to adjust the voice
guidance volume.
8 Menu/Power Press to return to the Main Menu or hold down to turn on/off.
* iCN 630, 635, 650 only
1
2 3
4
5
8
7
6

5
iCN 600 series | User Manual
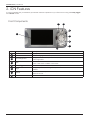
Back Components
Component Description
1 Speaker Outputs voice commands and warnings. Use Volume button to adjust.
2 Memory Card Slot Slot for memory card. Insert card with label facing the front of the iCN.
3 GPS Receiver Receives signals from GPS satellites when lifted out to the horizontal position.
4 Car Antenna Socket Connection socket for GPS car antenna (not included).
5 Power Socket Connection socket for power cable.
6 USB Socket Connection socket for USB cable to your computer.
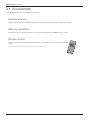
Remote Control
Button functions are the same as the iCN control buttons. You cannot turn on the iCN
using the Remote Control.
Only included with the iCN 635 and 650. Available for the iCN 610 as an accessory.
1
2
3
4
5
6

6
iCN 600 series | User Manual
3. Memory Card
iCN 635
Your iCN may come with an optional memory card containing a preactivated map. To navigate to your destination
you will first need to insert the memory card into your iCN.
Important: If your iCN did not come with a memory card, you will first need to purchase one separately then install
the required map from the enclosed Map CDs using Smart
Desktop. See Installing Maps Using Smart Desktop
on page 32.
To navigate in an area outside of the preactivated map, you must first purchase a Map Product Key from your
Navman supplier. Install Smart
Desktop, then use it to activate your Map Product Key and install the required map.
See Installing Maps Using Smart Desktop on page 32.
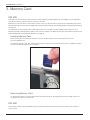
Inserting Memory Card
Note: The first time you insert the memory card you will first need to remove the plastic space saver
from the SD/MMC slot.
To insert the memory card, first ensure that the iCN is turned off, then gently insert the card in the Memory Card
slot with the label facing the front of the iCN.
Removing Memory Card
To remove the memory card, first ensure that the iCN is turned off, then gently push the top edge of the card
to release it and pull it out of the slot.
iCN 650
The iCN 650 contains all preactivated maps for USA and Canada in internal memory and does not come with a
memory card.

7
iCN 600 series | User Manual
4. Turning your iCN On and Off
Turn iCN On
1. Plug the power adapter into the socket on the left of the iCN and the other end into the vehicle lighter socket.
2. Gently pull the bottom of the GPS receiver away from the iCN. The receiver will lift out to a horizontal position
to allow it to obtain a GPS fix.
3. Press the Menu/Power button for one second.
Turn iCN Off
1. Gently push the GPS receiver back towards the iCN. The receiver will click in to place.
2. Complete one of the following:
• iCN 635: Press the Menu/Power button for three seconds until the iCN turns off.
• iCN 650: Press the Menu/Power button for three seconds. When the confirmation message displays, select
Yes and press OK. The iCN will turn off.

8
iCN 600 series | User Manual
5. Position in a Vehicle
Before you begin, check if your vehicle is fitted with a heat reflecting or heated windshield. If so, you will need to
purchase an external antenna for your iCN to receive GPS signals.
There are a number of ways to position an iCN in a vehicle. Follow these instructions carefully.
• Do not install where it could cause interference with vehicle air bags.
• For security and to avoid overheating, do not leave your iCN in an unattended
vehicle, especially in strong sunlight or extremely cold temperatires.
• Do not use or handle the iCN when it is hot — leave it to cool out of direct sunlight. If your iCN is
too hot, you will be prompted to turn down the brightness (press and hold the Zoom button). If the
iCN continues to get hotter the screen will go blank, however voice instructions will continue.
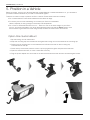
Option One: Suction Mount
1. Slip the locking nut over the ball foot.
2. Snap the mounting clip onto the ball foot and tighten the locking nut onto the thread of the mounting clip.
3. Position the two locating slots on the underside of the iCN into the tabs on the mounting clip.
Push the iCN into the clip.
4. Clean and dry the surfaces, hold the suction cup firmly against the glass and press down the lever.
5. Open the antenna outwards, so it has a clear view of the sky.
6. Plug the power adapter into the socket on the left of the iCN and the other end into the vehicle lighter socket.

9
iCN 600 series | User Manual
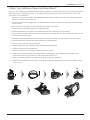
Option Two: Adhesive Tape and Screw Mount*
You can use the base plate, adhesive tape and screws supplied to mount the iCN directly into the vehicle dashboard.
Important: This is a permanent solution — the adhesive tape cannot be removed once fixed and the screws will
leave holes in your dashboard.
1. Choose a position on the dashboard where the iCN will be clearly visible by the driver. Use the alcohol swab to
ensure all surfaces are clean and dry.
2. Remove one of the backing layers from the adhesive tape and press it firmly to the underside of the base plate
for 30 seconds.
3. Press the suction cup firmly in to the base plate and press the lever down.
4. Remove the second backing layer from the adhesive tape .
5. Position the ball foot in to position on the dashboard and press down firmly for 30 seconds.
6. Fit the retainer ring inside the screw plate by sliding the four locating tabs into the corresponding slots on the
underside of the screw plate.
7. Place the screw plate over the ball foot ensuring the suction cup tab fits in to the tab slot on the screw plate.
8. Use the three screws to fasten the screw plate firmly to the dashboard.
9. Press the screw caps over the screw heads.
10. Slip the locking nut over the ball foot with the flat side facing upwards.
11. Snap the socket clip onto the ball foot.
12. Wind the locking nut onto the thread of the socket clip until firm.
13. Snap the iCN onto the socket clipw. Position the two locating tabs on the underside of the iCN into the
corresponding slots on the socket clip. Then push the iCN into the clip.
14. Open the antenna outwards so the GPS antenna has a clear view of the sky.
15. Plug the power adapter into the socket on the left of the iCN and the other end into the vehicle lighter socket.
*iCN 635, 650 only

10
iCN 600 series | User Manual
6. Main Menu Screen
The Main Menu screen gives you access to all of the iCN’s functions, including navigating to a destination.
1. Press the MENU/Power button for about one second.
2. The Language screen will display. Use the 8-way toggle to highlight your language choice and press OK
.
• You can stop the Language screen displaying on startup by selecting the Do not show on startup check box.
Press OK to confirm.
3. Press the Page button.
4. The Warning screen will display. Read the warning mesage and press OK to confirm that you understand.
5. The
Tutorial will display. Press the Page button to move through the screens.
• You can turn off the Tutorial on startup by using the 8-way toggle to highlight the Do not show Tutorial on
startup check box, press OK to confirm.
6. The Main Menu screen will display.
7. Use the 8-way toggle to highlight Main Menu options, confirm a selection by pressing OK
.
• Return to the Main Menu at any time by pressing the MENU/Power button.
7. Screen Keyboard
The screen keyboard will display when required to enter text, such as when entering a street name.
1. Use the 8-way toggle to move around the keyboard.
• Press OK to select a character.
• Press ESC to delete a character; Hold ESC to delete the line.
• Press Zoom up to display the Alternative keyboard.
• Press Zoom down to return to the Alphabetical keyboard.
• The list will reduce to match your search criteria. Press Page to
see more of the list.
2. Use the 8-way toggle to select a search result from the list. Press OK
.

11
iCN 600 series | User Manual
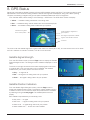
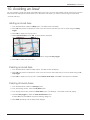
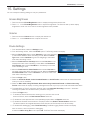
8. GPS Status
Signals are transmitted by Global Positioning System (GPS) satellites orbiting the Earth. This screen provides a visual
representation of the information being received. Latitude and longitude are displayed, along with a North-pointing
compass, the heading in degrees and ground speed. Satellites available are shown as segments.
From the Main Menu, select Settings > More Settings
> GPS Status. The GPS Status screen will display.
• Yellow — a satellite is being tracked but is not being used
• Red — a satellite is being used to determine a two dimensional (2D) fix
• Green — the satellite is being used to determine your position.
The circle under the sattelite segments is green when there is a valid fix (2D or 3D), and red when there is no fix. While
a 2D fix is sufficient to maintain a valid fix, a 3D fix is more accurate.
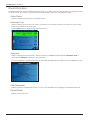
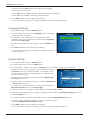
Satellite Signal Strength
From the GPS Status screen, press the Page button to display the Satellite
Signal Strengths screen. The strength of each satellite is displayed on a bar
chart.
The circle on the right-hand side of the screen displays green when there
is a valid fix (2D or 3D), and red when no fix is available. The satellites
available from your current position are shown as bars.
• Grey — no signal at all
• Red — this signal is not being used to fix your position
• Green — this signal is being used to fix your position.
Satellite Position Indicators
From the Satellite Signal Strengths screen, press the Page button to
display the Satellite analysis screen. The position of each satellite is shown
in relation to Earth. You can view the status and performance of a satellite
by selecting it using the 8-way toggle. The satellite performance will
display.
Each satellite is represented by a small empty circle.
• Gray circle — no signal
• Red circle — a signal not being used to fix your position
• Green circle — a signal being used to fix your position
• Yellow satellite icon — shows the current satellite.
Latitude and longitude
of the current position
Local time
A green circle indicates a valid fix
Current heading in degrees and
ground speed
Each segment represents a satellite

12
iCN 600 series | User Manual
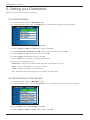
9. Setting your Destination
Before you travel, you must specify a destination.
To a Street Address
1. From the Main Menu, select the Destination option.
2. From the Destination screen, select the Address option. The Destination-Address screen will display.
3. Select a Country using the 8-way toggle, press OK
.
4. To select a Regio
n or State press OK. Select a region. Press OK.
5. To select a Postcode or ZIP Code press OK. Select a postcode or ZIP code. Press OK.
6. To select a Town press OK. Select a city or town. Press OK
.
7. To select a Road press OK. Select a road. Press OK
.
8. Press the Page button to display the Address-Details screen.
9. Choose one of the following options:
• Add to Trip - Opens the Trip Planner screen and adds the destination to your trip
• Save - Saves the destination as a Shortcut or Favorite
• Show - Displays the address on the
Map screen
• Go - Calculates the route and displays it on the
Map or 3D Map screen.
To the Intersection of Two Streets
1. From the Main Menu, select the Destination option.
2. From the Destination screen, select the Intersection option. The Destination-Intersection screen will display.
3. Select a Country using the 8-way toggle, press OK
.
4. To select a Region or State press OK. Select a region. Press OK
.

13
iCN 600 series | User Manual
5. To select a Postcode or ZIP Code press OK. Select a postcode or ZIP code. Press OK.
6. To select a City/Town press OK. Select a city or town. Press OK
.
7. To select the first intersecting street, press OK. A list of intersecting streets will display. Select a street. Press OK
.
8. Select And. A list of intersecting streets will display. Select a street. Press OK
.
9. Press the Page button, the Intersection-Details screen will display.
10. Choose one of the following options:
• Add to Trip - Opens the Trip Planner screen and adds the destination to your trip
• Save - Saves the destination as a Shortcut or Favorite
• Show - Displays the address on the
Map screen
• Go - Calculates the route and displays it on the
Map or 3D Map screen.
To a City or Town Centre
1. From the Main Menu, select the Destination option.
2. From the Destination screen, select the City/Town Centre option. The Destination - City/Town Center screen
will display.
3. Select a Country using the 8-way toggle, press OK
.
4. To select a Regio
n or State press OK. Select a region. Press OK.
5. To select a Postcode or ZIP Code press OK. Select a postcode or ZIP code. Press OK
.
6. To select a City/Town press OK. Select a city or town. Press OK
.
7. Press the Page button to display the Address Details screen.
8. Choose one of the following options:
• Add to Trip - Opens the Trip Planner screen and adds the destination to your trip
• Save - Saves the destination as a Shortcut or Favorite
• Show - Displays the address on the
Map screen
• Go - Calculates the route and displays it on the
Map or 3D Map screen.

14
iCN 600 series | User Manual
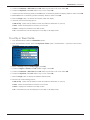
To a Point-Of-Interest (POI)
A POI is a named site, feature, landmark or public venue. POI's are stored in Categories, such as parks and
museums. POI's can be displayed as icons on a map.
1. From the Main Menu, select the Destination option.The Destination screen will display.
2. From the Destination screen, select the Points of Interest option. The Destination-POI screen will display.
3. Select a Category using the 8-way toggle, press OK
4. Select a Type, press OK to narrow the search.
5. Select a Country, to confirm press OK
6. Select an Area by pressing Page. Enter a name and choose from the list. Press OK
7. The Select POI screen will display, press OK, the Select POI text entry screen will display a list.
8. Select a POI using the 8-way toggle. Press Page to view more. Press OK to select from the list.
9. The POI Detail screen will display. Choose one of the following options:
• Add to Trip — Opens the Trip Planner screen and adds the destination to your trip
• Save — Saves the destination as a Shortcut or Favorite
• Show — Displays the address on the Map screen
• Go — Calculates the route and displays it on the
Map or 3D Map screen.
To a Recent Destination
The last 30 routes are stored as Recent destinations. Recent is only available if a route has been calculated.
1. From the Main Menu, select the Destination option.
2. From the Destination screen, select the Recent
option The Recent screen will display.
3. Select a destination from the list, press OK
4. Choose one of the following options:
• Add to Trip — Opens the Trip Planner screen and adds the destination to your trip
• Save — Saves the destination as a Shortcut or Favorite

15
iCN 600 series | User Manual
• Show — Displays the address on the Map screen
• Go — Calculates the route and displays it on the
Map or 3D Map screen.
Multiple Destination Points with the Trip Planner
You can use the Trip Planner to set multiple destination points for your trip. Your route will be calculated to go
via each of these points in the specified order. Destination points can be added via the Trip Planner screen or by
selecting Show Details from the pop-up menu on the Map screen, then Add to Trip.
1. From the Main Menu, select the Trip Planner
option. The Trip Planner screen will display.
2. Select Add and press OK. The Destination screen will open.
3. Select Address and press OK. The Destination Address screen will open.
Note: You can also add destination points using intersections, Cities/Towns, Points of Interest and recent
destinations.
4. Select a Country using the 8-way toggle, press OK
.
5. To select a Regio
n or State press OK. Select a region. Press OK.
6. To select a Postcode or ZIP Code press OK. Select a postcode or ZIP code. Press OK
.
7. To select a Town press OK. Select a city or town. Press OK
.
8. To select a Road press OK. Select a road. Press OK
.
9. Press the Page button to display the Address-Details screen.
10. Select Add to Trip and press OK. The destination point is added to your trip. The Trip Planner screen will
display.
• To add another destination point, go to step 2.
11. To move a destination point up or down, select the point and press OK. The Address Details screen will
display.
• Select Move and press OK. The Trip Planner screen will display with the selected destination point highlighted.
• Use the 8-way toggle to move the destination point up or down the list.
• Press OK
.
12. To delete a destination point, select the point and press OK. The Address Details screen will display.
• Select Delete from Trip and press OK. The Trip Planner screen will display with the selected destination
deleted.
13. Choose one of the following options:
• Add — Opens the Destination screen to add a destination point.
• Clear — Deletes all destination points.
• Save — Opens the New Favorite screen to save the trip as a Shortcut or Favorite
• Go — Calculates the route and displays it on the
Map or 3D Map screen

16
iCN 600 series | User Manual
Using the Map screen to Plan a Route
You can plan a route directly from the Map screen using the Popup menu.
1. From the Main Menu, select the Map option. The Map screen will display.
• Move round the Map screen using the 8-way toggle
• Zoom using + and - on the Zoom/Brightness button.
2. Press OK to display cross-hair on the Map screen
• To remove the cross-hair press ESC
3. Use the 8-way toggle to place the intersection of the cross-hair on a destination, the street name will display.
4. Press OK to select the street as your destination. The Pop-up menu will display
5. Select Navigate To. The route is calculated and displayed on the Map or 3D Map screen.

17
iCN 600 series | User Manual
10. Avoiding an Area*
You can calculate a route that avoids a specified area on the map. Up to ten Avoid Areas can be active at any one time.
Avoid Areas are displayed as shaded areas. If no alternative route exists, you will be routed through an Avoid Area.
* iCN 635, 650 only
Adding an Avoid Area
1. From the Main Menu, select the Map option. The Map screen will display.
2. Press OK and place the intersection of the cross-hair over the area that you want to avoid using the 8-way
toggle
.
3. Press OK to display the Pop-up menu.
4. Select Add Avoid Area. Press OK. An Avoid Area is displayed.
5. Set the Avoid Area to the correct size and position using the 8-way toggle
.
6. Press OK to enable the Avoid Area.
Deleting an Avoid Area
1. From the Main Menu, select the Map option. The Map screen will display.
2. Press OK and place the intersection of the cross-hair over the Avoid Area that you want to delete using the 8-
way toggle
.
3. Press OK to display the Pop-up menu. Select Delete Avoid Area. Press OK. The Avoid Area is deleted.
Deleting All Avoid Areas
1. From the Main Menu, select the Settings option.
2. From the Settings screen, select the My Data option.
3. From the My Data screen, select the Clear Data option. The Settings - Clear Data screen will display.
4. Use the 8-way toggle to select the Clear Avoid Areas button.
• Select Yes and press OK to accept the Warning dialog box.
5. Press ESC repeatedly until the Map screen displays.

18
iCN 600 series | User Manual
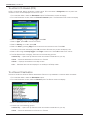
11. Viewing Your Route
Once a route has been calculated, there are a number of ways to view it. Cycle through the screens by pressing the
Page button. To cancel a route or stop the Route Demonstrator, return to the Main Menu, select the Route Information
option, then the Cancel Route option.
Back-On-Track
™
Automatic Rerouting
Your route is re-directed if you make a wrong turn. The ? symbol will display upper left of the 3D Map and
Next Instruction screens while the route re-calculates.
Automatic rerouting is enabled on the Routing screen.
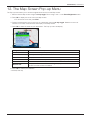
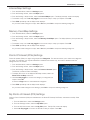
Map Screen
This screen displays north, with your current position and surrounding street names. If a route has been calculated,
the route and turns are highlighted.
From the Main Menu, select the Map option
• Zoom using + and - on the Zoom/Brightness button
• Press OK to display the cross-hair. Press again to display the Pop-up menu.
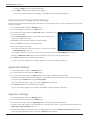
3D Map Screen — iCN 635, 650 only
Your route displays on a map oriented to the traveling direction, with an adjustable horizon.
1. From the Main Menu, select the Map option. The Map screen will display.
2. Press the Page button to display the 3D Map screen.
• Zoom using + and - on the Zoom/Brightness button
• Use the 8-way toggle up or down to adjust the viewing angle
• Press OK to display the
Destination Pop-up menu
GPS strength indicator
Your current location
Your next turn is high
-
lighted in a different
color to future turns.
The color will depend
on the theme you are
using.
Your current position is
marked with
.
Additional information can be displayed
here. Press the 8-way toggle left or
right to scroll the following options.
• Current speed
• Current time
• Current bearing / heading (HDG)
• Distance to next turn
• Distance to go to destination (DTG)
• Expected time of arrival (ETA)
• Time to go to destination (TTG)
GPS strength indicator
Your current location
North oriented compass
Additional information can display here.
Press the 8-way toggle left or right
to scroll the options. You must have a
route calculated to view these options.
• Current speed
• Current time
• Current bearing / heading (HDG)
• Distance to next turn
• Distance to go to destination (DTG)
• Expected time of arrival (ETA)
• Time to go to destination (TTG)
Direction of next turn

19
iCN 600 series | User Manual
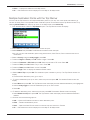
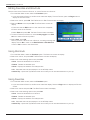
Next Turn Screen
Displays the turn direction, street name and the distance to the next turn. A route must have been calculated for this
screen to display. Access to this screen is set on the Settings - Display screen.
1. From the Main Menu, select the Map option The Map screen will display.
2. Press the Page button until the Next Turn screen displays.
Next Four Turns Screen
This screen displays the next four turns of your route, the turn direction, street name and the distance to the turn.
A route must have been calculated for this screen to display. Access to this screen is set on the Settings - Display
screen.
1. From the Main Menu, select the Map option. The Map screen will display.
2. Press the Page button until the Next Four Instructions screen displays.
Distance to the next turn
GPS strength indicator
Direction of the next turn
Your current location
The next instruction
Additional information can be displayed
here. Press the 8-way toggle left or
right to scroll the following options.
• Current speed
• Current time
• Current bearing / heading (HDG)
• Distance to next turn
• Distance to go to destination (DTG)
• Expected time of arrival (ETA)
• Time to go to destination (TTG)
Map of the next turn
The next turn is highlighted at the top of the list.
Your current location.
The distance to this turn.
Your destination or next
destination point.
Additional information can be displayed
here. Press the 8-way toggle left or
right to scroll the following options.
• Current speed
• Current time
• Current bearing / heading (HDG)
• Distance to next turn
• Distance to go to destination (DTG)
• Expected time of arrival (ETA)
• Time to go to destination (TTG)
GPS strength indicator.

20
iCN 600 series | User Manual
Route Information
The Route Information screen provides information about your current route, and lets you skip a trip destination point
or cancel a route. The screen is only available from the Main Menu when you are navigating a route.
Show Route
Select to display your entire route on the Map screen.
Instruction List
Select to display the Instruction List screen. The Instruction List screen is similar to the Next Four Turns screen
except that it displays your entire route.
Use the Page button to page through the instruction list.
Summary
Select to display the Route Summary screen containing your From and To addresses, Estimated Time to
arrival and the Distance remaining to your destination.
If you are navigating a multiple destination trip, the information displayed will relate to your next destination point.
Skip Destination
Select to skip the next destination point of your trip. Only available when navigating a multiple destination trip.
Cancel Route
Select to cancel the route.
Page is loading ...
Page is loading ...
Page is loading ...
Page is loading ...
Page is loading ...
Page is loading ...
Page is loading ...
Page is loading ...
Page is loading ...
Page is loading ...
Page is loading ...
Page is loading ...
Page is loading ...
Page is loading ...
Page is loading ...
Page is loading ...
Page is loading ...
Page is loading ...
Page is loading ...
Page is loading ...
-
 1
1
-
 2
2
-
 3
3
-
 4
4
-
 5
5
-
 6
6
-
 7
7
-
 8
8
-
 9
9
-
 10
10
-
 11
11
-
 12
12
-
 13
13
-
 14
14
-
 15
15
-
 16
16
-
 17
17
-
 18
18
-
 19
19
-
 20
20
-
 21
21
-
 22
22
-
 23
23
-
 24
24
-
 25
25
-
 26
26
-
 27
27
-
 28
28
-
 29
29
-
 30
30
-
 31
31
-
 32
32
-
 33
33
-
 34
34
-
 35
35
-
 36
36
-
 37
37
-
 38
38
-
 39
39
-
 40
40


Navman iCN 600series User manual
- Category
- Navigators
- Type
- User manual
Ask a question and I''ll find the answer in the document
Finding information in a document is now easier with AI
Related papers
-
Navman ICN 600 Series V3 Owner's manual
-
-
Navman ICN510-520-SMARTST2005 User manual
-
Navman iCN 600series User manual
-
-
Navman F-Series User manual
-
Navman iCN520 User manual
-
-
-
Navman ICN550 User manual
Other documents
-
Beyerdynamic MCS-D 200 User manual
-
Beyerdynamic MCS-D 3123 User manual
-
-
DSC neo HS2128 User manual
-
-
DSC HS2016 User manual
-
-
-
Michelin Navigation User manual
-
 American Dynamics Excalibur SE Installation & Setup Instructions Manual
