
TYFS120 KNX/IP Secure Interface
1
6LE008079A
Application software
KNX / IP secure Interface
Electrical / Mechanical characteristics : see product information
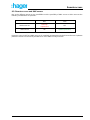
Order
number
Product
designation
Application
software ref.
TP device
RF devices
TYFS120
KNX / IP secure
Interface
STYFS120

2
TYFS120 KNX/IP Secure Interface
Table of contents
1. Application .................................................................................................................................... 3
2. KNX Security ................................................................................................................................. 3
2.1. KNX IP Security for the interface function ......................................................................... 3
2.2. KNX Data Security for the device ...................................................................................... 3
3. Installation and Connection ........................................................................................................ 4
3.1. KNX programming mode ................................................................................................... 4
3.2. Status display .................................................................................................................... 4
4. Factory default settings ............................................................................................................... 6
5. ETS database ................................................................................................................................ 7
6. ETS parameter dialogue............................................................................................................. 11
6.1. General settings .............................................................................................................. 11
6.2. Prog. mode on device front ............................................................................................. 11
6.3. Manual operation on device ............................................................................................ 11
7. Programming .............................................................................................................................. 12
7.1. Via the KNX bus .............................................................................................................. 12
7.2. Via KNXnet/IP Tunneling ................................................................................................. 12
7.3. Via direct IP connection ................................................................................................... 12
8. Interface settings within ETS .................................................................................................... 13
9. Remote access ............................................................................................................................ 15
9.1. Remote access with NAT ................................................................................................ 15
9.2. Remote access with VPN ................................................................................................ 15
9.3. Remote access and KNX secure .................................................................................... 16
10. Open Source Licenses ............................................................................................................. 17

Application
TYFS120 KNX/IP Secure Interface
3
1. Application
The KNX IP secure interface serves as a universal interface for PC or Laptop to the KNX bus. The KNX
bus can be accessed from any point on the LAN. The KNX IP secure interface can be used as a
programming interface for ETS®. For access via KNXnet/IP Tunneling max. 8 simultaneous connections
are possible.
The device supports KNX Security. The option can be activated in the ETS. As a secure interface, the
device prevents unauthorised access to the system.
The IP address can be assigned via DHCP or via the ETS configuration. The device operates according to
the KNXnet/IP specification using core, device management and tunneling.
Power is supplied via the KNX bus.
2. KNX Security
The KNX standard was extended by KNX Security to protect KNX installations from unauthorized access.
KNX Security reliably prevents the monitoring of communication as well as the manipulation of the system.
The specification for KNX Security distinguishes between KNX IP Security and KNX Data Security. KNX IP
Security protects the communication over IP while on KNX TP the communication remains unencrypted.
Thus KNX IP Security can also be used in existing KNX systems and with non-secure KNX TP devices.
KNX Data Security describes the encryption at telegram level. This means that the telegrams on the twisted
pair bus are also encrypted.
2.1. KNX IP Security for the interface function
When using a KNX IP interface to the bus, access to the installation is possible without security for all
devices that have access to the IP network. With KNX Security a password is required. A secure connection
is already established for the transfer of the password. All communication via IP is encrypted and secured.
In both modes, the interface forwards both encrypted and unencrypted KNX telegrams. The security
properties are checked by the respective receiver or tool.
2.2. KNX Data Security for the device
The KNX IP secure interface also supports KNX Data Security to protect the device from unauthorised
access from the KNX bus. If the KNX IP interface is programmed via the KNX bus, this is done with
encrypted telegrams.
Encrypted telegrams are longer than the previously used unencrypted ones. For secure
programming via the bus, it is therefore necessary that the interface used (e.g. USB) and any
intermediate line couplers support the so-called KNX long frames.

Installation and Connection
4
TYFS120 KNX/IP Secure Interface
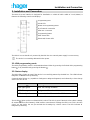
3. Installation and Connection
The KNX IP secure interface is designed for installation on a DIN rail with a width of 1 unit (18mm). It
features the following controls and displays:
Programming LED
Mode LED
Button for Programming Mode
RJ45 network connection
KNX Bus connection
Programming button
KNX Status LED
Ethernet/IP Status LED
The KNX IP secure interface is powered by the KNX bus. An external power supply is not necessary.
The device is not working without KNX bus power.
3.1. KNX programming mode
The KNX programming mode is activated/deactivated either by pressing the flushed KNX programming
button or by simultaneously pressing the buttons .
3.2. Status display
The KNX LED lights up green if the device is successfully powered by the KNX bus. The LED indicates
telegrams on the KNX bus by flickering.
Communication failures (e.g. repetitions of telegram or telegram fragments) are indicated by a short change
of the LED color to red.
LED Status
Meaning
LED lights green
KNX bus voltage available.
LED flickers green
Telegram traffic on the KNX bus
LED shortly red
Communication failures on the KNX bus
Table 1 - Overview of the different indications of the KNX LED
The IP LED lights up when an Ethernet link is active. This LED is green if the device has valid IP settings
(IP address, Sub net and Gateway). With invalid or nonexistent IP settings the LED is red. This is also the
case if e.g. the device has not yet received the IP settings by a DHCP server. The LED indicates IP
telegrams by flickering.

Installation and Connection
TYFS120 KNX/IP Secure Interface
5
LED Status
Meaning
LED lights green
The device has an active Ethernet link and valid IP settings.
LED lights red
The device has an active Ethernet link and invalid IP settings or
not yet received the IP settings by a DHCP server.
LED flickers green
IP telegram traffic
Table 2 - Overview of the different indications of the IP LED
The Mode LED can visualize the status of each KNXnet/IP tunneling connection.
With the buttons Conn Up/Dn you can chose each single connection. Conn Up counts the connection
numbers up and Conn Dn down. The actually selected connection number is indicated by flashing
(1x…8x) of the Mode LED . An available KNXnet/IP Tunneling connection is indicated by a green LED
and a used tunneling connection is indicated by an orange LED.
Via the Escape function (Esc) this indication can be ended by simultaneously pressing the buttons Conn
Up/Dn .
If neither programming mode nor manual operation are active the Mode LED can visualize configuration
errors.
LED Status
Meaning
LED lights green
Device is working in standard operation mode.
LED lights red
Programming mode is active
LED flashes green 1x..8x
Programming mode is not active.
Manual operation is active.
The selected tunnel (1-8) is not used and free
LED flashes orange 1x…8x
Programming mode is not active.
Manual operation is active.
The selected tunnel (1-8) is used
LED flashes red
Programming mode is not active.
Manual operation is not active.
The device is not properly loaded e.g.
after an interrupted download.
Table 3 - Overview of the different indications of the Mode LED

Factory default settings
6
TYFS120 KNX/IP Secure Interface
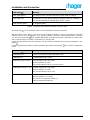
4. Factory default settings
Factory default configuration:
Individual device address: 15.15.255
Number of configured KNXnet/IP tunneling configuration : 1
Individual address of tunneling configuration : 15.15.240
IP address assignment: DHCP
Initial key (FDSK) : active
Security Modus : not active
Reset to factory device settings (Master-Reset)
It is possible to reset the device to its factory settings:
Separate the KNX Bus connector from device
Press the KNX programming button and keep it pressed down
Reconnect the KNX Bus connector of device
Keep the KNX programming button pressed for at least another 6 seconds
A short flashing of all LEDs ( ) visualizes the successful reset of the device to factory
default settings.

ETS database
TYFS120 KNX/IP Secure Interface
7
5. ETS database
The ETS database (ETS 5.7 or higher) can be downloaded from the product website of the KNX IP secure
interface or via the KNX online catalogue.
If you are not interested in the KNX IP Secure feature, you still have the possibility to use a non-secure
version of the application to configure your device.
If you use the secure version of the application, then the following steps have to be proceeded.
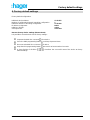
If the first product is inserted into a project with KNX Security, the ETS prompts you to enter a project
password.
Figure 1 – Set Project Password
This password protects the ETS project from unauthorized access. This password is not a key that is used
for KNX communication. The entry of the password can be bypassed with "Cancel", but this is not
recommended for security reasons.
ETS requires a device certificate for each device with KNX Security that is created in the ETS. This
certificate contains the serial number of the device as well as an intangible key (FDSK = Factory Default
Setup Key).

ETS database
8
TYFS120 KNX/IP Secure Interface
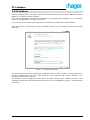
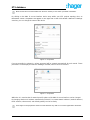
Figure 2 – Adding Device Certificate
The certificate is printed as text on the device. It can also be conveniently scanned from the printed QR
code via a webcam.
The list of all device certificates can be managed in the ETS Overview - Projects - Security window.
This initial key is required to safely put a device into operation from the start. Even if the ETS download is
recorded by a third party, the third party has no access to the secured devices afterwards. During the first
secure download, the initial key is replaced by the ETS with a new key that is generated individually for
each device. This prevents persons or devices who may know the initial key from accessing the device.
The initial key is only reactivated after a master reset.
The serial number in the certificate enables the ETS to assign the correct key to a device during a download.
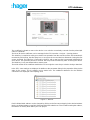
In the ETS, some settings are displayed in addition to the parameter dialog in the properties dialog (at the
edge of the screen). The IP settings can be made here. The additional addresses for the interface
connections are displayed in the topology view.
Figure 3 – Devices
Each individual KNX address can be changed by clicking on the list entry and typing in the desired address
into the “Individual Address” text-field. If the text-field frame switches to color red after entering the address,
the address is already taken within your ETS project.

ETS database
TYFS120 KNX/IP Secure Interface
9
Make sure that none of the addresses above is already in use within your KNX installation.
By clicking on the KNX IP secure interface device entry within your ETS projects topology view, an
information column ‘Properties’ will appear on the right side of the ETS window. Within the ‘Settings’
overview, you can change the name of the device.
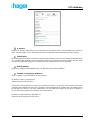
Figure 4 – Properties
If secure tunneling is activated, a unique password will be created automatically for each tunnel. These
passwords can be displayed under the ‘Settings’ overview, when a tunnel is selected.
Figure 5 – Properties
Within the “IP” overview the IP network specific options of the KNX IP secure interface can be changed.
By changing "obtain an IP address automatically (via DHCP)" to “Use a static IP address" (static IP address)
the IP address, subnet mask, and default gateway can be set freely.
All changes in the properties menu become effective only after a successful application download.

ETS database
10
TYFS120 KNX/IP Secure Interface
Figure 6 – Properties
IP address
Here the IP address of the KNX IP secure interface can be entered. This is used to address the device via
the IP network (LAN). The IP addressing should be coordinated with the administrator of the network.
Subnet mask
Enter the subnet mask here. The device uses the values entered in this mask to determine whether there
is a communication partner in the local network. If there is no partner in the local network, the device will
not send the telegrams directly to the partner but to the gateway that routes the telegram.
Default gateway
Enter the IP address of the gateway here, e.g. the DSL router of the installation.
Example of assigning IP addresses:
A PC is used to access the KNX IP secure interface :
IP address of the PC:192.168.1.30
Subnet of the PC:255.255.255.0
The KNX IP secure interface is located in the same local LAN, i.e. it uses the same subnet. The subnet
constrains the IP addresses that can be assigned. In this example, the IP address of the IP interface must
be 192.168.1.xx, where xx can be a number from 1 to 254 (with the exception of 30, which is already in
use). It must be ensured that no numbers are assigned twice.
IP address of the IP Interface:192.168.1.31
Subnet of the IP Interface:255.255.255.0

ETS parameter dialogue
TYFS120 KNX/IP Secure Interface
11
6. ETS parameter dialogue
The following parameters can be set using the ETS.
6.1. General settings
Figure 7 – General settings
6.2. Prog. mode on device front
In addition to the normal programming button the device allows activating the programming mode on the
device front without opening the switchboard cover. The programming mode can be activated and
deactivated via pressing simultaneously both buttons .
This feature can be enabled and disabled via the parameter “Prog. mode on device front”. The recessed
programming button (next to the Programming LED ) is always enabled and not influenced by this
parameter.
6.3. Manual operation on device
The manual operation of the KNX IP secure interface only contains the status display. This parameter sets
the duration of the manual mode. Upon completion the normal display mode is restored.

Interface settings within ETS
12
TYFS120 KNX/IP Secure Interface
7. Programming
The KNX IP secure interface can be programmed in different ways via the ETS:
7.1. Via the KNX bus
The device only needs to be connected to the KNX bus. The ETS requires an additional interface (for
example, USB) to have access to the bus. Via this way both the individual address and the entire application
including IP configuration can be programmed. Programming via the bus is recommended if no IP
connection can be established.
7.2. Via KNXnet/IP Tunneling
No additional interface is required. Programming via KNXnet/IP Tunneling is possible if the device already
has a valid IP configuration (e.g. via DHCP). In this case the device is displayed in the interface
configuration of the ETS and must be selected. The download is executed via the ETS project as with many
other devices.
7.3. Via direct IP connection
While KNXnet/IP tunneling is limited to the speed of KNX TP, the device can be loaded at high speed via
a direct IP connection. The direct IP connection is possible if the device already has a valid IP configuration
as well as a physical address. To do this, select "Use direct IP connection if possible" in the ETS menu
under "Bus - Connections - Options". The download then takes place directly into the device and is not
visible in the ETS group monitor.
Figure 8 – Connection Options
Due to the significantly shorter transmission times, it is recommended that downloads be carried
out via IP.

Interface settings within ETS
TYFS120 KNX/IP Secure Interface
13
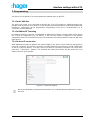
8. Interface settings within ETS
The KNX IP secure interface serves as a programming interface. The ETS can use this function to establish
a connection via IP to the respective TP line.
Within the ETS, KNX interfaces can be selected and set up via the ETS menu "Bus Interfaces".
The ETS can access configured KNX IP Interfaces even without a database entry. If the setup of the KNX
IP Interface does not comply with the conditions of the KNX installation it must be configured via an ETS
project. See the ETS database section for more information.
If security mode is activated in the KNX IP Interface, a password is required to establish a connection.
As factory default the assignment of the IP address is set to “automatically via DHCP” and thus no further
settings are necessary. To use this feature a DHCP server on the LAN must exist (e.g. many DSL routers
have an integrated DHCP server).
If the KNX IP interface has been connected to the LAN and has a valid IP address, it should appear
automatically in the menu item "Bus" under "Discovered interfaces".
By clicking on the discovered interface it is selected as the current interface. On the right side of the ETS
window all specific information and options of the connection appear.
The indicated device name and the "Host Individual Address" (individual address of the device) can only
be changed within your ETS project then.
Like all programmable KNX devices the KNX IP secure interface has an individual address which can be
used to access the device. This is used, for example, of the ETS when downloading to the KNX IP Interface
via the bus.
For the interface function the device contains additional individual addresses that can be set in the ETS.
When a client (e.g. ETS) sends via the KNX IP Interface telegrams to the bus, they contain a sender address
as one from the additional addresses. Each address is associated with a connection. Thus response
telegrams can be clearly transmitted to the respective client.
The additional individual addresses must be selected from the address range of the bus line in which the
interface is installed and may not be used by another device.
Example:
Device address
1.1.10
(address within ETS topology)
Connection 1
11.1.240
(1. additional address)
Connection 2
11.1.241
(2. additional address)
Connection 3
11.1.242
(3. additional address)
Connection 4
11.1.243
(4. additional address)
Connection 5
11.1.244
(5. additional address)
Connection 6
11.1.245
(6. additional address)
Connection 7
11.1.246
(7. additional address)
Connection 8
11.1.247
(8. additional address)
Section “Individual Address” enables you to select the individual KNX address of the currently used
KNXnet/IP Tunneling connection.

Interface settings within ETS
14
TYFS120 KNX/IP Secure Interface
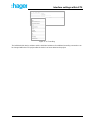
Figure 9 – IP Tunneling
The individual KNX device address and the individual addresses for additional tunneling connections can
be changed within the ETS project after the device has been added to the project.

Remote access
TYFS120 KNX/IP Secure Interface
15
9. Remote access
9.1. Remote access with NAT
NAT (Network Address Translation) is a method used to translate IP addresses. It is primarily used in
routers (e.g. DSL/Fiber routers).
WARNING
Please note that remote access via NAT, without further safety measures, poses significant
dangers. Port forwarding provides universal access to your local IP network and your KNX
system.
Any Internet user can discover the open port on your static public IP address and can, for
example, access your KNX network via the ETS software.
We strongly advise using NAT only temporarily for testing or diagnostic purposes. After that,
close the port again to prevent abuse.
If remote access is realized through NAT, we strongly advise you not to specify the default port
of 3671 towards the Internet. Port 3671 is the official port for efcp - eFieldControl(EIBnet)
registered by KNX Association. This port can be easily determined by unauthorized persons.
Please use a port in the non-reserved range between port 50000 and port 60000.
Permanent remote access should be established only when protected! We recommend
remote access through VPN (Virtual Private Network). The VPN feature is already
integrated into most DSL routers.
9.2. Remote access with VPN
A VPN is an extension of private networks. It can be used to enable remote access (site-to-end) and link
private networks (site-to-site) via the Internet.
Site-to-end
A site-to-end VPN can be used to establish access to an internal network. For example, employees in the
field can use it to dial into their company network.
Site-to-site
A site-to-site VPN can be used to link private networks. For example, a site-to-site VPN can link two remote
company networks.
It is not possible for ETS to identify the interface automatically via the VPN connection. Within the ‘Server’
text box you have to fill in the IP-address of the KNX IP Interface.
The ‘Connect using NAT mode’ checkbox has to be activated. Despite the fact that the
connection is not established in NAT mode, this option enables certain initialisations which are
necessary for a KNXnet/IP connection.

Remote access
16
TYFS120 KNX/IP Secure Interface
9.3. Remote access and KNX secure
Due to the different remote access possibilities and the possibility of KNX secure or KNX unsecure the
following constellations are possible.
NAT
VPN
KNX unsecure
Warning!
unprotected
OK
KNX secure
OK
Optimal protection
Remote access via NAT and KNX unsecure is completely unprotected and should never be used. Optimum
protection results are reached by simultaneous use of KNX Security and VPN.

Open Source Licenses
TYFS120 KNX/IP Secure Interface
17
10. Open Source Licenses
This product contains open source software license:
curve25519-donna: Curve25519 elliptic curve, public key function
Source: http://code.google.com/p/curve25519-donna/
Copyright 2008, Google Inc. All rights reserved.
Redistribution and use in source and binary forms, with or without modification, are permitted provided that
the following conditions are met:
Redistributions of source code must retain the above copyright notice, this list of conditions and the
following disclaimer.
Redistributions in binary form must reproduce the above copyright notice, this list of conditions and the
following disclaimer in the documentation and/or other materials provided with the distribution.
Neither the name of Google Inc. nor the names of its contributors may be used to endorse or promote
products derived from this software without specific prior written permission.
THIS SOFTWARE IS PROVIDED BY THE COPYRIGHT HOLDERS AND CONTRIBUTORS "AS IS" AND ANY EXPRESS OR
IMPLIED WARRANTIES, INCLUDING, BUT NOT LIMITED TO, THE IMPLIED WARRANTIES OF MERCHANTABILITY AND
FITNESS FOR A PARTICULAR PURPOSE ARE DISCLAIMED. IN NO EVENT SHALL THE COPYRIGHT OWNER OR
CONTRIBUTORS BE LIABLE FOR ANY DIRECT, INDIRECT, INCIDENTAL, SPECIAL, EXEMPLARY, OR CONSEQUENTIAL
DAMAGES (INCLUDING, BUT NOT LIMITED TO, PROCUREMENT OF SUBSTITUTE GOODS OR SERVICES; LOSS OF USE,
DATA, OR PROFITS; OR BUSINESS INTERRUPTION) HOWEVER CAUSED AND ON ANY THEORY OF LIABILITY, WHETHER
IN CONTRACT, STRICT LIABILITY, OR TORT (INCLUDING NEGLIGENCE OR OTHERWISE) ARISING IN ANY WAY OUT OF THE
USE OF THIS SOFTWARE, EVEN IF ADVISED OF THE POSSIBILITY OF SUCH DAMAGE.
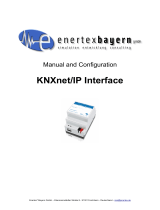
WARNING
- The device must be mounted and commissioned by an authorized electrician.
- The prevailing safety rules must be heeded.
- The device must not be opened.
- For planning and construction of electric installations, the relevant guidelines,
regulations and standards of the respective country are to be considered

18
01-2022
6LE008079A
hager.com
-
 1
1
-
 2
2
-
 3
3
-
 4
4
-
 5
5
-
 6
6
-
 7
7
-
 8
8
-
 9
9
-
 10
10
-
 11
11
-
 12
12
-
 13
13
-
 14
14
-
 15
15
-
 16
16
-
 17
17
-
 18
18


Ask a question and I''ll find the answer in the document
Finding information in a document is now easier with AI
Other documents
-
 Zennio ZSY-IPI-PL Owner's manual
-
 Zennio ZSYIPICL Owner's manual
-
 Extron electronics KNX 100G User manual
-
WAGO KNX IP Programmable Fieldbus Controller User manual
-
 Zennio ZSY-IP-ROU Owner's manual
-
JUNG IPR100REG Operating instructions
-
 enertexbayern Enertex KNXnet/IP Interface Manual And Configuration
-
-
iGuzzini MH98 Installation guide
-
 Zennio ZSYKIPI Owner's manual


