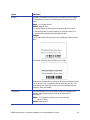
DataCard CR500 Installation And Administrator's Manual
- Type
- Installation And Administrator's Manual

Datacard
®
CR500™ Instant Issuance System
Installation and Administrator’s Guide
January 2018
Part No. 527516-001, Rev. B

ii
Notice
Please do not attempt to operate or repair this equipment without adequate training.
Any use, operation or repair you perform that is not in accordance with the information
contained in this documentation is at your own risk.
Trademark Acknowledgments
Datacard is a registered trademark and service mark of Entrust Datacard Corporation in
the United States and other countries.
MasterCard is a registered trademark of MasterCard International Incorporated.
Visa is a registered trademark of Visa International Service Association.
All other product names are the property of their respective owners.
Proprietary Notice
The design and information contained in these materials are protected by US and
international copyright laws.
All drawings and information herein are the property of Entrust Datacard Corporation. All
unauthorized use and reproduction is prohibited.
Entrust Datacard
1187 Park Place
Shakopee, MN 55379
Phone: 952-933-1223
Fax: 952-933-7971
www.entrustdatacard.com
Copyright © 2015, 2018 Entrust Datacard Corporation. All rights
reserved.

iii
Compliance Statements
Liability
The WARNING and CAUTION labels have been placed on the equipment for your safety. Please do
not attempt to operate or repair this equipment without adequate training. Any use, operation,
or repair in contravention of this document is at your own risk.
Safety
The following basic safety tips are given to ensure safe installation, operation, and maintenance
of Entrust Datacard™ equipment.
• Connect equipment to a grounded power source. Do not defeat or bypass the ground lead.
• Place the equipment on a stable surface (table) and ensure floors in the work area are dry and
non-slip.
• Know the location of equipment branch circuit interrupters or circuit breakers and how to turn
them on and off in case of emergency.
• Know the location of fire extinguishers and how to use them. ABC type extinguishers may be
used on electrical fires.
• Know local procedures for first aid and emergency assistance at the customer facility.
• Use adequate lighting at the equipment location.
• Maintain the recommended temperature and humidity range in the equipment area.

iv
Regulatory Compliance
EMC Compliance Notice
To ensure compliance of the model RX10 retransfer printer to the radiated emissions
requirements for class “A” Information Technology Equipment, be sure to use a shielded Ethernet
cable when connecting to your network
Notice for USA (FCC Notice)
This equipment has been tested and found to comply with the limits for Class A computing
devices, pursuant to Part 15 of FCC rules. These limits are designed to provide reasonable
protection against harmful interference when the equipment is operated in a commercial
environment. This equipment generates, uses, and can radiate radio frequency energy. If this
equipment is not installed and used in accordance with this instruction manual, it may cause
harmful interference to radio communications. Operation of this equipment in a residential area
is likely to cause harmful interference in which case the user will be required to correct the
interference at their own expense. Changes or modifications not expressly approved by the party
responsible for compliance could void the user's authority to operate the equipment.
This device complies with Part 15 of the FCC Rules. Operation is subject to the following two
conditions: (1) This device may not cause harmful interference, and (2) this device must accept
any interference received, including interference that may cause undesired operation.
Notice for Canada
Industry Canada
This digital apparatus does not exceed the Class A limits for radio noise for digital apparatus set
out in the Radio Interference Regulations of the Canadian Department of Communications.
Le présent appareil numérique n'émet pas de bruits radioélectriques dépassant les limites
applicables aux appareils numériques de la classe A prescrites dans le Règlement sur le brouillage
radioélectrique édicté par le ministère des Communications du Canada.
RSS-Gen, Issue 3, December 2010, Section 7.1.3 User Manual Notice
This Device complies with Industry Canada License-exempt RSS standard(s). Operation is subject
to the following two conditions: 1) this device may not cause interference, and 2) this device
must accept any interference, including interference that may cause undesired operation of the
device.
Cet appareil est conforme avec Industrie Canada RSS standard exemptes de licence(s). Son
fonctionnement est soumis aux deux conditions suivantes: 1) ce dispositif ne peut causer des
interférences, et 2) cet appareil doit accepter toute interférence, y compris les interférences qui
peuvent causer un mauvais fonctionnement du dispositif.

v
Notice for Europe
The EU Declaration of Conformity can be found on EntrustDatacard.com under product
compliance.
WARNING: This is a class A product. This equipment is compliant with class A of either CISPR32 or
CISPR22. In a domestic/residential environment this equipment may cause radio interference, in
which case the user may be required to take adequate measures.
WEEE: The model RX10 retransfer printer uses a lithium coin cell battery. Refer to the service
manual for battery removal instructions.
Simplified EU Declaration of Conformity
Entrust Datacard Corporation declares that the following radio equipment: MXD, MX6000,
MX6100, PB6500, MX2000, MX2100, SP55k, SP35, SP55, CP40, CP60, CP80, SP75, FP65, SR200,
SR300, PX10, PX30, EX30, MPR3800, CR500f, MX1100, RX10, and PB1000 is in compliance with
the Directive 2014/53/EU.
Intentional Radiator Information
EMC Compliance Notice:
For model RX10/Multi-hopper configurations, to ensure compliance with Conducted Immunity
standard EN61000-4-6, use USB cables no longer than three meters in length.
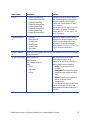
Description/Model Number FCC ID Frequency
Effective Radiated
Power (ERP) mW
PX10 Supplies RFID GDI-Q20010 13.56MHz 9.16E-06
PX30 Supplies RFID GDI-Q30030 13.56MHz 9.16E-06
Central Issuance Supplies
RFID
GDI-SID004 13.56MHz 1.96E-07
LX30, RX10 Supplies RFID GDI-506241001 13.56MHz 3.03E-05
EX30 Supplies RFID GDI-Q30130 13.56MHz 9.16E-06
FP65 Supplies RFID GDI-Q10055 13.56MHz 3.65E-05
Central Issuance Smartcard
Coupler
GDI-50543001 13.56MHz 1.45E-05

vi
Notice for Australia
This is a Class A product. In a domestic environment this product may cause radio interference, in
which case the user may be required to take adequate measures.
Notice for China (Simplified Chinese)
为 级产 环
该产 线
这
对
Notice for Taiwan (Traditional Chinese)
Notice for Japan
Japanese Voluntary Control Council for Interference (VCCI) class A statement
Korea Communications Commission (KCC) statement

vii
California Proposition 65 Compliance
WARNING: This product contains chemicals, including lead, known to the State of California to
cause cancer, and birth defects or other reproductive harm. Wash hands after handling.
Entrust Datacard believes that its products are not harmful when used as designed. However, the
above warning is made in compliance with the State of California Safe Drinking Water and Toxic
Enforcement Act of 1986, which requires warning labels on products that may contain elements
that the State of California considers harmful.
California Lithium Perchlorate Warning
Perchlorate Material - special handling may apply. See www.dtsc.ca.gov/hazardouswaste/
perchlorate.
This notice is required by California Code of Regulations, Title 22, Division 4.5, Chapter 33: Best
Management Practices for Perchlorate Materials. This product/part includes a battery that
contains Perchlorate material.

viii

ix
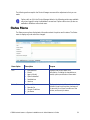
Revision Log
Datacard
®
CR500 Instant Issuance System
Installation and Administrator’s Guide
Revision Date Description of Changes
A June 2015 First release of this document
B January 2018 Updated printer information

x

xi
Contents
Chapter 1: Introduction. . . . . . . . . . . . . . . . . . . . . . . . . . . . . . . . . . . . . . . . . . . . . . . . . . . . . 1
About This Manual . . . . . . . . . . . . . . . . . . . . . . . . . . . . . . . . . . . . . . . . . . . . . . . . . . . . . . . . . . . . . 1
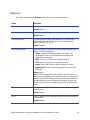
Related Documentation. . . . . . . . . . . . . . . . . . . . . . . . . . . . . . . . . . . . . . . . . . . . . . . . . . . . . . . . . 2
Intended Audience . . . . . . . . . . . . . . . . . . . . . . . . . . . . . . . . . . . . . . . . . . . . . . . . . . . . . . . . . . . . 2
If You Need Assistance . . . . . . . . . . . . . . . . . . . . . . . . . . . . . . . . . . . . . . . . . . . . . . . . . . . . . . . . . 2
The CR500 Card Printer. . . . . . . . . . . . . . . . . . . . . . . . . . . . . . . . . . . . . . . . . . . . . . . . . . . . . . . . . . 3
Card Printer Components . . . . . . . . . . . . . . . . . . . . . . . . . . . . . . . . . . . . . . . . . . . . . . . . . . . . 3
Security Enclosure Touch Screen and Print Unit Front Panel . . . . . . . . . . . . . . . . . . . . . 4
Printer Door Locks . . . . . . . . . . . . . . . . . . . . . . . . . . . . . . . . . . . . . . . . . . . . . . . . . . . . . . . . 4
CardWizard Issuance Software . . . . . . . . . . . . . . . . . . . . . . . . . . . . . . . . . . . . . . . . . . . . . . . . 5
Printer Manager. . . . . . . . . . . . . . . . . . . . . . . . . . . . . . . . . . . . . . . . . . . . . . . . . . . . . . . . . . . . . 5
Chapter 2: Plan the Installation . . . . . . . . . . . . . . . . . . . . . . . . . . . . . . . . . . . . . . . . . . . . . . 7
Packing List . . . . . . . . . . . . . . . . . . . . . . . . . . . . . . . . . . . . . . . . . . . . . . . . . . . . . . . . . . . . . . . . . . . 8
Unpack the Printer . . . . . . . . . . . . . . . . . . . . . . . . . . . . . . . . . . . . . . . . . . . . . . . . . . . . . . . . . . . . . 9
Site Requirements . . . . . . . . . . . . . . . . . . . . . . . . . . . . . . . . . . . . . . . . . . . . . . . . . . . . . . . . . . . . . 10
Site Guidelines . . . . . . . . . . . . . . . . . . . . . . . . . . . . . . . . . . . . . . . . . . . . . . . . . . . . . . . . . . . . . 10
Operating Environment . . . . . . . . . . . . . . . . . . . . . . . . . . . . . . . . . . . . . . . . . . . . . . . . . . . . . 10
Ventilation Clearance . . . . . . . . . . . . . . . . . . . . . . . . . . . . . . . . . . . . . . . . . . . . . . . . . . . . . .11
Printer Dimensions . . . . . . . . . . . . . . . . . . . . . . . . . . . . . . . . . . . . . . . . . . . . . . . . . . . . . . . . . . 12
Work Surface . . . . . . . . . . . . . . . . . . . . . . . . . . . . . . . . . . . . . . . . . . . . . . . . . . . . . . . . . . . . . . 12
Security Lock . . . . . . . . . . . . . . . . . . . . . . . . . . . . . . . . . . . . . . . . . . . . . . . . . . . . . . . . . . . . . . 13
Network Connection. . . . . . . . . . . . . . . . . . . . . . . . . . . . . . . . . . . . . . . . . . . . . . . . . . . . . . . .13
Network Security Requirements . . . . . . . . . . . . . . . . . . . . . . . . . . . . . . . . . . . . . . . . . . . . . . . . . 13
Chapter 3: Install the Printer . . . . . . . . . . . . . . . . . . . . . . . . . . . . . . . . . . . . . . . . . . . . . . . . 15
Printer Installation . . . . . . . . . . . . . . . . . . . . . . . . . . . . . . . . . . . . . . . . . . . . . . . . . . . . . . . . . . . . . 16
Use the Bolt-Down Feature. . . . . . . . . . . . . . . . . . . . . . . . . . . . . . . . . . . . . . . . . . . . . . . . . . . . . . 16
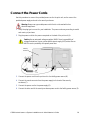
Connect the Power Cords . . . . . . . . . . . . . . . . . . . . . . . . . . . . . . . . . . . . . . . . . . . . . . . . . . . . . . 19
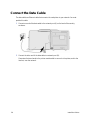
Connect the Data Cable . . . . . . . . . . . . . . . . . . . . . . . . . . . . . . . . . . . . . . . . . . . . . . . . . . . . . . . 20
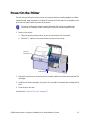
Power On the Printer. . . . . . . . . . . . . . . . . . . . . . . . . . . . . . . . . . . . . . . . . . . . . . . . . . . . . . . . . . . 21
Clean the Print Unit . . . . . . . . . . . . . . . . . . . . . . . . . . . . . . . . . . . . . . . . . . . . . . . . . . . . . . . . . . . . 22
Install the Concealed Output Stacker . . . . . . . . . . . . . . . . . . . . . . . . . . . . . . . . . . . . . . . . . . . . 27
Printer Configuration. . . . . . . . . . . . . . . . . . . . . . . . . . . . . . . . . . . . . . . . . . . . . . . . . . . . . . . . . . . 28
Activate the Printer . . . . . . . . . . . . . . . . . . . . . . . . . . . . . . . . . . . . . . . . . . . . . . . . . . . . . . . . . . . . 29
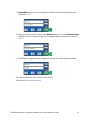
Set or Retrieve the Printer IP Address . . . . . . . . . . . . . . . . . . . . . . . . . . . . . . . . . . . . . . . . . . . . .33
Set a Static Printer IP Address. . . . . . . . . . . . . . . . . . . . . . . . . . . . . . . . . . . . . . . . . . . . . . . . .33
Retrieve the Printer IP Address . . . . . . . . . . . . . . . . . . . . . . . . . . . . . . . . . . . . . . . . . . . . . . . . 38
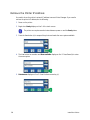
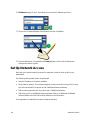
Set Up Network Access . . . . . . . . . . . . . . . . . . . . . . . . . . . . . . . . . . . . . . . . . . . . . . . . . . . . . . . . 40

xii
Verify Network Communication . . . . . . . . . . . . . . . . . . . . . . . . . . . . . . . . . . . . . . . . . . . . . . . . . 41
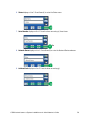
Access Printer Manager . . . . . . . . . . . . . . . . . . . . . . . . . . . . . . . . . . . . . . . . . . . . . . . . . . . . .41
Print a Test Card . . . . . . . . . . . . . . . . . . . . . . . . . . . . . . . . . . . . . . . . . . . . . . . . . . . . . . . . . . . . 42
Additional Setup Tasks. . . . . . . . . . . . . . . . . . . . . . . . . . . . . . . . . . . . . . . . . . . . . . . . . . . . . . . 44
Set Up CardWizard Issuance Software . . . . . . . . . . . . . . . . . . . . . . . . . . . . . . . . . . . . . . . . . . . . 45
Printer Use Guidelines . . . . . . . . . . . . . . . . . . . . . . . . . . . . . . . . . . . . . . . . . . . . . . . . . . . . . . . . . . 45
Chapter 4: Using Printer Manager . . . . . . . . . . . . . . . . . . . . . . . . . . . . . . . . . . . . . . . . . . . 47
Start and Stop Printer Manager . . . . . . . . . . . . . . . . . . . . . . . . . . . . . . . . . . . . . . . . . . . . . . . . . . 48
Printer Manager User Access Levels . . . . . . . . . . . . . . . . . . . . . . . . . . . . . . . . . . . . . . . . . . . 48
WebUser . . . . . . . . . . . . . . . . . . . . . . . . . . . . . . . . . . . . . . . . . . . . . . . . . . . . . . . . . . . . . . . 48
WebAdmin . . . . . . . . . . . . . . . . . . . . . . . . . . . . . . . . . . . . . . . . . . . . . . . . . . . . . . . . . . . . .48
WebService . . . . . . . . . . . . . . . . . . . . . . . . . . . . . . . . . . . . . . . . . . . . . . . . . . . . . . . . . . . . 48
Start Printer Manager. . . . . . . . . . . . . . . . . . . . . . . . . . . . . . . . . . . . . . . . . . . . . . . . . . . . . . . . 48
Stop Printer Manager. . . . . . . . . . . . . . . . . . . . . . . . . . . . . . . . . . . . . . . . . . . . . . . . . . . . . . . . 50
Printer Manager Settings. . . . . . . . . . . . . . . . . . . . . . . . . . . . . . . . . . . . . . . . . . . . . . . . . . . . . . . . 50
Status Menu . . . . . . . . . . . . . . . . . . . . . . . . . . . . . . . . . . . . . . . . . . . . . . . . . . . . . . . . . . . . . . . . . . 51
Printer Setting Menu . . . . . . . . . . . . . . . . . . . . . . . . . . . . . . . . . . . . . . . . . . . . . . . . . . . . . . . . . . . 53
Communication. . . . . . . . . . . . . . . . . . . . . . . . . . . . . . . . . . . . . . . . . . . . . . . . . . . . . . . . . . . . 56
ActivityLog . . . . . . . . . . . . . . . . . . . . . . . . . . . . . . . . . . . . . . . . . . . . . . . . . . . . . . . . . . . . . . . . 57
Behavior . . . . . . . . . . . . . . . . . . . . . . . . . . . . . . . . . . . . . . . . . . . . . . . . . . . . . . . . . . . . . . . . . . 59
Vital Product Data . . . . . . . . . . . . . . . . . . . . . . . . . . . . . . . . . . . . . . . . . . . . . . . . . . . . . . . . . . 61
FrontPanel. . . . . . . . . . . . . . . . . . . . . . . . . . . . . . . . . . . . . . . . . . . . . . . . . . . . . . . . . . . . . . . . . 61
Print . . . . . . . . . . . . . . . . . . . . . . . . . . . . . . . . . . . . . . . . . . . . . . . . . . . . . . . . . . . . . . . . . . . . . . 62
Pick. . . . . . . . . . . . . . . . . . . . . . . . . . . . . . . . . . . . . . . . . . . . . . . . . . . . . . . . . . . . . . . . . . . . . . . 67
MagStripeGeneral . . . . . . . . . . . . . . . . . . . . . . . . . . . . . . . . . . . . . . . . . . . . . . . . . . . . . . . . . . 68
Update Password. . . . . . . . . . . . . . . . . . . . . . . . . . . . . . . . . . . . . . . . . . . . . . . . . . . . . . . . . . . 69
Set Job Queue State . . . . . . . . . . . . . . . . . . . . . . . . . . . . . . . . . . . . . . . . . . . . . . . . . . . . . . . . 69
TroubleShooting Menu . . . . . . . . . . . . . . . . . . . . . . . . . . . . . . . . . . . . . . . . . . . . . . . . . . . . . . . . . 70
Test Card. . . . . . . . . . . . . . . . . . . . . . . . . . . . . . . . . . . . . . . . . . . . . . . . . . . . . . . . . . . . . . . . . . 71
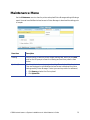
Maintenance Menu. . . . . . . . . . . . . . . . . . . . . . . . . . . . . . . . . . . . . . . . . . . . . . . . . . . . . . . . . . . . 73
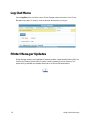
Log Out Menu . . . . . . . . . . . . . . . . . . . . . . . . . . . . . . . . . . . . . . . . . . . . . . . . . . . . . . . . . . . . . . . . 74
Printer Manager Updates . . . . . . . . . . . . . . . . . . . . . . . . . . . . . . . . . . . . . . . . . . . . . . . . . . . . . . . 74
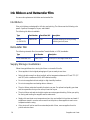
Chapter 5: Supplies and Parts. . . . . . . . . . . . . . . . . . . . . . . . . . . . . . . . . . . . . . . . . . . . . . . 75
Ink Ribbon and Retransfer Film . . . . . . . . . . . . . . . . . . . . . . . . . . . . . . . . . . . . . . . . . . . . . . . . . . 76
Ink Ribbon . . . . . . . . . . . . . . . . . . . . . . . . . . . . . . . . . . . . . . . . . . . . . . . . . . . . . . . . . . . . . . . . . 76
Retransfer Film. . . . . . . . . . . . . . . . . . . . . . . . . . . . . . . . . . . . . . . . . . . . . . . . . . . . . . . . . . . . . . 76
Supply Storage Guidelines . . . . . . . . . . . . . . . . . . . . . . . . . . . . . . . . . . . . . . . . . . . . . . . . . . . 76
Cards . . . . . . . . . . . . . . . . . . . . . . . . . . . . . . . . . . . . . . . . . . . . . . . . . . . . . . . . . . . . . . . . . . . . . . . 77
Card Size. . . . . . . . . . . . . . . . . . . . . . . . . . . . . . . . . . . . . . . . . . . . . . . . . . . . . . . . . . . . . . . . . . 77
Card Material . . . . . . . . . . . . . . . . . . . . . . . . . . . . . . . . . . . . . . . . . . . . . . . . . . . . . . . . . . . . . . 77
Card Handling . . . . . . . . . . . . . . . . . . . . . . . . . . . . . . . . . . . . . . . . . . . . . . . . . . . . . . . . . . . . . 78
Card Storage Guidelines. . . . . . . . . . . . . . . . . . . . . . . . . . . . . . . . . . . . . . . . . . . . . . . . . . . . .78

xiii
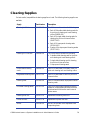
Cleaning Supplies. . . . . . . . . . . . . . . . . . . . . . . . . . . . . . . . . . . . . . . . . . . . . . . . . . . . . . . . . . . . . 79
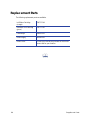
Replacement Parts . . . . . . . . . . . . . . . . . . . . . . . . . . . . . . . . . . . . . . . . . . . . . . . . . . . . . . . . . . . . 80
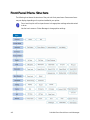
Appendix A: Print Unit Front Panel Menu and Messages . . . . . . . . . . . . . . . . . . . . . . . A-1
Front Panel Menu Structure . . . . . . . . . . . . . . . . . . . . . . . . . . . . . . . . . . . . . . . . . . . . . . . . . . . . A-2
Front Panel Menu Description . . . . . . . . . . . . . . . . . . . . . . . . . . . . . . . . . . . . . . . . . . . . . . . . . .A-3
Appendix B: Printer Specifications . . . . . . . . . . . . . . . . . . . . . . . . . . . . . . . . . . . . . . . . . B-1
Operating Specifications . . . . . . . . . . . . . . . . . . . . . . . . . . . . . . . . . . . . . . . . . . . . . . . . . . . . . . B-2
Operating Environment . . . . . . . . . . . . . . . . . . . . . . . . . . . . . . . . . . . . . . . . . . . . . . . . . . . . . . . B-2
Storage Environment . . . . . . . . . . . . . . . . . . . . . . . . . . . . . . . . . . . . . . . . . . . . . . . . . . . . . . . . . B-3

xiv

CR500 Instant Issuance System Installation and Administrator’s Guide 1
Chapter 1: Introduction
This chapter provides information about this Installation and
Administrator’s Guide, and an introduction to the CR500 card printer.
About This Manual
This manual provides detailed instructions for installing the CR500 card printer and for
performing setup and administration tasks for the card printer. The tasks described in this manual
are not normally performed by the personnel who print cards.
Chapter 1: "Introduction” provides basic information about this manual and the CR500 card
printer.
Chapter 2: "Plan the Installation” provides instructions for unpacking the printer and selecting a
proper installation location.
Chapter 3: "Install the Printer” provides instructions for installing the hardware components,
cables, and power cords of the printer, and for configuring and verifying the network connection
to the printer.
Chapter 4: "Using Printer Manager” provides instructions for using the Printer Manager web
interface to perform management tasks required to configure and operate the card printer.
Chapter 5: "Supplies and Parts” describes the supplies and replacement parts available for the
CR500 printer.
Appendix A: "Print Unit Front Panel Menu and Messages” describes the print unit front panel
menu options.
Appendix B: "Printer Specifications” provides information about operating specifications and the
storage environment for the printer.

2 Introduction
Related Documentation
Refer to the following for more information about the CR500 card printer:
CR500 Instant Issuance System Quick Install Guide provides installation instructions to quickly
set up the printer.
Datacard CR500 Instant Issuance System User’s Guide contains general information about the
card printer, instructions for operating and maintaining the printer, and troubleshooting and
error recovery information.
Datacard CR500 Instant Issuance System User Reference Guide provides easy access to
instructions for using and maintaining the CR500 card printer.
Intended Audience
This manual provides information for:
The site manager responsible for setting up the CR500 printer and the system that uses the
printer.
The technical professionals who set up and maintain card printing for issuance sites.
If You Need Assistance
If you work with an Entrust Datacard-authorized dealer, distributor, or value-added reseller,
contact them for assistance. A value-added reseller provides the CR500 card printer as part of an
overall system.
If any contents of the carton are missing, contact your Entrust Datacard-authorized dealer,
distributor, or reseller. If you purchased your printer directly from Entrust Datacard, contact the
Entrust Datacard Customer Care Center in your region:
Make sure that you have the printer serial number, located on the back of the printer, when you
call.
For Datacard® CardWizard® issuance software support, call 1-800-568-4598.
Americas +1 800.328.3996 or 952.988.2316
Europe, Middle East,
and Africa
+44 1489555627
Asia Pacific +852 2821 0121

CR500 Instant Issuance System Installation and Administrator’s Guide 3
The CR500 Card Printer
The Datacard CR500 card printer uses retransfer printing technology to produce high-quality,
edge-to-edge printing on a variety of PVC and non-PVC card surfaces.
The retransfer printing process uses two types of ribbon: a YMCK-I color ink ribbon and a
retransfer film. The printer uses the ink ribbon to print images on the retransfer film. A heated
roller then transfers the image onto a card. The inhibitor panel on the ribbon removes retransfer
material in areas of the card that have a magnetic stripe, signature panel, hologram, or smart
card chip. The inhibitor panel also is called peel-off, and the ink ribbon can be identified as either
YMCK-I or YMCK-PO.
The printer includes a multi-hopper that can be loaded with three different card types, and an
exception card slide for printing single cards.
The CR500 printer can print on one or both sides of the card. Magnetic stripe capability is
standard, and the printer can be equipped with optional contact and contactless smart card
capabilities.
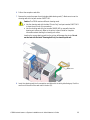
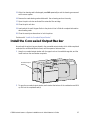
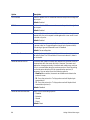
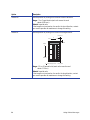
Card Printer Components
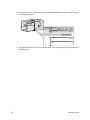
The card printer consists of two connected components:
Print unit: The part of the printer that applies images to cards.
Security enclosure: This locked compartment feeds cards into the print unit. It contains the
multi-hopper, the touch screen, the reject card area, and an exception card slide used to feed
single cards into the printer.
For more detailed information about the CR500 card printer components and operation,
refer to the printer’s User’s Guide.
Print Unit
Security Enclosure

4 Introduction
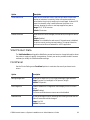
Security Enclosure Touch Screen and Print Unit Front Panel
During day-to-day operation, users interact with the card printer through the security enclosure
touch screen. The touch screen displays printer status, information about the installed supplies,
and system messages. The touch screen also is used to navigate the printer’s menu system. Refer
to the printer’s User’s Guide for complete information about the touch screen menu system.
When the security enclosure door is open, you have access to the print unit front panel. This LCD
screen and buttons are used to perform some CR500 operations, but should not normally be
used by personnel who print cards. Refer to Appendix A: "Print Unit Front Panel Menu and
Messages”.
Printer Door Locks
The security enclosure door has a mechanical lock that can be opened or locked using either of
these methods:
Insert the provided key into the lock and turn to lock or unlock the door.
Use CardWizard Instant Issuance software to electronically unlock the door by entering one
or more user names and passwords.
The physical key should be used only while installing the card printer. After the printer has been
installed, the key should be stored in a secure location. Only users who can provide the proper
authentication are able to unlock the security enclosure door and access the cards.
Caution: The print unit door contains a separate lock mechanism that could be locked
or unlocked using the print unit front panel. Do not use this lock with the CR500 card
printer. Do not use the print unit front panel menu to create a security key and lock the
print unit door.
Security Enclosure
Touch Screen
Print Unit Front Panel
(hidden when the
security enclosure door
is closed)

CR500 Instant Issuance System Installation and Administrator’s Guide 5
CardWizard Issuance Software
The CR500 card printer works with Datacard CardWizard issuance software to create and print
cards. CardWizard software is a centralized application that processes card data and obtains the
needed authorization from the financial system that manages customer accounts.
CardWizard software performs the following functions:
Prepares card data
Links to financial software, so that the cards issued are linked with customer accounts
Manages security, including unlocking the printer’s security enclosure
Refer to the following for more information about using CardWizard software:
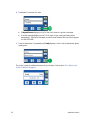
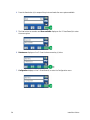
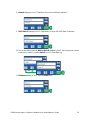
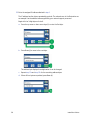
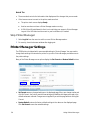
Printer Manager
Printer Manager is a web-based interface that displays information about the card printer and
allows you to manage printer settings and operation. System administrators and service providers
can use Printer Manager to fine-tune card appearance, set advanced options, and troubleshoot
printing problems. You access Printer Manager through your computer’s web browser using the
printer’s IP address.
Refer to Chapter 4: "Using Printer Manager” for detailed instructions on how to access and use
Printer Manager.
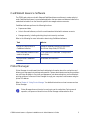
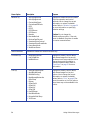
Task Refer to:
Define the CR500 printer to
CardWizard software
Datacard CardWizard Issuance Software and
Card Printer Setup Guide, 527792-001
Use CardWizard software to send
cards to the printer
“Print Cards from CardWizard” in the printer’s
User’s Guide
Set up and use CardWizard
software
CardWizard documentation
Printer Manager does not have to be running to use the card printer. During normal
operation, site personnel should not use Printer Manager unless asked to do so.

6 Introduction
Page is loading ...
Page is loading ...
Page is loading ...
Page is loading ...
Page is loading ...
Page is loading ...
Page is loading ...
Page is loading ...
Page is loading ...
Page is loading ...
Page is loading ...
Page is loading ...
Page is loading ...
Page is loading ...
Page is loading ...
Page is loading ...
Page is loading ...
Page is loading ...
Page is loading ...
Page is loading ...
Page is loading ...
Page is loading ...
Page is loading ...
Page is loading ...
Page is loading ...
Page is loading ...
Page is loading ...
Page is loading ...
Page is loading ...
Page is loading ...
Page is loading ...
Page is loading ...
Page is loading ...
Page is loading ...
Page is loading ...
Page is loading ...
Page is loading ...
Page is loading ...
Page is loading ...
Page is loading ...
Page is loading ...
Page is loading ...
Page is loading ...
Page is loading ...
Page is loading ...
Page is loading ...
Page is loading ...
Page is loading ...
Page is loading ...
Page is loading ...
Page is loading ...
Page is loading ...
Page is loading ...
Page is loading ...
Page is loading ...
Page is loading ...
Page is loading ...
Page is loading ...
Page is loading ...
Page is loading ...
Page is loading ...
Page is loading ...
Page is loading ...
Page is loading ...
Page is loading ...
Page is loading ...
Page is loading ...
Page is loading ...
Page is loading ...
Page is loading ...
Page is loading ...
Page is loading ...
Page is loading ...
Page is loading ...
Page is loading ...
Page is loading ...
Page is loading ...
Page is loading ...
Page is loading ...
Page is loading ...
Page is loading ...
Page is loading ...
Page is loading ...
Page is loading ...
Page is loading ...
Page is loading ...
-
 1
1
-
 2
2
-
 3
3
-
 4
4
-
 5
5
-
 6
6
-
 7
7
-
 8
8
-
 9
9
-
 10
10
-
 11
11
-
 12
12
-
 13
13
-
 14
14
-
 15
15
-
 16
16
-
 17
17
-
 18
18
-
 19
19
-
 20
20
-
 21
21
-
 22
22
-
 23
23
-
 24
24
-
 25
25
-
 26
26
-
 27
27
-
 28
28
-
 29
29
-
 30
30
-
 31
31
-
 32
32
-
 33
33
-
 34
34
-
 35
35
-
 36
36
-
 37
37
-
 38
38
-
 39
39
-
 40
40
-
 41
41
-
 42
42
-
 43
43
-
 44
44
-
 45
45
-
 46
46
-
 47
47
-
 48
48
-
 49
49
-
 50
50
-
 51
51
-
 52
52
-
 53
53
-
 54
54
-
 55
55
-
 56
56
-
 57
57
-
 58
58
-
 59
59
-
 60
60
-
 61
61
-
 62
62
-
 63
63
-
 64
64
-
 65
65
-
 66
66
-
 67
67
-
 68
68
-
 69
69
-
 70
70
-
 71
71
-
 72
72
-
 73
73
-
 74
74
-
 75
75
-
 76
76
-
 77
77
-
 78
78
-
 79
79
-
 80
80
-
 81
81
-
 82
82
-
 83
83
-
 84
84
-
 85
85
-
 86
86
-
 87
87
-
 88
88
-
 89
89
-
 90
90
-
 91
91
-
 92
92
-
 93
93
-
 94
94
-
 95
95
-
 96
96
-
 97
97
-
 98
98
-
 99
99
-
 100
100
-
 101
101
-
 102
102
-
 103
103
-
 104
104
-
 105
105
-
 106
106


DataCard CR500 Installation And Administrator's Manual
- Type
- Installation And Administrator's Manual
Ask a question and I''ll find the answer in the document
Finding information in a document is now easier with AI
Related papers
-
DataCard CP40 User manual
-
-
-
 Datacard Group CP60 User manual
-
-
-
-
-
-
DataCard SP35 Plus Quick Install Manual

Other documents
-
CTA LT-USGT Owner's manual
-
JVC PRIMA401 User manual
-
DNP CX-D80 User manual
-
 Digital Identification Solutions EDIsecure XID 8300 User manual
-
 Magicard Prima 8 User manual
-
 Ultra electronics XID93xx Series User manual
-
 Digital Identification Solutions XID93xx Series User manual
-
-
 Ultra electronic Prima 2e User manual
-


