Page is loading ...

All rights reserved.
Specifications are subject to change without notice.
User Manual

LIMITED WARRANTY
AND LIMITATION OF LIABILITY
Customers enjoy one-year warranty
from the date of purchase.
This warranty does not cover fuses,
disposable batteries, damage from
misuse accident, neglect, alteration,
contamination, or abnormal conditions
of operation or handling, including
failures caused by use outside of the
product's specifications, or normal wear
and tear of mechanical components.

Table of Contents Page
Introduction..........................................................1
Safety Information................................................1
Instrument Overview............................................3
LCD Display...................................................3
Function Buttons............................................5
Rotary Switch.................................................7
Input Terminals..............................................11
Measurements Instruction..................................12
Measure AC/DC Voltage..............................12
Measure AC/DC Current ..............................12
Measure Resistance.....................................13
Test for Continuity........................................14
Test Diodes..................................................14
Measure Capacitance..................................15
Measure Frequency.....................................16
Measure Duty Cycle.....................................16
Measure Temperature .................................17

Square waves output....................................17
Battery measurement...................................17
NCV....................................................18
V.F.C....................................................18
Maintenance.......................................................19
Clean the Product.........................................19
Replace the Batteries...................................19
Replace the Fuses.......................................20
Specifications.....................................................21
General Specifications.................................21
Mechanical Specifications............................21
Environmental Specifications.......................22
Electrical Specifications......................................23

Introduction
This product is a battery-powered, true-rms, auto-
ranging digital multimeter with a 6000 counts
LCD display and a backlight.
Safety Information
To avoid possible electrical shock, fire, or
personal injury, please read all safety information
before you use the product. Please use the
product only as specified, or the protection
supplied by the product can be compromised.
• Examine the case before you use the product.
Look for cracks or missing plastic. Carefully look
at the insulation around the terminals.
• The measurement must be made with correct
input terminals and functions and within the
allowable measuring range.
1

• Do not use the product around explosive gas,
vapor, or in damp or wet environments.
• Keep fingers behind the finger guards on the
probes.
• When the product has already been connected
to the line being measured, do NOT touch the
input terminal that is not in service.
• Disconnect the test leads from the circuit before
changing the mode.
• When the voltage to be measured exceeds 36V
DC or 25V AC, the operator shall be careful
enough to avoid electric shock.
• Misuse of mode or range can lead to hazards,
be cautious. “ ” will be shown on the display
when the input is out of range.
• Low level of a battery will result in incorrect
readings. Change the batteries when battery
level is low. Do not make measurements when
the battery door is not properly placed.
2

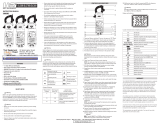
LCD Display
①
Auto range. The product selects
the range with the best resolution
②
Manual range. The user selects
the range.
③
REL
The product measures both
sinusoidal and
nonsinusoidal ac
waveforms accurately.
④
Display freezes present reading
⑤
Display shows maximum reading.
⑥
Diode test.
⑦
Display shows minimum reading.
⑧
Continuity test.
Instrument Overview
3
①
②
③
④
⑤
⑥
⑦
⑧
⑨
⑩
⑪
⑫
⑬
⑭
⑮
⑯
⑰
⑱
⑲
⑳

⑨
V.F.C
Voltage Frequency Converter
⑩
Secondary measurements display
⑪
Duty cycle test.
⑫
Temperature test.
(Fahrenheit or Celsius)
⑬
Frequency
test. (Hertz)
⑭
Temperature test.
(Fahrenheit or Celsius)
⑮
Analog bar graph.
⑯
The product measures both
sinusoidal and
nonsinusoidal ac
waveforms accurately.
⑰
Primary measurement display.
⑱
Low battery. Replace batteries.
⑲
Alternating current.
⑳
Direct current.
Measurement units.
4

5
Function Buttons
①
Selects alternate measurement modes on a
rotary switch setting, including:
1.
Frequency/AC V
2.
Frequency/AC mV
3. DC A/AC A
4. DC mA/AC mA
5. DC
μA/AC μA
6. Square waves output
②
Push once to hold the current reading on the
display; push again to continue normal
operation.
④
⑤
⑥
①
②
③

③
Push
this button once to enter the
manual
range
mode. In manual range mode,
each
push
increases the range; when the
highest
range
is reached, the next push will lead
to
the
lowest range. To exit the manual
range
mode,
Long push for exit.
④
Push this button once to enter the V.F.C
model. Push once more to exit the model.
⑤
Push
this button to enter the relative
mode.
The
product will store the present
reading
as
a reference for subsequent
readings.
The
display is zeroed, and the
stored
reading
is subtracted from all
subsequent
readings
. Push again to exit the
relative
mode
.
Push
this button over 2 seconds, it
will
open
the flashlight, long push again
to
turn
off the flashlight
⑥
Push
to toggle between the MAX and
the
MIN
mode. To exit MAX/MIN mode,
push
the
button for more than 2 seconds
6

Rotary Switch
Turn
off the product at this position.
•
The product automatically
powers
off after 15 minutes of inactivity.
•
The built-in beeper beeps 5
times
1 minute before auto power off.
•
To restart the product from
auto
power off, press the HOLD
button
or turn the rotary switch back
to
the OFF position and then to
a
needed position.
•
To disable the Auto Power
Off
function, hold down the
SELECT
button when turning on
the
product, you will hear five beeps
if
you have successfully
disabled
the function.
7

8
AC V≤750V,
Frequency
V.F.C
DC V
≤1000V
AC V
(mV)≤800.0mV
Frequency (Equal to
)
DC V
(mV)≤800.0mV
Frequency
,Duty cycle:1%~99%。
Resistance
:≤80MΩ。
Capacitance
:≤100mF。
Diode
Continuity
DC A
:≤20A。
AC A
:≤20A。
DC A
:≤800.0mA。
AC A
:≤800.0mA。
DC A
:≤800.0μA。
AC A
:≤800.0μA。
Celsius:
-20~1000, Fahrenheit:-
4~1832

DC V
:≤8V
DC V
:≤80V
DC V
:≤800V
DC V
:≤1000V
AC V
:≤750V
AC V
:≤80V
AC V
:≤8V
Resistance
:≤80MΩ
Resistance
:≤8MΩ
Resistance
:≤800KΩ
Resistance
:≤80KΩ
Resistance
:≤8KΩ
Resistance
:≤800Ω
12V
Battery test
9V
Battery test
1.5V
Battery test
9

Square
waves output 50-5000Hz
Non
-contact Voltage
10

Input Terminals
20A
Input
terminal for AC/DC
current
measurements
to 20A.
Input
terminal for AC/DC
current
measurements
to 800mA.
Input
terminal for battery testing.
COM
Common (return) terminal for all
measurements.
Input
terminal for the measurements of:
1
. AC/DC voltage
2
. Resistance
3
. Capacitance
4
. Frequency
5
. Temperature
6
. Continuity
7
. Diode
8
. Duty cycle
9
. Square waves output
10

Measurements Instruction
Measure AC/DC Voltage
1. Connect the black test lead to the COM
Terminal and the red lead to the Terminal.
2. Turn the rotary switch to each manual range
from 8V~1000V according to the votage you
want to test. Or you can choose the auto-range
for testing the voltage.
3. Touch the probes to the correct test points of
the circuit to measure the voltage.
4. Read the measured voltage on the display.
Measure AC/DC Current
1. Connect the black test lead to the COM
Terminal and the red lead to the mA μA (MAX
current is 800mA)Terminal or the 20A (MAX
current is 20A)Terminal (choose based on the
value of the current to be measured).
11
*Do not measure voltage that exceeds the extremes
as indicated in the Specifications.
*Do not touch high voltage circuit during
measurements.

2. Turn the rotary switch to , ,
according to the signal you want to test.
3. Press SELECT to toggle between AC/DC.
4. Break the circuit path to be measured, connect
the test leads across the break and apply
power.
5. Read the measured current on the display.
Measure Resistance
1. Connect the black test lead to the COM
Terminal and the test lead to the Terminal.
2. Turn the rotary switch to each range from
800Ω~80MΩ, Or you can tuen the rotaty
switch to model.
3. Touch the probes to the desired test points of
the circuit to measure the resistance.
4. Read the measured resistance on the display.
12
*Do not measure current that exceeds the extremes
as indicated in the Specifications.
*Use the 20A Terminal and the Mode when you
are measuring an unknown current. Then switch
to the mA μA Terminal and the Mode or the
Mode if necessary.
*Do not input voltage at this setting.

Test for Continuity
1. Connect the black test lead to the COM
Terminal and the red lead to the Terminal.
2. Turn the rotary switch to .
3. Touch the probes to the desired test points of
the circuit.
4. The built-in beeper will beep when the
resistance is lower than 50Ω, which indicates a
short circuit.
Test Diodes
1. Connect the black test lead to the COM
Terminal and the red lead to the Terminal.
13
*Do not input voltage at this setting.
*Disconnect circuit power and discharge all
capacitors before you test resistance.
*Do not input voltage at this setting.

2. Turn the rotary switch to ,
3. Connect the red probe to the anode side and
the black probe to the cathode side of the
diode being tested.
4. Read the forward bias voltage value on the
display.
5. If the polarity of the test leads is reversed with
diode polarity or the diode is broken, the
display reading shows “ ”.
Measure Capacitance
1. Connect the black test lead to the COM
Terminal and the red lead to the Terminal.
2. Turn the rotary switch to .
3. Connect the red probe to the anode side and
fewwfew
14
*Do not input voltage at this setting.
*Disconnect circuit power and discharge all
capacitors before you test diode.

the black probe to the cathode side of the
capacitor being tested.
4. Read the measured capacitance value on the
display once the reading is stablized.
Measure Frequency
1. Connect the black test lead to the COM
Terminal and the red lead to the Terminal.
2. Turn the rotary switch to (applies to high
frequency with low voltage); or turn the rotary
switch to , press SELECT once to toggle to
the Frequency Mode (applies to low frequency
with high voltage).
3. Touch the probes to the desired test points.
4. Read the measured frequency value on the
display.
15
*Disconnect circuit power and discharge all
capacitors before you test capacitance.
/