Page is loading ...

1000 Elwell Ct. Suite 200
Palo Alto, CA 94303
www.sentinelvision.com
650-964-6200
SafeScout
Users Guide
Version 3.2
By
www.sentinelvision.com
650-964-6200

SafeScout Users Guide Page 1
FCC Regulations
This device complies with Part 15 of the FCC Rules. Operation is
subject to the following two conditions: (1) This device may not
cause harmful interference, and (2) this device must accept any
interference received, including interference that may cause
undesired operation.
NOTE: This equipment has been tested and found to comply with the
limits for a Class B digital device, pursuant to Part 15 of the FCC Rules.
These limits are designed to provide reasonable protection against
harmful interference in a residential installation. This equipment
generates, uses and can radiate radio frequency energy and, if not
installed and used in accordance with the instructions, may cause harmful
interference to radio communications. However, there is no guarantee
that interference will not occur in a particular installation.
If this equipment does cause harmful interference to radio or television
reception, which can be determined by turning the equipment off and on,
the user is encouraged to try to correct the interference by one or more of
the following measures:
-- Reorient or relocate the receiving antenna.
-- Increase the separation between the equipment and receiver.
-- Connect the equipment into an outlet on a circuit different from that to
which the receiver is connected.
-- Consult the dealer or an experienced radio/TV technician for help.
Changes or modifications to the SafeScout unit not expressly
approved by Sentinel Vision may void the user’s authority to operate
the equipment.
SafeScout Users Guide Page 2
Table of Contents
Quick Set-up Guide................................................................4
Detailed Product Instructions & Information……….......9
Your SafeScout Unit……………………………......9
Proper Positioning………………………………....10
Pet Immunity………………………………………12
System Test………..………………………………12
Walk Test……………………………………..…...12
Motion Detection & Detection Area………………13
Dial Out with 8 or 9……………………………….13
Arming & Disarming Your System……………….14
Keypad Operation…………………………………14
Keyfob Operation………………………………….14
Keyfob Battery Replacement Instructions......…….15
Siren……………………………………………….16
Alert, Services & Additional Features…………………..18
General Information……………………………….18
Motion Alert……………………………………….18
Panic Alert…………………………………………19
Entry Notification………………………………….20
Exit Notification…………………………………...20
Professional Monitoring…………………………...21
Remote Access of SafeScout Alert Information…..22
Passcode & Other System Changes……………….22
Sending images and text to a cell phone…………..23
Troubleshooting Guide……..……………………………24
FCC Part 68 Requirements 26
Product Warranty Information…...…………...………..28

SafeScout Users Guide Page 3
Thank you for choosing the SafeScout security and
notification system.
If you have any questions about your system or set up, please consult our
web site at www.sentinelvision.com
, or call 877-873-8800 to speak to
one of our Customer Service representatives. We will be happy to assist
you.
Your SafeScout System
When you open your SafeScout system, you will find the following
items:
1. SafeScout monitoring unit
2. AC charger with 12-foot cord
3. Wireless Siren
4. Extended faceplate screw
5. Male-to-male RJ11 phone cord (14 feet)
6. Three-button keyfob
7. Two back up 9-Volt alkaline batteries
8. SafeScout Quick Installation Guide
9. SafeScout User’s guide
10. Service agreement
11. Self addressed stamped envelope
12. Warning sticker: “Premises Are Under Video & Audio
Survellance”
13. 2 Wall mounting screws and sheetrock anchors
14. Clear wall mounting bracket
SafeScout Users Guide Page 4
Quick Set-Up Guide
You’ll find the installation and set-up instructions for the SafeScout
Monitoring Unit and its notification services listed below. There are five
easy steps to successfully setting up your SafeScout. Setup usually takes
approximately 15 minutes to complete.
Figure A
1. SafeScout Location and Installation
• Install one of the backup 9 volt alkaline batteries into your
SafeScout monitoring unit. Open the battery compartment in the
back of your monitoring unit and connect the battery leads.
Place the battery into the battery holder and close the battery
compartment door. DO NOT attempt to install the battery while
the monitoring unit is plugged into a standard electrical wall
outlet.
• Choose a location to be monitored. It is best to select a location
that is centrally located within your premise (for example: the
main entry or living area). Your SafeScout monitoring unit will
require AC power and a telephone jack located within 12 feet
from the unit. This distance could be increased with power or
telephone extension cords available from your local electronics
retailer. In addition a wireless phone jack system could be used
in conjunction with the SafeScout monitoring unit. Please note
that the SafeScout system and all of its components are only
suitable for indoor use. It is not recommended that the
SafeScout system or any of its components be installed
outdoors. For optimum keyfob range please chose a location as

SafeScout Users Guide Page 5
far away from other electrical equipment such as radios,
televisions and microwaves as possible. In addition do not place
the Monitoring Units antenna on top of or near electrical cords.
• Position or aim the monitoring unit to best view the desired area
of protection, most likely from a corner of the room.
• It is best to select a corner that is near a window; not a corner
facing a window.
• Figure B
• The SafeScout should be at least four (4) feet off the floor but
no higher than seven (7) feet.
• Plug the wall power adaptor into the back of the SafeScout
monitoring unit (see Figure C next page) and plug the other end
into a standard electrical wall outlet that is not connected to a
wall switch. Make sure the antenna located on the back of the
monitoring unit and the wall adaptor cords do not cross. Let the
antenna hang down from the monitoring unit parallel to the
other cords or the antenna can be placed perpendicular to the
floor across a shelf, table, etc.
• Plug the telephone cord into one of the telephone jacks on the
back of the SafeScout (see Figure D next page). Note: You may
connect a separate telephone into the SafeScout by connecting
to the other telephone jack (RJ11) on the back of the SafeScout
monitoring unit.
Apartment
..
..
Apartment
..
..
Good Location
Fair Location
SafeScout Users Guide Page 6
Figure C Figure D
• We suggest that you place the siren in a different room from the
SafeScout system to confuse potential intruders. However, do
not place the siren more than 50 feet away from the SafeScout
monitoring unit.
• Open the battery compartment on the back of the siren with a
Phillips head screwdriver and connect the 9 volt alkaline battery
to the battery terminal located inside the compartment. Replace
and secure the battery compartment cover with a Phillips head
screwdriver. Plug the siren into a standard electrical wall outlet
that is not connected to a wall switch. Never plug the wireless
siren into an electrical extension cord or surge protection power
strip. Secure the siren to the outlet. To do this simply remove
the old center screw (but do not remove the face plate) and plug
the siren into the bottom receptacle. Then take the extended
faceplate screw provided with your SafeScout system and screw
it through the siren, through the faceplate, and into your outlet.
If you need help with this process, please be sure to seek the
assistance of a qualified electrician. Remember to keep the old
screw to replace in the outlet if you move. (See page 16 for
further instructions.)
2. Registration
• (If you do not have a convenient Internet connection available,
you can also register by calling Customer Service at 877-873-
8800.)
• Using an Internet connection, go to our secure web site at
http://www.sentinelvision.com
and click on “New Customer”. If
you have any questions regarding online registration please call
Sentinel Vision Customer Service at 1-877-873-8800.

SafeScout Users Guide Page 7
• Note: The registration process will require you to provide the
unique serial number of your SafeScout monitoring unit,
wireless siren and keyfob. These serial numbers are located on
the back of the corresponding unit. They are also listed on the
side of the box and the SafeScout Quick Installation Guide.
Please note that the person who is registered as the “owner” on
the contact page will have the ultimate authority in making
future changes.
• Please enter the required information to complete the
registration process. Be sure to make note of any passcodes you
have entered.
3. Complete the Service Agreement
• Find the service agreement and the self-addressed envelope in
the SafeScout package.
• Sign at the bottom on the front of the service agreement.
• Place the service agreement in the self addressed stamped
envelope and mail it to Sentinel Vision.
• Your warranty will be extended to a total of two (2) years if
your agreement is received with in 30 days of registration.
4. System Test
• (You MUST register prior to moving to this phase of system
test.)
• The system test requires the telephone line to be free to
communicate.
• Press the grey “Test” button (see Figure A on page 4) on the
back of the SafeScout monitoring unit to force connect to
Sentinel Vision and register your SafeScout. Note: If your
telephone system requires that you dial an 8 or 9 prior to making
a call, refer to “Dial out with 8 or 9” in the detailed product
instruction section on page 14.
• Your SafeScout monitoring unit will announce “Connecting to
Sentinel Vision” and begin to sound a series of beeps. After
approximately 1-3 minutes you will hear, “System is registered”
from the SafeScout monitoring unit, letting you know that your
unit has communicated and received the information and that
you have registered successfully.
SafeScout Users Guide Page 8
5. Using Your System
• Position your system using the view guide at the top of the
SafeScout monitoring unit to find the desired viewing angle.
The SafeScout monitoring unit has a 63-degree angle of view,
which will protect an area up to 40 feet by 40 feet. There is also
a clear U-shaped mounting bracket enclosed if you wish to
angle the SafeScout monitoring unit up or down, mount it to a
wall, ceiling or under a kitchen cabinet.
• There are two methods by which you can arm and disarm your
system: Either use the keypad on top of the SafeScout
monitoring unit or use the remote keyfob. To arm your system,
simply enter your code, followed by the # key (for example,
enter “1234#”) or press and hold the “arm” (lock closed) button
on the keyfob. Once the SafeScout is armed, you will hear,
“System is arming” from the SafeScout monitoring unit. You
will also hear a series of beeps from the wireless remote siren.
This “exit delay” will allow you 30 seconds to leave the
protected area. If you move in the protected area after the exit
delay beeps have stopped you will cause the SafeScout to trip
and send an alert.
• If you re-enter the protected area and your SafeScout is armed,
you will hear your remote siren beeping during the SafeScout’s
30-second entry delay time. To disarm your system, enter your
passcode followed by the # key. For example, enter “1234#” or
press the “disarm” (lock open) button on your keyfob. The siren
should stop sounding when you disarm the system. If the siren
does not stop beeping, try entering your passcode followed by
the # key a second time. Once the system is disarmed, the
SafeScout monitoring unit will state, “System is disarmed.”
• If you do not enter your passcode to disarm your system within
the 30 second entry delay, the SafeScout will initiate an alert
and the wireless siren will start sounding loudly for
approximately five minutes.
• You can always disarm your system at any time by entering in
your passcode or using the remote keyfob.

SafeScout Users Guide Page 9
• Detailed Product Instructions and
Information
Figure E
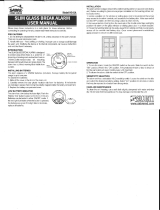
Your SafeScout Unit
The SafeScout is a sophisticated monitor that includes a PIR motion
detector, digital imager, microphone, memory and modem. When the unit
detects motion, images and sound are captured. The unit dials out on
your existing telephone line and sends the images and sound to the
Sentinel Vision automated control center. From there, the alert and
images and/or sound (as predetermined by the owner who registered the
system) are sent to the owner’s selected contacts.
The SafeScout monitoring unit and wireless siren have 9-volt alkaline
backup batteries in case of a power outage. These batteries will last for
approximately thirty minutes depending on use and available battery
capacity. If the battery in the SafeScout monitoring unit dies, it will wait
until the power comes back on, and then return to the state it was in prior
to the loss of power. For example, if the system was armed when the
power outage occurred, the system will be armed when power is restored.
It is recommended that these back up batteries be replaced once every 6
months or following any power outages.
Apartment
..
..
Control
Central
Tel Co.
Digital Images & Sound
+
Jun 26, 2003 / 9:34 PM
POLICEPOLICE
Professional
Monitoring
Jun 26, 2003 / 9:34 PM
Jun 26, 2003 / 9:34 PM
Aug 23, 200 4 / 9:34 P M
Sentinel Vision
Alert… Jun 26,
Sentinel Vision
Alert… Aug 6,
Jun 26, 2003 / 9:34 PM
Sentinel
Vision
SV-One
1 The user arms the system,
and leaves the premise
2 An individual enters the area
3 The wireless siren activates, and recorded images
and sound are sent to Control Central
4 Control Central calls and sends email to
whoever the owner has designated
SafeScout Users Guide Page 10
We recommend that you test the battery located in your SafeScout
monitoring unit once a month. This can be done by unplugging the AC
charger cord from the back of the SafeScout monitoring unit while the
unit is in the disarmed state. Once the cord has been removed use the
keypad or your keyfob to arm the unit. If the unit will not arm it is
recommended that the 9 volt alkaline battery be replaced. Once the test is
complete reconnect the AC charger cord to the back of the SafeScout
monitoring unit.
The SafeScout system does not record images or sound unless it is
armed. In this way, it is similar to a digital camera sitting on a desk--it
requires an action to activate. The SafeScout monitoring unit is equipped
with a privacy door, which can be moved into place to cover the lens and
microphone when you are home, if you do not wish images or sound to
be recorded.
The system is user-friendly, delivering reliable information that allows
you to make informed decisions.
Proper Positioning
We highly recommend that you give special attention to the proper
positioning of your SafeScout monitoring unit to maximize the protection
area. Place the unit at a height at least Four (4) feet from the floor and on
the edge of a flat surface. Placing the SafeScout monitoring unit back
from the edge of your chosen location will reduce its coverage area. You
can set the position of the SafeScout to protect the desired area by using
the view guide on top of the SafeScout monitoring unit. (See the walk
test section on page 12 for additional testing tips.)
The SafeScout system comes with a clear U-shaped mounting bracket to
allow flexibility in location and a vertical angle of view. With this
bracket, you can position the SafeScout monitoring unit 360 degrees
looking down or up as needed. This bracket also makes it easy to mount
your SafeScout monitoring unit to a wall or under a cabinet. It could also
be mounted to the ceiling in the corner of a room.

SafeScout Users Guide Page 11
U-shaped bracket SafeScout in U-shaped bracket
You can also mount your SafeScout monitoring unit using an optional
corner bracket that you can buy from Sentinel Vision to position it in the
corner of a room. Combine the U-shaped bracket with the corner bracket
(available from Sentinel Vision) to position your SafeScout correctly.
(See below.)
Corner bracket mounted on wall
U-shaped bracket mounted SafeScout mounted with
on corner bracket u-shaped and corner
brackets
The SafeScout system comes with a 14-foot male-to-male RJ11
telephone connection cord. This meets the location needs of most
installations. If you require a longer telephone connection cord to your
SafeScout, you can purchase a phone extension cord at most electronic or
home improvement stores.
SafeScout Users Guide Page 12
Pet Immunity
The SafeScout system has a pet immunity technology that does not
recognize pets smaller than 30 lbs. For this feature to work properly, your
SafeScout monitoring unit must be placed at a height of five (5) feet from
the ground on a level surface. Position your SafeScout in a location that
pets cannot jump on or up next to. (A small cat can look big when it sits
directly in front of a camera.)
Test this with your pet in the walk test mode. If your pet trips the system,
it is best to find a different location for the SafeScout monitoring unit so
your pet will not trip the SafeScout system when it is armed.
System Test
You can test your system and the related communications at any time by
simply pushing the test button on the back of your SafeScout monitoring
unit. The SafeScout system will conduct a test by capturing one image,
recording sound and sending the test alert only to the registered owner.
For maintenance purposes and to ensure your SafeScout system is
functioning properly it is recommended that a system test be conducted
once a month.
Walk Test
The SafeScout system has a walk test feature, which allows a user to test
the protection area by walking through the area to determine the precise
detection zone. To enable this feature, the SafeScout monitoring unit
must be plugged in and disarmed. Enter this sequence on the SafeScout
monitoring unit keypad: “92558*” (this sequence must be entered only
on the SafeScout monitoring unit keypad for this feature to work).
This walk test feature will last a maximum of 10 minutes. During this
time, as you walk through the detection area, the monitoring unit will
sound four (4) beeps within approximately one half second of detection
each time the motion detector is tripped. As you walk test, stop for five
(5) seconds after each beep so your SafeScout system has time to reset.
To disable the walk test mode, just enter the code again (92558*). Your
SafeScout system will immediately transition back to its disarmed state.

SafeScout Users Guide Page 13
If the walk test code is not entered, the SafeScout system will
automatically transition back to the disarm state after ten (10) minutes.
For maintenance purposes and to ensure your SafeScout system is
functioning properly it is recommended that a walk test be conducted
once a month.
Motion Detection and Detection Area
The SafeScout system has a sophisticated passive infrared detector to
detect motion. This detector looks for infrared energy emitted by people
and animals. This is the same technology that is used in most high tech
security applications and systems.
The SafeScout system can detect motion in an area as large as 40 feet by
40 feet. For maximum detection, your SafeScout must be mounted at
height between 5 feet and 7.5 feet from the floor. At 4 feet, the detection
area may be reduced to approximately 30 feet by 30 feet, depending on
environmental conditions.
It is important to note that certain environmental conditions
could result in false alarms and/or impaired operation of
your alarm system. The most common examples are light
dimmers, fluorescent lights, TV or computer CRT displays
and any piece of electrical equipment using a switching
power supply or "clock" oscillator (computers and other
digital devices).
Dial Out with 8 or 9
Some office and hotel telephone systems require you to dial an 8 or 9
prior to calling an outside line. Since your SafeScout system must send
Å
40 feet
Æ
63 Degrees
Monitoring Unit
Area of Coverage
SafeScout Users Guide Page 14
calls out to communicate and send alerts, you must program the system
to allow for this.
To program your SafeScout system to dial an 8 or 9 prior to making
calls, please complete whichever of the following steps is appropriate:
a) Type “23338*” into the SafeScout monitoring unit keypad to
add an 8 and a two-second pause in front of the number that is
dialed out.
b) Type “23339*” into the SafeScout monitoring unit keypad to
add a 9 and two-second pause in front of the number that is
dialed out.
To remove the dial out 8 or 9 request, simply type “23330*” into the
SafeScout monitoring unit keypad.
Arming and Disarming Your System
Your SafeScout system may be armed and disarmed using either of the
following two methods:
1. Enter your passcode on the keypad at the top of the SafeScout
monitoring unit.
2. Press and hold the Arm or Disarm button on the remote keyfob
for up to 5 seconds.
Keypad Operation
To use the keypad on top of the SafeScout monitoring unit to arm or
disarm your system, simply type your passcode and the # key (for
example: “1,2,3,4,#”). Your passcode will arm a disarmed system or
disarm an armed system.
Keyfob Operation
The remote keyfob allows you to arm or disarm your SafeScout system at
the touch of a button. Most car alarms use the same type of technology.
To operate the Arm or Disarm features on the keyfob, simply press and
hold the Arm or Disarm button for up to five (5) seconds. You will hear
a verbal acknowledgement that the system is arming or is disarmed.

SafeScout Users Guide Page 15
The keyfob also has a panic button. To use this panic button, simply
press and hold down for approximately one (1) second.
One remote keyfob is included with your SafeScout system and a
maximum of 6 keyfobs can be used with your SafeScout system. If you
would like more keyfobs, they are available through Sentinel Vision. For
ordering information please call our toll-free number 877-873-8800.
SafeScout keyfob
It should be noted that interference from environmental conditions such
as but not limited to florescent lighting, fish tank pumps and radio waves
could reduce the distance at which the keyfob will operate the SafeScout
monitoring unit. For optimum performance it is best to have a clear line
of sight from the keyfob to the monitoring unit with no obstructions.
Keyfob Battery Replacement Instructions
It is recommended that the battery located within the keyfob be replaced
at least once a year. To do so use a small Phillips head screwdriver to
loosen the two screws located on the back of the keyfob. Remove the
back casing cover and using a non-metallic tool (examples: a plastic pen
cap; small piece of cardboard) slide the battery out of the battery clip.
Slide the replacement battery firmly in place using your finger, replace
the back casing cover and tighten the screws securing the back casing
cover of the keyfob. Please use a Panasonic CR2032 3V Lithium,
Duracell DL2032 or equivalent
WARNING: Make sure the new battery has the same orientation as the
old battery, the plus “+” side facing up, the same side of the keyfob PCB
as the three buttons. Failure to do so could destroy your keyfob
SafeScout Users Guide Page 16
Inside of keyfob using pen cap to remove battery
Siren
The SafeScout system includes a wireless siren. The SafeScout
monitoring unit communicates to the siren using standard wireless RF
(radio frequency) technology. This means you can install the siren in a
remote location away from the SafeScout monitoring unit. The delay
(soft) and alarm (loud) sounds come from the siren, not from the
SafeScout monitoring unit.
To install the siren, first open the battery compartment on the back of the
siren using a small Phillips head screwdriver (not included). Connect a 9
volt battery to the back-up battery terminals. Close the battery
compartment and screw back in the screw. Then simply plug the siren
into any standard electrical wall outlet. We have designed the siren to be
mounted on the lower half of an outlet so you can still use the other half
of the electrical receptacle. The siren should be placed no further than 50
feet from the SafeScout unit. Never connect the wireless siren to an
electrical extension cord or surge protector strip.
Use the extended faceplate screw provided to fasten the siren to your
outlet instead. Simply remove the center screw from the faceplate of the
wall outlet. Be careful to leave the faceplate in the same position. Plug
the siren into the lower outlet, then use the long screw provided with
your SafeScout to screw the siren into the wall outlet. Be careful not to
tighten the screw too tightly. (We recommend that you keep the old
screw in case you move.) If you need help with this process, please seek
help from a qualified electrician.

SafeScout Users Guide Page 17
Remove center screw Screw siren into wall outlet
The wireless siren has a backup 9-volt alkaline battery in case of power
failure. This battery and the backup battery of the SafeScout monitoring
unit should be changed every six (6) months and also following a power
outage.
Warning: Never attempt to replace the 9-Volt alkaline back up
batteries while the SafeScout monitoring unit or wireless siren is
connected to a standard US electrical outlet. Attempting to do so
could result in serious injury.
SafeScout Users Guide Page 18
Alerts, Services and Additional Features
All services require a signed service agreement, which may be faxed to
650-964-6205 or mailed to Sentinel Vision Inc. The mailing address is
printed on the back of the user guide.
General Information
As with traditional alarm systems, all transmission of alerts requires the
use of a telephone line. Most communications are sent just a few times a
month and are completed in two to three minutes. As a result, your
SafeScout system does NOT need a dedicated phone line, and will share
the line with other phones. Interruption of this communication can delay
proper notification and available information.
All alerts are date- and time-stamped at the time of occurrence. Each alert
will be available to review at www.sentinelvision.com
on your user page
for 30 days.
Motion Alert
Once a motion is detected within the detection zone while the SafeScout
Monitoring Unit is armed, the SafeScout wireless siren will sound the
soft delay. This will provide time for an authorized user to disarm the
SafeScout system.
During this time, the SafeScout monitoring unit is capturing images and
recording sound and storing them in case the system is not disarmed. If
the system is disarmed, the image and sound memory is erased and no
alerts are sent out.
If the system is not disarmed, the siren will sound loudly after 30 seconds
to indicate that the system has been tripped. The SafeScout system will
call the Sentinel Vision automated control center and download the
recorded images and sound. An alert message is sent, along with images
and sound, to the primary and secondary contacts. (The owner selects
whether images, sound, or both are sent with an alert to a specific
contact. The owner also selects the primary and secondary contacts.) Up
to five (5) images and 20 seconds of sound are available per alert to each
contact. The images are captured at the time the SafeScout system is

SafeScout Users Guide Page 19
tripped, and four additional images are captured after the trip. The sound
records a few seconds prior to and the balance after the trip.
The alert sent to a telephone contact will have provisions for obtaining
additional information and responses through the Sentinel Vision
interactive voice response system. One such feature allows you to listen
to the alert sound track. You may also cancel the alarm during this call
from any touch tone phone.
Register for Sentinel Vision services at www.sentinelvision.com
or call
Customer Service at 877-873-8800.
This feature is included as part of the Automated notification service
package.
Panic Alert
The panic alert is designed to call for help in any situation where you feel
threatened or require help. Your red panic button is located on the
SafeScout keyfob.
Using the panic button is easy: Simply press and hold down the red panic
key on the keyfob for one second. (Holding the panic button down
prevents accidental activation.) If you press the panic button by mistake,
simply press and hold the disarm button to turn the siren off and disarm
the system.
When you send a panic alert, SafeScout system will immediately activate
the siren and call for help. Our panic notification service will send a
panic alert plus one (1) image and up to 20 seconds of recorded sound to
the people whom you have selected as emergency contacts.
The panic button works up to 50 feet from the SafeScout monitoring unit
in a typical wood and sheetrock premise and provides peace of mind that
you can summon help from your selected contacts in any situation at any
time.
We recommend that you use the panic alert service in conjunction with
the professional monitoring service. (See Professional Monitoring
Service section on page 20.)
SafeScout Users Guide Page 20
The panic alert feature is part of the automated notification service
package. The professional monitoring feature requires an additional,
nominal service fee.
Entry Notification
This service notifies you when someone enters your home or business
and disarms your SafeScout system. This is perfect for children arriving
home when a parent is not there to greet them. The Entry Notification
service will send a notification with up to three (3) images and 20
seconds of recorded sound when your child enters the home and disarms
the SafeScout. Now you can know that your child is home safely.
This service is also ideal for businesses. With Entry Notification, you
will know that an employee opened your business on time, and you will
be notified anytime an employee enters the business and disarms the
system.
You can register for this or any optional service on our web site at
www.sentinelvision.com
or by calling Customer Service at 877-873-
8800.
This feature requires a nominal monthly service fee.
Exit Notification
Exit notification will let you know when someone arms your SafeScout
system and leaves the premises. This type of arming is like a standard
arming. Exit Notification is a perfect solution for families and small
businesses since it will notify you when someone has left your home or
business. You can also be sure that your system is armed and your
valuables protected.
The Exit Notification service will send a notification with up to three (3)
images and 20 seconds of recorded sound when someone arms your
SafeScout and leaves the protected area.
This feature requires a nominal monthly service fee.

SafeScout Users Guide Page 21
Professional Monitoring
Professional monitoring will take the worry out of watching your home
or business. Once an intrusion or panic alert is detected, images and
sound will be sent to a professional alarm monitoring center in addition
to your pre-selected contacts. You can choose whether the alert
information is sent on a primary (immediately) or secondary (two minute
delay) basis. (Some customers prefer to have the opportunity to cancel an
alert prior to the interaction of professional monitoring center in the case
of a false alarm.)
This professional monitoring center monitors thousands of alarm systems
every day, 24 hours a day, 365 days a year. The alarm monitoring facility
is Underwriters Laboratory Listed, and operators go through weeks of
rigorous training.
Sentinel Vision is unique in that we offer this monitoring service by the
month or year so you can choose when you need the service the most. If
you are traveling and unable to respond, the monitoring center can handle
an emergency while you are away. Another unique Sentinel Vision
feature is that you, the customer, can have the alert come to you before it
is sent to the monitoring center. This means that you can also cancel an
alert prior to police dispatch in the event of a false alarm. After signing
up for this service, you will be able to contact the professional
monitoring center professionals directly.
Please note: If you have professional monitoring from
any alarm company, the police may be dispatched to
your home or business by the professional monitoring
center. You may need an alarm license or permit. Some
cities require the alarm subscriber to file for a city police
permit. Some permits require an annual fee and in some
cities permits are free. Annual fees rarely exceed 30
dollars for the entire year. If you have the professional
monitoring option or if you believe the police will be
dispatched to your home, we recommend you telephone
your city clerks office or local police department (do not
use 911), to inquire about governing rules regarding
police permits for alarm systems in your area.
SafeScout Users Guide Page 22
This feature requires a nominal monthly service fee.
You can select the Professional Monitoring option during registration or
on the user modification page of the www.sentinelvision.com
web site.
Remote Access of SafeScout Alert Information
You can access current and previous alert information from your user
alert page at www.sentinelvision.com
. Alert information is available on
your user page for 30 days from the date of the alert.
If you are disconnected during a current alert telephone transmission, you
can re-access your alert call and information by calling our toll-free
number at 888-786-6843 (888-SVNotify). An interactive voice response
system will guide you through the process. We do require personal
information for your privacy protection.
Passcode and Other System Changes
You can make changes such as passcodes and contacts in your user
section at www.sentinelvision.com
. Go to the registered user section and
enter your user name and passcode. Then you can navigate to make a
change to your passcode, contacts, or other settings.
Note: If you make a passcode change, you must press the test button on
the back of the SafeScout monitoring unit so your system can
communicate with the Sentinel Vision services to download your new
settings. Any changes made at www.sentinelvision.com
will not be
recognized by the SafeScout system unless this step is completed.

SafeScout Users Guide Page 23
Sending images and text to a cell phone
Sentinel Vision uses SMS (commonly referred to as Text
Messaging) and MMS (commonly referred to as Picture
Messaging) services from cellular carriers to send text, text and
image messages to cellular phones. These messages may come
in 10 seconds or a few minutes. Sentinel Vision cannot
guarantee the speed or reliability of these messing services
provided by the cellular carriers.
Please be aware, that the
cellular carrier's MMS gateway may limit the number of
images that can be attached to an alert email.
In order to receive text and picture messaging to a cell phone, a
special email that has your cellular phone number embedded in
its email would need to be added as a Sentinel Vision contact's
email address. This can be done in the settings modification
page for registered users at www.sentinelvision.com. Please
contact your cellular
phone carrier for the proper email addressing or refer to the
customer support page at www.sentinelvision.com for a list of
carriers and their contact information.
Below you will find a current listing of SMS and MMS email
addresses by carrier as of the time of printing of this users
guide. All addresses should be preceded by your cellular phone
number (example [email protected]):
Cell Carrier SMS Email Address MMS Email Address
ALLTEL @message.alltel.com N/A
AT&T Wireless @mobile.att.net @mmode.com
Cingular @mobile.mycingular.com @mms.mycingular.com
MetroPCS @mymetroPCS.com @mymetroPCS.com
Nextel @messaging.nextel.com N/A
Sprint
@messaging.sprintpcs.com @pm.sprint.com
T-Mobile @tmomail.net @tmomail.net
Verizon
@vtext.com @vzwpix.com
SafeScout Users Guide Page 24
Troubleshooting Guide
Problem Solution
SafeScout monitoring unit will not
force connect.
SafeScout system will not arm or
disarm.
SafeScout system is not working.
____________________________
SafeScout is registered, but will
not communicate.
New passcode does not work.
Did you register your system? Your system
must be registered at
www.sentinelvision.com. Check to make
sure you have the correct serial number
registered.
Check to make sure the AC power cord is
attached to the SafeScout monitoring unit
and plugged in correctly at the power outlet.
Check the power outlet with a lamp or
another appliance to make sure it is working
correctly. Be sure that the outlet you are
using is not controlled by a light switch.
Check the telephone cord and connection.
Telephone line must be free to use.
____________________________________
Check the telephone cord and connection.
The telephone line must be free and
available for the SafeScout to use to dial out.
See passcode change section of the User
Guide and make sure you have pressed the
test button on the back of the SafeScout
monitoring unit to download new passcodes
to your system.
Siren does not sound.
Check to make sure that the siren is plugged
in correctly to a working AC outlet. If the
siren has been inadvertently removed, secure
it with the extended faceplate screw
provided with your SafeScout system. See
Siren section in user guide.
Make sure the siren is within 50 feet of the
Monitoring Unit.

SafeScout Users Guide Page 25
The delay sound is too soft and
hard to hear.
Verify on the registration page that your
siren serial number is registered and correct.
The serial number must be registered
accurately for your siren to operate.
The siren may be located too far from the
SafeScout monitoring unit, or other
environmental conditions may be restricting
the RF signal. Move siren to a closer
location and test.
Move to a location closer to your entry/exit
area.
Keyfob does not work. You must register the keyfob serial number
with the corresponding user.
Replace keyfob’s battery. Panasonic
CR2032 3V Lithium, Duracell DL2032 or
equivalent.
Images are not clear or are too
dark.
Check to make sure that the privacy door is
open. Also check to be sure that the imager
(camera) view is not obstructed.
Test with additional lighting.
Sound recording is not clear or
cannot be heard.
Emails sent from Sentinel Vision
are not in my inbox.
Make sure the privacy door is open. Also
check that the microphone is not obstructed.
Move the SafeScout monitoring unit closer
to the protection area.
If you are listening to the sound on a
computer, try increasing the volume on the
software that plays sound files on your
computer.
Change the junk mail filter settings on your
email account and add
[email protected] as an approved
sender.

SafeScout Users Guide Page 26
FCC CFR 47, PART 68 ACTA TIA 968-A
REQUIREMENTS
1. This equipment complies with 47 CFR, Part 68 of the rules. On the
bottom side of this equipment is a label that contains, among other
information, the certification number and ringer equivalence number
(REN) for this equipment. If requested, this information must be
provided to the telephone company.
2. This equipment contains two RJ-11C phone jacks. The Facility
Interface Code (FIC), indicated by ‘02LS2’ is used to identify the type of
interface that the terminal equipment requires for compatible
interconnection with wire-line connection facilities. The Service Order
Code (SOC), indicated by ‘9.0Y’ is used to identify the type of analog
transmission services provided to the user.
3. A compliant telephone cord and modular plug is provided with
equipment. This equipment is designated to be connected to the
telephone network or premises wiring using a compatible modular jack
which is Part 68 compliant. See Installation Instructions for details.
4. If the terminal equipment SafeScout SVI-MU-100 causes harm to the
telephone network, the telephone company will notify you in advance
that temporary discontinuance of service may be required. But if advance
notice is not practical, the telephone company will notify the customer as
soon as possible. Also, you will be advised of your right to file a
complaint with the FCC if you believe it is necessary.
5. The telephone company may make changes in its facilities, equipment,
operations or procedures that could affect the operation of the equipment.
If this happens the telephone company will provide advance notice in
order for you to make necessary modifications to maintain uninterrupted
service.
6. If trouble is experienced with this equipment SafeScout SVI-MU-100,
for repairs or warranty information, please contact Sentinel Vision at
877-873-8800. If the equipment is causing harm to the telephone
network, the telephone company may request that you disconnect the
equipment until the problem is resolved.
7. The SafeScout SVI-MU-100 has no user-serviceable parts.
8. This equipment cannot be used on public coin phone service provided
by the telephone company. Connection to party line service is subject to
state tariffs. (Contact the state public utility commission, public service
commission or corporation commission for information.)
SafeScout Users Guide Page 27
Product Warranty Information
One (1) Year Limited Product Warranty
Sentinel Vision, Inc. warrants to the original purchaser of this product
that it will be free from defects in material and workmanship for a period
of one (1) year from the date of original purchase, under normal use and
service. Sentinel Vision’s obligation will be limited to, at Sentinel
Vision’s option, repairing or replacing, free of charge for parts, labor, or
transportation, any product failing such warranty. Sentinel Vision shall
have no obligation under this warranty or otherwise if the product is
altered, repaired or serviced by anyone other than Sentinel Vision or an
authorized Sentinel Vision repair facility. In case of defect, please
contact Sentinel Vision.
This one (1) year limited warranty is given in lieu of all other
warranties or conditions whether express or implied. THERE ARE
NO EXPRESS WARRANTIES OTHER THAN THOSE STATED
HERE. ANY IMPLIED WARRANTIES OF MERCHANTABILITY OR
FITNESS FOR A PARTICULAR PURPOSE ARE LIMITED TO THE
DURATION OF THE EXPRESS WARRANTY. ALL OTHER
EXPRESS OR IMPLIED CONDITIONS, REPRESENTATIONS AND
WARRANTIES, INCLUDING ANY IMPLIED WARRANTY OF
NON-INFRINGEMENT, ARE DISCLAIMED. ANY ACTION FOR
BREACH OF ANY WARRANTY MUST BE BROUGHT WITHIN
ONE (1) YEAR FROM THE DATE OF PURCHASE. IN NO CASE
SHALL SENTINEL VISION BE LIABLE TO ANYONE IN
CONNECTION WITH THE FUNCTIONING, MALFUNCTIONING
OR FAILURE OF THIS PRODUCT FOR ANY CONSEQUENTIAL
OR INCIDENTAL DAMAGES WHETHER FOR BREACH OF THIS
OR ANY OTHER WARRANTY, EXPRESSED OR IMPLIED, OR
FOR ANY OTHER BASIS OF LIABILITY WHATSOEVER, EVEN IF
THE LOSS OR DAMAGE IS CAUSED BY SENTINEL VISION’S
OWN NEGLIGENCE OR FAULT. Some states do not allow limitations
on how long an implied warranty lasts or the exclusion or limitation of
incidental or consequential damages, so the above limitations or
exclusions may not apply to you.
Sentinel Vision makes no representation or warranty that the product
cannot be compromised or circumvented; that the product will prevent
any personal injury or property loss by burglary, robbery, fire or
otherwise; or that the product will provide adequate warning or

SafeScout Users Guide Page 28
protection. Features of the product may be triggered in the case of
burglary, robbery, fire or other events, but the product cannot prevent,
nor is there any guarantee or warranty that the product will succeed in
preventing any such occurrence or that it will limit or prevent any
resulting personal injury or property loss. CONSEQUENTLY,
SENTINEL VISION SHALL HAVE NO LIABILITY FOR ANY
PERSONAL INJURY, PROPERTY DAMAGE OR OTHER LOSS
BASED ON A CLAIM THAT THE PRODUCT DID NOT PROVIDE
SUFFICIENT WARNING OR PROTECTION, DID NOT PERFORM
AS ADVERTISED, DESCRIBED OR EXPECTED, DID NOT
ADEQUATELY CAPTURE ANY INPUT OR TRANSMIT ANY
SIGNAL OR DID NOT GIVE ANY VISUAL OR AURAL WARNING
OR THAT THE PRODUCT MALFUNCTIONED OR FAILED.
HOWEVER, IF SENTINEL VISION IS HELD LIABLE, WHETHER
DIRECTLY OR INDIRECTLY, FOR ANY LOSS OR DAMAGE
ARISING UNDER THE LIMITED WARRANTY OR OTHERWISE,
REGARDLESS OF CAUSE OR ORIGIN OF SUCH LIABILITY,
SENTINEL VISION’S MAXIMUM LIABILITY SHALL NOT IN ANY
CASE EXCEED THE PURCHASE PRICE OF THE PRODUCT,
WHICH SHALL BE THE COMPLETE AND EXCLUSIVE REMEDY
AGAINST SENTINEL VISION. This warranty gives you specific legal
rights, and you may also have other rights which vary from state to state.
No increase or alteration, to this warranty is authorized unless provided
in writing by Sentinel Vision.
For further assistance, please call Customer Service toll-free at 877-873-
8800.
Thank you, and enjoy your SafeScout!
SafeScout Users Guide Page 29
/