Page is loading ...

1
MLS 100 A • User Guide
About this Manual
This manual contains information about the Extron MLS 100 A Switcher
and on how to install, set up, and operate it.
About the MLS 100 A Switcher
The Extron MLS 100 A Switcher is a compact, quarter rack width switcher.
The MLS 100 A features four selectable audio inputs, and one Aux/Mix
input that is always active and can be mixed with any and all of the four
selectable audio inputs.
Front panel buttons, an RS-232-based control system, or an Extron
MediaLink
™
Controller (MLC) can be used for input selection.
Features
• Furniture, rack, and projector mountability — MLS 100 A Switcher can be mounted under a desk or other furniture, or
mounted on a projector lift with optional brackets. Alternatively, they can be rack mounted on an optional rack shelf.
• Stereo audio input and output — Unbalanced stereo audio inputs can be output as balanced or unbalanced stereo audio,
and the audio output level can be adjusted.
• Mono auxiliary/mix audio input — The Aux/Mix port on each switcher lets you mix a mono, line level audio input signal with
that of one of the four selectable stereo audio inputs.
UL/Safety Requirements
The Underwriters Laboratories (UL) requirements listed below pertain to the safe installation and operation of the switcher.
1. This unit is not to be connected to a centralized DC power source or used beyond its rated voltage range.
NOTE: The Extron P/S 100 and other Extron power supplies may be used with the MLS.
2. Do not use the switcher near water.
CAUTION: To reduce the risk of fire or electric shock, do not expose this apparatus to rain or moisture.
ATTENTION : Afin de réduire les risques d’incendie ou de choc électrique, protégez cet appareil de la pluie ou de
l’humidité.
3. Clean the switcher only with a dry cloth.
4. Do not install the switcher near any heat source, such as a radiator, heat register, stove, or another apparatus (including
ampliers) that produces heat.
5. Unplug the switcher during lightning storms or when it will be unused for long periods.
6. This unit must be installed in accordance with the National Electrical Code.
Mounting the Switchers
The one rack unit high, quarter rack width switchers can be set on a table, mounted on a rack shelf, mounted under a desk or
tabletop, or mounted on a projector bracket. Go to www.extron.com to see optional mounting accessories.

2
MLS 100 A • User Guide (Continued)
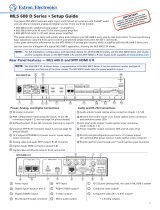
Rear Panel Features and Cabling
Turn off and disconnect power from all the equipment before you connect cables to the
MLS.
Audio Connections
1
Audio Inputs — Each of these 3-pole, 3.5 mm captive screw connectors accepts one unbalanced stereo or mono audio
input. Wire each captive screw connector as shown in figure 1, depending on the input type.
Connect two RCA-style (tip-ring) connectors to the other end of each audio input cable as shown in gure 2.
LR
Audio Input Wiring
(unbalanced, stereo)
Aux/Mix Input Wiring
(balanced/unbalanced, mono)
AUX
/
MIX
MONO
LR
Audio Input Wiring
(unbalanced, mono)
Left (+)
Right (+)
Gnd (Sleeve, )
Left (+)
Gnd (Sle
eve, )
Tip (+)
Ring (–)
Gnd (Sleeve, )
Tip (+)
Sleeve (Gnd)
Figure 1. Captive Screw Connector Figure 2. RCA-style Connectors
2
Aux/Mix Mono audio input —The Aux/Mix Mono audio channel is always active: its signal
is output no matter which, if any, other audio input (input 1, 2, 3, or 4) is selected. For
example, you could connect the output of a wireless microphone receiver to this port so the
presenter comments can always be heard and are independent of the A/V source used for
the presentation.
The mix output level can be adjusted between ‑43dB and +24dB.
LR
Audio Input Wiring
(unbalanced, stereo)
Aux/Mix Input Wiring
(balanced/unbalanced, mono)
AUX
/
MIX
MONO
LR
Audio Input Wiring
(unbalanced, mono)
Left (+)
Right (+)
Gnd (Sleeve, )
Left (+)
Gnd (Sleeve, )
Tip (+)
Ring (–)
Gnd (Sleeve, )
NOTE: The Aux/Mix level must be adjusted physically via the front panel control. It cannot be
adjusted via software.
Connect a 3.5 mm, 3-pole captive screw connector to one end of an audio cable as shown at right.
3
Audio output (Preamp) — Connect self-powered speakers or another stereo audio device to
the MLS via this 5-pole, 3.5 mm captive screw connector. Depending on how the connector is
wired, the audio output can be balanced or unbalanced stereo audio. Wire the connector as
shown in figure 3.
Audio Output Captive Screw_MLS 100.eps
Unbalanced Output
Tip
See Caution
Sleeve (s)
Tip
See Caution
Balanced Output
Tip
Ring
Sleeve (s)
Tip
Ring
LR
OUT
OUT
LR
Figure 3. Wiring the Connector
ATTENTION: For unbalanced audio, connect the sleeves to the ground contact. DO NOT connect the sleeves to the
negative (–) contacts.
ATTENTION : Pour l’audio asymétrique, connectez les manchons au contact au sol. Ne PAS connecter les manchons
aux contacts négatifs (–).
After all the equipment has been cabled and powered on, use the MediaLink Control Program or an RS-232 controller to
set the per-input gain/attenuation to match the correct audio output level for the kind of output (balanced or unbalanced)
you need. See Setting Up Optimal Audio Gain on page3 and Switcher (MLS) Config on page13 for details on
determining and setting the gain/attenuation to produce the desired output levels.
NOTES:
• If you wire an audio output for balanced output, the MLS outputs a unity signal (input level = output level). Wiring an
audio output for unbalanced output causes the audio signal to be attenuated by 6dB.
• Overall volume control ranges from 0% (90 dB attenuation) to 100% (0dB attenuation). Adjustment increments are
1dB for steps from 1% to 40% volume. Adjustments are in 0.5 dB increments from 41% to 100% of full volume.
MLS 100 A
LR
A
B
LR
LR
LR
1
2
3
LR
4
AUX/MIX
MONO
AUDIO INPUTS
MLC/RS-232
POWER
12V .5A MAX
MLS 100 A
PREAMP
11223
34
4
1
2
3

3
Control and Power Connections
4
MLC/RS-232 Power port — An Extron MediaLink Controller (MLC 206), a computer, or an RS-232 controller provides
remote control of input switching and volume, and also provides a way to set the switcher audio input levels. To control
and/or set up the MLS, connect a cable between this 5-pole, 3.5 mm captive screw connector and an optional MLC206,
computer, or a RS-232 controller. Also connect an external 12 VDC power supply here to provide power to the MLS and to
the optional MLC.
Extron Comm-Link cable is recommended for this connection. If using Comm-Link cable, the switcher and controller can be
up to 250 feet (76.2 m) apart. Wire the captive screw connector for connection to an MLC 206 or control system as shown
below.
• For a stand-alone MLS switcher, connect a cable from the host computer or a control
Power Supply
Output Cord
Captive Screw
Connector
Power Wiring.eps
AA
SECTION A–A
system to this connector to set up and remotely control the switcher, connect a 12 VDC
power supply, and tie all the drain wires to the same ground.
• For an MLS switcher slaved to an MLC controller, connect a cable from the
MLC/MLS/Power port and from a 12VDC power supply, and tie all the drain wires to
the same ground.
Once the system has been cabled and set up via the control software and the front panel Aux/Mix adjustment, the MLC or
a host computer communicating through the MLC can be used to remotely control the switcher. See the MediaLink Control
Program help le for details on conguring an MLC-MLS system.
NOTES:
• An Extron IR Link infrared repeater cannot be used with the MLS 100 A Switchers. There is no connection for that
device control signals.
• The MLC to which the MLS 100 A switcher is connected must have MLC
firmware version 1.04 or higher. The control/setup software must be version 2.0 or
higher. Use one of the following methods to find out the version levels of the MLC
firmware and the control software.
• Connect the MLC RS-232 port to a computer or RS-232 controller, and send an
SIS command of Q to the MLC. The MLC responds with its firmware version.
• Connect the MLC RS-232 port to a computer, start the MediaLink control software,
and click on Help to display the software version, the MLC firmware version, and
the MLS firmware version as shown in the example on the right.
If your MLS rmware is an earlier version, contact Extron to obtain updated rmware.
Setting Up Optimal Audio Gain
Audio input levels and desired output levels vary depending on the types of equipment involved. Before setting the MLS per-input
gain or attenuation, determine the levels of the input and output equipment. Use the table below as a general guide.
Ty pical audio lvls_tbl_062304.eps
Typical Audio Levels
for Various Equipment Types
Input/Output Levels
XX
Professional line level audio equipment
XX
+4 dBu 0 dBu
-10 dBV
(-8 dBu)
-20 dBV
(-18 dBu)
Equipment
Categories
Consumer audio equipment (VCRs, DVDs,
laptop computers, portable audio devices)
Table 1. Typical Audio Levels
Gain and attenuation are adjustable (from -18dB to +24dB) for each input (1 through 4) via RS-232 control only (using
HyperTerminal, a third party controller, or the MediaLink Control/Conguration Software). The gain and attenuation for the Aux/Mix
input are adjustable only via the switcher front panel.

4
MLS 100 A • User Guide (Continued)
Setup via the MediaLink Control/Configuration Software
CAUTION: To avoid damage to your hearing, the output volume should be set as low as possible before you test the sound
system.
ATTENTION : Pour éviter d’abîmer votre ouïe, le volume de sortie doit être positionné au niveau le plus bas possible avant de
tester le système audio.
1. Cable and power on all the equipment.
2. Start the MediaLink Control Software and select the Switcher (MLS)
Cong portion of the program (
1
).
3. Select an audio input (
2
).
• Volume for the four switchable inputs is not adjustable via the front
panel. It can be adjusted only via RS-232 (including via an MLC).
• Wait at least ten (10) seconds between making a change (input
selection or audio adjustment) and disconnecting power from the
MLS. The switcher needs several seconds to store and save the
new settings in its memory.
4. Use the following table to determine the gain or attenuation. Match the desired level for balanced output or for unbalanced
output, depending on how the output connector is wired.
MLS100Series_audio gain tbl_062304.eps
Gain and Attenuation Settings for MLS 100 Series Switchers
Desired Output Levels
Balanced
+4 dBu 0 dB -4 dB -12 dB -22 dB
0 dB
0 dB
0 dB
+6 dB
+4 dB -8 dB -18 dB
+8 dB+12 dB
10 dB+18 dB+22 dB
-10 dB
+10 dB +6 dB
+6 dB
+6 dB
+2 dB -6 dB -16 dB
-2 dB -12 dB
+18 dB +14 dB
+16 dBn.a. +24 dB
-4 dB
+4 dBu
0 dBu
0 dBu
-10 dBV
(-8 dBu)
-10 dBV
(-8 dBu)
-20 dBV
(-18 dBu)
-20 dBV
(-18 dBu)
+4 dBu 0 dBu
-10 dBV
(-8 dBu)
-20 dBV
(-18 dBu)
Input Source
Levels
Unbalanced
Table 2. Gain and Attenuation Settings for MLS 100 Series
NOTES:
• If you wire an audio output for balanced output, the MLS outputs a unity signal (input level = output level). If you wire
an audio output for unbalanced output, it causes the audio signal to be attenuated by 6dB (gain = -6dB).
• For dBV the reference is 1 volt.
• For dBu the reference is 0.775 volts.
5. In the control program, move the Audio Input Level slider to select the gain/attenuation for that input, as shown
on the right.
6. Repeat steps 3–5 for the other three inputs.
7. Test the system by listening to audio output for each input. Start by setting the audio output to the lowest level.
a. If the audio output is too loud or is clipping (becoming distorted as the loudest parts are cut off), decrease
the gain for that input.
b. If the output is too soft or inaudible, increase the gain.
NOTES:
• Input gain and attenuation for audio inputs 1 through 4 is adjustable via RS-232 control only (using SIS commands
or the MediaLink Control/Configuration Software.)
• The Aux/Mix input level can be adjusted via the front panel Aux/Mix Level control only. Aux/Mix level can not be
adjusted via RS-232 (SIS commands, configuration software, or an MLC MediaLink Controller). The Aux/Mix level is
independent of the input and volume controls for the four switchable inputs.
• Volume for the four switchable inputs is not adjustable via the front panel. It can be adjusted only via RS-232
(including via an MLC).
• Wait at least ten (10) seconds between making a change (input selection or audio adjustment) and disconnecting
power from the MLS. The switcher needs several seconds to store and save the new settings in its memory.

5
Front Panel Features and Operation
All the MLS 100 A switchers share the same front panel design, shown on the right.
MLS 100 Series
MediaLink Switcher
AUX/MIX
LEVEL
INPUT SELECT
1
2 3 4
1
12
2
1
Input selection buttons and indicator LEDs — Press one of these buttons
to select the desired audio and video input. The corresponding LED lights and
remains lit while an audio-video input is selected. During audio breakaway
(selectable only via RS-232 control, described in chapter 4), audio is switched
separately from video; the selected video input LED lights steadily, and the
audio input LED blinks.
The MLS 100 A accepts only audio inputs, so pressing one of these buttons selects an audio-only input.
Input 0 can be selected via RS-232 control only by using an SIS command or by selecting Mute (shown on
the right) from the User Mode section of the control program (if the MLS is used without an MLC).
Selecting input 0 mutes the audio from inputs 1 through 4.
For all models the Aux/Mix audio input is always enabled and cannot be turned on or off from the front
panel. The Aux/Mix audio does not change when you switch between the four selectable audio inputs.
The last selected input (including audio/video breakaway selec tions) will be the active input when the MLS is powered on.
NOTE: Wait at least 10 seconds between making a change (input selection or audio adjustment) and disconnecting
power from the MLS. The switcher needs several seconds to store the new settings in its memory.
2
Aux/Mix Level control — This potentiometer controls the auxiliary/mix audio volume. This channel audio is always output,
no matter which, if any, other audio input (0, 1, 2, 3, 4) is selected. Use a small screwdriver to turn this control while you listen
to the audio output. When the control is turned to its counterclockwise limit (-43dB), the Aux/Mix signal is inaudible. You hear
the maximum Aux/Mix volume when the control is turned to the clockwise limit (+24dB).
NOTES:
• Once this level is set, the Aux/Mix level remains the same no matter which input (1 through 4) is selected, and the
Aux/Mix audio can be heard at that level even if the selectable audio inputs are muted or if audio input 0 is selected
via RS-232 control.
• The gain and attenuation for audio inputs 1 through 4 is adjustable only via RS-232 control (using SIS commands or
the MediaLink Control/Configuration Software.)
The gain and attenuation for the Aux/Mix input is adjustable only via the Aux/Mix Level control.
• Wait at least 10 seconds between making a change (input selection or audio adjustment) and disconnecting power
from the MLS. The switcher needs several seconds to store/save the new settings in its memory.
Executive Mode — Enabling and Disabling Front Panel Buttons
1. To disable front panel input selection (turn executive mode on), simultaneously press input selection buttons 1 and 4 and hold
them down for three seconds. All LEDs light for about one second.
2. While executive mode is on, input selection can be performed via RS-232 control or from an optional MediaLink Controller.
3. To enable front panel input selection (turn executive mode off), repeat step 1 (pressing and holding buttons 1 and 4).

6
MLS 100 A • User Guide (Continued)
Troubleshooting
1. Connect the cables between the MLS and the A/V input devices. Connect the provided power supply and a host computer,
third party control system, or MediaLink Controller to the MLS MLC/RS-232 Power port. Connect the MLS to the display
device (projector) and audio output device (tape deck, speakers).
2. Connect the control device (computer, control system, or MLC 206), the A/V source devices, projector and audio output
device to a power source and turn them on.
3. Start the MediaLink Control Program and set up the MLS (and the MLC, if one is used).
NOTE: To set up the MLS 100 A switcher you must use MediaLink Control Software version 2.0 or higher. If the software
version is below 2.0, download a new version of the software from the Extron Web site, www.extron.com.
4. Press an input button on the MLS, watch the MLS LEDs, observe the display, and listen to the audio.
a. If the input selection LED does not light when a button is pressed, the MLS might not be receiving power. Check the
wiring at the MLS MLC/RS-232 Power port.
• If the conductor assignments are not correct, the circuits may be damaged if power is applied to the wrong pole.
• If the wiring is correct, ensure that the power supply has been plugged in to a functional power source.
b. If power is present at the MLS and at the input and output devices, but nothing happens (an A/V switch is not
detected) when a button is pressed:
• If a MediaLink Controller is part of the system, the MLC rmware may be too old. If it is older than version 1.04,
contact Extron for a rmware upgrade.
NOTE: The MLC to which the MLS 100 A switcher is connected must have MLC firmware version 1.04 or higher.
Use one of the following methods to find out the version levels of the MLC firmware and the control software:
• Connect the MLC RS-232 port to a computer or RS-232 controller, and send an SIS command of Q to the MLC.
The MLC responds with its firmware version.
• Connect the MLC RS-232 port to a computer, start the MediaLink control software, and click on Help to display
the software version, the MLC firmware version, and the MLS firmware version.
• The audio settings may be too low. Adjust the Aux/Mix level by turning the Aux/Mix Level adjustment on the front
panel. Adjust each selectable input level by using SIS commands, a control system, or the Switcher (MLS)
Cong. part of the MediaLink Control/Conguration Software.
• The input or output connectors may not be rmly attached to the MLS, or they may be miswired.
c. If power is present, but sound from inputs 1 through 4 is not audible, and if changing the audio volume and gain/
attenuation settings does not resolve the problem, make sure that neither audio input 0 nor audio mute is selected. Use
the SIS information (I) command or the MediaLink Control/Conguration Program to determine the audio settings.
5. Call the Extron S
3
Sales and Technical Support Hotline if the equipment still does not respond when the MLS buttons are
pressed.
Serial Communication
The MediaLink switcher can be remotely set up and controlled via a host computer or other device (such as a control system)
attached to the rear panel MLC/RS-232 Power port. Alternatively, the switcher can be controlled by an optional MediaLink
Controller (MLC) (connected to the MLS MLC/RS-232 Power port), or by an RS-232 device acting through the MLC. The control
device (host) can use either the Extron Simple Instruction Set (SIS
™
) commands or the graphical control/conguration program
for Windows
®
. For details on use and setup of a system that includes a MediaLink Controller, see the MediaLink Controllers User
Manual.
The switcher protocol is:
Control-power
pinout_MLS100.eps
MLC
/RS-232
POWER
AB
MLS 100 Series
Switcher
MLC/RS-232
Power Port
Ground ( )
+12 VDC
Transmit (Tx)
B
Receive
(Rx)
A
• 9600 baud • 1 stop bit
• no parity • no ow control
The MLC/RS-232 Power 3.5 mm, 5-pole captive screw connector pin assignments are shown
on the right.

7
RS-232 Programmer Guide
Host-to-MLS Communications
SIS commands consist of one or more characters per eld. No special characters are required to begin or end a command
sequence. When the MLS determines that a command is valid, it executes the command and sends a response to the host
device. All responses from the switcher to the host end with a carriage return and a line feed (CR/LF = ]), which signals the end
of the response character string. A string is one or more characters.
MLS-initiated Messages
When a local event such as a front panel selection or adjustment takes place, the MLS responds by sending a message to the
host. No response is required from the host. The MLS-initiated messages are listed here (underlined).
© Copyright 2019, Extron Electronics MLS 100 A, Vx.xx]
The MLS sends the copyright message when it rst powers on. Vx.xx is the rmware version number.
Chn X!] (where X! is the input number)
The MLS sends this response when an input is switched.
Error Responses
When the MLS receives a valid SIS command, it executes the command and sends a response to the host device. If the MLS is
unable to execute the command because the command is invalid or it contains invalid parameters, it returns an error response to the
host. Error response codes and their descriptions are as follows:
E01 – Invalid input channel number (the number is too large)
E10 – Invalid command
E13 – Invalid value (the number is out of range/too large)
E14 – Invalid for this conguration
Using the Command and Response Tables
The command/response tables on the next page list valid command ASCII codes, the MLS responses to the host, and a
description of the command function or the results of executing the command. Unless otherwise indicated (as for the gain
commands), upper and lower case characters may be used interchangeably in the command eld.
ASCII to HEX Conversion Table
•
The ASCII to HEX conversion table on the left is for use with the
command and response tables.

8
MLS 100 A • User Guide (Continued)
System Definitions
•
=
Space
]
=
Carriage return with line feed
}
=
Carriage return with no line feed
E,W
=
Escape key, or hex 1B (use W instead of E for web browsers, or at any time)
14
,
24
,
28
=
Superscripts indicate the error message displayed if the command is entered incorrectly or with invalid
parameters.
X!
=
Specic input number (0 – 4 maximum)
0 = no connection 3 = input 3 & Aux/Mix
1 = input 1 & Aux/Mix 4 = input 4 (audio only) and Aux/Mix
2 = input 2 & Aux/Mix
X@
=
Audio gain (per input)
0 to 24; 0dB through +24dB in 1dB steps
X#
=
Audio attenuation (per input)
0 to 18; 0dB through -18dB in 1dB steps
X$
=
Input to be adjusted (1 – 4)
1 = input 1 3 = input 3
2 = input 2 4 = input 4
X%
=
Audio gain/attenuation value (-18 through +24)
X^
=
Volume adjustment range: 0% (90 dB attenuation) to 100% (0dB attenuation). Adjustment increments are 1 dB
for steps from 1% to 40% volume. Adjustments are in 0.5 dB increments from 41% to 100% volume.
X&
=
On/off status
0 = off/disable 1 = on/enable
X*
=
Switcher rmware version (listed to two decimal places e.g.: x.xx)

9
Command and Response Table for SIS Commands
Command ASCII command
(host to device)
Response
(device to host)
Additional description
Input Selection
Select an input (audio
and video).
X!! Chn X!] Select input X! (audio and video).
Example:
4! Chn4] Example: select input 4
Select an audio input.
X!$ Aud X!] Select input X! audio only.
Select a video input.
X!& Vid X!] Select input X! video only.
Audio Input Gain and Attenuation (per input)
Set a specic input audio
gain.
X$*X@ G In X$ Aud= X%]
Set a single input gain (in dB).
Example: 3*9G
In X$ Aud=+09]
Set input 3 gain to +9dB.
Set a specic input audio
attenuation.
X$*X#g In X$ Aud= X%]
Set an input attenuation (in dB).
Increment a specic input
gain.
X$*+G In X$ Aud= X%]
Increase an input gain by 1dB.
Decrement a specic
input gain.
X$*-G In X$ Aud= X%]
Decrease an input gain by 1dB.
View a specic input
audio gain level.
X$*G In X$ Aud= X%]
Show an input audio level.
Set current input audio
gain.
X@G In X$ Aud= X%]
Set the current input gain (in dB).
Set current input audio
attenuation.
X@g In X$ Aud= X%]
Set attenuation (in dB).
Increment current input
gain.
+G
In X$ Aud= X%]
Increase the gain by 1dB.
Decrement current input
gain.
-G
In X$ Aud= X%]
Decrease the gain by 1dB.
View current input audio
gain level.
G
In X$ Aud= X%]
Show the audio level.
KEYS:
X!
=
Specific input number
(0 – 4 maximum): 0 = no connection 3 = input 3 & Aux/Mix
1 = input 1 & Aux/Mix 4 = input 4 (audio only) & Aux/Mix
2 = input 2 & Aux/Mix
X@
= Audio gain (per input) 0 to 24; 0 dB through +24 dB in 1 dB steps
X#
= Audio attenuation (per
input)
0 to 18; 0dB through -18 dB in 1 dB steps)
X$
= Input to be adjusted (1
– 4)
Input to be adjusted (1 – 4)
1 = input 1 3 = input 3
2 = input 2 4 = input 4
X%
= Audio gain/attenuation
value
Audio gain/attenuation value (-18 through +24).
Audio Mute (overall)
Mute on. 1Z
Amt1]
Mute all audio outputs.
Mute off. 0Z
Amt0]
Unmute all audio outputs.
View the audio mute
status.
Z
Amt0]
Show the status of audio mute.

10
MLS 100 A • User Guide (Continued)
Command ASCII command
(host to device)
Response
(device to host)
Additional description
Volume Adjustment (overall)
Set the overall output
volume.
X^V VolX^]
Specify the volume for the audio
output.
Example: 13V
Vol013]
Set volume to 13.
Increment the volume. +V
VolX^]
Increase audio output.
Decrement the volume. -V
VolX^]
Decrease audio output.
View the volume level. V
VolX^]
Show the output volume
Executive Mode
Turn executive mode off. 0X
Exe0]
Enable front panel operation.
Adjustments and
selections can be made from the
front panel.
Turn executive mode on. 1X
Exe1]
Lock front panel adjustments
and switching; make changes
by RS-232 only. Only Aux/Mix
volume adjustment is available
via front panel.
View the executive mode
status.
X
ExeX&]
Show executive mode status.
Example: X
Exe0]
Firmware Version, Part Number, and Information Requests
Query rmware version
number.
Q
VerX*]
Show the switcher rmware
version.
Request the part number. N
N60-497-0X]
Show the MLS part number.
Request general info. I (see below) Show the MLS status.
Vid • Aud • Vol
X1 X1 X6
Video input # X1
is selected/active
.
Audio input
# X1 is
selected/active.
Audio v
olume
level is .
X6
KEYS:
X%
=
Audio gain/attenuation
value
-18 through +24
X^
=
Volume adjustment range: 0% (90 dB attenuation) to 100% (0 dB attenuation).
Adjustment increments are 1 dB for steps from 1% to 40% volume.
Adjustments are in 0.5 dB increments from 41% to 100% volume.
X&
=
On/off status 0 = off/disable 1 = on/enable
X*
=
Switcher firmware version Listed to two decimal places e.g.: x.xx
Zap (reset to default settings)
Zap all MLS settings and
memories.
zXXX
ZapXXX]
Reset everything (all settings
and adjustments) to the factory
default.

11
Command and Response Table for Special Function SIS Commands
The syntax for setting a special function is __* X? # where __ is the function number and X? is the value. To view a function
setting, use __#, where __ is the function number. In this table the values of the X? variable are different for each command/
function. These values are given in the right most column.
Command ASCII command
(host to device)
Response
(device to host)
Additional Description
Input Selection
Set the RGB delay.
3 *X? # RGBDly* X?]
0 = 0.0 seconds (default),
1 = 0.5 seconds,
2 = 1.0 seconds,
... in ½ second steps up to 10 = 5.0
seconds.
Example: 3*7#
RGBDly*X&]
Example: 3.5 second RGB delay.
KEYS:
X&
=
On/off status 0 = off/disable 1 = on/enable
Control and Configuration Software for Windows
®
The included Extron MediaLink Control/Conguration Program for Windows offers another way to control the switcher via RS-232
connection in addition to the Simple Instruction Set commands. The control program graphical interface includes input selection
functions and some additional features that are available only through the software.
NOTE: To set up the MLS 100 A switcher you must use MediaLink Control/Configuration Software version 2.0 or higher.
The control software is compatible with Windows 2000, Windows XP, and Windows 7. Extron MediaLink Control Program is
included with the MLS, and updates can be downloaded from the Extron Website.
Installing the Software
To install the software on the hard drive:
1. On the MLS 100 A product page, click the Downloads button.
2. Open and read the Release Notes for important information.
3. Click the MediaLink Switchers (MLS) and PoleVault Switchers (PVS) link.
The Download Center page opens.
4. At the bottom of the page, click Run (see figure4,
1
)
Figure 4. MLSConfigUtilityv1x2x1.exe Dialog Box
5. Follow the prompts in the dialog box.
By default the installation creates a C:Program Files (x86)\Extron\MLS directory.
Using the Control and Configuration Program
The MediaLink Help Program provides information on settings and on how to use the control program itself. Some features are
available only via this control program. These features are described in the sections of this chapter that correspond to the parts of
the control program where the features are found.
1. To run the control program, double-click on the MediaLnk Control Pgm icon in the Extron Electronics group or folder. The
Comm Port Selection menu appears on the screen.
2. Click on the comm port that is connected to the MLS RS-232 port. The Extron MediaLink Control/Conguration Program
windows appear. The port and rmware information are displayed at the bottom of the screen. There are two views available:
the User Mode screen, and the Switcher (MLS) Cong screen.
4

12
MLS 100 A • User Guide (Continued)
User Mode
For stand-alone MLS 100 A Switchers
If an MLS 100 A switcher is used without a MediaLink Controller, the User Mode screen, shown below, emulates the MLS front
panel input selection buttons and also provides a means of volume control.
Figure 5. MLS 100 A, User Mode Screen
Special features
• Audio/video breakaway switching — To switch the audio signal separately from the video signal, check the Audio
checkbox (at the right side of the I/O Switching area) and uncheck the Video checkbox, then select an input. The MLS
switches to that input audio and leaves the previously selected video source active. Audio breakaway is shown above: the
video is from input 1 and the audio is from input 2. (The corresponding SIS command is 1&2$.)
To switch the video signal without changing the audio source, check the Video check box and uncheck the
Audio checkbox (see the image on the right).
Selecting Mute selects input 0 (no input).
• Volume Mute — Check this box (shown at right) in the lower left corner of the software window to activate
the audio mute (Amt) command. See Audio Mute (overall) (see page9) for the corresponding SIS command.
• Disable Switcher Front Panel Menus — This feature (near the bottom of the screen) toggles the executive
mode on or off to prevent or enable making changes (input selections) via the MLS front panel.
For MLS 100 A switchers controlled by an MLC
If the MLS 100 A switcher is connected to and controlled by an MLC, the User Mode screen will look something like this:
Figure 6. MLS 100 A Connected and Controlled by an MLC

13
In this case, you must set the volume control in the Controller (MLC) Cong section to “Switcher,”
as shown at right.
NOTE: Wait at least 10 seconds between making a change (input selection or audio adjustment)
and disconnecting power from the MLS. The switcher needs several seconds to store/save the new
settings in its memory.
Switcher (MLS) Config
The Switcher (MLS) Cong screen, shown below, allows you to make adjustments without having to use the
front panel controls.
NOTE: Wait at least 10 seconds between making a change (input selection or audio adjustment) and disconnecting power
from the MLS. The switcher needs several seconds to store the new settings in its memory.
Figure 7. MLS 100 A Switcher (MLS) Config Screen
In this part of the program you can:
• Set the per-input audio gain or attenuation.
• Set overall volume; this is the same as the User Mode volume adjustment.
• Set the RGB delay period (MLS 102 VGA model only).
• Reset the switcher to factory default settings.
Saving and Restoring Configurations
The MLS can be congured via RS-232 communication, and the conguration settings can be saved to a le for later use.
1. In the MediaLink Control/Conguration Program, select File, then select Save Conguration as...
2. Save the le as lename.MLK. An unlimited number of conguration les can be saved as long as each le has a unique le
name ending in .MLK.
3. To retrieve the conguration from within the MediaLink Control Program, select File, then select Restore Conguration
from... A set of all the switcher and audio adjustment settings is downloaded into the MLS.
steps 1 and 2

14
MLS 100 A • User Guide (Continued)
Emulation Mode
The MediaLink Control/Conguration Program features an emulation mode so you can set up a MediaLink system before
equipment is available on site. In emulation mode a MediaLink Controller is always included in the system. You select which MLS
switcher and which control modules will be connected to the MLC. For a stand-alone MLS (without an MLC), connect the MLS
directly to the host computer for setup rather than using emulation mode.
You can save the emulated settings to a conguration le, then load that conguration le to the switcher (or switcher and MLC)
when equipment is available.
1. Start the control program by double-clicking on the MediaLnk Control Pgm icon in the Extron group
or folder.
The Comm Port Selection screen (see image at right) appears.
2. Click the Emulate radio button, then click OK.
The Initialize Emulated MediaLink Conguration from... dialog box opens.
3. Because you will be creating a brand new conguration, click Cancel instead of selecting a driver le.
The Save Emulated MediaLink Conguration as... dialog box opens.
4. Enter a lename of your choice for storing the conguration settings, then click Save.
The Emulation Conguration dialog box appears.

15
5. Select the MediaLink equipment that will be part of the system you want to congure, then click on OK.
The Extron MediaLink Control/Conguration Program window appears.
6. Select the desired settings in each section of the program.
If you include an MLC in the system, keep in mind that IR learning cannot be performed in emulation mode. You must have
an MLC connected to the host computer.
7. To save the conguration for future use, follow steps 1 and 2 on page13.
Updating Firmware
If the need arises, you can replace the MLS rmware without opening the unit or changing rmware chips. Follow the directions
below.
This procedure must be performed using a PC on which the MediaLink Control Software (version 2.4 or higher) has been installed,
and the PC RS-232 port must be directly cabled to the MLS MLC/RS-232 Power port.
ATTENTION: Do not attempt to upload firmware if a MediaLink Controller (MLC) or other control system is connected to the
MLS switcher. The RS-232 cable from the PC must be connected directly to the MLS.
ATTENTION : N’essayez pas de charger un firmware si un contrôleur MediaLink (MLC) ou un autre système de contrôle est
connecté au sélecteur MLS. Le câble RS-232 de l’ordinateur doit être connecté directement au SCP.
NOTE: Each time you replace existing rmware, the switcher is reset to the factory default settings.
1. Visit the Extron Website (www.extron.com) to nd the appropriate rmware le for the model of switcher you want to update.
Save the new rmware le, and write down the lename and location for later use.
2. Connect a cable between the MLC/RS-232 Power port of the MLS and the serial (RS-232) port of the PC, and power on the
MLS.
3. Start the MediaLink control/conguration program.
4. From the File drop-down menu in the upper left corner, select Update
Firmware (see the image on the right).
The MediaLink Control Software closes, and a separate utility program opens
and displays a window indicating the current rmware version.
5. Click Upload. You are prompted to select the rmware le that you downloaded in step 1.
6. Click OK.
7. When the browser window opens, locate and select the rmware le, then click Open to upload the rmware into the MLS.
NOTE: The firmware update file must have a filename extension of .s19. If the file does not have that extension, it will not
work properly.

16
68-652-01 Rev. E
07 19
For information on safety guidelines, regulatory compliances, EMI/EMF compatibility, accessibility, and related topics, see the
Extron Safety and Regulatory Compliance Guide on the Extron website.
© 2003-2019 Extron Electronics — All rights reserved. www.extron.com
All trademarks mentioned are the property of their respective owners.
Worldwide Headquarters: Extron USA West, 1025 E. Ball Road, Anaheim, CA 92805, 800.633.9876
8. Follow the on-screen instructions.
NOTE: When you recycle power, power off the switcher for at least four seconds, then restore power.
9. When the rmware uploading is complete, a dialog box appears and asks you to:
• Exit the firmware update utility program if the new rmware loaded correctly (if the correct rmware version is
displayed in the program window, as shown in the example below)
or
• Run the utility again if the rmware did not load correctly.
10. Follow the on-screen directions to complete the process.
Using the Help Program
For information on program features, press the <F1> computer key, or click on the Help menu within the MediaLink control
program, or double-click on the MediaLnk Help icon in the Extron group or folder.
For explanations of buttons or functions, click on the tabs in the help screen to reach the desired screen. Use a mouse or the
<Tab> and <Enter> keys to select a button/function. A description and tips on using the program appear on screen.
Key to File Names
Filename Description
________.MLK User-saved MLC/MLC-MLS/MLS conguration le. This includes adjustments/ settings. If the MLS is
connected to an MLC 206, the le also contains whatever driver (if any) was installed in the MLC 206 at the
time the le was saved. See the MLS 206 User Manual for details.
_______.s19 This is an Extron-supplied rmware update le. When the rmware is replaced, the switcher is also
automatically reset to factory default settings.
/