Chicago Electric 93449 Assembly And Operating Instructions Manual
- Category
- Power tools
- Type
- Assembly And Operating Instructions Manual
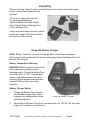
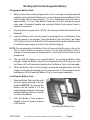
Chicago Electric 93449 is a versatile power tool that combines the functionality of a cordless hammer drill, a conventional drill, and a screwdriver. Its durable aluminum gear housing with a removable battery provides both power and portability. With 8 variable drill mode settings and a hammer mode, this tool can tackle a wide range of drilling applications in various materials. The reversible motor allows for easy removal of fasteners, while the adjustable clutch ensures precise torque control for delicate tasks.
Chicago Electric 93449 is a versatile power tool that combines the functionality of a cordless hammer drill, a conventional drill, and a screwdriver. Its durable aluminum gear housing with a removable battery provides both power and portability. With 8 variable drill mode settings and a hammer mode, this tool can tackle a wide range of drilling applications in various materials. The reversible motor allows for easy removal of fasteners, while the adjustable clutch ensures precise torque control for delicate tasks.


-
 1
1
-
 2
2
-
 3
3
-
 4
4
-
 5
5
-
 6
6
-
 7
7
-
 8
8
-
 9
9
-
 10
10
-
 11
11
-
 12
12


Chicago Electric 93449 Assembly And Operating Instructions Manual
- Category
- Power tools
- Type
- Assembly And Operating Instructions Manual
Chicago Electric 93449 is a versatile power tool that combines the functionality of a cordless hammer drill, a conventional drill, and a screwdriver. Its durable aluminum gear housing with a removable battery provides both power and portability. With 8 variable drill mode settings and a hammer mode, this tool can tackle a wide range of drilling applications in various materials. The reversible motor allows for easy removal of fasteners, while the adjustable clutch ensures precise torque control for delicate tasks.
Ask a question and I''ll find the answer in the document
Finding information in a document is now easier with AI
Related papers
-
Chicago Electric Impact Driver 68853 User manual
-
-
Chicago Electric 3273 Owner's Manual & Safety Instructions
-
-
-
-
-
-
Chicago Electric 60495 Owner's Manual & Safety Instructions
-
Drill Master 68394 User manual