Page is loading ...

Simple and Easy to Follow Installation Manual
Expert Advice
Expert Advice
®
800-745-5337
Free Call!
%
800-745-5337
www.quadratec.com
www.quadratec.com
Free Call!
%
Essentials
Essentials
DVD_REVISED_SIZE:INST_SHEET 7/25/2008 4:41 PM Page 1

Page 2 www.quadratec.com
Vizualogic
®
A-1250™ & A-1150™
DVD Headrest
“JK” Wrangler Installation Instructions
Note: Be sure to read this entire instruction sheet AND the Vizualogic instruction sheet before beginning your installation. This sheet
outlines the installation of a Vizualogic brand DVD Headrest Kit into a 2007 or newer Jeep Wrangler. These instructions are intended
to assist with the installation process and by no means replace the Vizualogic installation manual.
Tools Required:
•Torx
®
T30 driver (for center console fasteners)
• 7mm or 9/32 nut driver (for dash fascia panel fasteners)
• Screwdriver – straight slot (to pry dash fascia panel snaps)
• Pliers (to crimp wire taps)
Recline Seat
Press to Release
Upholstery Channels
Hook Together Between
Seat Back and Pad
Carefully Route Cables
Through Headrest
Guide Posts
Carefully Disconnect
Upholstery Channels
Remove All 4 T30
Torx Head Bolts
J
J
Figure 1
Figure 2
Figure 2A
Figure 3
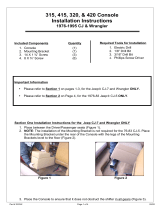
1.
Recline
both front seats to allow room to remove
both front seat headrests. With the headrests erected,
press both side releases buttons as shown.
(Figure 1)
2. We suggest that you save the removed front seat
headrests. Do not discard.
3.
Disconnect
the upholstery channels on both seats.
This can be somewhat strenuous so proceed with care.
(Figure 2)
4. Carefully
insert
video monitor cables through headrest
guide posts according to the manufacturer’s installation
manual. Route the cables down the seat back and exit the
cables next to the center console. Install the DVD Head-
rests into the guide posts in the high position and remove
the slack in the cable. Not too tight here. Remember that
headrest need to freely adjust up and down.
(Figure 2A)
5.
Remove
the four torx head fasteners (size T30) that se-
cure the center console to the vehicle’s floor. There are two
bolts at the rear of the center console (left and right) and
two towards the front (left and right). Fastener removal al-
lows the console to be lifted upwards a few inches to
neatly tuck away the monitor cables and other system
wiring inside the console’s shell.
(Figure 3)
DVD_REVISED_SIZE:INST_SHEET 7/25/2008 4:41 PM Page 2

Page 3 www.quadratec.com
6.
Route
the Driver and Passenger side monitor cables as
shown. Use two cable zip ties to neatly bundle each set of
DVD cables where the cables exit the seat back and meet
the center console.
Route
the four monitor cables under-
neath the center console and exit the four cables at the
middle of the passenger side seat slider as shown.
(Figure 4)
7.
Reconnect
the upholstery channels on both front seats.
8.
Adhere
the rough “hook” side of the “hook and loop”
fastener material onto the floor carpet and under the front
passenger seat as shown.
(Figure 5)
9.
Adhere
the softer furry “loop” side of the “hook and
loop” fastener material onto Audio/Video Module as
shown.
(Figure 6)
10.
Attach
the FM Transmitter Antenna to the A/V Con-
trol Module and route underneath the seat slider and
under the center console. Extend the FM Transmitter An-
tenna towards the radio and underneath the center con-
sole.
11.
Connect
the monitor wires to the A/V Control Module
according to the Vizualogic installation manual. Again,
route all wires below the seat slider rails.
12.
Connect
the System Power Harness to the A/V Mod-
ule according to the Vizualogic installation manual. Once
again, route all wires below the seat slider rails. Use sev-
eral zip ties to neatly bundle the wires. Attach the A/V
Module underneath the front passenger seat with the
hook and loop fastener material.
(Figure 7)
Passenger
Side Cables
Driver
Side Cables
Figure 4
Figure 5
Figure 6
Figure 7
Hook Material
Loop Material
Route Wires Below Seat Slider Rail
Audio/Video
Module
Seat Slider Rail
A/V Control
Module
For additional copies of these instructions please
visit our website for a downloadable PDF Version.
Vizualogic
®
A-1250™ & A-1150™
DVD Headrest
“JK” Wrangler Installation Instructions
DVD_REVISED_SIZE:INST_SHEET 7/25/2008 4:42 PM Page 3

Page 4 www.quadratec.com
Vizualogic
®
A-1250™ & A-1150™
DVD Headrest
“JK” Wrangler Installation Instructions
13. Gently
pry
off the plastic Fascia Panel that’s in front of
the gear shifter and just below the lower bank of switches
as shown. A thin straight slot screwdriver works well.
Pry from the top corners only.
(Figure 8)
14.
Remove
the two center dashboard fasteners located
directly behind the Fascia Panel using a 7mm or 9/32 Nut
Driver.
(Figure 9)
15. Route the System Power Harness underneath the cen-
ter console and towards dash.
16.
Disconnect
the driver side Auxiliary Power Outlet
plug and pull down passenger side power outlet.
*But Do NOT Unplug.
17.
Route
the power harness (
the Red, Yellow and Black
wires
) from the control module and underneath the seat
slider; through the center console and out the opening just
below the Auxiliary Power Outlets. Locate the three red
wire harness taps for the next procedure. Note how wire
taps are installed but do NOT attach wire taps at this
time.
(Figure 10 & 11)
18. Begin attaching wire tap connectors to the proper
wires. There are 3 wires to connect.
a. Attach a wire tap connector to the (
RED
with
GREEN
stripe
) wire at the passenger side auxiliary power outlet
and connect the
YELLOW
wire from the power harness as
shown to the wire tap.
(Figures 10 & 14)
b. Attach a wire tap connector to the (
BLACK
with
WHITE
stripe) wire at the passenger side Auxiliary Power
Outlet plug and connect the
BLACK
wire from the power
harness to the wire tap as shown.
(Figures 12 & 14)
Figure 9
Figure 10
Figure 11
Remove Bolts
Route Wires
Through Dash
Wire Tap
Crimp with Pliers
Passenger Side
Aux Power Outlet
Driver Side Aux
Power Outlet
Figure 8
Gently Pry
Fascia Panel
For additional copies of these in-
structions please visit our website
for a downloadable PDF Version.
DVD_REVISED_SIZE:INST_SHEET 7/25/2008 4:42 PM Page 4

Page 5 www.quadratec.com
Vizualogic
®
A-1250™ & A-1150™
DVD Headrest
“JK” Wrangler Installation Instructions
19. Disconnect the plug attached to the driver side power
outlet.
a. Attach a wire tap connector to the (
BLUE
with
PINK
stripe)
wire at the Driver side Auxiliary Power Outlet plug. Connect
the
RED
wire from the power harness to the wire tap as
shown.
(Figure 13)
b. Tuck all wiring away and
Reconnect
the driver side
Auxiliary Power Outlet plug.
20.
Reinstall
the two center dashboard fasteners and
the Fascia Panel.
21.
Lift
the rear of the center console above the floor an
inch or so and finish tucking all harness wiring underneath.
22.
Secure
the four torx fasteners that secure the center con-
sole to the floor.
23. You are now ready to test and enjoy your Headrest
Monitor/DVD System. Be sure to read and understand the
Vizualogic Owner’s Manual.
Passenger Side
12+ Power Outlet
YELLOW FROM POWER HARNESS
WIRE TAP
CONNECTOR
RED FROM POWER HARNESS
WIRE TAP
CONNECTOR
BLACK FROM POWER HARNESS
Driver Side
12+ Power Outlet
WIRE TAP
CONNECTOR
Red with Green Stripe
Black with White Stripe
Blue with Pink Stripe
Figure 13
Figure 14
Figure 12
Wire Tap Blue/Pink Wire
Red Harness Power Wire
Simplified Wire Illustration from Steps 18 and 19.
Plug Attached
to Driver Side
Power Outlet
Yellow Harness
Power Wire
Black Harness
Power Wire
Red Harness
Power Wire
Lift Dash
Panel
Power Outlet Plug
DVD_REVISED_SIZE:INST_SHEET 7/25/2008 4:42 PM Page 5
/