Page is loading ...

VAN3 INSTALLATION INSTRUCTIONS
Thank you for buying RAB lighting xtures. Our goal is to design the best quality products to get the job done right. We’d like to hear your comments.
Call the Marketing Department at 888-RAB-1000 or email: marketing@rabweb.com
LOCATION
Fixture can be ceiling mounted. Fixture should not be
recessed.
MOUNTING
It is recommended that xture be attached securely
by drilling through the back of xture and attaching to
mounting surface (hardware not supplied). When drilling
xture, care must be taken to avoid drilling close to ballast
or within 1/4” of sides of xture. All unused entries must be
plugged. Use weatherproof silicone sealant to insure proper
seal.
1. Remove refractor and socket mounting plate from xture.
2. For reccessed junction box installation, remove knockout
at back of xture. (see mounting note above).
3. For conduit use, remove desired side knockout(s) in
housing. (see mounting note above).
4. Connect xture ballast leads to supply leads with wire
nuts. See wiring section.
5. Replace socket mounting plate. Install lamp and refractor.
TAMPERPROOF SCREWS
RAB Vandalproof xtures are shipped with both standard
and tamperproof screws. For maximum security, insert
tamperproof screws into the refractor and tighten with
Center Pin Torx Screwdriver. (Catalog # Vandriver, not
supplied)
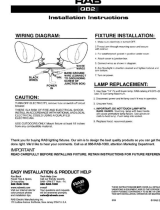
LIGHT
FIXTURE
(+)LINE BLACK
(-)COMMON WHITE
GROUND GROUND
WIRING
IF SUPPLY WIRES ARE LOCATED WITHIN (3) INCHES
OF BALLAST, USE WIRE RATED FOR AT LEAST 150ºC.
IF SUPPLY WIRES ARE ROUTED AND SECURED MIN. (3)
INCHES AWAY FROM BALLAST, USE WIRE TREATED
FOR AT LEAST 90ºC. SOME FIXTURES WILL BE SHIPPED
WITH A BALLAST FOR MULTIPLE VOLTAGES. IF
YOUR INSTALLATION VOLTAGE IS DIFFERENT THAN
THE WIRE FIXTURE VOLTAGE, FIND THE CORRECT
FIXTURE VOLTAGE WIRE AND MAKE THE PROPER WIRE
CONNECTIONS.
1. Connect the line (+) xture lead to the black supply lead.
2. Connect the common (-) xture lead to white supply
lead.
3. Connect the GROUND wire from xture to supply ground.
4. All unused leads must be capped and insulated.
IMPORTANT
READ CAREFULLY BEFORE INSTALLING FIXTURE. RETAIN THESE INSTRUCTIONS FOR FUTURE REFERENCE.
Fixtures must be wired in accordance with the National Electrical Code and all applicable local codes. Proper grounding is required
for safety. Vandalproof xtures are for indoor or outdoor use and should not be used in areas with limited ventilation or high
ambient temperatures. THIS PRODUCT MUST BE INSTALLED IN ACCORDANCE WITH THE APPLICABLE INSTALLATION CODE BY A
PERSON FAMILIAR WITH THE CONSTRUCTION AND OPERATION OF THE PRODUCT AND THE HAZARDS INVOLVED.
WARNING: Make certain power is OFF before installing or maintaining xture.

VAN3 INSTALLATION INSTRUCTIONS
Thank you for buying RAB lighting xtures. Our goal is to design the best quality products to get the job done right. We’d like to hear your comments.
Call the Marketing Department at 888-RAB-1000 or email: marketing@rabweb.com
TROUBLESHOOTING
1. Is the proper lamp is installed? Check the wattage and on
the xture label against markings on the lamp. Refer to
Replacement Lamp table for verication.
2. Make sure the lamp is not defective. Try a lamp known to
be in operating condition.
3. Check that the line voltage at xture is correct. Refer to
wiring directions.
4. Is there voltage at the lamp socket? If there is no voltage,
check all connections.
5. Is the xture grounded properly?
6. Is the photocell functioning properly (if used)?
VAN3-IN-0213
LAMP INSTALLATION
CAUTION: Prior to installing, check that the lamp is of
proper type and wattage. Observe lamp manufacturer’s
recommendations on lamp operation, ballast type and
burning position.
1. Disconnect power. Make sure xture and lamp are cool
enough to touch.
2. Loosen screws holding refractor.
3. Remove refractor and install lamp.
4. Close refractor and re-install screws.
CLEANING & MAINTENANCE
CAUTION: Be sure xture temperature is cool enough
to touch. Do not clean or maintain while xture is
energized.
1. Clean reector and refractor with non-abrasive glass
cleaning solution.
2. As lamps age, light output diminishes. Mass relamping at
regular intervals ensures full light output at the highest
eciency.
PHOTOCELL INSTALLATION
A photocell control may be installed in the eld.
1. Remove reector and socket mounting plate.
2. Remove close-up plug on desired side of xture.
3. Install Photocell as per diagram.
REPLACEMENT LAMPS
METAL HALIDE
Wattage Catalog ANSI Code
50W LMH50 M110
70W LMH70 M98
HIGH PRESSURE SODIUM
Wattage Catalog ANSI Code
35W LHPS35 S76
50W LHPS50 S68
70W LHPS70 S62
FLUORESCENT
Wattage Catalog Base Type
26W LCFL26 GX24q-3 CFL
32W LCFL32 GX24q-3 CFL
42W LCFL42 GX24q-4 CFL
Note: Minimum starting temperature of uorescent xture is 0ºF
(-18ºC).
(+) LIN E
RED
(–) COMMON
WHITE
SUPPLY
BLACK
LIGHT
FIXTURE
Easy Installation & Product Help
Tech Help Line
Call our experts 888 RAB-1000
©2012 RAB LIGHTING Inc.
No
rthvale, New Jersey 07647 USA
rabweb.com
Visit our website for product info
email
Answered promptly sales@rabweb.com
Note: These instructions do not cover all details or variations in
equipment nor do they provide for every possible situation during
installation operation or maintenance.
/


