Whalen 991070 / WSZB184872-GW5BMS User manual
- Type
- User manual

Version: 2015-05-19 Rev. 1
Whalen Furniture Manufacturing Factory # HAIOFF
1
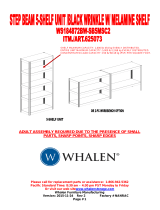
ITM. / ART. 991070
MODEL# WSZB184872-GW5BMS
Assembly Instructions
Please call for replacement parts or assistance:
1-866-942-5362
(English, Spanish and French)
8:30a.m. – 4:30p.m. Monday - Friday, PST
Or visit our website www.whalenstorage.com
Or e-mail your request to
parts@whalenfurniture.com
1. Please read instructions prior to assembly.
(Please note that there is a recommended
tool not included in this package).
2. Verify that there are no missing parts.
3. Two people are recommended for assembly.
4. Gently set parts on a flat, smooth surface.
5. For indoor use only.
“ADULT ASSEMBLY REQUIRED DUE TO THE PRESENCE OF SMALL PARTS,
SHARP POINTS, SHARP EDGES AS RECEIVED”
IMPORTANT, RETAIN FOR FUTURE REFERENCE:
READ CAREFULLY
SHELF MAXIMUM CAPACITY: 454 kg / 1000 lb EVENLY DISTRIBUTED.
ENTIRE UNIT MAXIMUM CAPACITY: 2268 kg / 5000 lb EVENLY DISTRIBUTED.
CONCENTRATED LOAD CAPACITY: 732.6 kg / 1615 lb PER SQUARE METER
(0.47 kg / 1 lb PER SQUARE INCH)

2
Factory # HAIOFF
Storage Rack is NOT recommended for outdoor use.
1. Do not exceed 454 kg / 1000 lb per shelf. Do not exceed 2268 kg / 5000 lb per unit.
2. Weight should be evenly distributed on the shelf surface. Weight that is concentrated
in the center of the shelf will reduce the shelf capacity.
3. Load small stable items on the top shelves, heavier and bulkier items should be
stored on the lower shelves. Load unit placing objects from the bottom to top. This
will ensure stability of overall unit.
4. Never climb or stand on the unit and do not use as a ladder.
5. Not intended to be used by children.
6. Do not alter the product in any way as it could compromise the performance of the
unit as intended and will void all warranties.
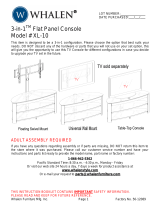
Note: Larger heavier items
stored on the bottom
levels and smaller lighter
items stored on the upper
levels.
Use caution when placing
items on each shelf.
Dropping items onto the
shelf can cause an impact
load that could result in
shelf failure.
Failure to follow these guidelines can result
in properly damage or personal injuries.

3
Factory # HAIOFF
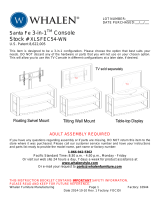
Parts List
Please read completely through the instructions and verify that all parts listed are present before
beginning assembly
Tool Required: Rubber Mallet (NOT INCLUDED)
PART# PART DESCRIPTION QUANTITY
A- Angle Post
8
B-Long Z-beam
10
C-Short Z-beam
10
D- Shelf Deck
5
E- Post Cap
8
F- Post Inserts
4
G- Post Clips
2

4
Factory # HAIOFF
ATTENTION
1. Use some type of lubricant to ease the joining of the angle posts and beams.
2. Use a cloth or wood block to protect the surface finish of the product when using a
rubber hammer.
3. Must drive the rivets to the bottom of the keyhole by hitting the beam near the joint.
4. Assemble the unit on a sturdy and level surface. Avoid assembly on carpet.
OPTION #1 5-SHELF STORAGE RACK
Note: To facilitate assembly we recommend having two persons assemble the unit. If you
do not understand these directions, or have any doubts about the safety of the installation,
please call a qualified contractor or contact Whalen Storage at 1-866-942-5362 for
assistance. If you have any defective parts please do not use, improper installation may
result in damage or injury.
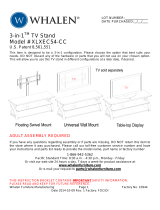
Assembly Instructions
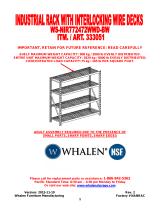
1. Start the End Assembly by joining a Short Z-beam (part C) into the two bottom keyholes of an
Angle Post (part A). Install the Z-beam in the upright position, as shown in detail #1. Drive the
rivets to the bottom of the keyhole by hitting the beam near the joint with a rubber mallet to lock
the pieces together.
Repeat last step to the second Angle
Post (part A) creating an End Assembly.
2. Assemble a Long Z-beam (part B) to the other two bottom keyholes of the End Assembly.
Assure all Z-beams are assembled in the upright position, as shown in detail #2. Hit the beam
near the joint with a rubber mallet to lock pieces together.
Note: Don’t hit too hard so you will not damage or bend the beams.
Repeat last step to add an additional Long Z-beam, the other Short Z-beam and two Angle
Posts to the End Assembly to create the Bottom Frame Assembly, as shown in detail #2.
Note: Follow the order 1st through 5th as shown in detail #2 to facilitate the assembly. Hit the
beams near the joints to lock the pieces into place.
C
A
C
A
A
C
B
B
A
B
C
3
rd
4
th
5
th
1
st
2
nd

5
Factory # HAIOFF
Assembly Instructions
3. Now pick up a Short Z-beam (part C) and join into the top two keyholes of the other 2 Angle
Posts (part A) to create a Top End Assembly. Drive the rivets to the bottom of the keyhole
with a rubber mallet. Make sure the flat edge of the Z-beam point up, as shown in detail #3.
Repeat last step for the opposite side Top End Assembly.
4. Before joining the Top End Assembly to the Bottom Frame Assembly insert Post Inserts (part F)
into the Angle Posts (part A) on the Bottom Frame Assembly, as shown in detail #4.
Proceed to assemble the Top End Assembly on to the Post Insert (part F), as shown in detail #4.
Repeat last 2 step for the opposite Top End Assembly.
5. Add a Short Z-beam (part C) to mid section at the joint by inserting the top rivet of the Z-beam
into the bottom keyhole of the Top End Assembly, and the bottom rivet of the Z-beam into the
top keyhole of the Bottom Frame Assembly, as shown in detail #5. Make sure all Z-beams are
in the upright position. Drive the rivets to the bottom of the keyholes by hitting the beam
near the joints to lock top and bottom of rack together.
Repeat last step to add an additional Short Z-beam (part C) and two Long Z-beams (part B).
C
C
A
A
A
A
F
F
A
A
F
F
F
A
A
C
B
B
C
C

6
Factory # HAIOFF
6. Proceed to add two additional Long Z-beams (part B) to top two keyholes of the Angle Posts
(part A). As shown in detail #6 install the Z-beams in the upright position. Be sure to have the
rivets in the keyholes before hitting the beams near the joints to lock the pieces together.
7. Assemble the remaining Long and Short Z-beams (part B and C) to your desired location on
the Angle Post (part A) to create two additional shelves, as shown in detail #7. Be sure to
install the Z-beams in the upright position. Hit the beams near the joints to lock pieces
together.
Note: The posts are adjustable in 3.8 cm / 1.5 in increments. You can adjust the shelves to
your desired height.
B
A
C
B
A
C
C
C
C
B

7
Factory # HAIOFF
Assembly Instructions
8. Now lay the Shelf Decks (part D) in between the Z-beams. See detail #8A.
Insert the Post Caps (part E) on the top of the Angle Posts (part A), as shown in detail #8B
OPTION #2 Side by Side
9. Repeat steps 1 through 2 to create a Bottom Frame Assembly.
Now insert two Short Z-beams and two Long Z-beams
(part C and B) in the top keyholes of the Angle Posts.
Hit the beams near the joints with a rubber mallet to
Lock pieces together, as shown in detail #9.
Add two additional Short Z-beams and two
Long Z-beams (part C and B) to create a
shelf at your desired level. Be sure all
Z-beams are assembled in the upright
position, as shown in detail #9.
10. Now start the Add-on Unit by joining the first Short Z-beam (part C) into the top two keyholes
of the other two Angle Posts (part A), as shown in detail #10. Hit the beam near the joints with
a rubber mallet to lock pieces together.
Repeat for the opposite end assembly.
A
B
B
C
C
C
A
B
C
C
C
C
A
D
D
D
D
D
D
E
A
Z-beam
Shelf Deck

8
Factory # HAIOFF
Assembly Instructions
11. Complete the Add-on Unit by adding two Long Z-beams (part B) at the top keyholes of the
Angle Posts (part A), as shown in detail #11. Install all Z-beams in the upright position. Hit the
beams near the joint with a rubber mallet to lock joints into place.
12. Now lay the Shelf Decks (part D) in between the Z-beams. Make sure all Z-beams are in the
upright position, as shown in detail #12.
13. To secure the frames together, align the four middle Angle Posts (part A) of the frames, as
shown in detail #13. Start with the two back middle Angle Posts. Align the indents on the Post
Clips (part G) and two keyholes of the back middle Angle Posts. Firmly clamp together a Post
Clip and the two angle posts. Repeat the step to clamp the two front middle angle posts.
Note: To remove Post Clips use a screwdriver. Insert the Post Caps (part E) on the top of the
Angle Posts (part A), as shown in detail #13.
14. Periodically inspect the unit to ensure all Z-beams are seated properly and firmly connected to
the Angle Posts.
A
A
B
B
D
D
D
Shelf Deck
Flat edge on top
Upright Position
(Z-beam)
A
G
E
A
A
E
D
A

9
Factory # HAIOFF
Care and Maintenance
Use a soft, clean cloth that will not scratch the surface when dusting.
Use of furniture polishes is not necessary. Should you choose to use polishes, test first in an inconspicuous
area.
Using solvents of any kind on your furniture may damage your furniture’s finish.
Never use water to clean your furniture as it may cause damage to the finish.
Stains or marks from crayons or ink markers will be difficult to remove.
Do not use any harsh abrasives or chemicals to clean any metal surfaces as it may damage the
protective coating.
Metal will rust if the finish is scratched or if your furniture is exposed to excessive humidity, particularly in
salt water locations.
Most metal furniture has a protective coating to prevent rust, however rust may occur if the finish is
marred or wears away over time.
In the event that your furniture is stained or otherwise damaged during use, we recommend that you call
a professional to repair your furniture.
Check rivets and post clips periodically and tighten them if necessary.
LIMITED LIFETIME WARRANTY
This Whalen Storage product (exclusive of shelves) is warranted to the original purchaser. If there is a
failure in this unit due to defects in materials or workmanship, Whalen Storage will repair or replace this
item at our discretion without charge. Warranty is void if product has been assembled incorrectly, misused,
abused by overloading, altered in any way or damaged due to accident. This warranty is not transferable
and does not cover chipping, flaking, scratches, rust, dents, or other damages to the surfaces of this
product. Responsibility of Whalen Storage is limited to repair or replacement of this product. Whalen
Storage is not responsible for consequential incidental, or other damages or losses resulting from product
failure.
This warranty is in lieu of all other expressed warranties. Some adapt for Canada do not allow the exclusion
or limitation of incidental or consequential damages, so the above limitation may not apply to you. This
warranty gives you specific legal rights and you may have other rights which vary from adapt for Canada.
In case of product failure, damage or defective parts refer to:
Whalen Storage
1578 Air Wing Rd.
San Diego, Ca. 92154 USA
1-866-942-5362
KEEP THESE INSTRUCTIONS FOR FURTHER REFERENCE
Your assembly should now be complete.
Thank you for your purchase.
www.whalenstorage.com
E
Serious or fatal crushing injuries can occur from furniture
tip-over. To help prevent tip-over:
Place heaviest items on the lowest rack.
Do not place heavy objects on the top of this product.
Never allow children to climb or hang on the shelves.
Use of tip-over restraints may only reduce but not eliminate the risk of tip-over.
Contact your local hardware store for tip-over restraints that will best meet the
area where unit will be used.
AUSTRALIA: Our goods come with guarantees that cannot be excluded under the Australian Consumer Law. You
are entitled to a replacement or refund for a major failure and for compensation for any other reasonably foreseeable
loss or damage. You are also entitled to have the goods repaired or replaced if the goods fail to be of acceptable
quality and the f
ailure does not amount to a major failure.
-
 1
1
-
 2
2
-
 3
3
-
 4
4
-
 5
5
-
 6
6
-
 7
7
-
 8
8
-
 9
9


Whalen 991070 / WSZB184872-GW5BMS User manual
- Type
- User manual
Ask a question and I''ll find the answer in the document
Finding information in a document is now easier with AI
Related papers
-
 Whalen 625073 / WS184872BW-SB5MSC2 User manual
-
 Whalen XL-10 User manual
-
 Whalen BEH2DF User manual
-
 Whalen XLSFEC54-WN User manual
-
 Whalen XLXEC54-CC User manual
-
 Whalen SIG3IN1CGT User manual
-
 Whalen TV Console User manual
-
 Whalen ECOM-AXD User manual
-
 Whalen 333051 / WS-NIR772472WWD-BW User manual
-
 Whalen 956873 / WSZB244872-SV5MS User manual


Other documents
-
Home Styles 5021-94 Assembly Instructions
-
Home Styles 5520-945 Assembly Instructions
-
StyleWell GC-11115-SRP-WH User guide
-
Home Decorators Collection 9415500860 Installation guide
-
Kmart 43268436 User manual
-
Montana Woodworks MWGCTB User guide
-
Edsal PC101 Assembly Manual
-
-
 Muscle Rack ZR4824SVL5P Operating instructions
-
