Page is loading ...

Convertible Pendant
Instruction Manual
Please read carefully and save these instructions. as you may need them at a later date.
SAFETY
WARNING: BE SURE THE ELECTRICITY TO THE WIRES YOU ARE WORKIGN ON IS SHUT OFF;EITHER THE
FUSE REMOVED OR THE CIRCUIT BREAKER OFF. TURNING THE POWER OFF USING THE LIGHT SWITCH
IS NOT SUFFICIENT TO PREVENT ELECTRICAL SHOCK.
NOTE: The important safeguards and instructions appearing is this manual are not meant to cover all possible
conditions and situations that may occur. It must be understood that common sense, caution and care are factors,
which cannot be built into any product. These factors must be supplied by the person(s) installing this unit.
READ & SAVE THESE INSTRUCTIONS
CAUTION: Before assembling your lighting fixture, refer to the sections titled Wiring Connections. If you feel you do
not have enough electrical wiring experience, either refer to a do-it –yourself wiring handbook or have your fixture
installed by a qualified, licensed electrician.
UNPACK THE PACKAGE
Check the contents to be sure everything is included
Tools Needed: Slotted screwdriver, Adjustable wrench, Step ladder, Wire cutters, Wiring supplies as required by
electrical code.
INSTALLATION & OPERATION INSTRUCTIONS
GENERAL
1. Before starting the installation, disconnect the power by turning off the circuit breaker or by removing the
appropriate fuse at the fuse box.
2. All electrical connections must be in accordance with local and National Electrical Code (NEC) standards. If you
are unfamiliar with proper electrical wiring connections, obtain the services of a qualified electrician.
3. Be sure to read these installation instructions and review the diagrams thoroughly before installation.
Assembly and Installation
Thank you for purchasing a World Import product. This lighting is already assembled and suitable for installing as
Semi Flush or Chain Hung Pendant to accommodate your selection.
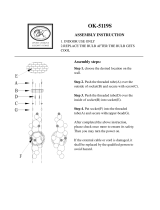
To be installed as Pendant Light:
1. Screw the three threaded pipes (16,17,18) together with the light arm (19) first, then screw the hanging ring
module (13) onto the upper threaded pipe (16).
2. Connect one end of the chain (11) with the hanging ring module (13), the other end with the screw collar loop
(10), adjust the length of the chain according to your need. Pull the electric wire (12) and ground wire along with
the chain, and through the threaded ring (15) and put down the canopy(14), then set the wires through the
center hole of the canopy and threaded tube (9).
3. Screw the threaded tube (9) onto the screw collar loop (10).
4. Lock the mounting bracket (2) with the outlet box (1) by screwing the fixture screw (7)
5. Wiring Connection: Attach the power supply wires to the electric wire (12) by connecting the power supply live
wire to the smooth fixture electric wire (26) and the power supply neutral wire to the ribbed fixture electric
wire(27). Attach the supply ground wire from the outlet box and the fixture ground wire( 5) from the fixture onto

the ground wire screw(8) on the mounting bracket (2), then connect both wires together using the correct size of
wire connectors(6). Place connected wires inside of the outlet box.
6. Slide the canopy (14) and the threaded ring (15) of the screw collar loop up the chain. Place the canopy over
the outlet box and secure in place by screwing the threaded ring onto the screw collar loop.
7. Put the glass shade (20) onto the shade holder (24) and attach the socket iron ring (21), then tighten the big
threaded ring (22) to secure the glass shade in correct position.
To be installed as Semi Flush Light:
1. Screw the three threaded pipes (16,17,18) together with the light arm (19) first, then screw the hanging ring
module (13) onto the upper threaded pipe (16).
2. Lock the mounting bracket (2) with the outlet box (1) by screwing the fixture screw (7)
3. Wire Connection: refer to the above Step 5.
4. Attach the hanging ring module (13) with the mounting bracket (2) through the set screw (28), then screw the
decorative nut (23) for tightening.
5. Put the glass shade (20) onto the shade holder (24) and attach the socket iron ring (21), then tighten the big
threaded ring (22) to secure the glass shade in correct position.
Relamping
1. Turn off the lamp at the switch and the main power supply.
2. Make sure the bulb is cool enough before touching.
3. Remove the old bulb and insert new bulb type A Med. base 75W Max.into the socket.
4. Restore the main power and turn on at the switch to check the operation of the bulb.
CAUTION: Refer to the relamping label near the lampholder for recommended bulb type and maximum wattage
allowed (bulb sold separately).
1.
Outlet box
2. Mounting bracket
3. Hex nut
4. Lock washer
5. Fixture ground wire
6. Wire connector
7. Fixture screw
8. Ground wire screw
9. Threaded tube
10. Screw collar loop
11. Chain
12. Electric wire
13. Hanging ring module
14. Canopy
15. Threaded ring
16. Threaded pipe
17. Threaded pipe
18. Threaded pipe
19. Light arm
20. Glass shade
21. Socket iron ring
22. Big threaded ring
23. Decorative nut
24. Shade holder
25. Light bulb
26. Smooth fixture electric wire
27. Ribbed fixture electric wire
28. Set screw
Pendant Light
Semi Flush Light
/