Page is loading ...

BeSUN Electronic Control Unit
An electronic control unit integrated into the Wind/Sun Sensor
compartment, for the automation of sun blinds and rolling
window shutters, with the possibility radio control operation for
individual and/or centralised control.
- Mod. (BeSUN 306) : 306 MHz
- Mod. (BeSUN 330) : 330 MHz
- Mod. (BeSUN 418) : 418 MHz
- Mod. BeSUN 433 : 433,92 MHz
- Mod. BeSUN 433 SET: “Narrow Band” 433.92 MHz
- Mod. BeSUN 868 : “Narrow Band” 868.3 MHz
( ) Product intended for those countries where its use is
permitted.
TECHNICAL DATA
- Power supply: 230V~ 50/60Hz 2.5 W
- Motor output: 230V~ 500W Max.
- Working temperature: -10÷60°C
- Radio receiver: see model
- Compatible radio controls: 12-18 Bit or Rolling Code
- Anemometer sensitivity: 5 - 40 Km/h
- Sun sensor sensitivity: 5 - 40 Klux
- Number of codes that may be stored: 4 Max.
- Packaging dimensions: 240x185x110 mm.
- Container: PC UL94V-0 (IP54)
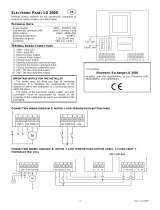
CONNECTION OF CN 1 TERMINAL BOARD
1: Earth
2: 230V line input (Phase).
3: 230V line input (Neutral).
4: Upward movement motor output.
5: Shared motor output.
6: Downward movement motor output.
INITIAL OPERATING CONDITION
The device can only operate in conjunction with one or more
radio controls. There is no radio control code stored in the
default factory setting.
OPERATION USING DIFFERENT MODELS OF REMOTE CONTROL
Different models of remote control may be programmed. By
storing a code (1 button) a cyclic step by step operation (Up-
Stop-Down) may be achieved, and by storing two different
codes (2 buttons) different commands are produced, one for
Up and one for Down. Storing three different codes (3 “BeFree”
series buttons) produces three different commands: the first for
Up, the second for Stop and the third for Down.
Operation using a 1-button radio control:
The following type of operation is obtained using a radio-
control with a single button: The first press controls the upward
movement until the motor stops (the motor has a running time
of around 2 minutes). The second press controls the downward
movement of the shutter. If the button is pressed before the
motor stops running, the control unit will stop the shutter
moving and the button will need to be pressed again to
reactivate the motor in the opposite direction.
Operation using a 2-button radio control:
By using a radio control with 2 buttons, the following processes
may be carried out: the first button, “Up”, controls the upward
movement for about 2 minutes, until the motor has stopped
running and the second button (“Down”) controls the downward
movement of the shutter. If the upward movement is
interrupted with another “Up” command, the motor will continue
to run in the upward movement direction. If, however, the
movement is interrupted with a “Down” command, the control
unit will stop the motor.
The procedure is the same for the down movement phase.
Operation using a 3-button radio control (BeFree x1):
The following type of operation is obtained using the BeFree
x1 radio control: the (Up) key controls the upward movement
until the end of the motor time (2 minutes), the (Stop) key
makes the shutter stop and the (Down) key controls the
downward movement. If a stop command is sent during the
upward or downward movement, the control unit causes the
shutter to stop. If a command that is in the opposite direction to
the current movement is sent during the upward or downward
movement, the control unit causes the shutter to change
direction.
Operation using a 3-button radio control (BeFree x3):
When using the BeFree x3 radio control, you will obtain the
same operation as previously described for the BeFree x1
version; in addition, by using the keys (-) and (+) at the sides of
the radio control it is possible to enable and disable the sun
sensor (the selection is confirmed by a quick Up / Down
movement of the motor).
Operation using a 3-button radio control (BeFree x6):
When using the BeFree x6 radio control, you will obtain the
same operation as previously described for the BeFree x1
version; in addition, by using the keys (-) and (+) at the sides of
the radio control it is possible to select the UP – STOP –
DOWN controls for 6 different types of use.
INVERSION OF THE ROTATION MOTOR
If you notice that when pressing the UP key on the radio-
control the control unit causes the shutter to move upwards
instead of downwards, all you have to do is simply repeat the
programming procedure pressing the DOWN key instead of the
UP key, or invert the motor’s Upward movement wire with the
Downward movement wire.
GROUP OR GENERAL CENTRALISATION
It is also possible to insert two identical codes (buttons) from
one radio control to all the control units or a group of them that
are situated at a maximum distance of 20 metres from the point
of command, in order to obtain general or partial motion of
more than one automation.
ANEMOMETER OPERATION
The electronic control unit will control the upward movement of
the sun shade every time the wind exceeds the selected
threshold.
SUN SENSOR OPERATION
The electronic control unit controls the downward movement of
the sun shade after 5 minutes during which the brightness is
greater than the threshold selected using the VR1 trimmer and
displayed by means of the SUN LED; it also controls the
upward movement of the shade after 5 minutes during which
the brightness is below the selected threshold.
When the SUN LED lights up on the control unit, this indicates
that the sun’s intensity exceeds the threshold selected using
the VR1 trimmer; this enables you to use the current light
conditions as a reference when setting the desired value.
OPERATION PRINCIPLES
SW1 SW1 SW1 SW1
Step-by-step P/P + Down mov. Sun Sensor Test Anemometer
Test
Step-by-step (Dip 1 and 2 OFF)
The following type of operation may be obtained using the
BeFree xx radio control: the Up key controls the upward
movement until the end of the set motor time (2 minutes), the
Stop key makes the shutter stop and the Down key controls
the downward movement. If a stop command is sent during the
1 Rev. 1.4 20-05-2009
GB

upward or downward movement, the control unit causes the
shutter to stop. If a command that is in the opposite direction to
the current movement is sent during the upward or downward
movement, the control unit causes the shutter to change
direction. The electronic control unit will control the upward
movement of the sun shade every time the wind exceeds the
selected threshold.
2) Step-by-step + Aut. downward movement (Dip 1 ON and
Dip 2 OFF)
The device operates as described previously (step-by-step)
with the difference that, when the wind speed exceeds the set
value, the control unit will cause the shade to move upwards;
once the disturbance is over, the control unit will cause the
shade to move downwards after 5 minutes in which the wind
speed is less than the set value.
3) Sun Sensor Test (Dip 1 OFF and Dip 2 ON)
The operation of the Sun Sensor and the correct rotation
direction can be checked at the time of installation in the
following way: turn the VR1 trimmer as far as possible in a
clockwise direction (in the + position); at the same time, the
control unit will cause the SUN LED to light up and there will be
an downward movement lasting 5 seconds. Turn the VR1
trimmer in an anticlockwise direction (in the – position); at the
same time, the control unit will cause the SUN LED to switch
off and there will be a upward movement lasting 5 seconds.
4) Anemometer Test (Dip 1 and 2 ON)
The operation of the Anemometer and the correct rotation
direction can be checked at the time of installation in the
following way: manually turn the anemometer blades; at the
same time, the control unit will cause an upward movement
lasting 5 seconds.
PROGRAMMING KEYS AND INDICATOR LEDS
SEL key: selects the type of function to store; selection is
indicated by the LED flashing. The desired function can be
selected by pressing the key repeatedly. The selected function
remains active for 15 seconds (flashing LED) following which
the control unit returns to its original status.
SET key: programmes the function that has been selected
using the SEL. Key.
Indicator LED
LED on: option stored.
LED off: option not stored.
Flashing LED: option selected.
---------------------- MAIN MENU -----------------
Reference LED LED Off LED On
1) CODE No code TX Pgm code
2) T. MOT. Motor time 2 minutes Pgm motor time
3) WIND Wind safety 25 km/h Pgm. Wind safety
4) MAN/AUT Sun sensor = OFF Sun sensor = ON
5) SUN Sun shining = OFF Sun shining =
ON
1) CODE LED
Programming using a 1- or 2-button radio control:
To programme the transmission codes in the radio control,
proceed as follows: press the SEL key; the CODE LED begins
to flash. Send the first preselected code using the relevant
radio control at the same time; when the CODE LED begins to
flash rapidly send the second code to be stored. The CODE
LED will remain lit and the programming will be complete. If the
second code is not sent within 10 seconds the control unit exits
the programming stage, selecting the function using a single
button on the radio control. If you have stored 4 codes and you
repeat the programming operation, all the indicator LEDs will
start flashing extremely rapidly to indicate that no more codes
can be stored.
Programming BeFree xx series radio controls.
The control unit allows you to store the whole “BeFree xx”
radio control by programming only the UP key.
To programme the “BeFree xx” radio-control codes, proceed as
follows: press the SEL key; the CODE LED begins to flash.
Press the UP key of the desired radio control at the same time;
at that moment, the CODE LED will remain lit and
programming will be complete. If all of the possible 4 radio
control codes have been stored and you repeat the
programming operation, all indicator LEDs will start flashing
very rapidly to indicate that no new codes can be stored.
Deleting the codes To delete all transmission codes
stored in the memory, proceed as follows: press the SEL key;
the CODE LED starts flashing. Then press the SET key; the
CODE LED switches off and the procedure is complete.
2) LED T. MOT.
Programming the motor operating time
The control unit comes with a motor power supply time of two
minutes (LED T.MOT. OFF).
The motor time must be programmed when the shutter is down
and in the following way:
Press the SEL key until the T.MOT LED key flashes, then hold
down the SET key; the shutter will begin to move upwards.
Once the desired position has been reached, release the SET
key – at this very moment, the motor time will be stored and
the T.MOT LED will remain lit.
If you are using an automation with a stop limit, we recommend
that you set a time that exceeds the stop limit of the shutter by
a few seconds.
If you want unlimited motor time, perform the same
programming procedure, holding down the SET key for less
than two seconds; the T.MOT LED will remain lit and the
unlimited time function will be set. The operation may be
repeated if a mistake is made during programming.
3) WIND SPEED LED
Programmed wind threshold display
The wind safety threshold may be displayed in the following
way: use the SEL key to navigate to the WIND LED position;
the LED will double-flash the same number of times as the
stored wind safety threshold (each WIND LED double-flash
corresponds to an increase of 5 Km/h), (for example: 5 WIND
LED flashes = 25 Km/h).
Wind safety threshold selection from 5 to 40 km/h
The control unit comes with a default wind safety threshold
setting of 25 km/h (WIND LED OFF).
The wind safety threshold may be programmed in the following
way: use the SEL key to navigate to WIND LED, then press the
SET key to start the programming procedure: At the same time
the WIND LED will begin to double-flash (each double-flash of
the WIND LED corresponds to an increase of 5 km/h); press
the SET key once the desired threshold has been reached – at
this moment, the selected value will be stored and the WIND
LED will remain lit (for example: 5 WIND LED double-flashes =
25 km/h).
The operation may be repeated if a mistake is made during
programming.
4) MAN/AUT LED
Enabling the Sun Sensor
The control unit comes with the Sun Sensor disabled
(MAN/AUT LED OFF).
The Sun Sensor may be enabled in the following ways:
Using the SEL and SET keys:
press the SEL key until the MAN/AUT LED flashes, then press
the SET key briefly; at this moment the MAN/AUT LED remains
lit and the Sun Sensor will be enabled. Repeat the operation to
disable the Sun Sensor.
Using the BeFree x3 radio control:
2 Rev. 1.4 20-05-2009

Hold the (+) key on the radio control down for 5 seconds; at the
same time the control unit will cause the shutter to move
Up/Down for one second to confirm that the Sun Sensor has
been enabled, and the MAN/AUT LED will remain lit. Repeat
the operation to disable the Sun Sensor by following the same
procedure, but instead holding down the (-) key for 5 seconds.
5) SUN LED
Sun sensitivity adjustment (5 - 40 Klux)
The control unit allows you to adjust the sensitivity of the Sun
Sensor using the VR1 trimmer. When the SUN LED lights up
on the control unit, this indicates that the intensity of the sun
exceeds the selected threshold; this enables you to use the
current light conditions as a reference when setting the desired
value.
EXTENDED MENU
The control unit is supplied by the manufacturer with the
possibility of selecting only the functions listed in the main
menu.
To enable the functions of the extended menu proceed as
follows: press the SET key and hold for 5 seconds; the WIND
and MAN/AUT LEDs will flash alternately and the user has 30
seconds within which to select the functions of the extended
menu using the SEL and SET keys. After another 30 seconds
the control unit returns to the main menu.
---------------------- EXTENDED MENU -----------------
Reference LED LED Off LED On
A) CODE remote PGM = OFF remote PGM = ON
B) T.MOT. Aut. Movement lock = OFF Aut. Movement lock =
ON
C) WIND Flashing beacon ON/OFF
D) MAN/AUT Flashing beacon ON/OFF
A) CODE
(Remote programming of radio control):
The control unit allows the transmission code to be
programmed by remote, without using the SEL key.
To programme the transmission code from remote proceed as
follows: send the radio control code continuously for more than
10 seconds and the control unit will enter the programming
mode as described above for the CODE LED in the main
menu.
The control unit is supplied by the manufacturer with remote
programming of the transmission code not enabled; to enable
the function proceed as follows: check that the extended menu
is enabled (WIND and MAN/AUT LEDs start flashing
alternately), use the “SEL” key to navigate to the CODE LED
when it is flashing and press the “SET” key: the CODE LED
lights up and programming is completed. Repeat the operation
to restore the previous configuration.
B) T. MOT. (Automatic movement lock):
The control unit enables the prevention of automatic
movements (Up / Down sun blind movements on the Sun
Sensor command or the within the Automatic Downward
movement function), so that if a stop command is sent from a
radio control during the movement stage, the control unit locks
the automatic movements until a new Up or Down command is
sent. The control unit is supplied by the manufacturer with the
Automatic Movement Lock disabled; to enable the function
proceed as follows: check that the extended menu is enabled
(WIND and MAN/AUT LEDs start flashing alternately), use the
“SEL” key to navigate to the T.MOT LED and when it is
flashing press the “SET” key: the T.MOT LED will light up and
programming is completed. Repeat the operation to restore the
previous configuration.
RESET
To restore the default configuration, press the SEL and SET
keys simultaneously; all indicator LEDs will switch on and then
off again immediately.
NOTES FOR THE INSTALLER
− Before the shutter automation, it is necessary to check it
is in good condition and that it complies with EN 12604
and the Machines Directive.
− The wiring of external electrical components must comply
with EN 60204-1 as amended in section 5.2.7 of EN
12453. The power supply leads and connection cables
must be secured using the cable clamp included in the
container.
− Connect the earth wire of the motor to the earth wire of
the electrical system using the special terminal, as
illustrated in the connection diagram.
− The control unit is not equipped with a 230 V a/c electric
line sectioning device. The installer is responsible for
installing a sectioning device in the system. The
sectioning device must be positioned so that it is
protected against accidental closure, in compliance with
section 5.2.9 of EN 12453.
− The motor reducer used to move the shutter must comply
with section 5.2.7. of EN 12453.
− For the radio receiver to operate correctly when two or
more control units are used, we recommend that you
install the devices at least 3 metres away from each
other.
SEAV s.r.l. hereby declares that the following product:
BeSUN electronic control unit complies with the requirements
of Directives R&TTE 99/5/EC, EMC 2004/108/EC, LVD
2006/95/EC.
3 Rev. 1.4 20-05-2009

4 Rev. 1.4 20-05-2009
/