
Contents: Dell PowerVault 200S, 201S, 210S, and 211S Storage Systems Installation and Service Guide
file:////ausolupload1/docs/eDocs_backupProd_2272013/Stor-sys/hendrx12/en/it/index.htm[3/26/2013 10:58:07 AM]
Dell™ PowerVault™ 200S, 201S, 210S, and 211S Storage Systems
Installation and Service Guide
You must right-click the link for a portable document format (PDF) file and save the file to your
hard-disk drive. Attempting to link directly to large PDF files causes your system to freeze.
To save PDF files (files with an extension of .pdf) to your hard-disk drive, right-click the document title, click
Save Target As in Microsoft® Internet Explorer or Save Link As in Netscape Navigator, and specify a
location on your hard-disk drive.
Right-click only the following links:
Table of Contents
Safety Instructions
Preface
Introduction
Installing Your Rack-Mount Storage System
Installing Your Stand-Alone Storage System
Configuring Your ESEM or SEMM for Cluster Operation
Connecting Your Storage System to the Host Computer
Installing Drives
Service Information for Technicians
Getting Help
Technical Specifications
Maintaining Your Storage System
Regulatory Notices
Limited Warranty and Return Policy
Abbreviations and Acronyms
Index
NOTES: PDF files require Adobe™ Acrobat Reader Version 4.0, which can be downloaded from the
Adobe World Wide Web site at: http://www.adobe.com/. Make sure that you include the option for
searching PDF files before you download Acrobat Reader.
To navigate within a PDF file, move the cursor within the document until a hand pointing appears.
Click the link to open it. The left pane contains an index to the section. Click Contents to return to the
Table of Contents.
To perform a word search among all the .pdf files for this document, click the search icon (binoculars
with paper behind them) in the Acrobat toolbar or click Edit, point to Search, and click Query. If
Search is not listed in the Edit menu, you must download the Acrobat Reader with the option for
searching PDF files from the Adobe World Wide Web site at: http://www.adobe.com/.
Model AMP

Contents: Dell PowerVault 200S, 201S, 210S, and 211S Storage Systems Installation and Service Guide
file:////ausolupload1/docs/eDocs_backupProd_2272013/Stor-sys/hendrx12/en/it/index.htm[3/26/2013 10:58:07 AM]
Information in this document is subject to change without notice.
© 2000 Dell Computer Corporation. All rights reserved.
Reproduction in any manner whatsoever without the written permission of Dell Computer Corporation is
strictly forbidden.
Reproduction in any manner whatsoever without the written permission of Dell Computer Corporation is
strictly forbidden.
Trademarks used in this text: Dell, the DELL logo, PowerEdge, Dell OpenManage, PowerVault, and
DellWare are trademarks of Dell Computer Corporation; Novell and NetWare are registered trademarks of
Novell, Inc.; Microsoft, Windows, Windows NT, and MS-DOS are registered trademarks of Microsoft
Corporation; VESA is a registered trademark of Video Electronics Standards Association.
Other trademarks and trade names may be used in this document to refer to either the entities claiming the
marks and names or their products. Dell Computer Corporation disclaims any proprietary interest in
trademarks and trade names other than its own.
Initial release: 20 Nov 1998
Last revised: 14 Mar 2000

xvii
!"#$
4390398
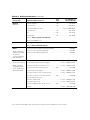
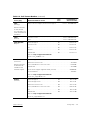
2xxS Storage System Features . . . . . . . . . . . . . . . . . . . . . . . . . . . . . . . . . . . . . . . . 1-1
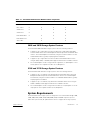
200S and 201S Storage System Features . . . . . . . . . . . . . . . . . . . . . . . . . . . . 1-3
210S and 211S Storage System Features . . . . . . . . . . . . . . . . . . . . . . . . . . . . 1-3
System Requirements. . . . . . . . . . . . . . . . . . . . . . . . . . . . . . . . . . . . . . . . . . . . . . . 1-3
Indicators. . . . . . . . . . . . . . . . . . . . . . . . . . . . . . . . . . . . . . . . . . . . . . . . . . . . . . . . . 1-4
Enclosure Indicators. . . . . . . . . . . . . . . . . . . . . . . . . . . . . . . . . . . . . . . . . . . . . 1-4
SCSI Hard-Disk Drive Indicators. . . . . . . . . . . . . . . . . . . . . . . . . . . . . . . . . . . . 1-5
Back Panel Indicators . . . . . . . . . . . . . . . . . . . . . . . . . . . . . . . . . . . . . . . . . . . . 1-6
Data Protection . . . . . . . . . . . . . . . . . . . . . . . . . . . . . . . . . . . . . . . . . . . . . . . . . . . . 1-7
Getting Help . . . . . . . . . . . . . . . . . . . . . . . . . . . . . . . . . . . . . . . . . . . . . . . . . . . . . . 1-7
Setting Up a Stand-Alone Storage System . . . . . . . . . . . . . . . . . . . . . . . . . . . . . . . 3-1
Rack Installation Restrictions . . . . . . . . . . . . . . . . . . . . . . . . . . . . . . . . . . . . . . 3-1
Stand-Alone Kit Contents . . . . . . . . . . . . . . . . . . . . . . . . . . . . . . . . . . . . . . . . . 3-1
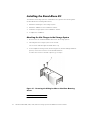
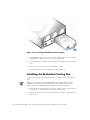
Installing the Stand-Alone Kit. . . . . . . . . . . . . . . . . . . . . . . . . . . . . . . . . . . . . . . . . . 3-2
Attaching the Hat Flanges to the Storage System. . . . . . . . . . . . . . . . . . . . . . 3-2
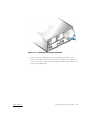
Attaching Stabilizers to the Stand-Alone Chassis. . . . . . . . . . . . . . . . . . . . . . . 3-3
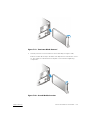
Installing the Storage System in the Stand-Alone Chassis. . . . . . . . . . . . . . . . 3-4
Completing the Installation. . . . . . . . . . . . . . . . . . . . . . . . . . . . . . . . . . . . . . . . 3-6

xviii
!"#$
!"""
!#
Configuring the ESEM or SEMM for Cluster Operation . . . . . . . . . . . . . . . . . . . . . 4-2
Installing the ESEM or SEMM . . . . . . . . . . . . . . . . . . . . . . . . . . . . . . . . . . . . . . . . 4-3
Managing the PowerVault 2xxS Storage System in a Cluster Configuration . . . . . 4-5
$
% $
Preparing the Storage System . . . . . . . . . . . . . . . . . . . . . . . . . . . . . . . . . . . . . . . . 5-1
Connecting the Storage System . . . . . . . . . . . . . . . . . . . . . . . . . . . . . . . . . . . . . . . 5-1
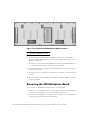
Preventing Unauthorized Access to the Storage System . . . . . . . . . . . . . . . . . . . . 5-5
Running the Diagnostics . . . . . . . . . . . . . . . . . . . . . . . . . . . . . . . . . . . . . . . . . . . . . 5-5
& '( &
SCSI Hard-Disk Drive Configuration . . . . . . . . . . . . . . . . . . . . . . . . . . . . . . . . . . . . 6-1
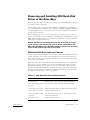
Removing and Installing SCSI Hard-Disk Drives in the Drive Bays . . . . . . . . . . . . . 6-3
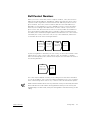
SCSI Hard-Disk Drive Indicator Patterns . . . . . . . . . . . . . . . . . . . . . . . . . . . . . 6-3
Removing a SCSI Hard-Disk Drive From the Storage System. . . . . . . . . . . . . 6-4
Installing a SCSI Hard-Disk Drive in the Storage System . . . . . . . . . . . . . . . . 6-7
) (!!* )
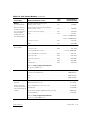
Precautionary Measures . . . . . . . . . . . . . . . . . . . . . . . . . . . . . . . . . . . . . . . . . . . . . 7-1
Troubleshooting Overview . . . . . . . . . . . . . . . . . . . . . . . . . . . . . . . . . . . . . . . . . . . 7-2
Indicators Overview. . . . . . . . . . . . . . . . . . . . . . . . . . . . . . . . . . . . . . . . . . . . . 7-2
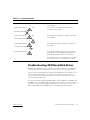
Troubleshooting SCSI Hard-Disk Drives . . . . . . . . . . . . . . . . . . . . . . . . . . . . . . . . . 7-3
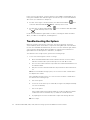
Troubleshooting the System. . . . . . . . . . . . . . . . . . . . . . . . . . . . . . . . . . . . . . . . . . 7-4
Troubleshooting a Cooling Fan . . . . . . . . . . . . . . . . . . . . . . . . . . . . . . . . . . . . . . . . 7-6
Troubleshooting a Power Supply . . . . . . . . . . . . . . . . . . . . . . . . . . . . . . . . . . . . . . 7-7
System Messages . . . . . . . . . . . . . . . . . . . . . . . . . . . . . . . . . . . . . . . . . . . . . . . . . 7-9
Parts Replacement Procedures. . . . . . . . . . . . . . . . . . . . . . . . . . . . . . . . . . . . . . . . 7-9
Recommended Tools. . . . . . . . . . . . . . . . . . . . . . . . . . . . . . . . . . . . . . . . . . . . 7-9
Computer Orientation . . . . . . . . . . . . . . . . . . . . . . . . . . . . . . . . . . . . . . . . . . . 7-9
Component Locations . . . . . . . . . . . . . . . . . . . . . . . . . . . . . . . . . . . . . . . . . . 7-11
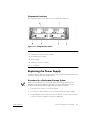
Replacing the Power Supply . . . . . . . . . . . . . . . . . . . . . . . . . . . . . . . . . . . . . . . . . 7-11
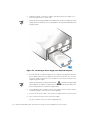
Procedure for a Redundant Storage System . . . . . . . . . . . . . . . . . . . . . . . . . 7-11
Procedure for a Nonredundant Storage System . . . . . . . . . . . . . . . . . . . . . . 7-13
Replacing a Cooling Fan . . . . . . . . . . . . . . . . . . . . . . . . . . . . . . . . . . . . . . . . . . . . 7-14
Replacing an Enclosure Module . . . . . . . . . . . . . . . . . . . . . . . . . . . . . . . . . . . . . . 7-15
Removing and Reinstalling the Component Mounting Bracket . . . . . . . . . . . . . . 7-17
Removing the Dual-Bus Split Backplane Module . . . . . . . . . . . . . . . . . . . . . . . . . 7-19
Removing the SCSI Backplane Board . . . . . . . . . . . . . . . . . . . . . . . . . . . . . . . . . . 7-20

xix
!"#$
Removing and Reinstalling the Lock Bar. . . . . . . . . . . . . . . . . . . . . . . . . . . . . . . . 7-24
Installing Redundant Components Procedures . . . . . . . . . . . . . . . . . . . . . . . . . . . 7-25
Recommended Tools . . . . . . . . . . . . . . . . . . . . . . . . . . . . . . . . . . . . . . . . . . . 7-26
Installing the Redundant Power Supply. . . . . . . . . . . . . . . . . . . . . . . . . . . . . . . . . 7-26
Installing the Redundant Cooling Fan . . . . . . . . . . . . . . . . . . . . . . . . . . . . . . . . . . 7-28
Installing the Second Enclosure Module . . . . . . . . . . . . . . . . . . . . . . . . . . . . . . . . 7-30
+ ,% +
Technical Assistance . . . . . . . . . . . . . . . . . . . . . . . . . . . . . . . . . . . . . . . . . . . . . . . 8-1
Help Tools . . . . . . . . . . . . . . . . . . . . . . . . . . . . . . . . . . . . . . . . . . . . . . . . . . . . . . . . 8-2
World Wide Web . . . . . . . . . . . . . . . . . . . . . . . . . . . . . . . . . . . . . . . . . . . . . . . 8-2
AutoTech Service . . . . . . . . . . . . . . . . . . . . . . . . . . . . . . . . . . . . . . . . . . . . . . . 8-3
TechFax Service . . . . . . . . . . . . . . . . . . . . . . . . . . . . . . . . . . . . . . . . . . . . . . . . 8-3
TechConnect BBS . . . . . . . . . . . . . . . . . . . . . . . . . . . . . . . . . . . . . . . . . . . . 8-3
Automated Order-Status System. . . . . . . . . . . . . . . . . . . . . . . . . . . . . . . . . . . 8-3
Technical Support Service . . . . . . . . . . . . . . . . . . . . . . . . . . . . . . . . . . . . . . . . 8-4
Problems With Your Order . . . . . . . . . . . . . . . . . . . . . . . . . . . . . . . . . . . . . . . . . . 8-4
Product Information. . . . . . . . . . . . . . . . . . . . . . . . . . . . . . . . . . . . . . . . . . . . . . . . . 8-4
Returning Items for Warranty Repair or Credit . . . . . . . . . . . . . . . . . . . . . . . . . . . . 8-4
Before You Call . . . . . . . . . . . . . . . . . . . . . . . . . . . . . . . . . . . . . . . . . . . . . . . . . . . . 8-5
Dell Contact Numbers . . . . . . . . . . . . . . . . . . . . . . . . . . . . . . . . . . . . . . . . . . . . . . . 8-7
- *!
-. .
Data Preservation . . . . . . . . . . . . . . . . . . . . . . . . . . . . . . . . . . . . . . . . . . . . . . . . . . B-1
Scheduling Backups . . . . . . . . . . . . . . . . . . . . . . . . . . . . . . . . . . . . . . . . . . . . . B-1
Backup Devices . . . . . . . . . . . . . . . . . . . . . . . . . . . . . . . . . . . . . . . . . . . . . . . . B-1
Cleaning Storage System Components. . . . . . . . . . . . . . . . . . . . . . . . . . . . . . . . . . B-2
Recommended Tools and Accessories . . . . . . . . . . . . . . . . . . . . . . . . . . . . . . B-2
Cleaning the Storage System Exterior . . . . . . . . . . . . . . . . . . . . . . . . . . . . . . . B-2
Environmental Factors. . . . . . . . . . . . . . . . . . . . . . . . . . . . . . . . . . . . . . . . . . . . . . . B-2
Temperature. . . . . . . . . . . . . . . . . . . . . . . . . . . . . . . . . . . . . . . . . . . . . . . . . . . B-2
Humidity. . . . . . . . . . . . . . . . . . . . . . . . . . . . . . . . . . . . . . . . . . . . . . . . . . . . . . B-3
Altitude. . . . . . . . . . . . . . . . . . . . . . . . . . . . . . . . . . . . . . . . . . . . . . . . . . . . . . . B-3
Dust and Particles . . . . . . . . . . . . . . . . . . . . . . . . . . . . . . . . . . . . . . . . . . . . . . B-4
Corrosion . . . . . . . . . . . . . . . . . . . . . . . . . . . . . . . . . . . . . . . . . . . . . . . . . . . . . B-4
ESD . . . . . . . . . . . . . . . . . . . . . . . . . . . . . . . . . . . . . . . . . . . . . . . . . . . . . . . . . B-4
Electromagnetic and Radio Frequency Interference . . . . . . . . . . . . . . . . . . . . B-5
Magnetism . . . . . . . . . . . . . . . . . . . . . . . . . . . . . . . . . . . . . . . . . . . . . . . . . . . . B-5
Shock and Vibration . . . . . . . . . . . . . . . . . . . . . . . . . . . . . . . . . . . . . . . . . . . . . B-6
Power Source Interruptions . . . . . . . . . . . . . . . . . . . . . . . . . . . . . . . . . . . . . . . B-6

xx
!"#$
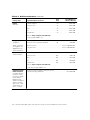
Power Protection Devices. . . . . . . . . . . . . . . . . . . . . . . . . . . . . . . . . . . . . . . . . . . . B-7
Surge Protectors . . . . . . . . . . . . . . . . . . . . . . . . . . . . . . . . . . . . . . . . . . . . . . . B-7
Line Conditioners. . . . . . . . . . . . . . . . . . . . . . . . . . . . . . . . . . . . . . . . . . . . . . . B-7
Uninterruptible Power Supply . . . . . . . . . . . . . . . . . . . . . . . . . . . . . . . . . . . . . B-7
- /
FCC Notices (U.S. Only) . . . . . . . . . . . . . . . . . . . . . . . . . . . . . . . . . . . . . . . . . . . . . C-2
Class A. . . . . . . . . . . . . . . . . . . . . . . . . . . . . . . . . . . . . . . . . . . . . . . . . . . . . . . C-2
Class B. . . . . . . . . . . . . . . . . . . . . . . . . . . . . . . . . . . . . . . . . . . . . . . . . . . . . . . C-3
IC Notice (Canada Only) . . . . . . . . . . . . . . . . . . . . . . . . . . . . . . . . . . . . . . . . . . . . . C-3
CE Notice (European Union) . . . . . . . . . . . . . . . . . . . . . . . . . . . . . . . . . . . . . . . . . . C-4
EN 55022 Compliance (Czech Republic Only). . . . . . . . . . . . . . . . . . . . . . . . . . . . . C-5
VCCI Notice (Japan Only) . . . . . . . . . . . . . . . . . . . . . . . . . . . . . . . . . . . . . . . . . . . . C-5
Class A ITE. . . . . . . . . . . . . . . . . . . . . . . . . . . . . . . . . . . . . . . . . . . . . . . . . . . . C-5
Class B ITE. . . . . . . . . . . . . . . . . . . . . . . . . . . . . . . . . . . . . . . . . . . . . . . . . . . . C-6
MOC Notice (South Korea Only) . . . . . . . . . . . . . . . . . . . . . . . . . . . . . . . . . . . . . . . C-6
Class A Device. . . . . . . . . . . . . . . . . . . . . . . . . . . . . . . . . . . . . . . . . . . . . . . . . C-6
Class B Device. . . . . . . . . . . . . . . . . . . . . . . . . . . . . . . . . . . . . . . . . . . . . . . . . C-7
Polish Center for Testing and Certification Notice . . . . . . . . . . . . . . . . . . . . . . . . . C-7
Wymagania Polskiego Centrum BadaÒ i Certyfikacji . . . . . . . . . . . . . . . . . . . . . . . C-8
PozostaŠe instrukcje bezpieczeÒstwa . . . . . . . . . . . . . . . . . . . . . . . . . . . . . . . . . . C-8
NOM Information (Mexico Only). . . . . . . . . . . . . . . . . . . . . . . . . . . . . . . . . . . . . . . C-9
Información para NOM (únicamente para México) . . . . . . . . . . . . . . . . . . . . . . . . . C-9
BSMI Notice (Taiwan Only). . . . . . . . . . . . . . . . . . . . . . . . . . . . . . . . . . . . . . . . . . C-10
-' 012 '
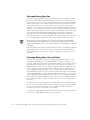
Three-Year Limited Warranty (U.S. Only) . . . . . . . . . . . . . . . . . . . . . . . . . . . . . . . . D-1
Coverage During Year One . . . . . . . . . . . . . . . . . . . . . . . . . . . . . . . . . . . . . . . D-2
Coverage During Years Two and Three . . . . . . . . . . . . . . . . . . . . . . . . . . . . . . D-2
General Provisions . . . . . . . . . . . . . . . . . . . . . . . . . . . . . . . . . . . . . . . . . . . . . . D-3
Three-Year Limited Warranty (Canada Only) . . . . . . . . . . . . . . . . . . . . . . . . . . . . . . D-3
Coverage During Year One . . . . . . . . . . . . . . . . . . . . . . . . . . . . . . . . . . . . . . . D-4
Coverage During Years Two and Three . . . . . . . . . . . . . . . . . . . . . . . . . . . . . . D-4
General Provisions . . . . . . . . . . . . . . . . . . . . . . . . . . . . . . . . . . . . . . . . . . . . . . D-5
One-Year End-User Manufacturer Guarantee
(Latin America and the Caribbean Only) . . . . . . . . . . . . . . . . . . . . . . . . . . . . . . . . . D-6
Guarantee . . . . . . . . . . . . . . . . . . . . . . . . . . . . . . . . . . . . . . . . . . . . . . . . . . . . D-6
Exclusions . . . . . . . . . . . . . . . . . . . . . . . . . . . . . . . . . . . . . . . . . . . . . . . . . . . . D-6
Making a Claim . . . . . . . . . . . . . . . . . . . . . . . . . . . . . . . . . . . . . . . . . . . . . . . . D-6
Limitation and Statutory Rights . . . . . . . . . . . . . . . . . . . . . . . . . . . . . . . . . . . . D-6
“Total Satisfaction” Return Policy (U.S. and Canada Only). . . . . . . . . . . . . . . . . . . D-7

xxi
!"#$
-" 33("
-
4 Figure 1-1. Front Panel for PowerVault 2xxS Storage Systems
(Shown on PowerVault 210S/211S). . . . . . . . . . . . . . . . . . . . . . . . . . 1-5
Figure 1-2. Back Panel for PowerVault 2xxS Storage Systems . . . . . . . . . . . . . . 1-6
Figure 3-1. Removing the Sliding Lock Bar or Nut-Plate Mounting Screws. . . . . 3-2
Figure 3-2. Installing the Hat Flange . . . . . . . . . . . . . . . . . . . . . . . . . . . . . . . . . . 3-3
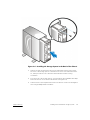
Figure 3-3. Attaching the Stabilizers . . . . . . . . . . . . . . . . . . . . . . . . . . . . . . . . . . 3-4
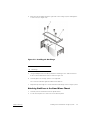
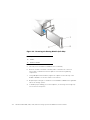
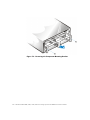
Figure 3-4. Installing the Storage System in the Back of the Chassis . . . . . . . . . 3-5
Figure 3-5. Installing the Front Screws . . . . . . . . . . . . . . . . . . . . . . . . . . . . . . . . 3-6
Figure 4-1. ESEM and SEMM Jumpers. . . . . . . . . . . . . . . . . . . . . . . . . . . . . . . . 4-2
Figure 4-2. Removing the Existing Module (Left Side) . . . . . . . . . . . . . . . . . . . . 4-4
Figure 5-1. Back Panel Showing Redundant Configuration . . . . . . . . . . . . . . . . . 5-2
Figure 5-2. SCSI ID Numbers for PowerVault 200S and 201S. . . . . . . . . . . . . . . 5-3
Figure 5-3. SCSI ID Numbers for PowerVault 210S and 211S. . . . . . . . . . . . . . . 5-4
Figure 5-4. Keylock for PowerVault 2xxS
(Shown on PowerVault 200S/201S). . . . . . . . . . . . . . . . . . . . . . . . . . 5-5
Figure 6-1. Drive Numbers and SCSI Numbers for
PowerVault 200S/201S . . . . . . . . . . . . . . . . . . . . . . . . . . . . . . . . . . . 6-2
Figure 6-2. Drive Numbers and SCSI Numbers for
PowerVault 210S/211S . . . . . . . . . . . . . . . . . . . . . . . . . . . . . . . . . . . 6-2
Figure 6-3. Keylock and Lock Bar for PowerVault 2xxS
(Shown in PowerVault 200S/201S) . . . . . . . . . . . . . . . . . . . . . . . . . . 6-5
Figure 6-4. Drive Carrier Lock . . . . . . . . . . . . . . . . . . . . . . . . . . . . . . . . . . . . . . . 6-6
Figure 6-5. Drive Carrier Handle. . . . . . . . . . . . . . . . . . . . . . . . . . . . . . . . . . . . . . 6-6
Figure 6-6. Installing a SCSI Hard-Disk Drive . . . . . . . . . . . . . . . . . . . . . . . . . . . . 6-7
Figure 7-1. Cooling Fans for PowerVault 2xxS Storage Systems . . . . . . . . . . . . 7-6
Figure 7-2. Power Supply . . . . . . . . . . . . . . . . . . . . . . . . . . . . . . . . . . . . . . . . . . 7-7
Figure 7-3. Storage System Orientation for PowerVault 2xxS
(Shown From Top View of PowerVault 200S/201S) . . . . . . . . . . . . 7-10
Figure 7-4. Component Locations . . . . . . . . . . . . . . . . . . . . . . . . . . . . . . . . . . . 7-11
Figure 7-5. Removing a Power Supply on a Redundant System . . . . . . . . . . . . 7-12
Figure 7-6. Removing a Power Supply on a Nonredundant System . . . . . . . . . 7-13
Figure 7-7. Removing a Cooling Fan . . . . . . . . . . . . . . . . . . . . . . . . . . . . . . . . . 7-15
Figure 7-8. Removing the Existing Module (Left Side) . . . . . . . . . . . . . . . . . . . 7-16
Figure 7-9. Removing the Component Mounting Bracket . . . . . . . . . . . . . . . . . 7-18
Figure 7-10. Dual-Bus Split Backplane Module Location . . . . . . . . . . . . . . . . . . . 7-20
Figure 7-11. Screw Location . . . . . . . . . . . . . . . . . . . . . . . . . . . . . . . . . . . . . . . . 7-21
Figure 7-12. Screw Location in the Left Module Bay. . . . . . . . . . . . . . . . . . . . . . 7-22
Figure 7-13. Chassis Separation. . . . . . . . . . . . . . . . . . . . . . . . . . . . . . . . . . . . . . 7-22
Figure 7-14. Keylock and Lock Bar for PowerVault 2xxS
(Shown on PowerVault 200S/201S). . . . . . . . . . . . . . . . . . . . . . . . . 7-25

xxii
!"#$
Figure 7-15. Removing the Power-Supply Blank . . . . . . . . . . . . . . . . . . . . . . . . . 7-27
Figure 7-16. Inserting the Redundant Power Supply. . . . . . . . . . . . . . . . . . . . . . 7-28
Figure 7-17. Removing the Cooling-Fan Blank. . . . . . . . . . . . . . . . . . . . . . . . . . . 7-29
Figure 7-18. Inserting the Redundant Cooling Fan . . . . . . . . . . . . . . . . . . . . . . . 7-30
Figure 7-19. Terminator Blank Removal . . . . . . . . . . . . . . . . . . . . . . . . . . . . . . . 7-31
Figure 7-20. Second Module Insertion . . . . . . . . . . . . . . . . . . . . . . . . . . . . . . . . 7-31
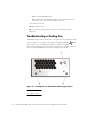
Figure 8-1. Diagnostics Checklist . . . . . . . . . . . . . . . . . . . . . . . . . . . . . . . . . . . . 8-6
Figure C-1. VCCI Class A ITE Regulatory Mark . . . . . . . . . . . . . . . . . . . . . . . . . . C-5
Figure C-2. VCCI Class B ITE Regulatory Mark . . . . . . . . . . . . . . . . . . . . . . . . . . C-6
Figure C-3. MOC Class A Regulatory Mark . . . . . . . . . . . . . . . . . . . . . . . . . . . . . C-7
Figure C-4. MOC Class B Regulatory Mark . . . . . . . . . . . . . . . . . . . . . . . . . . . . . C-7
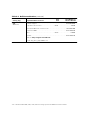
*3 Table 1-1 PowerVault 2xxS Enclosure Module Feature Comparison . . . . . . . . 1-3
Table 5-1. Storage System Operation and Cable Connections . . . . . . . . . . . . . 5-3
Table 6-1. SCSI Hard-Disk Drive Indicator Patterns . . . . . . . . . . . . . . . . . . . . . . 6-3
Table 7-1. System Indicators . . . . . . . . . . . . . . . . . . . . . . . . . . . . . . . . . . . . . . . 7-3
Table 8-1. International Dialing Codes . . . . . . . . . . . . . . . . . . . . . . . . . . . . . . . . 8-8
Table 8-2. Dell Contact Numbers . . . . . . . . . . . . . . . . . . . . . . . . . . . . . . . . . . . . 8-9
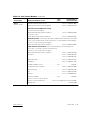
Table A-1. PowerVault 200S and 201S. . . . . . . . . . . . . . . . . . . . . . . . . . . . . . . . A-1
Table A-2. PowerVault 210S and 211S. . . . . . . . . . . . . . . . . . . . . . . . . . . . . . . . A-3

iii
!"
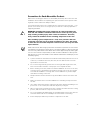
Use the following safety guidelines to ensure your own personal safety and to help
protect your computer or storage system from potential damage.
Throughout this guide, blocks of text may be accompanied by an icon and printed in
bold type or in italic type. These blocks are notes, notices, cautions, and warnings,
and they are used as follows:
NOTE: A NOTE indicates important information that helps you make better use of
your computer system.
!"
"#
$%&$%&!"
"#
Observe the following caution and warnings while servicing this system:
'
%()
*
+
$%&
!"
!
*,-[[[*,./[[0

iv
!"
$%&
11")
!"#$% &'()
*+,+% -* ,.'%*+%/!*.0#.1 &2%'/*+$+%
!30!*"04*+..0!#+'2$ !"#% &'(
*.%02*1314
1113"311
131"3
.% 055#5#5511#05)
1615116
111##5#5
!"#$%&$'
(#) $#* "
"$)'
5657+89+:#+7#0% &', +' + (;&
,+#,8*,%!* 7+ !*<01!*,0 !* 9<'.&%*9 #<.
9,%+% &', +' + !9+&80=<,!*,,!*,,%'>$+%
&=.>+(
*.%027*83
9311913)
339
.%&*151611
91516611
6116
To reduce the risk of bodily injury, electrical shock, fire, and damage to the equipment,
observe the following precautions.
Observe the following general precautions for using and working with your system:
Observe and follow service markings. Do not service any Dell product except as
explained in your Dell system documentation. Opening or removing covers that
are marked with the triangular symbol with a lightning bolt may expose you to
electrical shock. Components inside these compartments should be serviced
only by a Dell authorized service technician.
If any of the following conditions occur, unplug the product from the electrical
outlet and replace the part or contact your Dell authorized service provider:
— The power cable, extension cable, or plug is damaged.

v
!"
— An object has fallen into the product.
— The product has been exposed to water.
— The product has been dropped or damaged.
— The product does not operate correctly when you follow the operating
instructions.
Keep your system components away from radiators and heat sources. Also, do
not block cooling vents.
Do not spill food or liquids on your system components, and never operate the
product in a wet environment. If the computer gets wet, see the appropriate
chapter in your troubleshooting guide or contact a Dell-authorized service
provider.
Do not push any objects into the openings of your system components. Doing so
can cause fire or electric shock by shorting out interior components.
Use the product only with Dell products or other Dell-approved equipment.
Allow the product to cool before removing covers or touching internal
components.
Use the correct external power source. Operate the product only from the type
of power source indicated on the electrical ratings label. If you are not sure of the
type of power source required, consult your Dell service provider or local power
company.
To help avoid damaging your system components, be sure the voltage selection
switch (if provided) on the power supply is set to match the power available at
your location:
— 115 volts (V)/60 hertz (Hz) in most of North and South America and some Far
Eastern countries such as South Korea and Taiwan
— 100 V/50 Hz in eastern Japan and 100 V/60 Hz in western Japan
— 230 V/50 Hz in most of Europe, the Middle East, and the Far East
Also be sure that your monitor and attached devices are electrically rated to oper-
ate with the power available in your location.
Use only approved power cable(s). If you have not been provided with a power
cable for your computer or storage system or for any AC-powered option
intended for your system, purchase a power cable that is approved for use in your
country. The power cable must be rated for the product and for the voltage and
current marked on the product’s electrical ratings label. The voltage and current
rating of the cable should be greater than the ratings marked on the product.
To help prevent electric shock, plug the system/components and peripheral
power cables into properly grounded electrical outlets. These cables are
equipped with three-prong plugs to help ensure proper grounding. Do not use
adapter plugs or remove the grounding prong from a cable. If you must use an
extension cable, use a three-wire cable with properly grounded plugs.

vi
!"
Observe extension cable and power strip ratings. Make sure that the total
ampere rating of all products plugged into the extension cable or power strip
does not exceed 80 percent of the extension cable or power strip ampere ratings
limit.
Do not use appliance/voltage converters or kits sold for appliances with your Dell
product.
To help protect your system/components from sudden, transient increases and
decreases in electrical power, use a surge suppressor, line conditioner, or un-
interruptible power supply (UPS).
Position system cables and power cables carefully; route system cables and the
power cable and plug so that they cannot be stepped on or tripped over. Be sure
that nothing rests on your system components’ cables or power cable.
Do not modify power cables or plugs. Consult a licensed electrician or your
power company for site modifications. Always follow your local/national wiring
rules.
To help avoid possible damage to the system board, wait 5 seconds after turning
off the system before removing a component from the system board or discon-
necting a peripheral device from the computer.
Handle batteries carefully. Do not disassemble, crush, puncture, short external
contacts, dispose of in fire or water, or expose batteries to temperatures higher
than 60 degrees Celsius (140 degrees Fahrenheit). Do not attempt to open or ser-
vice batteries; replace batteries only with batteries designated for the product.
Turn down the volume before using headphones or other audio devices.
Observe the following additional safety guidelines for your system:
Unless your installation and/or troubleshooting documentation specifically allows
it, do not remove enclosure covers, attempt to override the safety interlocks, or
access any components inside the system. Depending on your system, installa-
tion and repairs may be done only by individuals who are qualified to service your
computer or storage system equipment and trained to deal with products capa-
ble of producing hazardous energy levels.
When connecting or disconnecting power to hot-pluggable power supplies, if
offered with your Dell product, observe the following guidelines:
— Install the power supply before connecting the power cable to the power
supply.
— Unplug the power cable before removing the power supply.
— If the system has multiple sources of power, disconnect power from the sys-
tem by unplugging
all
power cables from the power supplies.
Move products with care; ensure that all casters and/or stabilizers are firmly con-
nected to the computer or storage system. Avoid sudden stops and uneven
surfaces.

vii
!"
Observe the following precautions for rack stability and safety. Also refer to the rack
installation documentation accompanying the system and the rack for specific warn-
ing and/or caution statements and procedures.
Server and storage systems are considered to be components in a rack. Thus, “com-
ponent” refers to any server or storage system, as well as to various peripherals or
supporting hardware.
$%&**1
!1")
#"
!1
:1"
1
'1
#
NOTE: Dell’s server and storage systems are certified as components for use in Dell’s
rack cabinet using the Dell customer rack kit. The final installation of Dell systems and
rack kits in any other brand of rack cabinet has not been approved by any safety agen-
cies. It is the customer’s responsibility to have the final combination of Dell systems
and rack kits for use in other brands of rack cabinets evaluated for suitability by a certi-
fied safety agency.
System rack kits are intended to be installed in a Dell rack by trained service tech-
nicians. If you install the kit in any other rack, be sure that the rack meets the
specifications of a Dell rack.
Do not move large racks by yourself. Due to the height and weight of the rack,
Dell recommends a minimum of two people to accomplish this task.
Before working on the rack, make sure that the stabilizers are secure to the rack,
extend to the floor, and that the full weight of the rack rests on the floor. Install
front and side stabilizers on a single rack or front stabilizers for joined multiple
racks before working on the rack.
Always load the rack from the bottom up, and load the heaviest item in the rack
first.
Make sure that the rack is level and stable before extending a component from
the rack.
Use caution when pressing the component rail release latches and sliding a com-
ponent into or out of a rack; the slide rails can pinch your fingers.
After a component is inserted into the rack, carefully extend the rail into a locking
position, and then slide the component into the rack.
Do not overload the AC supply branch circuit that provides power to the rack. The
total rack load should not exceed 80 percent of the branch circuit rating.
Ensure that proper airflow is provided to components in the rack.

viii
!"
Do not step on or stand on any system/component when servicing other sys-
tems/components in a rack.
!"#$%
Observe the following guidelines when working with options:
Do not connect or use a modem or telephone during a lightning storm. There
may be a risk of electrical shock from lightning.
Never connect or use a modem or telephone in a wet environment.
Do not plug a modem or telephone cable into the network interface controller
(NIC) receptacle.
Disconnect the modem cable before opening a product enclosure, touching or
installing internal components, or touching an uninsulated modem cable or jack.
Do not use a telephone line to report a gas leak while you are in the vicinity of the
leak.
&
Observe the following precautions for laser devices:
Do not open any panels, operate controls, make adjustments, or perform proce-
dures on a laser device other than those specified in the product’s
documentation.
Only authorized service technicians should repair laser devices.
Before you remove the computer covers, perform the following steps in the sequence
indicated.
0*)
!*
"''
*
";)
1. Turn off your computer and any devices.
2. Ground yourself by touching
an unpainted metal surface on the chassis, such as
the metal around the card-slot openings at the back of the computer, before
touching anything inside your computer.

ix
!"
While you work, periodically touch an unpainted metal surface on the computer
chassis to dissipate any static electricity that might harm internal components.
3. Disconnect your computer and devices from their power sources. Also, discon-
nect any telephone or telecommunication lines from the computer.
Doing so reduces the potential for personal injury or shock.
In addition, take note of these safety guidelines when appropriate:
When you disconnect a cable, pull on its connector or on its strain-relief loop, not
on the cable itself. Some cables have a connector with locking tabs; if you are dis-
connecting this type of cable, press in on the locking tabs before disconnecting
the cable. As you pull connectors apart, keep them evenly aligned to avoid bend-
ing any connector pins. Also, before you connect a cable, make sure that both
connectors are correctly oriented and aligned.
Handle components and cards with care. Don’t touch the components or con-
tacts on a card. Hold a card by its edges or by its metal mounting bracket. Hold a
component such as a microprocessor chip by its edges, not by its pins.
'
%()
*
+
Static electricity can harm delicate components inside your computer. To prevent
static damage, discharge static electricity from your body before you touch any of
your computer’s electronic components, such as the microprocessor. You can do so
by touching an unpainted metal surface on the computer chassis.
As you continue to work inside the computer, periodically touch an unpainted metal
surface to remove any static charge your body may have accumulated.
You can also take the following steps to prevent damage from electrostatic discharge
(ESD):
When unpacking a static-sensitive component from its shipping carton, do not
remove the component from the antistatic packing material until you are ready to
install the component in your computer. Just before unwrapping the antistatic
packaging, be sure to discharge static electricity from your body.
When transporting a sensitive component, first place it in an antistatic container
or packaging.
Handle all sensitive components in a static-safe area. If possible, use antistatic
floor pads and workbench pads.
The following notice may appear throughout this document to remind you of these
precautions:

x
!"
0<,*=
!
1#
.'
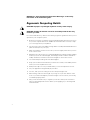
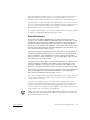
For comfort and efficiency, observe the following ergonomic guidelines when you set
up and use your computer system:
Position your system so that the monitor and keyboard are directly in front of you
as you work. Special shelves are available (from Dell and other sources) to help
you correctly position your keyboard.
Set the monitor at a comfortable viewing distance (usually 510 to 610 millimeters
[20 to 24 inches] from your eyes).
Make sure that the monitor screen is at eye level or slightly lower when you sit in
front of the monitor.
Adjust the tilt of the monitor, its contrast and brightness settings, and the lighting
around you (such as overhead lights, desk lamps, and the curtains or blinds on
nearby windows) to minimize reflections and glare on the monitor screen.
Use a chair that provides good lower back support.
Keep your forearms horizontal with your wrists in a neutral, comfortable position
while you use the keyboard or mouse.
Always leave space to rest your hands while you use the keyboard or mouse.
Let your upper arms hang naturally at your sides.
Sit erect, with your feet resting on the floor and your thighs level.
When sitting, make sure the weight of your legs is on your feet and not on the
front of your chair seat. Adjust your chair’s height or use a footrest, if necessary,
to maintain proper posture.
Vary your work activities. Try to organize your work so that you do not have to
type for extended periods of time. When you stop typing, try to do things that
use both hands.

xi
!"
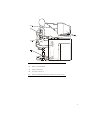
1 Monitor screen at or below eye level
2 Wrists relaxed and flat
3 Arms at desk level
4 Feet flat on the floor
5 Monitor and keyboard positioned directly in front of user

xii
!"

xiii
!"
!701,.0
This guide is intended for users of the Dell PowerVault 200S, 201S, 210S, and 211S
storage systems (hereafter called 2xxS storage systems) who want to learn about its
features and operation and for qualified service technicians who upgrade or service
the storage system. The chapters are summarized as follows:
W Chapter 1, "Introduction," provides an overview of the storage system's features,
a description of the controls and indicators on the front panel, and information on
where to get help if you need it.
W Chapter 2, "Installing Your Rack-Mounted Storage System," describes setting up
the rack-mounted storage system.
W Chapter 3, "Installing Your Stand-Alone Storage System," describes setting up the
stand-alone storage system.
W Chapter 4, "Configuring Your ESEM or SEMM for Cluster Operation," describes
how to configure the storage system.
W Chapter 5, "Connecting Your Storage System to the Host Computer," describes
how to connect your storage system to the host computer.
W Chapter 6, "Installing Drives," describes how to install small computer system
interface (SCSI) hard-disk drives in the storage system's drive bays.
W Chapter 7, "Service Information for Technicians," discusses upgrade and service
procedures for the storage system.
W Chapter 8, "Getting Help," describes the help tools Dell provides to assist you
should you have a problem with the storage system. It also explains how and
when to call Dell for technical assistance.
W Appendix A, "Technical Specifications," provides reference material for users inter-
ested in learning more about the details of the storage system.
W Appendix B, "Maintaining Your Storage System," describes preventive mainte-
nance procedures that you should perform regularly to keep your storage system
in top operating condition.
W Appendix C, "Regulatory Notices," provides information about regulatory agen-
cies that have tested and approved the PowerVault 2xxS storage system.

xiv
!"
W Appendix D, "Limited Warranty and Return Policy," describes the warranty for the
storage system and the "Total Satisfaction" Return Policy.
W "Abbreviations and Acronyms" defines the acronyms and abbreviations used in
this guide.
Dell Computer Corporation (“Dell”) manufactures its hardware products from parts
and components that are new or equivalent to new in accordance with industry-
standard practices. For information about the Dell limited warranty for your system,
see Appendix D, Limited Warranty and Return Policy.”
In addition to this Installation and Service Guide, you may also have one or more of
the following documents:
W
User's Guide or Installation and Troubleshooting Guide for the host computer.
W Dell PowerEdge Expandable RAID Controller (PERC) 2, Dell PERC 2/DC, Dell
PERC 2/SC, or Dell PERC 3/DI documentation, which includes information on the
SCSI host adapter.
W HP OpenView Network Node Manager Special Edition (NNM SE) x.x and Dell
OpenManage Hardware Instrumentation Package (HIP) x.x documentation, which
includes information on operating the Dell OpenManage HIP server management
application program.
W Dell PowerEdge cluster installation and troubleshooting documentation.
NOTE: Documentation updates are sometimes included with your system or
software to describe changes to your system or software. Always read these
updates before consulting any other documentation because the updates often
contain the latest information.
! "
Throughout this guide, blocks of text may be accompanied by an icon and printed in
bold type or in italic type. These blocks are notes, notices, cautions, and warnings,
and they are used as follows:
NOTE: A NOTE indicates important information that helps you make better use of
your computer system.
!"
"#
Page is loading ...
Page is loading ...
Page is loading ...
Page is loading ...
Page is loading ...
Page is loading ...
Page is loading ...
Page is loading ...
Page is loading ...
Page is loading ...
Page is loading ...
Page is loading ...
Page is loading ...
Page is loading ...
Page is loading ...
Page is loading ...
Page is loading ...
Page is loading ...
Page is loading ...
Page is loading ...
Page is loading ...
Page is loading ...
Page is loading ...
Page is loading ...
Page is loading ...
Page is loading ...
Page is loading ...
Page is loading ...
Page is loading ...
Page is loading ...
Page is loading ...
Page is loading ...
Page is loading ...
Page is loading ...
Page is loading ...
Page is loading ...
Page is loading ...
Page is loading ...
Page is loading ...
Page is loading ...
Page is loading ...
Page is loading ...
Page is loading ...
Page is loading ...
Page is loading ...
Page is loading ...
Page is loading ...
Page is loading ...
Page is loading ...
Page is loading ...
Page is loading ...
Page is loading ...
Page is loading ...
Page is loading ...
Page is loading ...
Page is loading ...
Page is loading ...
Page is loading ...
Page is loading ...
Page is loading ...
Page is loading ...
Page is loading ...
Page is loading ...
Page is loading ...
Page is loading ...
Page is loading ...
Page is loading ...
Page is loading ...
Page is loading ...
Page is loading ...
Page is loading ...
Page is loading ...
Page is loading ...
Page is loading ...
Page is loading ...
Page is loading ...
Page is loading ...
Page is loading ...
Page is loading ...
Page is loading ...
Page is loading ...
Page is loading ...
Page is loading ...
Page is loading ...
Page is loading ...
Page is loading ...
Page is loading ...
Page is loading ...
Page is loading ...
Page is loading ...
Page is loading ...
Page is loading ...
Page is loading ...
Page is loading ...
Page is loading ...
Page is loading ...
Page is loading ...
Page is loading ...
Page is loading ...
Page is loading ...
Page is loading ...
Page is loading ...
Page is loading ...
Page is loading ...
Page is loading ...
Page is loading ...
Page is loading ...
Page is loading ...
Page is loading ...
Page is loading ...
Page is loading ...
Page is loading ...
Page is loading ...
Page is loading ...
Page is loading ...
Page is loading ...
Page is loading ...
Page is loading ...
Page is loading ...
Page is loading ...
Page is loading ...
Page is loading ...
Page is loading ...
Page is loading ...
Page is loading ...
Page is loading ...
Page is loading ...
Page is loading ...
-
 1
1
-
 2
2
-
 3
3
-
 4
4
-
 5
5
-
 6
6
-
 7
7
-
 8
8
-
 9
9
-
 10
10
-
 11
11
-
 12
12
-
 13
13
-
 14
14
-
 15
15
-
 16
16
-
 17
17
-
 18
18
-
 19
19
-
 20
20
-
 21
21
-
 22
22
-
 23
23
-
 24
24
-
 25
25
-
 26
26
-
 27
27
-
 28
28
-
 29
29
-
 30
30
-
 31
31
-
 32
32
-
 33
33
-
 34
34
-
 35
35
-
 36
36
-
 37
37
-
 38
38
-
 39
39
-
 40
40
-
 41
41
-
 42
42
-
 43
43
-
 44
44
-
 45
45
-
 46
46
-
 47
47
-
 48
48
-
 49
49
-
 50
50
-
 51
51
-
 52
52
-
 53
53
-
 54
54
-
 55
55
-
 56
56
-
 57
57
-
 58
58
-
 59
59
-
 60
60
-
 61
61
-
 62
62
-
 63
63
-
 64
64
-
 65
65
-
 66
66
-
 67
67
-
 68
68
-
 69
69
-
 70
70
-
 71
71
-
 72
72
-
 73
73
-
 74
74
-
 75
75
-
 76
76
-
 77
77
-
 78
78
-
 79
79
-
 80
80
-
 81
81
-
 82
82
-
 83
83
-
 84
84
-
 85
85
-
 86
86
-
 87
87
-
 88
88
-
 89
89
-
 90
90
-
 91
91
-
 92
92
-
 93
93
-
 94
94
-
 95
95
-
 96
96
-
 97
97
-
 98
98
-
 99
99
-
 100
100
-
 101
101
-
 102
102
-
 103
103
-
 104
104
-
 105
105
-
 106
106
-
 107
107
-
 108
108
-
 109
109
-
 110
110
-
 111
111
-
 112
112
-
 113
113
-
 114
114
-
 115
115
-
 116
116
-
 117
117
-
 118
118
-
 119
119
-
 120
120
-
 121
121
-
 122
122
-
 123
123
-
 124
124
-
 125
125
-
 126
126
-
 127
127
-
 128
128
-
 129
129
-
 130
130
-
 131
131
-
 132
132
-
 133
133
-
 134
134
-
 135
135
-
 136
136
-
 137
137
-
 138
138
-
 139
139
-
 140
140
-
 141
141
-
 142
142
-
 143
143
-
 144
144
-
 145
145
-
 146
146
-
 147
147
-
 148
148


Ask a question and I''ll find the answer in the document
Finding information in a document is now easier with AI
Related papers
-
Dell PowerEdge 2400 User guide
-
-
Dell PowerVault 210S (SCSI) User guide
-
-
-
-
-
Dell PowerEdge 2550 Owner's manual
-
Dell PowerEdge 1300 User guide
-
Other documents
-
OWC Express USB 2.0 Enclosure User manual
-
 3D Innovations PowerEdge 300 User manual
-
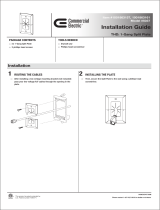 Commercial Electric 5037-WH-3PK Operating instructions
-
Adaptec ULTRAbloc 320 JBOD User guide
-
AUTOTECH 10.215.352 363 Installation guide
-
Legrand Six Bay Module Mounting Bracket, IS-0322 Installation guide
-
-
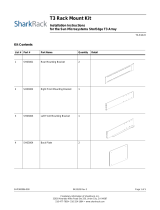 SharkRack T3-R19-H User manual
-
Xerox CentreWare for HP OpenView User guide
-
Cardinal 2XX-IP Installation guide


