Page is loading ...

SALSBURY INDUSTRIES
1010 East 62
nd
Street, Los Angeles, CA 90001-1598
Phone: 1-800-624-5269 Int’l Phone: 323-846-6700
Fax: 1-800-624-5299 Int’l Fax: 323-846-6800
www.mailboxes.com engineering
@mailboxes.com
Installation instructions are provided as general guidelines. It is advised that a professional installer be consulted. Salsbury Industries assumes no product assembly or installation liability.
Copyright © 2009 Salsbury Industries. All rights reserved. (Rev. 04, 9/23/09)
With their durable powder coat finish and all aluminum construction,
Salsbury’s 3500 series vertical mailboxes will provide years of
maintenance free service.
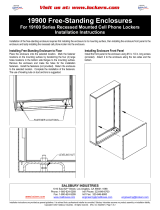
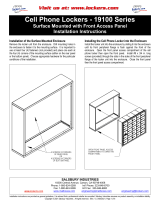
SURFACE MOUNTED
RECESSED MOUNTED
Units mount directly to a
surface and are attached
with mounting hardware
through the back.
(Hardware not included.)
Units fit into a rough
opening and are secured
with mounting hardware
through the back or side
panels of the unit.
Recessed units include a
flanged collar which fits
over the rough opening.
(Hardware not included.)
Surface unit dimensions
Recessed unit rough opening dimensions
SURFACE Width Height Depth
3503 18-3/4” 19” 7-1/2”
3504 24-1/4” 19” 7-1/2”
3505 29-3/4” 19” 7-1/2”
3506 35-1/4” 19” 7-1/2”
3507 40-3/4” 19” 7-1/2”
RECESSED 1-High 2-High
3503 17-1/4” 17-3/4” 36-3/4” 7-1/2”
3504 22-3/4” 17-3/4” 36-3/4” 7-1/2”
3505 28-1/4” 17-3/4” 36-3/4” 7-1/2”
3506 33-3/4” 17-3/4” 36-3/4” 7-1/2”
3507 39-1/4” 17-3/4” 36-3/4” 7-1/2”
Vertical Mailboxes – 3500 Series
Installation Instructions
PLEASE SEE IMPORTANT INSTRUCTIONS ON BACK
These units are U.S.P.S. approved to the required
security upgrades of USPS-STD-4B+ effective March
2005.
Notes
1. No more than two tiers of mailboxes may be installed.
2. Wall opening and lumber frame must be square.
3. Mailboxes should be shielded from direct weather conditions.
4. Store keys in a safe place until ready for use.
5. Hardware is not included to fasten units into rough opening.
Installation Instructions
1. If recessed unit, create rough opening in wall per dimensions in
Rough Opening Table. Units must be securely supported by a frame
constructed of 2”x4” lumber.
2. Remove unit from carton and place in an upright position on a
table or other flat surface.
3. Remove the compartment assembly from the frame by tilting the
compartment assembly forward until it extends approximately two
inches from the frame. Then lift the compartment assembly upward
so that its base clears the hinge pins located at the bottom of the
unit. Swing the lower end of the compartment assembly outward and
remove it from the frame.
4. Mount the frame in the desired location. Caution: Do not deform,
force, or twist the frame to fit an incorrect rough opening or
irregular surface. If the frame becomes deformed, it will not retain
proper alignment with the compartment assembly. Units serviced by
the United States Postal Service must be installed with the master
lock opening a minimum of 30” and a maximum of 58” above the
finished floor.
5. Replace the compartment assembly into the frame, reversing the
procedure in step 3 above.
Security Caution
The tenant door at or near the center of the compartment array, in
addition to providing access to a tenant’s mail, also provides access
to the USPS Arrow Lock that provides access to all compartments.
For the sake of security of the entire compartment array, it is
important that this tenant door be securely locked at all times,
even if there is no tenant receiving mail via this door.

SALSBURY INDUSTRIES
1010 East 62
nd
Street, Los Angeles, CA 90001-1598
Phone: 1-800-624-5269 Int’l Phone: 323-846-6700
Fax: 1-800-624-5299 Int’l Fax: 323-846-6800
www.mailboxes.com engineering
@mailboxes.com
Copyright © 2016 Salsbury Industries. All rights reserved. (Rev. 04, 5/3/16)
Arrow Lock Guard – 3500 Series
Installation Instructions
IMPORTANT !
After installing the mailboxes, contact your local postmaster – the
USPS will provide and install its own master lock on your mailbox
unit. Hardware for installing the master lock is included in the
plastic bag. Please provide the hardware and these instructions to
the USPS representative when they arrive to install the lock.
INSTRUCTIONS FOR THE USPS REPRESENTATIVE:
1.) Unlock and open the door marked ‘U.S. MAIL’, and pull the
top frame forward, exposing all of the mailboxes.
2.) Remove the Key from the Arrow Lock so the lock’s bolt is
extended.
3.) Rest the Arrow Lock on the pre-installed Lock Bracket
BOTTOM TAB with the bolt facing up and the keyway
facing outward (see sketch at right and Photo #3).
4.) Insert the key through the large hole in the Lock Bracket
and into the Arrow Lock, and then turn the key so the bolt
retracts. Now push the lock into place under the Top Tab of
the Lock Bracket (see Photo #4).
5.) Insert the two long screws through the Lock Bracket holes
and through the holes in the Arrow Lock (see sketch). Do
not attach the nuts yet.
6.) Place the Lock Guard (Photo #6) over the Arrow Lock so
the long screws are through its holes, and the Lock Guard
rests on TOP of the frame (as shown in sketch).
7.) Attach the Lock Nuts to the long screws and tighten using
a Phillips screwdriver and an open-end or socket wrench.
8.) Screw the short Self-tapping Screws through the Lock
Guard and the holes in the frame.
9.) Push the frame closed.
10.) Turn and remove the Arrow Lock Key, locking the unit.
Close and lock the ‘U.S. MAIL’ door.
BOTTOM
TAB
Step 3
LOCK
GUARD
LOCK
BRACKET
Step 3
FRAME
Long
Screws
Step 5
Step 6
Short
Screws
Step 8
LARGE
HOLE in
LOCK
BRACKET
Step 4
BOTTOM
TAB
Step 3
LOCK
GUARD
LOCK
BRACKET
Step 3
FRAME
Long
Screws
Step 5
Step 6
Short
Screws
Step 8
LARGE
HOLE in
LOCK
BRACKET
Step 4
Arrow
Lock Key
Arrow
Lock Key
PHOTO #4
PHOTO #3
Top Tab
Retracted bolt
PHOTO #6
/