Sony PCM-M10 Operating instructions
- Category
- Dictaphones
- Type
- Operating instructions


2
GB
WARNING
Do not expose the batteries (battery pack or batteries
installed) to excessive heat such as sunshine, fire or
the like for a long time.
RATED CURRENT CONSUMPTION: 1000 mA
To reduce the risk of fire or electric shock, do not
expose the AC power adaptor to dripping or
splashing, and do not place objects filled with liquids ,
such as vases, on the AC power adaptor.
As the main plug of AC power adaptor is used to
disconnect the AC power adaptor from the mains,
connect it to an easily accessible AC outlet. Should
you notice an abnormality in it, disconnect it from the
AC outlet immediately.
Excessive sound pressure from earphones and
headphones can cause hearing loss.
Do not install the AC power adaptor in a confined
space, such as a bookcase or built-in cabinet.
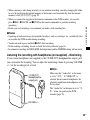
• The recorded music is limited to private use only.
Use of the music beyond this limit requires
permission of the copyright holders.
• Sony is not responsible for incomplete recording/
downloading or damaged data due to problems of
the PCM recorder or computer.
• Depending on the types of the text and characters,
the text shown on the PCM recorder may not be
displayed properly on device. This is due to:
– The capacity of the connected PCM recorder.
– The PCM recorder is not functioning normally.
– Content information is written in the language
or the character that is not supported by the
PCM recorder.

3
GB
Notice for users
Program © 1999, 2000, 2001, 2002, 2003, 2004,
2005, 2006, 2007, 2008, 2009 Sony Corporation
Documentation ©2009 Sony Corporation
All rights reserved. This manual or the software
described herein, in whole or in part, may not be
reproduced, translated or reduced to any machine
readable form without prior written approval from
Sony Corporation.
IN NO EVENT SHALL SONY CORPORATION BE
LIABLE FOR ANY INCIDENTAL,
CONSEQUENTIAL OR SPECIAL DAMAGES,
WHETHER BASED ON TORT, CONTRACT, OR
OTHERWISE, ARISING OUT OF OR IN
CONNECTION WITH THIS MANUAL, THE
SOFTWARE OR OTHER INFORMATION
CONTAINED HEREIN OR THE USE THEREOF.
Sony Corporation reserves the right to make any
modification to this manual or the information
contained herein at any time without notice.
The software described herein may also be governed
by the terms of a separate user license agreement.
This software is for Windows and cannot be used for
Macintosh.
The supplied connecting cable is for the PCM-M10
linear PCM Recorder. You cannot connect other
linear PCM recorders.

4
GB
Table of Contents
Techniques for Better Recording ..............7
Getting Started
Step 1: Checking the Contents of the
Package ...................................................10
Index to parts and controls .................11
Step 2: Inserting the Batteries .................13
When to replace batteries ...................14
To operate with the AC power
adaptor ................................................15
Step 3: Turning the PCM recorder On .... 16
Turning the power on .........................16
Turning the power off .........................16
Step 4: Setting the 时钟 ..........................17
Setting the clock after inserting
batteries ...............................................17
Setting the clock using the menu ........17
Step 5: Setting the Language to Be
Used in the Display Window .................. 19
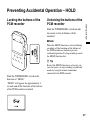
Preventing Accidental Operation –
HOLD .....................................................21
Locking the buttons of the PCM
recorder ...............................................21
Unlocking the buttons of the PCM
recorder ...............................................21
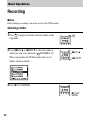
Basic Operations
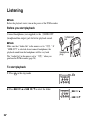
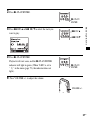
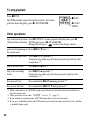
Recording ............................................. 22
Listening .............................................. 26
Deleting ............................................... 30
Other Recording Operations
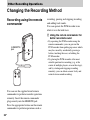
Changing the Recording Method ............32
Recording using the remote
commander .........................................32
Manual recording ................................33
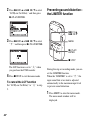
Recording a few seconds in advance –
the Pre-Recording function .................34
Recording on a memory card ..............36
Recording across memory media –
跨内存录音 ........................................39
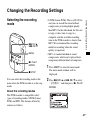
Changing the Recording Settings ............41
Selecting the recording mode .............41
Setting the microphone sensitivity ......42
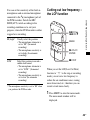
Cutting out low frequency –
the LCF function .................................43
Preventing sound distortion–
the LIMITER function ........................44
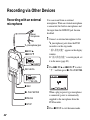
Recording via Other Devices ..................46
Recording with an external
microphone .........................................46
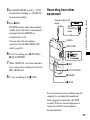
Recording from other equipment ........47

5
GB
Other Playback Operations
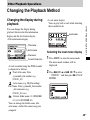
Changing the Playback Method ..............49
Changing the display during
playback ..............................................49
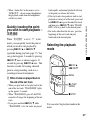
Listening the playback sounds
with the headphones or external
speakers ..............................................50
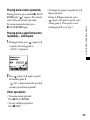
Quickly locating the point you
wish to start playback – 简易搜索 .....51
Selecting the playback mode ..............51
Playing back repeatedly ......................52
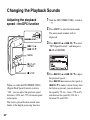
Changing the Playback Sounds ..............54
Adjusting the playback speed –
the DPC function ................................54
Adjusting the playback tones –
音调控制 ............................................55
Reinforcing the bass sound – 音效 .....56
Playback via Other Devices ....................58
Recording with other equipment ........ 58
Editing Tracks
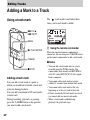
Adding a Mark to a Track .......................60
Using a track mark ..............................60
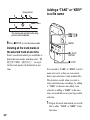
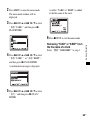
Adding a “TAKE” or “KEEP” to
a file name ..........................................62
Protecting a track ................................64
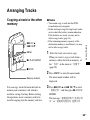
Arranging Tracks ....................................65
Copying a track to the
other memory ......................................65
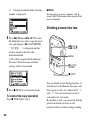
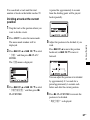
Dividing a track into two ....................66
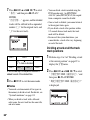
Deleting all tracks in a folder .............69
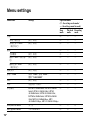
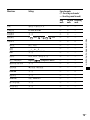
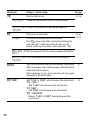
About the Menu Function
Making Settings for the Menu ................71
Menu settings ..........................................72
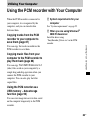
Utilizing Your Computer
Using the PCM recorder with Your
Computer .................................................83
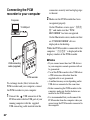
Connecting the PCM recorder to
your computer .....................................84
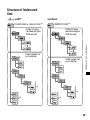
Structure of folders and files ...............85
Copying Tracks from the PCM
recorder to Your Computer .....................87
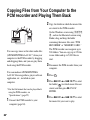
Copying Files from Your Computer
to the PCM recorder and Playing
Them Back ..............................................88
Using the PCM Recorder as a USB
Memory – Data Storage Function ...........90
Disconnecting the PCM Recorder
from Your Computer ...............................91
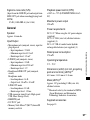
Additional Information
Precautions ..............................................92
Specifications ..........................................95
System requirements ...........................95
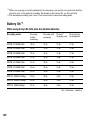
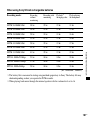
Battery life ........................................100

6
GB
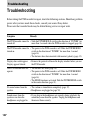
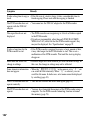
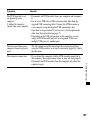
Troubleshooting
Troubleshooting ....................................102
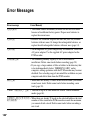
Error Messages ..................................... 108
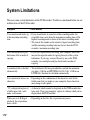
System Limitations ...............................112
Display Window ...................................113
Index .....................................................116
Trademarks ........................................... 119
What you record is for personal
enjoyment and use only. Copyright laws
prohibit other forms of use without the
permission of the copyright holders.
The use of Memory Stick™ media for
recording copyright-protected graphics or
other data is limited to the restrictions
specified under applicable copyright
laws. Any use beyond those restriction is
prohibited.
This product is compatible with
Memory Stick Micro™ (M2™) media.
M2™ is the abbreviated product name for
a Memory Stick Micro™.
In this booklet, M2™ is used to describe
Memory Stick Micro™ media.

7
GB
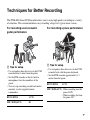
Techniques for Better Recording
The PCM-M10 linear PCM recorder allows you to enjoy high-quality recording in a variety
of situations. This section introduces easy recording setups for 6 typical music scenes.
For recording a solo acoustic
guitar performance
z Tips for setup
• Use a tripod or other device to set the PCM
recorder about 1 meter from the guitar.
• Set the PCM recorder so that its built-in
microphones face the sound box of the
guitar.
• To start, stop recording, or add track marks
remotely, use the supplied remote
commander.
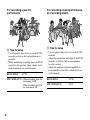
For recording a piano performance
z Tips for setup
• Use a tripod or other device to set the PCM
recorder level with the piano keyboard.
• Set the PCM recorder approximately 1.5
meters from the piano.
REC LEVEL AUTO
MIC SENS(ATT) HI
REC LEVEL AUTO
MIC SENS(ATT) • When recording near the
piano: LOW
• When recording far from
the piano: HI

8
GB
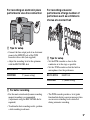
For recording a jazz trio
performance
z Tips for setup
• Use a tripod or other device to set the PCM
recorder as close to the lead instrument as
possible.
• While monitoring recording, move the PCM
recorder to the position where volume levels
from instruments are well-balanced.
For recording a band performance
at a recording studio
z Tips for setup
• Use a tripod or other device to set the PCM
recorder.
• Adjust the orientation and height of the PCM
recorder, so that the built-in microphones
face the vocalist.
• Adjust the positions of guitar amplifier or
base amplifier so that their volume levels are
well-balanced.
REC LEVEL AUTO
MIC SENS(ATT) • When recording near the
instrument: LOW
• When recording far from
the instrument: HI
REC LEVEL AUTO
MIC SENS(ATT) LOW

9
GB
For recording an electronic piano
performance via a line connection
z Tips for setup
• Connect the line output jack of an electronic
piano to the LINE IN jack of the PCM
recorder with a cable (not supplied).
• Adjust the recording level to the optimum
with the REC LEVEL dial.
For recording a musical
performance of large number of
performers such as a children’s
chorus at a concert hall
z Tips for setup
• Set the PCM recorder as close to the
conductor or to the stage as possible.
• Set the PCM recorder so that the built-in
microphones face the performers.
z For better recording
• For the most natural and dynamic recording,
manual recording is recommended.
(Adjustment using the REC LEVEL dial is
required.)
• To obtain the best recording results, perform
a trial recording in advance.
• The PCM recorder provides a level guide
function that displays an error message when
an excessive recording level is detected
during automatic recording.
REC LEVEL MANUAL
LIMITER 开 (menu setting)
REC LEVEL MANUAL
LIMITER 开 (menu setting)

10
GB
Getting Started
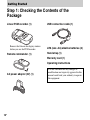
Step 1: Checking the Contents of the
Package
Linear PCM recorder (1)
Remove the film on the display window
before you use the PCM recorder.
Remote commander (1)
AC power adaptor (3V) (1)
USB connection cable (1)
LR6 (size AA) alkaline batteries (2)
Hand strap (1)
Warranty card (1)
Operating Instructions
You are cautioned that any changes or
modifications not expressly approved in this
manual could void your authority to operate
this equipment.

11
GB
Getting Started
Index to parts and controls
Front
A Peak level L/R (-12 dB/OVER) lamps
B Display window
C DELETE button
D MENU button
E (folder) button
F
> FF/ v (fast-forward/up) button
G
. FR/ V (fast-rewind/down) button
H
x STOP button
I
X PAUSE button/indicator
J
N PLAY/ENTER button/indicator*
K
z REC (record) button/indicator
L (repeat) A-B button
M DISPLAY button
N REC LEVEL (recording level) dial
O POWER/HOLD switch
P REMOTE jack
Q ACCESS indicator
R T-MARK(track mark) button
S Strap hole
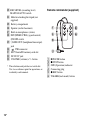
Rear
T LINE IN (line input) jack
U MIC SENS(ATT) (microphone
sensitivity (attenuator)) HI/LOW (high/
low) switch
V m (microphone) jack ( 插入供电功能
compatible)*

12
GB
W REC LEVEL (recording level)
MANUAL/AUTO switch
X Hole for attaching the tripod (not
supplied)
Y Battery compartment
Z Speaker (on the basement)
wj Built-in microphones (stereo)
wk DPC(SPEED CTRL) (speed control)
ON/OFF switch
wl i/LINE OUT (headphone/line output)
jack
e; USB connector
ea M2™/microSD memory card slot
es DC IN 3V jack
ed VOLUME (volume) +*/– button
* These buttons and jack have a tactile dot.
Use it as a reference point for operations, or
to identify each terminal.
Remote commander (supplied)
1 X PAUSE button
2
x STOP button
3 OPR (Operation) indicator
4 Connecting plug
5
z REC button
6 T-MARK(track-mark) button

13
GB
Getting Started
Step 2: Inserting the Batteries
1 Slide and lift the battery compartment lid
in the direction of the arrow.
2 Insert the two supplied LR6 (size AA)
alkaline batteries into the battery
compartment, and then close the lid.
Be sure to insert the batteries with the 3
and # ends in the right position.
If the battery compartment lid is
detached
If you drop the PCM recorder or handle it
forcibly, the battery compartment lid may
become detached.
If this occurs, insert a projected part at one
end of the battery compartment lid into the
opening on the PCM recorder (1), and
then align the other projected part of the lid
along the slit of the PCM recorder (2) as
illustrated above. Then stand up the lid and
push it down until the lid is attached to the
PCM recorder.
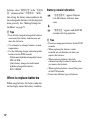
When using rechargeable
batteries
You can use rechargeable batteries with the
PCM recorder. To use rechargeable

14
GB
batteries, select “镍氢电池” in the “电池设
置 ” submenu of the “ 详细菜单 .” With
this setting, the battery remain indicator for
the rechargeable batteries will be displayed
more precisely. See “Making Settings for
the Menu” on page 71.
z Tips
• Even if fully-charged rechargeable batteries
are inserted, the battery indicator may not
show the full status.
• Use a charger to recharge batteries at room
temperatures.
• Use the following charger and rechargeable
batteries for the PCM recorder:
– Nickel metal hydride rechargeable battery:
NH-AA-B2E
– Quick battery charger for nickel metal
hydride rechargeable batteries:
BCG-34HS2E
When to replace batteries
When using batteries, the battery indicator
on the display shows the battery condition.
Battery remain indication
z Tips
• Do not use manganese batteries for this PCM
recorder.
• When replacing the batteries, tracks
recorded are not deleted even when you
remove the batteries.
• When replacing batteries, the clock
continues moving for about 3 minutes after
you remove the batteries.
• When replacing batteries, turn off the power
of the PCM recorder.
• Do not mix different types of batteries.
:“电池电量低 ” appears. Replace
two old batteries with new ones
soon.
m
:“更换电池 ” appears and the PCM
recorder will stop operation.

15
GB
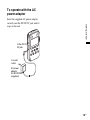
Getting Started
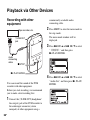
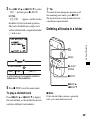
To operate with the AC
power adaptor
Insert the supplied AC power adaptor
securely into the DC IN 3V jack until it
stops to the end.
to a wall
outlet
to the DC IN
3V jack
AC power
adaptor
AC-ES3010K2
(supplied)

16
GB
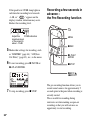
Step 3: Turning the PCM recorder On
Turning the power on
Slide the POWER/HOLD switch in the
direction of “POWER” for more than
1 second. The PCM recorder is turned on,
and an animation of “ 正在访问 ...” is
displayed.
Turning the power off
Slide the POWER/HOLD switch in the
direction of “POWER” for more than
2 seconds, and an animation of “See You!”
is displayed.
z Tips
• The PCM recorder is accessing memory
while “正在访问...” appears on the display
or the ACCESS indicator flashes. During
this time, do not remove or insert batteries
and do not disconnect or connect the AC
power adaptor, or the USB connecting cable.
Doing so may damage the data.
• Even if you do not use the PCM recorder, the
batteries are consumed slightly. When you
are not going to use the PCM recorder for an
extend period of time, it is recommended
that you turn the power off and remove the
batteries.
• When the PCM recorder remains turned on
and in the stop mode for about 10 minutes or
longer, the window display turns off
automatically and the PCM recorder enters
the sleep mode. You can operate the PCM
recorder by pressing a button.

17
GB
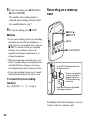
Getting Started
Step 4: Setting the 时钟
Recorded audio files (tracks) are named
using the date and time of the clock. By
setting the clock before recording, the
recording’s date and time will be correctly
saved.
When the PCM recorder is turned on before
the clock has been set, “时钟设定” appears
on the display. Then the “ 时钟 ” display of
the menu appears, and the year section
flashes in the display window.
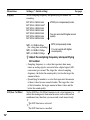
Setting the clock after
inserting batteries
1 Press > FF/ v or . FR/ V to set the
year, and then press
N PLAY/ENTER.
Perform the same operations to set
month, day, hour, and minute in
sequence.
2 Press x STOP to return to the stop mode
display.
Setting the clock using the
menu
While the PCM recorder is in the stop
mode, you can set the clock using the menu.
1 Select “ 时钟 ” in the menu in the stop
mode.
MENU
x STOP
> FF/ v,
. FR/ V
N
PLAY/
ENTER

18
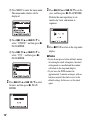
GB
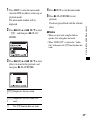
1 Press MENU to enter the menu mode.
The menu mode window will be
displayed.
2 Press > FF/ v or . FR/ V to
select “详细菜单,” and then press
N
PLAY/ENTER.
3 Press > FF/ v or . FR/ V to
select “ 时钟 ,” and then press
N
PLAY/ENTER.
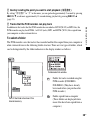
2 Press > FF/ v or . FR/ V to select
the date, and then press
N PLAY/
ENTER.
3 Press > FF/ v or . FR/ V to set the
year, and then press
N PLAY/ENTER.
Perform the same operations to set
month, day, hour, and minute in
sequence.
4 Press x STOP to return to the stop mode
display.
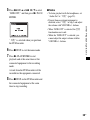
P Notes
• If you do not press a button within 1 minute
of entering the clock setting data, the clock
setting mode is cancelled and the window
will return to the stop mode display.
• If you leave the PCM recorder for
approximately 3 minutes or longer, with no
batteries inserted, the clock is reset to the
default settings. In this case, set the clock
again.

19
GB
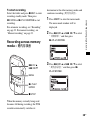
Getting Started
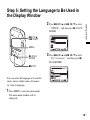
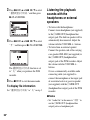
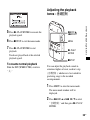
Step 5: Setting the Language to Be Used in
the Display Window
You can select the language to be used for
tracks, menus, folder names, file names,
etc. from 2 languages.
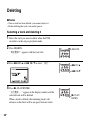
1 Press MENU to enter the menu mode.
The menu mode window will be
displayed.
2 Press > FF/ v or . FR/ V to select
“ 详细菜单 ,” and then press
N PLAY/
ENTER.
3 Press > FF/ v or . FR/ V to select
“ 语言 (Language),” and then press
N
PLAY/ENTER.
MENU
x STOP
> FF/ v,
. FR/ V
N
PLAY/
ENTER

20
GB
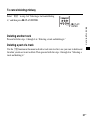
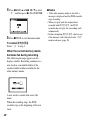
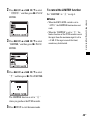
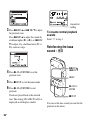
4 Press > FF/ v or . FR/ V to select
the language that you want to use, and
then press
N PLAY/ENTER.
You can select the following languages.
English, (Simplified Chinese)
5 Press x STOP to return to the stop mode
display.
Page is loading ...
Page is loading ...
Page is loading ...
Page is loading ...
Page is loading ...
Page is loading ...
Page is loading ...
Page is loading ...
Page is loading ...
Page is loading ...
Page is loading ...
Page is loading ...
Page is loading ...
Page is loading ...
Page is loading ...
Page is loading ...
Page is loading ...
Page is loading ...
Page is loading ...
Page is loading ...
Page is loading ...
Page is loading ...
Page is loading ...
Page is loading ...
Page is loading ...
Page is loading ...
Page is loading ...
Page is loading ...
Page is loading ...
Page is loading ...
Page is loading ...
Page is loading ...
Page is loading ...
Page is loading ...
Page is loading ...
Page is loading ...
Page is loading ...
Page is loading ...
Page is loading ...
Page is loading ...
Page is loading ...
Page is loading ...
Page is loading ...
Page is loading ...
Page is loading ...
Page is loading ...
Page is loading ...
Page is loading ...
Page is loading ...
Page is loading ...
Page is loading ...
Page is loading ...
Page is loading ...
Page is loading ...
Page is loading ...
Page is loading ...
Page is loading ...
Page is loading ...
Page is loading ...
Page is loading ...
Page is loading ...
Page is loading ...
Page is loading ...
Page is loading ...
Page is loading ...
Page is loading ...
Page is loading ...
Page is loading ...
Page is loading ...
Page is loading ...
Page is loading ...
Page is loading ...
Page is loading ...
Page is loading ...
Page is loading ...
Page is loading ...
Page is loading ...
Page is loading ...
Page is loading ...
Page is loading ...
Page is loading ...
Page is loading ...
Page is loading ...
Page is loading ...
Page is loading ...
Page is loading ...
Page is loading ...
Page is loading ...
Page is loading ...
Page is loading ...
Page is loading ...
Page is loading ...
Page is loading ...
Page is loading ...
Page is loading ...
Page is loading ...
Page is loading ...
Page is loading ...
Page is loading ...
Page is loading ...
-
 1
1
-
 2
2
-
 3
3
-
 4
4
-
 5
5
-
 6
6
-
 7
7
-
 8
8
-
 9
9
-
 10
10
-
 11
11
-
 12
12
-
 13
13
-
 14
14
-
 15
15
-
 16
16
-
 17
17
-
 18
18
-
 19
19
-
 20
20
-
 21
21
-
 22
22
-
 23
23
-
 24
24
-
 25
25
-
 26
26
-
 27
27
-
 28
28
-
 29
29
-
 30
30
-
 31
31
-
 32
32
-
 33
33
-
 34
34
-
 35
35
-
 36
36
-
 37
37
-
 38
38
-
 39
39
-
 40
40
-
 41
41
-
 42
42
-
 43
43
-
 44
44
-
 45
45
-
 46
46
-
 47
47
-
 48
48
-
 49
49
-
 50
50
-
 51
51
-
 52
52
-
 53
53
-
 54
54
-
 55
55
-
 56
56
-
 57
57
-
 58
58
-
 59
59
-
 60
60
-
 61
61
-
 62
62
-
 63
63
-
 64
64
-
 65
65
-
 66
66
-
 67
67
-
 68
68
-
 69
69
-
 70
70
-
 71
71
-
 72
72
-
 73
73
-
 74
74
-
 75
75
-
 76
76
-
 77
77
-
 78
78
-
 79
79
-
 80
80
-
 81
81
-
 82
82
-
 83
83
-
 84
84
-
 85
85
-
 86
86
-
 87
87
-
 88
88
-
 89
89
-
 90
90
-
 91
91
-
 92
92
-
 93
93
-
 94
94
-
 95
95
-
 96
96
-
 97
97
-
 98
98
-
 99
99
-
 100
100
-
 101
101
-
 102
102
-
 103
103
-
 104
104
-
 105
105
-
 106
106
-
 107
107
-
 108
108
-
 109
109
-
 110
110
-
 111
111
-
 112
112
-
 113
113
-
 114
114
-
 115
115
-
 116
116
-
 117
117
-
 118
118
-
 119
119
-
 120
120


Sony PCM-M10 Operating instructions
- Category
- Dictaphones
- Type
- Operating instructions
Ask a question and I''ll find the answer in the document
Finding information in a document is now easier with AI
Related papers
-
Sony PCM-D50 Operating instructions
-
-
Sony PCM-D1 User manual
-
Sony PCM-D100 Operating instructions
-
-
-
Sony MZ-NH1 User manual
-
Sony ICD-LX30 Operating instructions
-
Sony PCM-D10 Operating instructions
-
Other documents
-
Tascam AUDIO RECORDER Operating instructions
-
Olympus LS-100 Product information
-
-
Marantz CDR310 User manual
-
-
-
-
Korg Kross 2 Owner's manual
-
-