Page is loading ...

1
50061011 Chevy Impala SS
A Division of KW automotive North America, Inc
CHEVY IMPALA
1992 - 1996
LSD INSTALLATION

2
50061011 Chevy Impala SS
A Division of KW automotive North America, Inc

3
50061011 Chevy Impala SS
A Division of KW automotive North America, Inc
INSTALLATION INTRODUCTION
1. REMOVING THE FENDER, DOORS FROM THE A-PILLAR AND DISCONNECTING THE
WIRE HARNESS @ THE DOOR JAM
2. REMOVING THE EXISTING DOOR HINGES FROM THE DOORS; TOP AND BOTTOM.
3. MODIFYING THE INTERNAL FENDER AREAS FOR THE HINGE CLEARANCE.
4. MODIFYING THE ELECTRICAL HARNESS.
5. INSTALLING THE GROUND PLATE TO THE A-PILLAR AND THE SWING ARM TO THE
DOOR.
6. HANGING AND ALIGNING THE VEHICLE DOORS.
7. INSTALLING THE FENDER AND CHECKING FOR CLEARANCE.
8. REMOVE FENDER AND ROUTE THE WIRING.
9. RE-INSTALL FENDER AND CHECK FOR CLEARANCE.
10. JOB COMPLETE!

4
50061011 Chevy Impala SS
A Division of KW automotive North America, Inc
Installation Instructions LamboStyleDoors
(The instructions are to be used as a reference only. Please repeat steps for both doors.)
Pre-installation check list:
•Battery disconnected •Front bumper removal •Front fender removal
•Vehicle must be accident free •Vehicle must have inner fender cover
Preparations:
(Disassemble parts according to the vehicle manufacturers’ specifications)
•
Disassemble the door stopper
• Disconnect the wire harness between the chassis and the door (remove the harness from the door interior
when necessary)
• Disassemble the door. For this procedure, remove the pin between the hinges.
• Modify the hinges at the A-pillar and on the door (please see enclosure “modifying the hinges”.
• Extend the factory door wire harness with the enclosed wire harness extension kit.
(See enclosed “wire harness extension”.
• Modify the fender
(See enclosed “modifying the fender”.
• Relocate the door lock vacuum case (when necessary).
(e.g. from the passenger’s side inner fender to the engine compartment)
• Modify the windshield washer reservoir (when necessary).
(see enclosed “modifying the windshield washer reservoir”)

5
50061011 Chevy Impala SS
A Division of KW automotive North America, Inc
LSD Doors must be installed according to the provided vehicle specific instructions from LSD Doors and in-
stallation should be performed by an authorized dealer.
Always follow the latest accident prevention regulations (not applicable for North America) for each step to
prevent any serious bodily harm or injury.
Extending the factory wire harness must be completed according to the vehicle manufacturer‘s guidelines for
cable repairs. When working with Share-data bus systems please take special care to correctly rerouting the
wires and not to damage the wire insulation/shielding, twisting of the cables or interruption of any other sys-
tems (check with the specifications of the vehicle manufacturer).
When modifying vehicles equipped with door side air bag systems, the functionality of the air bag system
must be re-inspected through the vehicles authorized dealer.
During final door adjustments please make sure that the door closes and locks correctly as o.e.m. specifica-
tions (see original door close angles, lock and gapping positions etc.)
Please pay special attention while working in the operation area of the hinge system (especially when working
directly with the pivot mechanism or in the overall door operation zone).
All vehicle doors must be securely closed before setting vehicle into motion. Operating a vehicle with the
doors open is strictly prohibited.
Supplied vertical lifting door warning decals must be placed on the vehicles front side windows, clearly visible
from both inside and outside. Not placing decals on your vehicle might void your vehicle operating license
(not applicable for North America).
DO NOT install heavier speaker systems without first raising the pressure of the gas spring.
Please adjust the horizontal opening angle of the doors for maximum entrance space.
Please pay attention to your gas springs and make sure they open and maintain your door at the maximum
opening angle under all operation vehicle conditions.
Make sure you empty the door pockets/storage compartments, so objects will not fall out once the door is
raised and also not to offset the correct balance of the gas spring.
WARNING: The gas spring is under extreme pressure! Please make sure the snap rings are installed cor-
rectly and are snapped their respective guides.
DANGER WARNINGS

6
50061011 Chevy Impala SS
A Division of KW automotive North America, Inc
An additional inside support handle must be installed to solve the issue of possible difficulty of griping the
door, when raising and lowering your door from your seated position.
If there are white lights on your door, these must be made ineffective, e. g. taking of the bulb and bulb holder
according to fig. 5.22 ECE-law no. 48.
After mounting the LSD hinge system you must reinstall your OEM inner fender covers to keep your LSD
hinges free from debris and corrosion.
You must have an authorized workshop check that the central locking system (if equipped) is working prop-
erly.
You must have an authorized workshop check the functionality of all systems, switches and components
(including: loudspeakers, alarm system, CAN data bus systems, window lifts, crash-sensor, memory seat ad-
justment, mirror adjustment and heating, etc. if equipped).
While adjusting the door please take special care to position it in the matching door frame as not to cause any
damages to paint etc.
In case any chassis modifications were performed, please use the supplied chassis glue (if required for spe-
cific application) to seal any openings on the A-pillar or doors (make sure panels are free from grease and
dust before applying chassis glue for a superior water tight seal).
NOTE: please be aware your car might have different factory installed equipment from our tested R&D vehi-
cle, in this case please contact your LSD dealer to order higher or lower power gas damper units (an addi-
tional cost may apply).
Please note that the power of the gas dampers may fluctuate due to ambient temperature variations, the
opening and closing forces may also differ according to damper manufacturers specifications (warranty
claims will only be honored if there’s an internal defect or an error in production).
All LSD hinges come with a protective oil coating, please remove coating and then apply the included PSK
spray for superior sealing of the finish.
If any body work is performed, use Corrosion prevention methods according to the vehicle manufactures
specifications.
Updated installation instructions can be found on www.lsd-doors.com (guide notes subject to change without
notice).
A second person makes the work much easier. Please instruct the second person before start work-
ing.
It is recommended to keep your LSD door hinges maintained on a regular basis for a lifetime of trouble
free operation.
General installation instructions:
! Attention notice:

7
50061011 Chevy Impala SS
A Division of KW automotive North America, Inc
- After washing the vehicle, open the doors and check to see that all pivot points are properly greased
- Every three months, open doors and check to see that all pivot points are properly greased
- If the vehicle is subject to a harsh environment, such as salt or sand, it is critical that all pivot points stay
lubricated, especially if the doors are being used frequently, open doors and check to see that all pivot
points are greased properly
General Lubrication Information
In order for the LSD Door System to function properly, adequate lubrication is essential at all pivot
points on the system. Periodic lubricating of all pivot points is highly recommended on a consistent
basis. This helps in the life of all bearings involved.
Listed below are helpful hints of when to lubricate:

8
50061011 Chevy Impala SS
A Division of KW automotive North America, Inc
1x A 5X B 1x C 3x D
Snap ring Cable ties Gas Damper 2450 M.A.R.A Shim
1x E
1x F 1x G 2x H
LSD Swing Arm LSD Ground Plate LSD Hinge Assembly Cover plate
2x
I 1x J
LSD Warning notice Shim Roller Mount
HARDWARE LIST ( per vehicle side)

9
50061011 Chevy Impala SS
A Division of KW automotive North America, Inc
C
C
OEM
A
A
C
OEM
OEM
OEM
F
E

10
50061011 Chevy Impala SS
A Division of KW automotive North America, Inc
ORIGINAL EQUIPMENT CHASSIS HINGE REMOVAL MODIFICATION
IMPORTANT NOTE: The following instructions given, in sequential order, is a step-by-step procedure to
minimize any installation difficulty that may occur. By skipping steps, un-necessary problems can arise during
the installation process.
On this particular vehicle, the hinges are bolted to the A-Pillar. Using a wrench, un-bolt both the two top
mount bolts and the two bottom bolts that attach the hinge/door to the A-Pillar. Remove the door/hinges from
the A-Pillar and carefully put aside.
A-PILLAR

11
50061011 Chevy Impala SS
A Division of KW automotive North America, Inc
STEP 1 INNER FENDER MODIFICATION
For this particular application, once the outer fender has been removed, the inner fender needs
to be modified, to accommodate the new LSD hinges. The following pictures show the areas

12
50061011 Chevy Impala SS
A Division of KW automotive North America, Inc
STEP 1 INNER FENDER MODIFICATION –cont’d-
For this particular application, once the outer fender has been removed, the inner fender needs
to be modified, to accommodate the new LSD hinges. The following pictures show the areas
(outlined in white) that will need to be removed.
1a. Using a cutting tool, a manual or pneumatic saw, begin cutting along the white line to
wards the top of the inner fender (Photo 1). Cut-out completely and remove (Photo 2).
1b. After the first cut has been done, this is what it should look like (Photo 3).
PHOTO 1
PHOTO 2
PHOTO 3
80mm
65mm

13
50061011 Chevy Impala SS
A Division of KW automotive North America, Inc
PHOTO 3
STEP 1 INNER FENDER MODIFICATION –cont’d-
For this particular application, once the outer fender has been removed, the inner fender needs
to be modified, to accommodate the new LSD hinges. The following pictures show the areas
(outlined in white) that will need to be removed.
1c. The secondary cut for the removal of the large inner fender lip is done the same way as
the first. With this area already outlined, begin cutting the lines you have marked
(Photo 3).
1d. The final look of the area (Photo 4) is shown. We recommend that painting the ex-
posed cut areas to match the color of the inner fender. This is done to prevent any
rusting of the exposed areas.
PHOTO 4
1e. This portion of the inner fender modification is complete.

14
50061011 Chevy Impala SS
A Division of KW automotive North America, Inc
STEP 2 INNER FENDER MODIFICATION –cont’d-
For this particular application also, the outer fender also needs to be modified, to accom-
modate the new LSD hinges. The following pictures show the areas (outlined in white) that will
need to be removed.
2a. This cut for the removal of the fender lip is done using a cutting tool. Outline the area
using the dimensions given to you. This (Photo 5) shows the before cut.
2b. The final look of the area (Photo 6) is shown.
PHOTO 5
PHOTO 6
5mm-7mm
3.5cm
22cm
23.5cm
7.5mm
2cm

15
50061011 Chevy Impala SS
A Division of KW automotive North America, Inc
STEP 3 DIS-ASSEMBLING THE SWING ARM FROM THE GROUND PLATE
3a. Your new LSD Door Hinges have come assembled.
3b. As identified in (Photo 8), disassemble the swing arm from the ground plate. Un-bolt
all four mounting bolts or allen-heads and remove completely.
PHOTO FOR REFERENCE ONLY
F
E
PHOTO 8

16
50061011 Chevy Impala SS
A Division of KW automotive North America, Inc
STEP 4 MOUNTING THE GROUND PLATE TO THE A-PILLAR
4a. Using the kit supplied mounting hardware for the Ground Plate, attach it to the A-Pillar.
Finger tight initially, then using a wrench, torque to specifications. The photos below
show the top and bottom mounting points of the Ground Plate.
BOTTOM MOUNT TOP MOUNT
4b. For this particular application, there is an additional mount point that stiffens the top of
the Ground Plate, giving the Ground Plate more rigidity. The photo below shows, us-
ing existing hardware, anchoring the top of the Ground plate to the top of the A-Pillar.

17
50061011 Chevy Impala SS
A Division of KW automotive North America, Inc
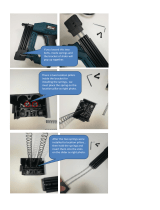
STEP 5 MODIFYING THE CHASSIS WIRING HARNESS
IMPORTANT NOTE: Prior to beginning extending the wiring harness from the A-pillar,
each individual wire needs to be cut one at a time. Each wire that is cut, has to be staggered
(See 5g) from the previous cut wire. By doing this, you will eliminate, when wrapping all the
wires, one large taped ball.
5a. If the wiring harness comes equipped with an insulation cover, this will need to be
removed.
STEPS 5b thru 5f are for REFERENCE ONLY (using white wire as reference)
5b. Isolate a single wire (Photo 9). Start the first cut on the white wire approximately 3”
from the door frame.
5c. Cut the wire sheath (insulation) (coming from door frame) back approximately
1/4” (Photo 10). Twist the end tight.
5d. Cut the wire sheath (insulation) (from kit supplied white wire) back approximately 1/4”.
Twist the end tight.
5e. Using the kit supplied heat shrink connector ends, insert the wire ends into the connec-
tor, one from each end (Photo 11).
5f. Using the heat gun, shrink wrap the connector ends to securely mate with the wire
ends (Photo 12).
PHOTO 9
PHOTO 10 PHOTO 11 PHOTO 12

18
50061011 Chevy Impala SS
A Division of KW automotive North America, Inc
STEP 5 MODIFYING THE CHASSIS WIRING HARNESS –cont’d-
5g. VERY IMPORTANT:
5h. Remember to stagger the cuts for each individual wire. This will eliminate having a
large wrap and will allow for minimal size and maximum flexibility.
5i. In the photo below an (INCORRECT) version is shown. By cutting it this way, wrapping
the wire at the end, will create a large ball in the middle of the newly extended wire har-
ness. Wire harness flexibility would be minimal.
5j. By staggering the cuts, (CORRECT), you eliminate creating a large taped ball, thus
making it easier to install back in the chassis. Wire harness would have minimal size
and maximum flexibility.
5k. On this particular install, a kit supplied cover plate is used on the door itself (Photo 13).
This cover plate is not mounted with any hardware, but instead is held in place by the
LSD Swing Arm.
5m. Once both cover plates have been fed onto the new extension wire harness, you are
able to attach the wire connector end of the A-Pillar (Photo 14).
INCORRECT CUTS CORRECT CUTS
PHOTO 13
PHOTO 14

19
50061011 Chevy Impala SS
A Division of KW automotive North America, Inc
STEP 5 ROUTING THE WIRE HARNESS
IMPORTANT NOTE:
5n. Prior to mounting the Swing Arm to the door, the wire harness needs to be fed through
the Swing Arm, as shown in (Photos 26a)
PHOTO 26a

20
50061011 Chevy Impala SS
A Division of KW automotive North America, Inc
STEP 6 MOUNTING THE LSD SWING ARM
6a. Using the existing O.E.M. nuts, mount the LSD swing arm on the door, matching
up each respective mount hole. Two mount holes at the top and two at the bottom
(Photo 15). Locate the mounting nuts at the center of their respective mount holes.
6b. Using a wrench, torque the bolts to 20ft-lb.
PHOTO 15
OEM
OEM
/