Page is loading ...

1
Getting Started with
ASP.NET 3.5
Ever since the first release of the .NET Framework 1.0 in early 2002, Microsoft has put a lot of effort
and development time into ASP.NET, the part of the .NET Framework that enables you to build rich
web applications. This first release meant a radical change from the older Microsoft technology to
build web sites called Active Server Pages (ASP), now often referred to as classic ASP. The introduc-
tion of ASP.NET 1.0 and the associated Visual Studio .NET 2002 gave developers the following ben-
efits over classic ASP:
❑ A clean separation between presentation and code. With classic ASP, your coding logic
was often scattered throughout the HTML of the page, making it hard to make changes
to the page later.
❑ A development model that was much closer to the way desktop applications are pro-
grammed. This made it easier for the many Visual Basic desktop programmers to make
the switch to web applications.
❑ A feature-rich development tool (called Visual Studio .NET) that allowed developers to
create and code their web applications visually.
❑ A choice between a number of object-oriented programming languages, of which Visual
Basic .NET and C# (pronounced as C-Sharp) are now the most popular.
❑ Access to the entire .NET Framework, which for the first time meant that web developers
had a unified and easy way to access many advanced features to work with databases, files,
e-mail, networking tools, and much more.
Despite the many advantages of ASP.NET over the older model, using ASP.NET also meant an
increase of complexity and the knowledge you needed to build applications with it, making it
harder for many new programmers to get started with ASP.NET.
After the initial release in 2002, Microsoft released another version of the .NET Framework (called
.NET 1.1) and the development IDE Visual Studio .NET in 2003. Many people saw this as a service
pack for the initial release, although it also brought a lot of new enhancements in both the frame-
work and the development tools.
87593c01.qxd:WroxPro 1/25/08 9:05 AM Page 1
COPYRIGHTED MATERIAL

In November 2005, Visual Studio 2005 and ASP.NET 2.0 were released. To the pleasant surprise of many
developers around the world, Microsoft had again been able to drastically improve and expand the prod-
uct, adding many features and tools that helped reduce the complexity that was introduced with ASP.NET
1.0. New wizards and smart controls made it possible to reduce the code required to build an application,
decreasing the learning curve for new developers and increasing the productivity.
The current version, ASP.NET 3.5, builds on top of the successful ASP.NET 2.0 release, leaving many of
the beloved features in place, while adding new features and tools in other areas.
Over the next 18 chapters, you learn how to build full-featured ASP.NET web sites using Visual Web
Developer, Microsoft’s development tool for ASP.NET web applications. This book guides you through
the process of creating a fully functional, database-driven web, starting with a bare bones web site in
this chapter, all the way down to the deployment of it to a production environment in Chapter 18.
To start off, this chapter gives you a good look at:
❑ Visual Web Developer 2008 Express Edition and Visual Studio 2008 and how to acquire and
install them.
❑ Creating your first web site with Visual Web Developer.
❑ The way an ASP.NET page is processed and sent to the browser.
❑ How you can use and customize the development environment.
The chapter closes with an overview of the sample web site that comes with this book, the Planet Wrox
web site. In this chapter, you’ll see what the site has to offer and how to use it; the remainder of this book
then shows you the inner workings of the site and how it’s built.
The sample site and all the examples in this book are built with Visual Web Developer (VWD), so it’s
important that you have it installed on your development machine, and know how to access its most
basic features. The next section shows you how to acquire and install VWD. Once you have it up and
running, you’ll see how to create your first web site, followed by an extensive tour through the many
features of VWD.
Microsoft Visual Web Developer
Although you could theoretically write ASP.NET web applications with Notepad or another text editor
alone, you really want to install a copy of Microsoft Visual Web Developer. VWD is developed specifi-
cally for building ASP.NET web sites, and as such, hosts an enormous amount of tools that will help you
in rapidly creating complex ASP.NET web applications.
Visual Web Developer comes in two flavors: as a standalone and free version called Microsoft Visual Web
Developer 2008 Express Edition, and as part of the larger development suite called Visual Studio 2008,
which is also available in different editions, each with its own price tag. Although the Express Edition of
VWD is free, it contains all the features and tools you need to create complex and feature-rich web applica-
tions. All the examples you find in the book can be built with the free Express Edition so there’s no need to
shell out big bucks for the commercial versions of Visual Studio 2008 to follow along with this book.
2
Chapter 1: Getting Started with ASP.NET 3.5
87593c01.qxd:WroxPro 1/25/08 9:05 AM Page 2

Getting VWD is easy. You can download it from the Microsoft site as discussed next.
Getting Visual Web Developer
You can get the free version of VWD from the Microsoft site at www.microsoft.com/express/. On the
Express home page, follow the Download Now link until you reach the page that offers the downloads
for the Express products, including Visual Web Developer 2008 Express Edition. From this page, you can
download Visual Web Developer 2008 Express Edition as a Web Install, where you download only the
installer, while the remaining files are downloaded during the installation process. Make sure you choose
Visual Web Developer from the page, and not one of the other free Express products. The page also allows
you to download all Express products conveniently as an ISO image that you can burn onto a DVD.
Don’t be fooled by the file size of the Web Install download, which is little under 3MB. The file you
downloaded is just the installer that downloads the required files over the Internet. The total download
is around 1.3GB.
If you want to try out the full version of Visual Studio 2008, which also contains VWD, you can sign up
for a free 90-day trial that you can get from the Microsoft site at
http://msdn2.microsoft.com/
vstudio
. You can choose to download an ISO image that you’ll need to burn on a DVD.
Installing Visual Web Developer Express Edition
Installing Visual Web Developer is a straightforward, although somewhat lengthy, process. Depending
on your installation method, your computer and your Internet connection speed, installing VWD may
take up to several hours.
Try It Out Installing Visual Web Developer 2008 Express Edition
This Try it Out exercise guides you through installing VWD Express Edition on your computer. It assumes
you’re using the web download option, although the process for installing the Express edition from a DVD
is almost identical. The steps you need to perform to install the full versions of Visual Studio 2008 are simi-
lar as well, although the screens you’ll see will be somewhat different.
No matter which version of VWD you install, it’s important that you also install SQL Server 2005 Express
Edition — a required component if you want to follow along with many of this book’s examples. When
you install the full version of Visual Studio 2008, the option to install SQL Server is included on the list
with features to install that you see during setup. If you install VWD Express Edition, you get the option
to choose SQL Server on the Installer Options dialog box. If you don’t see SQL Server listed on these dia-
log boxes, you probably already have SQL Server 2005 Express Edition installed.
1. When you’re installing the web version, run the file you downloaded from the Microsoft web
site. Otherwise, start the setup process from the Visual Studio or Visual Web Developer DVD.
2. Once the installer has started, click Next, read and accept the license terms, and click Next
once more.
3. On the Installer Options page, make sure you select both the MSDN Express Library for Visual
Studio 2008 and Microsoft SQL Server 2005 Express Edition. Although these two options add
3
Chapter 1: Getting Started with ASP.NET 3.5
87593c01.qxd:WroxPro 1/25/08 9:05 AM Page 3

considerably to the size of the download, both of them are invaluable for building ASP.NET web
applications. If you don’t see the SQL Server option, you already have it installed. The Microsoft
Silverlight Runtime component is optional, although it’s probably a good idea to download it now
because you’ll see more and more web sites using Silverlight in the near future. Click Next again.
4. On the Destination Folder page, you can leave the Install in folder field set to its default if you
have enough space on your primary disk. Otherwise, click the Browse button and select a differ-
ent location.
5. Click the Install button. If you’re using the web-based installer, the setup application will first
download the files over the Internet to your computer. During the installation process, you’ll
see a screen (similar to Figure 1-1) that shows you the progress of the download and installa-
tion of VWD.
6. Once the application is finished installing, you may get a dialog box asking to reboot your
machine. Click Restart now. Once your machine has started again, VWD is ready for use.
Figure 1-1
How It Works
The straightforward installation process guided you through the setup of VWD Express Edition. In the
Installer Options dialog box, you selected the MSDN Library — which contains the help files for VWD —
and Microsoft SQL Server 2005 Express Edition, Microsoft’s free version of its database engine. SQL Server
2005 is discussed and used a lot in this book, starting with Chapter 11. Appendix B shows you how to con-
figure security settings for the various versions of SQL Server 2005 using the free SQL Server Management
Studio Express Edition.
Now that VWD is installed, it’s time to fire it up and start working with it. The next section shows you how
to create your very first site in VWD. You see how to create a site, add content to a web page, and view that
page in your browser.
4
Chapter 1: Getting Started with ASP.NET 3.5
87593c01.qxd:WroxPro 1/25/08 9:05 AM Page 4

Creating Your First ASP.NET 3.5 Web Site
You probably can’t wait to get started with your first ASP.NET web site, so instead of giving you a theoreti-
cal overview of web sites in VWD, the next Try It Out exercise dives right into the action and shows you
how to build your first web project. Then, in the How It Works explanation and the section that follows,
you get a good look of what goes on behind the scenes when you view an ASP.NET page in your browser.
Try It Out Creating Your First ASP.NET Web Page
1.
Start VWD from the Windows Start menu if you haven’t done so already. The first time you
start VWD, there is a long delay before you can use VWD because it’s busy configuring itself.
Subsequent starts of the application will go much faster.
2. If you’re using a commercial version of Visual Studio, you also get a dialog box that lets you
choose between different collections of settings the first time you start Visual Studio. The choice
you make on that dialog box influences the layout of windows, toolboxes, menus, and shortcuts.
Choose Web Development Settings because those settings are designed specifically for ASP.NET
developers. You can always choose a different profile later by resetting your settings, as explained
later in this chapter.
3. Once VWD is fully configured, you see the main screen appear, as shown in Figure 1-2.
Figure 1-2
5
Chapter 1: Getting Started with ASP.NET 3.5
87593c01.qxd:WroxPro 1/25/08 9:05 AM Page 5

You get a full description of all the windows, toolbars, panels, and menus in the next section, so
for now, just focus on creating a new web site. Click the File menu in the upper-left corner and
choose New Web Site. If you’re using a commercial version of Visual Studio, you may have to
open the submenu New first. (Make sure you don’t accidentally use the New Project menu, as
that is used to create different types of .NET applications.) The New Web Site dialog box appears
as shown in Figure 1-3.
Figure 1-3
4. In the Templates section of the dialog box, verify that ASP.NET Web Site is selected. Also verify that
File System is the selected option in the Location drop-down list. If you want, you could change
the location on disk where the web site is stored by clicking the Browse button and choosing a
new location on your computer’s hard drive. For now, the default location — a folder under your
Documents folder — is fine, so you can leave the location as is.
5. In the Language drop-down list, you can choose a programming language you will use mainly
in your site. This book shows all examples in both Visual Basic and C# so you can choose a lan-
guage to your liking.
6. Click OK. VWD creates a new web site for you that includes one standard ASP.NET page called
Default.aspx, a web.config file, and an empty App_Data folder, as shown in Figure 1-4. It also
opens the file Default.aspx so you can see the code for the page.
Figure 1-4
6
Chapter 1: Getting Started with ASP.NET 3.5
87593c01.qxd:WroxPro 1/25/08 9:05 AM Page 6

7. Between the opening and closing <div> tags in the page, type the highlighted text and code:
<div>
<h1>Hello World</h1>
<p>Welcome to Beginning ASP.NET 3.5 on <%= DateTime.Now.ToString() %></p>
</div>
❑ You’ll see code formatted like this a lot more in this book. When you are instructed to
type in code formatted like this with mixed background colors, you only need to type
in the highlighted code. The other code should already be present in the file.
❑ When you see code like this in a discussion — for example, in a How it Works section —
the highlighted code is the part you need to focus on, while the code with no background
is less important.
❑ Don’t worry about the code with the angle brackets (
<>) in the welcome message; you’ll
see how it works later in this book. Although this code may not look familiar to you now,
you can probably guess what it does: it writes out today’s date and time.
8. From the Debug menu in VWD, choose Start Without Debugging (or press Ctrl+F5) to open the
page in your default browser, as shown in Figure 1-5.
Figure 1-5
If you don’t see the date and time in the page, or if you get an error, look again at the code in
the welcome message. It starts with an angle bracket (
<) followed by a percentage symbol and
an equals sign. It closes with a single percentage sign and another angle bracket (
>). Also, make
sure you typed in the code exactly as shown here, including capitalization. This is especially
true when you are using C#, as that language is case sensitive.
If you get an Information bar warning about Intranet settings in Internet Explorer, click the bar and choose
Enable Intranet Settings. If you want to learn more about the implications of these settings first, choose
What are Intranet Settings from the popup menu.
9. Notice how a little icon with a screen tip appeared in the tray bar of Windows, visible in Figure 1-6.
This icon belongs to the ASP.NET Development Server. This web server has been started by VWD
automatically to serve the request for your page. You’ll learn more about how the web server is able
to process your page later in this book.
7
Chapter 1: Getting Started with ASP.NET 3.5
87593c01.qxd:WroxPro 1/25/08 9:05 AM Page 7

Figure 1-6
That’s it. You just created your very first ASP.NET 3.5 web site with VWD.
How It Works
Although the web page you created in the previous Try It Out is quite simple, the process that eventu-
ally results in the page being displayed in your browser isn’t so simple. All by itself, the ASP.NET page
(also referred to as an ASPX page because of its extension) you created in the previous Try It Out can’t
do much. It needs to be processed and served by a web server before your browser can display it. That’s
why VWD automatically started up the built-in ASP.NET Development Server to handle the request for
the page. Next, it started up your default web browser and directed it to the address of the web server,
http://localhost:49168/WebSite1 in the Try It Out example, although the actual number in the
address may change every time you start the web server as the number is randomly chosen by VWD.
It’s important to realize that the ASPX file you created in VWD is not the same as the one that eventually
gets displayed by the browser.
When you create a page in VWD, you add markup to it. The markup in an ASPX page is a combination of
plain text, HTML, code for ASP.NET server controls (which you’ll learn more about in this chapter and
in Chapter 4), code written in Visual Basic.NET or C#, and more.
When you request an ASPX page in your browser, the web server processes the page, executes any code
it finds in the file, and effectively transforms the ASP.NET markup into plain HTML that it then sends to
the browser, where it is displayed. In the previous Try It Out, the resulting HTML causes the browser to
display the current date and time. HTML, or HyperText Markup Language, is the language that browsers
use to display a web page. You learn how HTML looks and how to use it later in this chapter.
To see how the final HTML differs from the original ASPX page, open the source for the page in your
browser. In most browsers, you can bring up the source window by right-clicking the page and choosing
View Source. This brings up your default text editor, showing the HTML for the page.
If you already closed your browser after the previous Try It Out, press Ctrl+F5 in VWD to open the
page again.
Most of the HTML you see in the text editor is similar to the original ASPX page. However, if you look at the
line that displays the welcome message and the current date and time, you’ll notice a big difference. Instead
of the code between the angle brackets and percentage signs, you now see the actual date and time:
<h1>Hello World</h1>
<p>Welcome to Beginning ASP.NET 3.5 on 11/1/2007 5:03:39 PM</p>
</div>
8
Chapter 1: Getting Started with ASP.NET 3.5
87593c01.qxd:WroxPro 1/25/08 9:05 AM Page 8

When the web server processed the page, it looked up the current date and time from the local computer,
and inserted it in the HTML that got sent to the browser.
In the following section, you’ll see how this works in much more detail.
An Introduction to ASP.NET 3.5
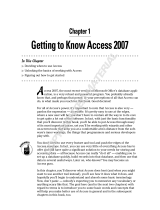
When you type a web address like www.wrox.com in your web browser and press Enter, the browser sends
a request to the web server at that address. This is done through HTTP, the HyperText Transfer Protocol. HTTP
is the protocol by which web browsers and web servers communicate. When you send the address, you
send a request to the server. When the server is active and the request is valid, the server accepts the request,
processes it, and then sends the response back to the client browser. The relationship between the request
and response is shown in Figure 1-7.
For simple, static files, like HTML files or images, the web server simply reads in the file from its local
hard drive and sends it to the browser. However, for dynamic files, such as ASPX pages, this is obviously
not good enough. If the web server were to send the ASPX file directly to the browser as a text file, you
wouldn’t have seen the current date and time in the browser, but instead you would have seen the actual
code (
<%= DateTime.Now.ToString() %>). So, instead of sending the file directly, the web server hands
over the request to another piece of software that is able to process the page. This is done with a concept
called Application Mapping or Handler Mapping, where an extension of a file (.aspx in this example) is
mapped to an application that is capable of handling it. In the case of an .aspx page, the request is eventu-
ally handled and processed by the ASP.NET runtime, part of the Microsoft .NET Framework designed
specifically to handle web requests.
Figure 1-7
Web Server
Browser
21
Request
Response
9
Chapter 1: Getting Started with ASP.NET 3.5
87593c01.qxd:WroxPro 1/25/08 9:05 AM Page 9

During the processing of the page, three important areas can influence the way the page eventually ends
up in the browser:
❑ Static text. Any static text, like HTML, CSS, or JavaScript code you place in a page, is sent to the
browser directly. You learn more about HTML, CSS, and JavaScript in this and subsequent chap-
ters, including Chapter 3, which gives you a detailed look at CSS.
❑ ASP.NET server controls. These controls are placed in your ASPX page and when they are
processed, they emit HTML that is inserted in the page. You’ll learn more about server controls
after the discussion of HTML in this chapter, and Chapter 4 is devoted entirely to ASP.NET
server controls.
❑ Programming code. You can embed code, like Visual Basic .NET or C#, directly in a page, as you
saw in the previous Try It Out. In addition, you can place code in a separate code file, called a
Code Behind file. This code can be executed by the runtime automatically, or based on a user’s
action. Either way, execution of the code can greatly influence the way the page is displayed, by
accessing databases, performing calculations, hiding or showing specific controls, and much
more. Programming your ASP.NET web pages is discussed in great detail in Chapter 5.
Once the page is done processing, and all the HTML for the page has been collected, it is sent back to the
browser. The browser then reads this HTML, parses it and, finally, displays the page for you to look at.
Since HTML is so critical for displaying web pages, the next section gives you an overview of HTML.
Understanding HTML
HTML is the de facto language for creating web pages and is understood by every web browser that exists
today. Since the beginning of the ’90s it has been the driving force of the World Wide Web, the part of the
Internet that deals with web pages. HTML documents are simple text files that contain markup, a combina-
tion of text, and additional data that influences that text.
HTML Elements
HTML uses angle brackets to indicate how your content should be rendered (or displayed) in the browser.
The angle brackets are referred to as tags; a pair of tags holding some text is referred to as an element. Take
another look at the HTML you saw in the previous Try It Out where you opened the source window for
the page in the browser:
<h1>Hello World</h1>
<p>Welcome to Beginning ASP.NET 3.5 on 11/1/2007 5:03:39 PM</p>
The first line of this example contains an <h1> element with an opening tag (<h1>) and a closing tag
(
</h1>). This element is used to signify a heading at level one. Notice how the element is closed with a
similar tag, but with an additional forward slash (/) in it:
</h1>. Any text between these opening and
closing tags is considered part of the element, and is thus rendered as a heading. In most browsers, this
means the text is rendered in a larger font. Similar to the
<h1> tag, there are tags for creating headings
up to level six, such as
<h2>, <h3>, and so on.
10
Chapter 1: Getting Started with ASP.NET 3.5
87593c01.qxd:WroxPro 1/25/08 9:05 AM Page 10

Below the heading element, you see a <p> element, which is used to denote a paragraph. All text within
the pair of
<p> tags is considered part of the paragraph. By default, a browser renders a paragraph with
some additional margin spacing at the bottom, although you can override that behavior.
Many tags are available in HTML; too many to cover them all here. The following table lists some of the
most important tags and describes how they can be used. For a complete list of all HTML elements, take
a look at the web site of the organization that maintains HTML:
www.w3.org/TR/html401/index/
elements.html
.
Continued
Ta g Description Example
<html>
Used to denote the start
and end of the entire page.
<html>
...All other content goes here
</html>
<head>
<title>
Used to denote a special sec-
tion of the page that con-
tains data about the page,
including its title.
<head>
<title>Welcome to my site</title>
</head>
<body>
Used to denote the start and
end of the body of the page.
<body>
Page body goes here
</body>
<a>
Used to link one web page
to another.
<a href=”http://www.wrox.com”>Visit the
Wrox site</a>
<img>
Used to embed images in
a page.
<img src=”Logo.gif” />
<b>
<i>
<u>
Used to format text in a
bold, italic, or underline
font.
This is <b>bold text</b> while <i>this
text is in italic</i>
<form>
<textarea>
<select>
<input>
Used for input forms that
allow users of a web site to
submit information to the
server.
<input type=”text” value=”Some Text” />
<table>
<tr>
<td>
These tags are used to cre-
ate a layout with a table.
The
<table> tag defines
the entire table, while the
<tr> and <td> are used
to define rows and cells,
respectively.
<table>
<tr>
<td>This is a Cell in Column 1</td>
<td>This is a Cell in Column 2</td>
</tr>
</table>
11
Chapter 1: Getting Started with ASP.NET 3.5
87593c01.qxd:WroxPro 1/25/08 9:05 AM Page 11

Continued
HTML Attributes
In addition to the HTML elements, the previous table also shows you HTML attributes. Attributes contain
additional information that changes the way a specific element behaves. For example, with the
<img> tag
that is used to display an image, the
src attribute defines the source of that image. Similarly, the <span>
tag contains a style attribute that changes the color of the text to red. The value of the style attribute
(
color: red;) is part of a Cascading Style Sheet (CSS), which is discussed in much more detail in Chapter 3.
Just as with the HTML elements, there is a long list of available attributes on the W3C web site:
www.w3
.org/TR/html401/index/attributes.html
.
You don’t need to memorize all these elements and attributes. Most of the time, they are generated for
you automatically by VWD. In other cases, where you need to enter them by hand, VWD has some
great tools to help you find the right tag or attribute. This tool, called IntelliSense, is discussed later in
the book.
The Difference Between HTML and XHTML
In addition to HTML, you may also run into the term XHTML. Although the two have very similar names,
there are some interesting differences that you need to be aware of. XHTML is a reformulation of HTML in
Ta g Description Example
<ul>
<ol>
<li>
These three tags are used to
create numbered or bulleted
lists. The
<ul> and the <ol>
define the looks of the list
(either unordered, with a
simple bullet, or ordered,
with a number), while the
<li> is used to represent
items in the list.
<ul>
<li>First item with a bullet</li>
<li>Second item with a bullet</li>
</ul>
<ol>
<li>First item with a number</li>
<li>Second item with a number</li>
</ol>
<span>
This tag is used to wrap
and influence other parts
of the document. It appears
as inline, so it adds no addi-
tional line break to the page.
<p>This is some normal text while <span
style=”color: red;”>this text appears in
red</span></p>
<div>
Just like the <span> tag,
the
<div> is used as a con-
tainer for other elements.
However, the
<div> acts
as a block element, which
causes an explicit line break
after the
<div> tag by
default.
<div>This is some text on 1 line</div>
<div>This text is put directly under the
previous text on a new line. </div>
12
Chapter 1: Getting Started with ASP.NET 3.5
87593c01.qxd:WroxPro 1/25/08 9:05 AM Page 12

XML — eXtensible Markup Language. This is a generic, text- and tag-based language used to describe data
and is used as the base language for many other languages, including XHTML.
So, XHTML is in fact largely just HTML rewritten with XML rules. These rules are pretty simple, and
most of the time VWD will help you get it right or show you a list of errors and suggestions on how to
fix them.
Always Close Your Elements
In XHTML, all elements must be closed. So when you start a paragraph with <p>, you must use </p> some-
where later in your page to close the paragraph. This is also the case for tags that don’t have their own clos-
ing tags, like
<img> or <br> (to enter a line break). In XHTML, these tags are written as self-closing tags,
where the closing slash is embedded directly in the tag itself as in
<img src=”Logo.gif” /> or <br />.
Always Use Lower Case for Your Tag and Attribute Names
XML is case sensitive, and XHTML applies that rule by forcing you to write all your tags in lowercase.
Although the tags and attributes must be in all lowercase, the actual value doesn’t have to be. So, the
previous example that displays the logo image is perfectly valid XHTML, despite the uppercase L in
the image name.
Always Enclose Attribute Values in Quotes
Whenever you write an attribute in a tag, make sure you wrap its value in quotes. For example, when
writing out the
<img> tag and the src attribute, write it like this:
<img src=”Logo.gif” />
and not like this:
<img src=Logo.gif />
Note that you could also use single quotes to enclose the attribute value, as in this example:
<img src=’Logo.gif’ />
It’s also sometimes necessary to nest single and double quotes. When some special ASP.NET syntax
requires the use of double quotes, you should use single quotes to wrap the attribute’s value:
<asp:Label ID=”DescriptionLabel” runat=”server” Text=’<%# Eval(“Description”) %>’ />
You’ll see this syntax used a lot more in other chapters in this book.
For consistency, this book uses double quotes where possible in all HTML that ends up in the client.
Nest Your Tags Correctly
When you write nested tags, make sure that you first close the inner tag you opened last, and then close
the outer tag. Consider this correct example that formats a piece of text with both bold and italic fonts:
<b><i>This is some formatted text</i></b>
13
Chapter 1: Getting Started with ASP.NET 3.5
87593c01.qxd:WroxPro 1/25/08 9:05 AM Page 13

Notice how the <i> is closed before the <b> tag. Swapping the order of the closing tags leads to invalid
XHTML:
<b><i>This is some formatted text</b></i>
Always Add a DOCTYPE Declaration to Your Page
A DOCTYPE gives the browser information about the kind of HTML it can expect. By default, VWD adds
a
DOCTYPE for XHTML 1.0 Transitional to your page:
<!DOCTYPE html PUBLIC “-//W3C//DTD XHTML 1.0 Transitional//EN”
“http://www.w3.org/TR/xhtml1/DTD/xhtml1-transitional.dtd”>
The DOCTYPE greatly influences the way browsers like Internet Explorer render the page. VWD’s default
DOCTYPE of XHTML 1.0 Transitional gives you a good mix between valid markup and pages that render
the same in all major browsers.
If you want to learn more about XHTML, get a copy of Beginning Web Programming with HTML,
XHTML, and CSS, ISBN: 978-0-7645-7078-0.
Besides HTML, an ASP.NET web page can contain other markup as well. Most pages will have one or
more ASP.NET Server Controls on the page to give it some added functionality. The next section briefly
looks at these ASP.NET Server Controls, and you get an in-depth look at them in Chapter 4.
A First Look at ASP.NET Markup
To some extent, the markup for ASP.NET Server Controls is similar to that of HTML. It also has the notion
of tags and attributes, using the same angle brackets and closing tags as HTML does. However, there are
also some differences.
For starters, most of the ASP.NET tags start with an
asp: prefix. For example, a button in ASP.NET looks
like this:
<asp:Button ID=”Button1” runat=”server” Text=”Button” />
Note how the tag is self-closed with the trailing slash (/) character, eliminating the need to type a sepa-
rate closing tag.
Another thing you may have noticed is that the tag and attribute names are not necessarily in all lower-
case. Because an ASP.NET Server Control lives on the server, it doesn’t have to adhere to the XHTML rules
used in the browser at the client. However, when a server control is asked to emit its HTML to a page that
is configured to output XHTML, it will do so in XHTML. So, the code for the same button looks like this
when rendered in the browser as XHTML:
<input type=”submit” name=”Button1” value=”Button” id=”Button1” />
Notice how the entire tag and its attributes conform to the XHTML standard.
Now that you understand the basics of an ASP.NET page and the HTML that it generates, it’s time to
look at VWD again. Knowing how to use the application and its many tools and windows is an impor-
tant step in building fun, good-looking, and functional web sites.
14
Chapter 1: Getting Started with ASP.NET 3.5
87593c01.qxd:WroxPro 1/25/08 9:05 AM Page 14

A Tour of the IDE
VWD is by far the most extensive and feature-rich integrated development environment (IDE) for building
ASP.NET web pages. The abbreviation IDE refers to the way all the separate tools you need to build
complex web applications are integrated in a single environment. Instead of writing code in a text edi-
tor, compiling code at the command line, writing HTML and CSS in a separate application, and manag-
ing your database in yet another, VWD allows you to perform all of these tasks, and more, from the
same environment. Besides the efficiency this brings because you don’t have to constantly switch
tools, this also makes it much easier to learn new areas of VWD, as many of the built-in tools work
in the same way.
The Main Development Area
To get familiar with the many tools that are packed in VWD’s interface, take a look at Figure 1-8. It shows
the same screen you got after you created your first web site in VWD, but now it highlights some of the
most important screen elements. If you had a previous version of Visual Studio installed, your screen may
look different, as Visual Studio 2008 is able to import settings from older versions.
Figure 1-8
Main
Menu
Toolbox
Properties
Grid
Document
Window
Toolbar
Area
Solution
Explorer
Database
Explorer
15
Chapter 1: Getting Started with ASP.NET 3.5
87593c01.qxd:WroxPro 1/25/08 9:05 AM Page 15

The Main Menu
At the top of the application, right below the Windows title bar, you see the main menu. This menu bar
contains familiar items you find in many other Windows applications, like the File, Edit, and Help menus
as well as menus that are specific to VWD, such as the Website and Debug menus. The menu changes
dynamically depending on the task you’re working on, so you’ll see menu items appear and disappear as
you work your way through the application.
The Toolbar Area
Right below the menu, you see the toolbar area that is capable of showing different toolbars that give
you quick access to the most common functions in VWD. In Figure 1-8, only four of the toolbars are
enabled, but VWD comes with many other toolbars that you can use in specific task-oriented scenarios.
Some toolbars appear automatically when you’re working on a task that requires a particular toolbar’s
presence, but you can also enable and disable toolbars to your liking. To enable or disable a toolbar,
right-click an existing toolbar or the menu bar and choose the toolbar from the menu that appears.
The Toolbox
On the left of the main screen, tucked away at the border of VWD, you see the tab for the Toolbox. If you
hover your mouse over the tab, the Toolbox folds out, giving you a chance to see what it contains. If you
click the little pin icon in the upper-right corner of the Toolbox (or any of the other panels that have this
pin icon), it gets pinned to the IDE so it remains open.
Just as with the menu bar and the toolbars, the Toolbox automatically updates itself to show content that
is relevant to the task you’re working on. When you’re editing a standard ASPX page, the Toolbox shows
the many controls you have available for your page. You can simply drag an item from the Toolbox and
drop it on a location of your page where you want it to appear. These controls are discussed in great detail
in Chapter 4.
The Toolbox contains multiple categories with tools that can be expanded and collapsed as you see fit to
make it easier to find the right tool. You can also reorder the items in the list, add and remove items from
the Toolbox, and even add your own tools to it. Customizing the IDE is discussed later in this chapter.
If the Toolbox is not visible on-screen, press Ctrl+Alt+X to open it or choose Toolbox from the View menu.
There are two additional tabs below the Toolbox tab: CSS Properties and Manage Styles. Both are dis-
cussed extensively in Chapter 3.
The Solution Explorer
At the right of the screen, you see the Solution Explorer. The Solution Explorer is an important window
because it gives you an overview of the files that comprise your web site. Instead of placing all your files
in one big folder, the Solution Explorer enables you to store files in separate folders, creating a logical and
organized site structure. You can use the Solution Explorer to add new files to your site, move existing
files around using drag and drop, delete files from the project, and more. Most of the functionality of
the Solution Explorer is hidden behind its right-click menu, which changes depending on the item you
right-clicked in the explorer window.
16
Chapter 1: Getting Started with ASP.NET 3.5
87593c01.qxd:WroxPro 1/25/08 9:05 AM Page 16

At the top of the Solution Explorer, you see a little toolbar that gives you quick access to some functional-
ity related to your web site, including opening the Properties window for the selected item, refreshing
the Solution Explorer window, an option to nest related files, and two buttons that allow you to copy and
configure your web site. All of this functionality is discussed later in the book.
You can access the Solution Explorer by choosing View ➪ Solution Explorer from the main menu or by
pressing Ctrl+Alt+L.
The Database Explorer
This window, hidden behind the Solution Explorer in Figure 1-8, enables you to work with your databases.
It gives you the tools to create new databases and open existing ones, add new tables and queries to your
database, and access other tools that enable you to work with the data in your database. If you have a com-
mercial version of Visual Studio, such as Visual Studio 2008 Professional, this window is called the Server
Explorer and may be located at the left of your screen.
The Database Explorer is discussed in more detail in the chapters about databases, starting with Chapter 11.
The Properties Grid
With the Properties Grid, you can view and edit the properties of many items in Visual Studio, including
files in the Solution Explorer, controls on a web page, properties of the page itself, and much more. The
window constantly updates itself to reflect the selected item. You can quickly open the Properties Grid
by pressing F4. This same shortcut can be used to force the Properties Grid to show the details of a
selected item.
The Document Window
The Document Window is the main area in the middle of the application. This is where most of the action
takes place. You can use the Document Window to work with many different document formats, includ-
ing ASPX and HTML files, CSS and JavaScript files, code files for VB and C#, XML and text files, and even
images. In addition, you can use the same window to manage databases, create copies of your site, and
view the pages in your site in the built-in mini-browser, and much more.
At the bottom of the Document Window in Figure 1-9, you see three buttons called Design, Split, and
Source. These buttons appear automatically when you’re working with a file that contains markup, such
as ASPX and HTML pages. They allow you to open the Design View of a page (giving you an idea of
how the page will look in the browser), its Markup View (the HTML and other markup), or both at the
same time. How this works is explained in more detail in Chapter 2 but for now, it’s important to realize
you can switch between Markup View and Design View by clicking the appropriate buttons. The Markup
View is also often called the Source View or Code View window. However, in order to avoid confusion,
this book uses the term Markup View exclusively.
The Document Window is a tabbed window by default, which means it can host multiple documents,
each one distinguished by a tab with the file name at the top of the window. The right-click menu of each
tab contains some useful shortcuts for working with the file, including saving and closing it and opening
the file’s parent folder in Windows Explorer.
17
Chapter 1: Getting Started with ASP.NET 3.5
87593c01.qxd:WroxPro 1/25/08 9:05 AM Page 17

To switch between documents, you can press Ctrl+Tab or you can click the down arrow in the upper-
right corner of the Document Window, as shown in Figure 1-9. Clicking the down arrow reveals a list
of open documents so you can easily select one.
Figure 1-9
Another way to switch documents is to press Ctrl+Tab and then hold the Ctrl key down. On the window
that pops ups, you can select a document you want to work with in the right hand column. You can then
use the cursor keys to move up and down in the list with open documents and get a live preview of each
document. This makes it super easy to select the correct file.
On the same dialog box, you see a list with all active tool windows. Clicking one of the windows in the
list will show it on-screen, moving in front of other windows if necessary.
The Start Page
Whenever you start up VWD, the Start Page is loaded in the Document Window. With the Start Page,
you can quickly create new web sites or open existing ones. The Start Page is also used to give you access
to some common help topics and shows headlines from the Microsoft web site. The main part of the Start
Page is used to display an RSS feed with information from the MSDN Visual Web Developer team.
To get a feel of how you can use all these windows, the following Try It Out shows you how to build a
simple web page that contains a few ASP.NET Server Controls.
18
Chapter 1: Getting Started with ASP.NET 3.5
87593c01.qxd:WroxPro 1/25/08 9:05 AM Page 18

Try It Out Designing Your First ASP.NET Web Page
This Try It Out exercise guides you through creating a new web site with a single page that contains a
number of ASP.NET Server Controls. You’ll see how to use windows like the Start Page and the Solution
Explorer, and how to use the Toolbox and the Properties Grid to add ASP.NET Server Controls to the
page and change their looks.
1. Start VWD. If you don’t see the Start Page, choose View ➪ Other Windows ➪ Start Page from
the main menu.
2. On the Start Page, click Web Site next to the Create label in the Recent Projects area. This trig-
gers the New Web Site dialog box. If you don’t see the link to create a new web on the Start
Page, choose File ➪ New Web Site or File ➪ New ➪ Web Site from VWD’s main menu instead.
Make sure that ASP.NET Web Site is selected and that File System is chosen in the Location
drop-down list. Click OK to create the new site.
3. Next, right-click the new web site in the Solution Explorer. Make sure you click the uppermost
element that says something like
C:\..\WebSite2\. It’s the highlighted element in Figure 1-4.
From the context menu that appears, choose Add New Item.
4. In the new window that appears, click Web Form and type ControlsDemo as the name. The
ASPX extension is added for you automatically when you click the OK button. You can leave the
other settings in the dialog box at their default settings. The page should open in Markup View,
showing you the default HTML, like the
<html>, <head>, <title>, and <body> elements that
Visual Web Developer adds there for you automatically when you create a new page.
5. Switch the page to Design View by clicking the Design button at the bottom of the Document
Window.
6. If the Toolbox isn’t open yet, press Ctrl+Alt+X to open it or hover your mouse over the Toolbox
tab to show it and then click the pin icon to make the Toolbox visible at all times. Drag a
TextBox
and a Button from the Toolbox into the dashed area in the Design View of the page. You should
end up with a page that looks similar to Figure 1-10.
Figure 1-10
7. Right-click the button in Design View and choose Properties. In the Properties Grid, locate the
Text property under the Appearance category (shown in Figure 1-11) and change it from Button
to Submit Information. As soon as you press Tab or click somewhere outside the Properties
Grid, the Design View of the page is updated and shows the new text on the button.
19
Chapter 1: Getting Started with ASP.NET 3.5
87593c01.qxd:WroxPro 1/25/08 9:05 AM Page 19

Figure 1-11
8. Press Ctrl+F5 to open the page in your default browser. Note that it’s not necessary to explicitly
save the changes to your page (although it’s a good idea to do this often anyway using the short-
cut Ctrl+S). As soon as you press Ctrl+F5 to run the page, VWD saves all changes to open docu-
ments automatically.
If you don’t like this behavior, you can change it in Visual Web Developer’s Options dialog box, accessible
from the Tools menu. Make sure that Show All Settings is checked, and then open the Projects and
Solutions node and choose Build and Run. In the Before Building list, you can change the way VWD
behaves when you open a page in your browser.
9. Type some text in the text box and then click the button. Note that after the page has reloaded,
the text is still displayed in the text box. Other than that, not much has happened because you
didn’t write any code for the button yet.
How It Works
When you dragged the Button and the TextBox from the Toolbox on the page in Design View, VWD
added the corresponding code for you in Markup View automatically. Similarly, when you changed the
Text property of the button in the Properties Grid, VWD automatically updated the markup for the con-
trol in Markup View. Instead of using the Properties Grid, you could also have typed the text directly
between the quotation marks of the
Text property in the code window.
After changing the
Text property, your page should now look like this in Markup View:
<asp:TextBox ID=”TextBox1” runat=”server”></asp:TextBox>
<asp:Button ID=”Button1” runat=”server” Text=”Submit Information” />
When you press Ctrl+F5 to view the page in the browser, the web server receives the request, the page is
processed by the ASP.NET runtime, and the resulting HTML for the page is sent to the browser.
Take a look at the resulting HTML for the page using the browser’s View Source command (rerun the
page from VWD by pressing Ctrl+F5 if you already closed it). You should see code similar to this:
<input name=”TextBox1” type=”text” value=”Hello World” id=”TextBox1” />
<input type=”submit” name=”Button1” value=”Submit Information” id=”Button1” />
20
Chapter 1: Getting Started with ASP.NET 3.5
87593c01.qxd:WroxPro 1/25/08 9:05 AM Page 20
/