Page is loading ...

Hybrid DVR
(Digital Video Recorder)
Quick Start Guide
1. Notes
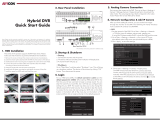
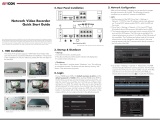
4. Rear Panel Instructions
6. Login
2. Packing Check
Please inspect the device and accessories after purchasing the device. If there are
any visible damages, shortages or defects, please contact your dealer or distributor
immediately.
7. Analog Camera Connection
8. Network Configuration & Add IP Camera
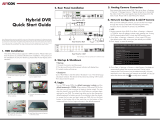
3. HDD Installation
5. Startup & Shutdown
This model of recorder supports 8 internal SATA hard drives. The following pictures
and diagrams of the HDD installation are for reference only and there might be slight
differences in the actual hardware received. Please make sure that the device is
powered off before the installation.
Remove the chassis cover and loosen the screws to remove the two HDD
mounting bars.
Align the HDDs to be installed to their proper mounting holes and secure the
HDDs onto the mounting bar with included screws.
Startup
Connect recorder to monitor with VGA or HDMI cable and power on device.
The device will boot and the power indicator will display blue.
After completely booting, a Startup Wizard should appear on the screen.
Shutdown
Click on “Start” button in lower-left corner of the screen and then select
“Shutdown” icon. This will bring up a shutdown window.
From within this new window, choose “Shutdown”. After recorder has completely
shut down, you can disconnect the power.
First connect the camera to the DVR. Then go to Start>Settings>Camera>Manage
Camera>Camera Signal to checkmark the video mode. The actual signals input shall
correspond to the video mode. Please refer to User Manual for details.
After you finish adding your analog cameras, you can see their live video streams
through the monitor connected to the DVR. The following instructions will mainly
introduce how to add the IP cameras via LAN/WAN.
LAN
Most networks will be configured for assigning an IP address automatically through
the router. After connecting this recorder to your network, navigate to
Start>Settings>Network>TCP/IP. If using DHCP, make sure that the option of
“Obtain an IPv4 address automatically” is selected. For manual IP address, make
sure to uncheck the “Obtain an IPv4 address automatically” option and enter
in the proper Address, Subnet Mask and Gateway information.
Navigate to Start>Settings>Camera>Add Camera. The DVR will search your local
network for cameras and list them. AVYCON and ONVIF cameras will be supported
automatically. If any AVYCON IP cameras are found, but do not have an IP address
that matches your local network, you can click on the Edit button for each camera
and modify the IP address directly from the DVR.
Re-install the two HDD mounting bars with HDDs attached and make sure to
tighten mounting bar screws.
Connect power and data cables to all HDDs installed.
Replace chassis cover and make sure to secure it with the included screws.
Tip: Before securing chassis cover, double-check all power and data connections
to HDDs and mainboard.
Diagram of rear panels below are for reference only.
To change the ports used by
the recorder, navigate to Start
>Settings >Network >Port. You
can enter a different HTTP port
(default value is 80) and Server
port (default port is 6036).
Click “Apply” to save the
settings.
Please read these instructions carefully and store them in a cool dry place for future reference. All the examples
and pictures used here are for reference only. There may be several technically incorrect diagrams or printing
errors in this manual. Any updated information will be added to successive versions of this manual. The
contents of this manual are subject to change without notice.
- Please read these instructions carefully and store them in a cool dry place for future reference
- All the examples and pictures used here are for reference only
- The contents of this manual are subject to change without notice.
- This device should be operated only from the type of power source indicated on the labeling.
Please verify that the voltage used matches what is indicated on the labeling.
IP Addres s Setti ngs
Obtain an I Pv 4 ad dr es s au to matically Obtain an I Pv 6 ad dr es s au tomatical ly
Ethernet Po rt 1 ( Online )
Obatin DN S se rv er a dd re ss a utomatica ll y
Address Address
Preferr ed D NS
192 . 168 . 1 . 2
0 . 0 . 0 . 0 0
192 . 168 . 1 . 1
1500
192 . 168 . 1 . 1
0 . 0 . 0 . 0
Subnet Ma sk Mask Leng th
Alterna te D NS
Gateway Gateway
MTU
Username
Password
admin
Login
Enter Password
Display Password Log In Automatical ly
LoginEdit Security Question Cancel
The default username is admin and the default password is 123456. You must configure
the wizard if you start the DVR for the first time and you may change the password
when you configure the wizard for the first time. You can skip the settings of wizard next
time. Click “Start” and select “Login”. This will take you to see a login box.
Enter default username and password you set and you can see the live image.
4.0.0.1.beta 1
Version
80
No.
Address
EditPort
Protocol Model
Subnet Mask
1
192.168.2.45
XXXXXX
255.255.25 5.0
Quickly Add
Manually Add
Add Camera
Selected: 1/1
Add
Default Password
Rem ai n Bandwidth: 10 / 1 0 Mb
Cancel
Mac Ad dress
Add ress Syn c to IP C
Edit IP
192 . 16 8 . 1 . 45
255 . 2 55 . 255 . 0
adm in
192 . 16 8 . 1 . 1
Sub net Mas k
Use rname
Gat eway
Pas sword
OK Cance l
CE :9 8 :23 :75 : 35 :22
VGA Connect to monitor
Connect to high definition display device
Network Port
Connect to USB storage debice or USB mouse
Alarm input for connecting sensor
Relay output; connect to external alarm
Ground
Connect to speed dome. Y is TX +,z is TX -
Connect to keyboard. A is TX +, B is TX -
Audio ouput
Audio input
Connect to HDD with e-SATA interface
HDMI 1
LAN
USB
ALARM IN
ALARM OUT
GND
P/Z
K/B
AUDIO OUT
AUDIO IN
e-SATA
Name Description
Connectors for Video inputVIDEO IN
Connect to high definition display deviceHDMI 2

9. UPnP
10. NAT
11. Manual Recording
12. Playback
Check each camera you want to add and then click “Add” button. The DVR
will automatically add the camera(s) selected and return to “Edit Camera”
interface. “Online” status means the device connected successfully and you
will see the live image. You may select the added device and click button to
modify channel, IP address, etc.
Versio n
Edit
Upgra de
No. Camera Name
Addre ss
Port
Proto col
Model
Previ ew
Statu s
Edit Camera
IP PlanningCamera Signal
Search Camera
1
2
3
4
5
192.1 68.1.45IP Camera 1
[A01] Camera1
[A02] Camera2
[A03] Camera3
[A04] Camera4
XXX 4.1.0 .0
Onlin e
XXX
80
Camer a Name
Addre ss
Model
Edit Camera
XXX
192 .16 8 . 1 . 58
80
admin
XXX
Port
Usern ame
Proto col
Passw ord
IP Camera 1
OKTest Cancel
Sync to IPC
WAN
If your DVR has been connected correctly to your local network and you can confirm
access to the internet, you can also add remote WAN IP cameras. To add a camera,
either click on the button on a blank channel or navigate to Start>Settings>
Camera and click on “Add Camera”. Choose “Manually Add”. Enter the WAN IP
address, server port, username and password of the remote IP camera. You can test
the connection by clicking on the “Test” button and if camera tests successfully you
can add that camera.
You can take advantage of your router’s UPnP function, which can automatically
configure port forwarding.
Navigate to Start>Settings>Network>UPnP, and enable UPnP and then click
“Apply” button to save.
Confirm that the UPnP function is enabled in your router.
Click “Refresh” button to refresh the UPnP status. If the UPnP status displays
“Invalid UPnP” after refreshing it for several times, their may be a port conflict.
Please change the mapping type to “Manual” and then click to edit the port
until the UPnP status changes to ”valid UPnP”
NAT Settings
Confirm that DVR is powered and connected to the Internet.
Navigate to Start>Settings>Network>TCP/IP. Confirm your IP
address settings (Automatic or Manual)
Set the preferred or alternative DNS Server. Click “Apply” to save
the parameters. Default values are 8.8.8.8 and 4.2.2.2
Next, navigate to Start>Settings>Network>NAT tab. Enable NAT
and then click apply. Wait up to one minute before testing remote
connection using the QR code.
Instant Playback
Click “Instant Playback” from the right-click menu of any camera’s preview window to
select the amount of time you want to preview. When playback starts you can also click on
the progress bar to change times.
General Playback
Click on the tool bar at the bottom of the live preview interface or click Start>Playback
to enter the playback interface as shown below. The system will load up the current
cameras viewed or you can manually select which cameras you want to view. Click in the
playback window to bring up the “Add Camera” window. Select the cameras you want to
view playback on and then click “Add” to add camera.
Before recording, confirm that a HDD has been installed and formatted. From the live
interface you can access the menu toolbar. Click button to start recording. Click it again
to stop recording. You can also click to check the status of the recording.
QR Code: Click on the menu bar at the bottom of the live interface to
check the QR code or go to Start>Settings>Network>Network Status to check
the QR code (12 digits) of the DVR.
Username: The username of the DVR. The default username is admin.
Password: The password of the DVR. The password is set by yourself when you
configure the wizard for the first time.
NAT Access
After finishing configuring the NAT settings, you can enter
www.autonat.com in the address bar of your browser. If this is the first
time visiting the site, you may have to install some ActiveX plugins.
After successfully installing ActiveX, you should see the login screen
and you should be able to enter in your credentials.
HTTP Port
HTTPS Port
Server Port
80
443
6036
80
443
183.17.254.19
183.17.254.19
Valid U PnP
Valid U PnP
Valid U PnP
Invalid UPnP
6036183.17.254.19
183.17.254.19
Port Type
External Port
External Address
UPnP Stat us Edit
Port
RTSP Por t
554
554
AutoMap Typ e
UPnP
Enable
Refresh App ly
nat.autonat.com
NAT Server Address
Enable
Visit Address www.autonat.com
Apply
Enter Password
Enter Username
Enter device serial number
Login
LL
oo
gg
ii
nn
/