Page is loading ...

Meteoclock
®
Suntime
SM1660 + ASM5
Instruction Manual / Mode d’emploi

18
English
Meteoclock
®
Suntime
SM1660 + ASM5 - User Manual
INTRODUCTION
Thank you for purchasing the MeteoClock
®
Suntime - SM1660 Weather Station. This Lexibook®
digital weather station does not only provide you with the exact time due to its radio controlled
clock, but can also give you the weather forecast and display the time of the sunrise and the
sunset! Please read the following manual carefully so as to be able to benet from all the
advantages and functions offered by this product.
MAIN FUNCTIONS
1
2
3
4
5
6
18
8
17
15
16
1314
12
11
10
9
7
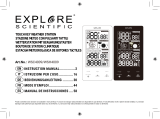
This section will provide you with a brief summary of the main functions of the SM1660 by
explaining the information displayed onscreen.

19
English
1. Symbols representing the weather forecast
Animated symbols representing the weather forecast for the next 12 to 24 hours are displayed in
this section of the screen:
Sun, Clouds, Rain,
Thunder, Snow (icon ashes) or
frost alert (icon remains solid).
2. Day of the week display
The SM1660 automatically sets the day of the week (in English only).
3. Displaying the time
With the SM1660, there is no need to set the time and date! It will always provide you with the
exact time and even takes into account the daylight saving time. It receives the DCF77 radio signal
from Frankfurt or the MSF of Greenwich and can thus automatically synchronize its clock.
4. Displaying the daylight saving icon
The DST icon is automatically displayed when daylight saving is in force in Europe.
5. Displaying Clock 1
The SM1660 offers two clocks represented by the icons “Clock 1” and “Clock 2”. Clock 1 is the
main clock, which is set automatically. Clock 2 is useful if you often travel overseas or if you wish
to know the exact time in another country on a regular basis. Once set, this second clock will
instantaneously provide you with the time, thus not requiring any mental calculations on your part!
6. Displaying the radio controlled clock
The xed icon in the tower indicates that the radio controlled time is activated. The weather station
synchronizes the hour and the date automatically.
7. Displaying the date and month
The date (DAY) and month (MONTH) is automatically displayed here.

20
English
8. Icons of Alarms 1 and 2
The SM1660 offers 2 programmable alarms. When an alarm has been set, an icon representing a
bell is displayed here.
9. Displaying the moon phases
The moon phase is automatically updated here as per the year, month and day.
10. Displaying the time of the sunrise and the sunset
The time of the sunrise and the sunset is automatically updated according to the day of the year
and the latitude of your home town. In order for the weather station to provide you with an
accurate weather forecast, you will need to indicate the code of your town or the city closest to
you.
11. Low battery indicator
If the batteries of the remote sensor are low, this icon will be displayed on the main unit. When the
lighting of the LCD screen of the main unit begins to fade, this indicates that the batteries are low
and must be replaced.
12. Remote channels 1, 2, 3, 4
This weather station is delivered with a remote sensor. You can, however, purchase 1, 2 or 3
additional remote sensors to measure the temperature and humidity in another place or room.
Each remote sensor is linked to a channel. You can access the readings obtained by each remote
sensor by pressing the “Channel” key found at the top of the weather station. The number of the
corresponding channel is displayed here.
Note: If you do not have additional sensors, please do not take this function into account.
13. Outdoor temperature and humidity display
Due to its wireless sensor, the station can detect the temperature and humidity outdoors from a
distance. The readings are displayed here. The room temperature and the rate of humidity are
automatically displayed in turn.
14. Outdoor temperature and humidity trend
The arrow icons provide the outdoor temperature and humidity trends in half-hour intervals. The
arrow indicates an upward trend while the arrow indicates a stable trend and the
arrow indicates a downward trend.

21
English
15. Indoor temperature and humidity display
The readings of outdoor temperature and humidity are recorded by the main unit and displayed
here. The indoor temperature and humidity are automatically displayed in turn.
16. Indoor temperature and humidity trend
This icon indicates the trends of the inside temperature and humidity in half-hour intervals.
The arrow indicates an upward trend; the arrow indicates a stable trend and
indicates a downward trend.
17. Pressure bar graph
This bar chart indicates the atmospheric pressure trend over a 12-hour period. The variation scale
is +/- 3 Hecto Pascal (hPa). Why refer to this bar chart? Generally, bad weather is associated
to a low atmospheric pressure and good weather to a high atmospheric pressure. The weather
forecast provided by the SM1660, using animated icons, thus depends on the evolution of the
atmospheric pressure. Therefore, if the weather station announces rain and you observe a sudden
and signicant fall in the bar chart readings, you can expect the rain to be strong and violent.
18. Displaying the atmospheric pressure
This weather station measures atmospheric pressure in Hecto Pascal and in real time.

22
English
Step 1 – Setting the radio-controlled zone of the clock
• Set the MSF/OFF/DSF switch, found at the back of the main unit, on DSF for use in
France, Spain, Italy and Germany.
• Set the switch on MSF for use in the United-Kingdom, Ireland and Portugal.
• Set the switch on OFF for use outside the GMT 0 and GMT 1 zones. If you do not live in Europe
(or if you live outside of the France and England time zones), the SM1660 will not be able to
receive the time automatically. You will thus need to set the time manually (See page 29).
Step 2 – Inserting the batteries
• Insert 3 AA/LR6 batteries into the battery compartment found at the back of the main unit.
Close the lid of the compartment.
• Unscrew the lid of the battery compartment found at the back of the wireless sensor.
Insert 2 AAA/LR03 batteries. Replace the lid of the compartment using a screwdriver.
• If you have not purchased additional sensors you will not need to set the remote sensor. Do not
press the and keys. If you wish to set more than one sensor onto your main unit, please
refer to the paragraph entitled “Multiple sensor use”.
Step 3 – Setting up the main unit and the remote sensor
• Place the remote sensor outside. It can also be wall-mounted.
• Pull out the main unit’s table stand, and place it on a smooth surface. It can also be
wall-mounted.
SETTINGS

23
English
Step 4 – Setting the local city and the altitude
• Look up and note the code of the city found closest to your home. Please refer to the list of city
codes found at the end of the user manual.
• Determine and note the altitude of your town or city in meters (for example: Paris, 88 meters).
• Ensure that the weather station is in the Clock 1 mode ( is displayed to the right of the time).
You may also press the key several times until CLOCK 1 appears on the display screen.
• Press and hold down the key for 3 seconds. The time will begin to ash.
• Press the key 3 times. The city code will ash above the « CITY » indicator.
• Use the or keys to scroll through the city codes on the screen. This setting is
important as it will affect the time of the sunrise and the sunset.
• Press the key to conrm the city code.
• The altitude level ashes. Use the or keys to set the altitude of your town or
city (in meters). Press the key to validate all these settings.
Step 5 – Radio controlled clock
• Approximately 7 minutes after the batteries have been inserted, the main unit will launch its
search to nd the signal of the radio controlled clock. The icon will ash for a few minutes
while the search is underway. When the signal is received, the icon will stop ashing and will
remain still.
• Ensure that the main unit displays the exact time and date. If this is not so, launch the signal
search once more by holding the key down for 3 seconds.
Reminder: the SM1660 will only receive the signal if you live in Europe (within the France and
England time zones).
• Ensure that the main unit displays the outdoor temperatures and rate of humidity transmitted by
the sensor. Your new weather station is now ready for use.

24
English
Scrolling through the menus
When you press the key, the menu will scroll by in the following order:
Clock 1 mode (CLOCK 1) Clock 2 mode (CLOCK 2)
Alarm 1 mode 1 1 Alarm 2 mode 2 2
Indoor temperature alarm mode (the icon will appear and the temperature will begin to ash)
Outdoor temperature alarm mode (the icon will appear and the temperature will begin to ash)
Clock 1 mode.
Setting Clock 2 (second time indicator)
• Press the key several times until CLOCK 2 appears to the right of the time.
• Press the or to set the time of another time zone (by increasing/decreasing
the time of Clock 1). Press the key to validate time.
Setting Alarms 1 and 2
• You can set 2 alarms.
• Press the key several times until the alarm 1 or 2 icon 12 is displayed.
• Press the key to set the hour of the alarm.
• Press the key to set the minutes of the alarm.
• Press the key to activate or deactivate the alarm. When an alarm is activated,
the bell symbol 1 / 2 and the icon ON will appear.
• When an alarm rings, the corresponding icon 1 or 2 will ash.
• Press the key to repeat the alarm. It will ring again 5 minutes later.
• Press ANY OTHER KEY to deactivate the alarm. If the alarm is not stopped manually, it will
automatically stop ringing after one minute.
OTHER FUNCTIONS

25
English
Backlight
Press the key to activate the back light. It will remain on for approximately
10 seconds.
Displaying the temperature in °C or °F
In Clock 2 mode, press the key to switch the temperature display from
degrees Celsius (°C) to degrees Fahrenheit (F°) and vice versa.
Min and Max temperature and humidity
Press the key several times in Clock 1 mode in order to scroll through the recordings of
the minimum and maximum temperature and humidity.
In Clock 1 mode, press and hold the key during 5 seconds to reset the recordings.
HI & LO Display
The “HI” and “LO” icons replace the temperature and humidity values onscreen when they fall
outside the scale of transmission.
Indoor/
Outdoor
Temperature Humidity Display
Indoor > +55°C > 95% HI
Indoor < -20°C < 15% LO
Outdoor > +70°C > 95% HI
Outdoor < - 30°C < 15% LO
Indoor and Outdoor Temperature Alarms
You may set temperature alarms for a local channel or a remote channel. If the temperature
reaches the threshold you have set, the alarm will go off.
• Select the temperature alarm mode by pressing the key several times. (Indoor).
The icon is displayed and the indoor temperature begins to ash.

26
English
• The default indoor temperature (14°C) or the existing temperature setting will begin to ash.
• Press the or keys to set your chosen limit for the indoor temperature.
• Press the key to select the high temperature alarm option , the low
temperature alarm option or to deactivate the alarm function (no symbol).
• Press the key to save your settings. The default outdoor temperature (14°C) or the
existing temperature setting will begin to ash.
• Press the or keys to set your chosen limit for the outdoor temperature.
• Press the key to select the high temperature alarm option , the low
temperature alarm option or to deactivate the alarm function (no symbol).
• Press the key to save your settings.
When the temperature alarm is triggered
• The icon indicates that the temperature has exceeded the limit of the temperature set.
• Press any key to stop the temperature alarm.
• The alarm will automatically stop after one minute if no keys are pressed.
• The temperature alarm has a distinctive sound when it rings and is different to the sound of
Alarms 1 and 2.

27
English
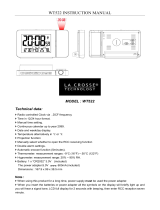
Throughout the 28 days of the lunar month, the aspect of the moon changes.
Indeed, the moon, being spherical, is always half lightened up by the sun.
As the moon rotates around the Earth, the appearance of its lightened side
changes continuously. This phenomenon creates moon phases. The moon
phase on your MeteoClock is automatically updated according to the
year/ month/day.
Moon Phase Display
1. New Moon
2. Young Crescent
3. First Quarter
4. Waxing Gibbous
5. Full Moon
6. Waning Gibbous
7. Last Quarter
8. Old Crescent
MOON PHASES
TIME OF SUNRISE AND SUNSET
The time of the sunrise and the sunset depends on the angle of the earth’s axis and the movement
of the planet around its orbit. Your MeteoClock
®
SM1660 station provides you with the exact time
of the sunrise and the sunset in your city! This weather station actually calculates the time of the
sunrise and the sunset according to the time of the year as well as the latitude and time zone of
your city.
For these settings, please refer to Step 4 in the “Settings” chapter on page 23.
Sunrise Sunset
1)
2)
3)
4)
5)
6)
7)
8)

28
English
Setting the Channel
If you have purchased several remote sensors, you will need to set each sensor on a different
channel.
• Press the key found inside the battery compartment of the remote sensor to select
a channel (1 to 4).
• Press this key once to switch to the 2nd channel, etc. The LED indicator will ash each time you
press this key.
• Set each remote sensor on a different channel. Channel 1 is used to receive outdoor readings
and to activate weather forecast symbols. Please place it outdoors.
Interferences
If your weather station detects other signals from neighbouring sources you will have to set your
remote sensor on a different house code (default setting = 1).
• Press the key found inside the battery compartment of the remote sensor to select a house
code (2-15). Press this key once to change the house code to 2, etc. The LED indicator will ash
each time you press this key.
• The remote sensors of each main unit must be set on the same house code.
Manual search (search for remote signals)
If a new sensor is added or a signal is lost (outdoor display will ash), you will have to manually
launch the search for each sensor.
• Press and hold down the key for 3 seconds.
• A ‘beep’ will sound to indicate that the search function has been activated.
• Each time a remote sensor is detected a “beep” will sound.
• Press the key and check whether the temperature and humidity readings of each
sensor are displayed on the screen.
MULTIPLE SENSOR USE

29
English
If you do not live in Europe (or fall outside the England or France time zones), you will have to set
the time and date manually.
• In CLOCK 1 mode, press and hold down the key for 3 seconds. The time will begin to
ash.
• Press the key to set the time and press the key to set the minutes.
• Press the key to select the hour format displayed (12 or 24 hours).
• Press the key to set the date and month.
• Press the key to set the month and the to set the date.
• Press the key to activate or deactivate daylight saving time. The DST icon
appears when daylight saving time is activated and the clock will move forward by one hour.
• Press the key, the year will ash. Press the or key to set the year.
• Press the key to set the city (please refer to the list of abbreviations of the cities found
at the end of the manual to nd the city closest to your home). Press the or key
to select the city.
• Press the key to set the altitude. Press the or key to enter the
correct altitude and validate your settings by pressing the key.
CLOCK MANUAL SETTING

30
English
Batteries
If the sensor is exposed to extreme temperatures for an extended period of time, the range of
transmission of the data may be affected.
Setting up the remote sensors
The remote sensors must be xed on a smooth surface to ensure that there are no interferences
in the data transmission range. The sensor and main unit must not be set up on or near a large
metallic surface. Before setting up the sensor at a chosen location, ensure that the main unit
receives the signals from this site. It is also recommended that the sensor be placed as close to
the main unit as possible in order to avoid any interferences.
Weather Forecast
We cannot guarantee absolute precision with regards the weather forecast. The weather forecast
function has a 75% precision rate due to it being created to suit a variety of environments.
IMPORTANT NOTICE
Problem:
1. The main unit cannot receive radio control DCF-77 or MSF signals to update the clock.
2. Temperature reading of outdoor remote sensor seems too high.
3. Receiver is no longer receiving remote sensor signals or display.
4. An abnormal operation has been observed and certain functions do not work.
Solution:
1. Place the clock away from metal objects or electrical appliances such as TVs, computers,
monitors, etc. Trigger the scan manually by holding the MIN- key for 3 seconds.
2. Wait a few minutes to ensure the remote sensor and receiver are in phase. Otherwise,
re-synchronize receiver by holding the CHANNEL key for 3 seconds until a beep is heard.
3. Ensure the remote sensor is out of direct sunlight, and away from sources of heat.
TROUBLESHOOTING

31
English
Additional sensors:
Measure temperature and hygrometry in other places!
- Upstairs
- In the baby’s bedroom
- In the basement
- In the garden
- In another room
To order, phone the Lexibook ofce located in your country or browse www.lexibook.com.
ACCESSORIES
Weather Station Receiver SM1660
Battery Type: 3 X1.5V AA batteries
Temp. Range: -20ºC to +55ºC
Measurement Accuracy: +/- 1ºC Within measuring range of 0 to 40ºC
Resolution: 0.1ºC
Humidity Range: 15% to 95%
Measurement Accuracy: +/- 5%
Resolution: 1%
SPECIFICATIONS
Weather Station Transmitter ASM5
Battery Type: 2 X1.5V AAA batteries
Temp. Range: -30ºC to + 70ºC
Humidity Range 15% to 95%
Transmission Frequency: 433.92MHz
Transmission Range: Up to 40 meters in open area.
4. Repeat the learning procedures.
- Temperature may be below -30°C.
- Batteries in remote sensor may need changing.
- Move remote sensor closer to the receiver.
- Make sure remote sensor is away from sources of electrical disturbance.
a- Reset the unit by replacing the batteries in both the transmitters and receiver.

32
English
In order to clean the unit, use only a soft cloth moistened with water; do not use any detergent
product. Do not dismantle or drop the unit. Remove the batteries if the unit is not going to be used
for an extended period of time.
MAINTENANCE
NOTE: Please keep this instruction manual, it contains important information.
This product is covered by our two-year warranty. To make use of the warranty or the after-sales
service, please contact your retailer and supply proof of purchase. Our warranty covers material
or installation-related defects attributable to the manufacturer, with the exception of wear caused
by failure to respect the instructions for use or any unauthorised work on the equipment (such as
dismantling, exposure to heat or damp, etc.).
LEXIBOOK UK ltd, Unit 10 Peterseld Industrial Estate, Bedford Road, Peterseld, Hampshire,
GU32 3QA, United Kingdom, Freephone helpline: 0808 100 3015, http://www.lexibook.com
Environmental Protection
Unwanted electrical appliances can be recycled and should not be discarded along with regular
household waste! Please actively support the conservation of resources and help protect
the environment by returning this appliance to a collection centre (if available).
WARRANTY

33
English
Nous, Lexibook® S.A.
2, avenue de Scandinavie
91953 Courtaboeuf Cedex
Hereby declare under our full and sole responsibility, that the product:
Name: MeteoClock
®
Suntime
Reference / type: SM1660
Make: Lexibook®
To which this declaration refers, complies with the essential requirements and any other provisions
stated in Directive R&TTE (1999/5/EC) for all that applies to:
RADIOFREQUENCY: EN 300220-1 (V1.3.1 2000-09), EN300220-3 (V1.1.1 2000-09)
CEM (Electromagnetic compatibility): EN 301489-1 (V1.4.1 2002-08),
EN301489-3 (V1.4.1 2002-08)
Additional information:
Certied laboratory being consulted: CETECOM
Technical report available from:
Lexibook, 2 avenue de Scandinavie, 91953 Courtaboeuf cedex
Dated the 29th of March 2006 is suitable for use within the European Union member states.
Julian Chung
QA Manager
2007
Copyright © 2007 LEXIBOOK®
DECLARATION OF CONFORMITY
0682

35
CITY COUNTRY CITY CODE
Besancon France BES
Besancon France BIA
Bordeaux France BOR
Brest France BRE
Cherbourg France CHE
Clermont Ferrand
France CMF
Lyon France LYO
Marseille France MAR
Monaco France MCO
Metz France MET
Nantes France NAN
Nice France NIC
Orléans France ORL
Paris France PAR
Perpignan France PER
Lille France LIL
Rouen France ROU
Strasbourg France STR
Toulouse France TOU
Helsinki Finland HEL
•
•
CITY COUNTRY CITY CODE
Aberdeen UK ABD
Belfast UK BEL
Birmingham UK BIR
Bristol UK BRI
Cardiff UK CAR
Edinburgh UK EDH
Glasgow UK GLA
Kingston UK KIN
Liverpool UK LVP
London UK LON
Manchester UK MAN
Newcastle upon
Tyne
UK NUT
Plymouth UK KIE
Budapest Hungary BUD
Zagreb Croatia ZAG
Ancona Italy ANC
Bari Italy BAI
Bologna Italy BOL
Cagliari Italy CAG
•
•
•
•

36
CITY COUNTRY CITY CODE
Catania Italy CAT
Firenze Italy FIR
Foggia Italy FOG
Genova Italy GEN
Lecce Italy LEC
Messina Italy MES
Milano Italy MIL
Napoli Italy NAP
Palermo Italy PAL
Parma Italy PAM
Perrero Italy PRO
Roma Italy ROM
Torino Italy TOR
Trieste Italy TRI
Venezia Italy VEN
Verona Italy VER
Ventimiglia Italy VTG
Dublin Ireland DUB
Luxembourg Luxembourg LUX
•
•
CITY COUNTRY CITY CODE
Bergen Norway BGN
Oslo Norway OSL
Stavanger Norway STA
Amsterdam Netherlands AMS
Arnhem Netherlands ARN
Eindhoven Netherlands EIN
Enschede Netherlands ENS
Groningen Netherlands GRO
Den Haag Netherlands HAA
Rotterdam Netherlands ROT
Evora Portugal AVO
Coimbra Portugal COI
Faro Portugal FAR
Leiria Portugal LEI
Lisbon Portugal LIS
Porto Portugal POR
Gdansk Poland GDZ
Krakow Poland KKW
Poznan Poland POZ
Szczecin Poland SZC
Warsaw
Poland WAW
•
•
•
•

116
CITY COUNTRY CITY CODE
Besancon France BES
Besancon France BIA
Bordeaux France BOR
Brest France BRE
Cherbourg France CHE
Clermont Ferrand
France CMF
Lyon France LYO
Marseille France MAR
Monaco France MCO
Metz France MET
Nantes France NAN
Nice France NIC
Orléans France ORL
Paris France PAR
Perpignan France PER
Lille France LIL
Rouen France ROU
Strasbourg France STR
Toulouse France TOU
Helsinki Finland HEL
•
•
CITY COUNTRY CITY CODE
Aberdeen UK ABD
Belfast UK BEL
Birmingham UK BIR
Bristol UK BRI
Cardiff UK CAR
Edinburgh UK EDH
Glasgow UK GLA
Kingston UK KIN
Liverpool UK LVP
London UK LON
Manchester UK MAN
Newcastle upon
Tyne
UK NUT
Plymouth UK KIE
Budapest Hungary BUD
Zagreb Croatia ZAG
Ancona Italy ANC
Bari Italy BAI
Bologna Italy BOL
Cagliari Italy CAG
•
•
•
•
CITY COUNTRY CITY CODE
Catania Italy CAT
Firenze Italy FIR
Foggia Italy FOG
Genova Italy GEN
Lecce Italy LEC
Messina Italy MES
Milano Italy MIL
Napoli Italy NAP
Palermo Italy PAL
Parma Italy PAM
Perrero Italy PRO
Roma Italy ROM
Torino Italy TOR
Trieste Italy TRI
Venezia Italy VEN
Verona Italy VER
Ventimiglia Italy VTG
Dublin Ireland DUB
Luxembourg Luxembourg LUX
•
•
SM1660IM.indd 116 5/14/07 6:02:20 PM
/