Page is loading ...

1Curved Shower Curtain Rod Installation Instructions
INSTRUCTIONS
Unpack and inspect the product for any
shipping damages. If you find damages, do not
install. Contact Customer Service at
1.866.855.2284. If you need assistance or have
questions while installing your shower rod
contact Customer Service.
We recommend consulting a professional if
you are unfamiliar with installing bathroom
fixtures. Signature Hardware accepts no liability
for any damage to the walls or ceiling, or for
personal injury during installation.
TOOLS AND MATERIALS:
Read entire shower rod installation Instructions.
Observe all local building and safety codes. For
the following installation instructions it is
assumed that any old fixtures have been
removed and any repairs to the wall have
been completed.
BEFORE INSTALLING INSTALLATION
CURVED SHOWER CURTAIN ROD
Pencil
Tape Measure
Level
Screwdriver
Drill
Hammer
Hacksaw
¼" Drill Bit
1. Lay the rod sections on the floor. For rods 84" and longer,
assemble with the connector piece.
2. Verify that the rod sections are the proper length for your
installation. If not, trim with a hacksaw.
3. Have someone help you measure. Hold rod up to desired
position, one person at each end to check the height and location.
Making sure that rod is level, use a pencil to lightly score marks at
the top and bottom of the wall plate. Set the rod down, then hold
the wall brackets up at the desired mounting height.
Measure and trim.

Curved Shower Curtain Rod Installation Instructions 2
CURVED SHOWER CURTAIN ROD
INSTALLATION
5. Drill pilot holes for the wall anchors.
Note: If there is a stud in your mounting location, use wood screws
to attach the wall brackets.
6. Gently tap the anchors into the pilot holes with a
hammer.
8. Attach the rod and brackets to the wall with the
mounting hardware provided.
7. Insert the ends of the rod into the wall brackets. Tighten
the set screws with a Philips head screwdriver to secure.
4. Mark the placement of the mounting holes. Use a tape
measure and level to make sure that your pencil marks are
lined up properly on each wall.
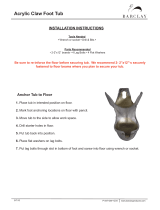
For 60" Standard Tub
For 60" Oval Tub
Mount rod approximately 3" inside the point
a straight rod is normally mounted. The
midpoint of the rod should extend several
inches past the outside rim of the tub.
Depending upon tub model, mount rod
between 6" and 8" from center line of the
tub. The middle portion of the rod should
curve just outside the contour of the tub.
2”-3”
6”-8”
X X
Ensure that the markings
are lined up properly.
Mark mounting holes.
X
Pilot Hole
Anchor
Tap anchors into
pilot holes.
Pilot Hole
/