Page is loading ...

What You Need To Know:
Tools:
Required:
*Adjustable
Wrench
Helpful:
Instructions for Models:
For additional assistance or service call:
SPEAKMAN Company
400 Anchor Mill Road
New Castle, DE 19720
PHONE: 800-537-2107
EMAIL: customerservice@speakman.com
WEB: www.speakman.com
*Groove Joint
Pliers
*Teflon Tape
*Supply Lines *Basin Wrench *Pipe Wrench
*Hacksaw *Tubing Cutter *Utility Knife
Important Notes:
Be sure to read instructions thoroughly before
beginning installation. Do not overtighten any
connections or damage may occur. This faucet has
an operating range of 20-80 psi.
Safety Tips:
Cover your drain to prevent loss of parts.
Be sure to wear eye protection while cutting pipe.
Maintenance:
Your new Lavatory Faucet is designed for years
of trouble-free performance. Keep it looking new
by cleaning it periodically with a soft cloth.
Avoid abrasive cleaners, steel wool, and harsh
chemicals as these will dull the finish and void
your warranty.
*Eye Protection
*Philips
Screwdriver
Make connections to water lines.Use 1/2” IPS
faucet connections (1) or use the supplied coupling
nuts (3) with 3/8” O.D. ball nose risers (2).Use wrenches
to tighten connections.Do not overtighten.
SB- -E1821
SB-1821
92-SB-1821-R2
Need Help?
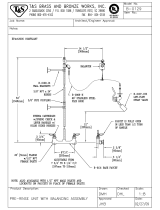
Shut off water supplies.Remove old faucet. Clean
sink surface in preparation for new faucet. Place
spout thru mounting hole in sink. Secure spout with
rubber washer ,metal washer and nut.
Slide Hot and Cold end valves thru sink mounting
holes. NOTE:Hot side end valve is labeled. Secure
end valves with washers and nuts. Hand tighten nuts
onto shank. Lock nuts into pisition by tightening screws.
Insert flexible hoses into the faucet base as shown,
tighten the handle with the clamp spring, and then
press the button of the spout in order to set flexible
hoses and the faucet.
1
2 5
4
3
3
1
2
Remove flange (1) and rubber washer (2) from
POP-UP drain assembly.
1
2

11
After installation is completed, remove aerator.
Turn on water supply and allow both hot and
cold water to run for at least one minute each to remove
the debris. While water is running ,check for leaks.
Replace aerator.
IMPORTANT:
6
Place the rubber washer (2) to underside of the
flange (1). Insert the threaded end of the drain
body up through the drain hole and attach flange to
the body with the pivot hole (3) pointing to the rear
of the sink.
1
3
2
7
Unscrew the nut (1) from the pop-up body .
NOTE:Retain the seal (2) on the pivot rod (3) .
Place the nut onto the pivot rod insert the rod and
seal (2) into the pivot hole (4) .Install stopper (5) as
shown (6) .Slide nut (1) on and hand tighten.
(Please do not overtighten).
1
2
4
3
5
6
8
Tighten lock nut (1) by rotating counterclockwise
until the pop-up drain assembly is secure.
Rubber washer should be on top of sink.
1
9
Place one end of spring clip (1) on the end of
pivot rod (2) . Insert rod through hole in
lift rod strap (3) .Secure with spring clip (1) .
1
3
2
Insert lift rod (1) into strap (2) and tighten screw(3).
10
1
2
3
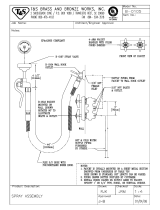
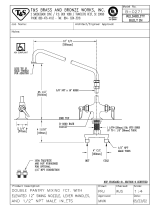
RPG04-0410 (-BN)
1
RPG05-0959
2
RPG05-0960
3
RPG45-0057
4
RPG05-0913 (1.5GPM)
5
RPG63-0089
6
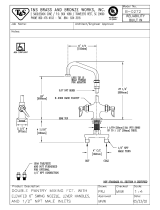
1
2
/
3
4
6
5
14.89”
[378mm]
2.74”
[70mm]
2.09”
[53mm]
1.18”
[30mm]
8.03”
[204mm]
4.02”
[102mm]
2.28”
[58mm]
4.81”
[122mm]
6.74”
[171mm]
4.92”
[125mm]
2.56”
[65mm]
15°
7
RPG05-40127 (1.2GPM)
7

92‐SM‐11030‐P‐R1
SPEAKMAN COMPANY
Tiber
TM
Collection Combination Series
SM-11030-P
DESCRIPTION
Speakman Tiber
TM
Collection Combination Series unites the best products included in our Tiber
TM
Series.
The combination begins with our anti-scald balanced pressure valve with integral stops, featuring a brass
body and adjustable temperature limit stop. The wall plate and handle are designed with definitive
Tiber
TM
Collection styling. Piston type pressure balancing/ceramic regulating cartridge assembly with
built-in check valves. Meets ASME A112.18.1 / CSA B125.1 & ASSE 1016 standards. Also provided
is the S-2561 brass 7” shower arm with metal wall flange. The featured product in the Tiber
TM
Collection
Combination Series is the ANYSTREAM
®
S-3023 showerhead with a 5” outer spray adjustment ring. Five
self-cleaning plunger nozzles resist scale build-up and provide 45 spray streams for a full body coverage
pattern. The center core nozzle delivers 12 massaging jets and a combination spray is included. Water-
conserving pressure compensating AUTOFLO
®
device reduces flow to 2.5 GPM / 9.46 LPM maximum, to
meet existing ANSI A112.18.1 Standard. Also included in this package is the metal S-1566 tub spout,
which features an integrated diverter, matched to the style of the other combination pieces.
SPECIFICATIONS
SM-11000-P Anti-Scald Balanced Pressure Valve:
Connections: ½” female copper sweat inlets & shower outlet; ½” NPT female tub outlet
Flow Rate: For use with
showerheads rated at 2.0 GPM
(7.6 LPM) or higher
S-3023 Showerhead:
Supply: ½” NPT female
Flow Rate:
2.5 GPM / 9.46 LPM MAX
S-2561 Shower Arm:
Supply: ½” NPT male inlet
Outlet: ½” NPT male outlet
S-1566 Tub Spout with Diverter:
Supply: ½” copper pipe slip fit
INSTRUCTIONS
See individual products for installation
of the components and warranty
information.
ROUGH-IN

INSTRUCTIONS FOR MODELS
92-SA-2200-02
For additional assistance or service please contact:
SPEAKMAN
®
Company
400 Anchor Mill Road
New Castle, DE 19720
800-537-2107
customerser[email protected]
www.speakman.com
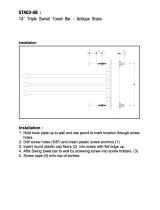
SA-2203 TOWEL RACK
SA-2204 7” TOWEL BAR
SA-2205 PAPER HOLDER
SA-2206 ROBE HOOK
SA-2207 24” TOWEL BAR
TOOLS AND SUPPLIES
Phillips
Screwdriver
Pencil
Drill Drill Bit
Ø3/16”
Level
Hex Key
(included)
Phillips
Drive Bit
Additional warranty information can be found at:
www.speakman.com
WARRANTY
MAINTENANCE
Cover your drain to prevent loss of parts.
SAFETY TIPS
IMPORTANT
• Be sure to read instructions thoroughly before
beginning installation.
• Do not over-tighten any connections or damage
may occur.
Your new Speakman Product is designed for years of
trouble-free performance. Keep it looking new by
cleaning it periodically with a soft cloth. The use of harsh
chemicals and abrasives on any of the Speakman custom
finish products may damage the finish and void the
product warranty. Please be sure to only use approved
cleaners. Please contact Speakman for any clarification
of acceptable cleaners.
1
The Mounting Plate (1) comes pre-installed in
the Accessory (2). Remove the Mounting Plate(s)
by loosening the pre-installed set screw at bottom
with the included Hex Key.
2
At the selected height, mark center point of
mounting locations onto wall referencing
the rough in diagram.
3
Align Mounting Plate over center point marked
in previous step. Mounting Plate should be
vertical with Notch in the cylinder (1) pointing to
the bottom as shown below. Mark Mounting
Screw locations onto the wall surface. Remove
items after marking mounting locations.
4
If mounting directly to wood stud, Plastic Anchors
are not required. If mounting to tile, acquire
proper mounting hardware capable of supporting
the accessory in use. If mounting to drywall, drill
guide holes at marked locations using a Drill
equipped with a Ø 3/16" bit.
Ø
3
/16”
5
Insert Plastic Anchors into drilled holes and screw
in the anchor using a Phillips Head screwdriver,
or a Drill equipped with a Phillips Driver Bit until
the head is flush with the wall surface.
OR

6
Secure Mounting Plate with the Mounting Screws
provided. Verify that the Mounting Plate is
aligned vertically.
7
Place Accessory (1) over Mounting Bracket and
secure the pre-installed set screw (2) with the
included Hex Key.
ROUGH-IN DIAGRAMS
SPEAKMAN
®
DIMENSIONS SUBJECT TO CHANGE WITHOUT NOTICE.
SA-2203
24"
610mm
26
1
16
"
662mm
10
1
16
"
255mm
4
3
16
"
106mm
SA-2204
9
5
16
"
237mm
2
3
4
"
70mm
2
1
16
"
52mm
7
5
16
"
185mm
SA-2205
11
16
"
18mm
7
5
8
"
193mm
5
16
"
8mm
2
3
4
"
70mm
1
4
"
7mm
3
8
"
10mm
SA-2206
2
3
16
"
56mm
11
16
"
18mm
3
8
"
10mm
2
3
4
"
70mm
SA-2207
2in
52mm
24"
610mm
26
1
16
"
662mm
2
3
4
"
70mm
/