Page is loading ...

1
eiQ-C22EW WIFI Robot Vacuum Cleaner
with HEPA filter and
self-charging home dock
USER MANUAL
Thank you for choosing ElectriQ
Please read this user manual before using this robotic vacuum cleaner
and keep it safe for future reference.
Visit our page www.electriQ.co.uk for our entire range of Intelligent Electricals

2
CONTENTS
FEATURES 3
SAFETY INSTRUCTIONS 3
PARTS 5
PRODUCT DIAGRAMS 6
FEATURES AND CLEANING MODES 6
BATTERY INSTALLATION AND REMOVAL 8
CHARGING DOCK 9
PAIRING THE CHARGING DOCK 10
SIDE BRUSH FITTING AND REMOVAL 10
ZONE DIVIDER (Optional Extra – Available Separately) 11
GENERAL OPERATION 12
REMOTE CONTROL 12
CONNECTING VIA THE APP 13
CLEANING AND MAINTENANCE 15
TROUBLESHOOTING 16
SPECIFICATION 17

3
FEATURES
ElectriQ brings you an easy to use robot vacuum cleaner that works both on hard
floor surfaces and carpets. This is not just sweeper but a real vacuum cleaner with
powerful suction and the latest dual side brush system.
You can now enjoy your personal time while the robot will clean for you.
With a slim profile at only 7.0 cm height and 27 cm diameter, this time saving device
will get in hard to reach places, including under furniture where other robots or
vacuum cleaners will fail to operate.
Simple operation with the supplied remote control, as well as the option of
controlling it though easy to use apps for both android and ios.
Easy to use due to automated cleaning pattern, your robot benefits from an
advanced cleaning algorithm that ensure that maximum effective cleaning is
achieved with minimum iterations. There are five advanced programs in operation
that will advance from spot cleaning, identifying the walls, pattern cleaning, around
the wall cleaning, systematic inline cleaning and even an under bed / sofa program.
According to the set timer the programs will be intelligently combined for maximum
cleaning efficiency.
Two extra-long side brushes around the outer edges ensure that dirt is gathered even
from corners and borders. The middle suction vacuum will ensure dirt and debris are
efficiently collected.
This robot features smart ultrasonic navigation sensors ensuring large 200 degrees
beam in front of the robot to avoid collision ensuring it stops before bumping into
objects. There are also cliff sensors that will stop the robot from failing of any steps.
Great on hard floors and on low and medium pile carpets, the robot will transition
between most hard floor / carpets setups. Easy to empty bag less sealed dust
container.
This robot vacuum features an easy to clean HEPA filter that will improve air quality
in your household during the cleaning operation.
SAFETY INSTRUCTIONS
Important
• Carefully read the instructions before operating the unit. Please retain the
manual for future reference
• This appliance is for indoor use only.
• Rating: This unit must be only connected to a 100-240 V / 50 Hz earthed outlet.
Always check the rating label against your electrical supply.
• If you are in any doubt about the suitability of your electrical supply have it
checked and, if necessary, retested by a qualified electrician.

4
• This robotic vacuum cleaner been tested and is safe to use. However, as with any
electrical appliances - use it with care.
• Disconnect the power plug from unit before dismantling, assembling or cleaning.
• Do not clean the unit by spraying it or immersing it in water.
• Never operate this appliance if the cord or power supply is damaged. Ensure the
power cord is not stretched or exposed to sharp object / edges.
• Do not use the appliance if any part or any accessory is damaged or defective.
• A damaged power supply should be replaced only with original parts from the
manufacturer.
• Avoid touching any moving parts of the appliance.
• Never insert fingers, or any other objects while the machine is in operation.
• This appliance is not intended for use by persons (including children) with
reduced physical, sensory or mental capabilities. It is also not intended for use by
those with a lack of experience and knowledge, unless they have been given
supervision or instruction concerning the use of the appliance by a person
responsible for their safety.
• Do not leave children or animals unsupervised with this appliance.
• Only use an original battery or charger from the manufacturer, any third party
components may damage the unit.
• Any service other than regular cleaning should only be performed by an
authorized service representative. Failure to comply could result in a voided
warranty.
• Do not use the appliance for anything other than its intended purpose.
• Do not use the appliance in places with high humidity (>80%RH)
• Do not immerse the robot in water or other liquids. If the robot is immersed in
water or other liquids by mistake, do not touch it with your hands. If the appliance is
immersed in water or other liquids, discard it. Do not use if you liquids have been
spilt on the floor.
• Do not use to clean printer toner spilt on the floor as this could cause fire.
• Before using the robot cleaner, remove any fragile objects from the floor e.g.
glasses, bottles, candles, lamps. Also remove any sharp metals, needles, nails, sharp
glass pieces or any other objects that could block or damage the robot
• Do not place any object on the top of the robotic cleaner
• Do not leave any fragile objects on the side of tables, cabinets etc where the
robot could bump into and cause them to fall.
Unit Safety Protection and Performance Tips
• Make sure the unit is assembled correctly before use
• Charge for 24 hours before operating for the first time. If not using the robot for
a long time please fully charge and remove the battery
• Clean the robot and brushes regularly. Empty and vacuum the dust container
• If the robot become entangled, remove brushes, clean the debris and
reassemble

5
PARTS
1. Robot Vacuum Cleaner 2. Battery 3. DC Power Adaptor
4. HEPA Filter 5. Side Brush 6. Remote
7. Charging Base

6
DIAGRAMS
FEATURES AND CLEANING MODES
Robotic Features
1. Home Dock — Auto cleaning with scheduler (Through App) & auto recharge when low on battery.
2. Ultrasonic navigation with obstacle detection
3. Ultrasonic collision detection
4. Anti-falling cliff detection sensor
5. Ultrasonic dirt / dust sensors — when is dirty area is detected, the robot will perform detail cleaning
using spiral mode
6. Supports an Ultrasonic zone divider (Available Separately) — can be use if needed to limit the access of
the robotic vacuum cleaner in certain areas.
7. Remote
Cleaning Features
1. Side brushes and powerful suction inlet — powerful suction and full coverage of cleaning.
2. Floating Roller Brush — allows the roller brush and suction to stay close to the ground, covers all the
dead spot while having full suction power.
3. Debris Filter & HEPA Filter — Debris filter holds normal debris and extends HEPA filter life span. High
efficiency particulate air filter traps the fine particles which trigger allergy and asthma symptoms.

7
CLEANING MODES
1. Auto Mode
Once the robot is activated without specific cleaning instructions, it will automatically execute the auto
function by repeating the five different modes. The combination of different cleaning patterns will ensure the
robot finishes the cleaning of any given space or area.
2.
Manual Mode
Users can manually instruct the robot to perform any specific cleaning pattern depending on the different
spaces to be cleaned.
Notes:
1. The robot is suitable for hard floor and low to medium pile carpet.
2. This robot is not suitable for very uneven surfaces. Do not use in long pile/thick carpet. Fold carpet
fringes under the carpet before starting operation
3. Please note that this robot will collect dust and small particles. It will not clean paper, plastic bags
and other large debris. It will get entangled in wires, so please declutter floor surfaces before using
4. Do not leave bottles, lamps or other breakables on the floor
5. Do not use in tight spaces less than 38 cm wide as the robot may get blocked
6. Do not use on wet or greasy dust.

8
BATTERY INSTALLATION AND REMOVAL
The robot battery is user replaceable. If the battery stops holding its charge, please re-order a
replacement from the manufacturer or retailer.
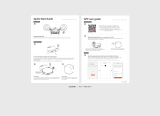
To remove the battery, please follow the steps below:
1. Remove the top cover from the robot vacuum cleaner
2. Remove the battery cover
3. Disconnect the connections of the battery
from the vacuum cleaner and remove
Once the battery has been removed, a replacement can be fitted by following the steps above in reverse.
Charging
If the robot shuts down while working or the battery indicator flashes, please charge the robot
immediately. When the robot completes its cleaning cycle or the battery level is low, the robot will return to
its dock automatically as long as there is enough power left to do this.
1. Plug the charger into the power outlet. Insert the power cable into the docking station and place the
robot onto the docking station to charge
2. The power plug can be inserted on the side of the robot. If the battery indicator flashes, it means the
robot is charging normally.

9
CHARGING DOCK
The charging dock must be positioned on an even
floor surface against a wall with at least a 60 cm (2
ft) clearance around. Connect the AC adaptor to
the power socket on the rear side of the dock or
robot. Only use the AC adaptor provided by the
manufacturer.
The LCD display on the charging dock will turn on
when it is plugged in. Always keep the dock
plugged in.
Docking Test
Leave the robot on the floor somewhere near the dock. Press the "Home" button on the remote control.
The robot will return to the dock automatically.
If the robot fails to dock, check the installation process to make the necessary adjustments to the docking
station until the robot can dock properly.
Robot Battery Recharge
When the Power Button on the robot blinks red, this indicates that the battery level is low. The robot will
shut down the vacuum engine and go back to the recharging home dock. The AC adaptor can be plugged
into the robot directly to recharge the battery.
When the battery is fully recharged, the Power Button will light up a solid blue. The recharging process
takes around 3 hours.
Robot Battery Care
A high capacity rechargeable battery pack is used in this robot. The battery can last for hundreds of
recharging cycles if it is properly cared for.
Recharge the battery as soon as the robot is used. Keep the robot charged when not in use.
If the robot will not be used for a longer period of time, remove the battery from the robot and store it in a
cool and dry place.
Notes:
1. Charge the robot for at least 24 hours before the first use.
2. Each time the battery is fully depleted charge for at least 3 hours.
3. Never use the robot in temperatures less than 0℃ or over 40℃ as this will reduce the battery life and
performance.
4. It is normal for the temperature of the charger to increase during the charging process
Notes: All the settings are disabled while battery is charging.

10
PAIRING THE CHARING DOCK
The charging base provided with your robot
vacuum cleaner comes pared to the cleaner, but
there are times when the dock may require
manually pairing. This would be the case if the
dock was replaced, or an additional charging dock
is added.
To do this, the top cover should be removed (As
shown in the battery replacement section). The
Vacuum cleaner should then be turned on and the
Pairing button pressed twice, so that the LED on the
vacuum is flashing Red. The ID key on the charging
base should be held down, and a long beep will
sound to indicate the pairing was successful. The
left bumper should then be pressed, to save and
exit the pairing mode.
SIDE BRUSH FITTING AND REMOVAL
The spinning side brushes are attached by a single bolt. They can be easily removed and reattached,
should they need replacing, or in the case of them becoming tangled.
Removal:
Attaching:

11
ZONE DIVIDER (Available Separately)
The zone divider is available seperately from the same retailer as the Robotic vacuum cleaner. It creates
an invisible ultrasonic barrier (Virtual Wall) that the robot vacuum cleaner will not cross.
1. The zone divider is powered by 2 AA batteries. Make sure to install the AA batteries with the correct
polarity.
2. To turn on the zone divider, slide the power switch to “ON” position.
3. When turned on, the blue LED light blinks for 70 seconds, then turns into standby mode. When the
robot vacuum cleaner starts working, the Virtual Wall will turn on and shows blue LED light.
4. The best effective distance of Virtual Wall barrier is about 2.5M
5. The LED light will blink when the Zone Divider is low on battery.
You can charge the zone divider battery by plugging the zone divider into charging base (when rechargeable
batteries are installed), please see the figure above.
Step 1: The power switch of Zone Divider must set to "ON" position. Step 2: Press and slide out the DC Plug
from charging dock.
Step 3: Plug the DC Plug into DC Inlet, the LED light will blink. Step 4: When recharge is complete, LED will
glow continuously.
6. When the robot vacuum is cleaning, the zone
divider must be positioned at least 1m (3 ft) away
from charging dock and must not be facing the
charging dock.
7. When the robot completes the cleaning cycle you can power off the zone divider by sliding the power
switch to "OFF" position. When the robot detects the invisible barrier, it will turn around and move to
another direction.

12
GENERAL OPERATION
Power switch
The power switch on the underside of the robot vacuum cleaner can be used to turn the unit on
and off. When the unit is turned on, the indicator LED light on the unit will illuminate to show
the battery status, as shown in the table below:
Indicator LED Light
System Status
Red led blinking
Battery Level is low
Blue led blinking
The battery is recharging
Solid Blue
The battery is fully recharged
Solid Red
Fault
REMOTE CONTROL
Power: Turn ON/OFF the robot. Other buttons only function
after the power button has been pressed to start the robot.
Start/Stop When you turn on the power switch, the robot is
standby, you need press the start/stop button to start/stop
the robot. Default cleaning mode is auto mode.
Directions: Move the robot towards desired direction; hold
the key to continue moving.
Spiral: While in auto mode if this key is pressed the robot
will start spiral cleaning mode, starting at a spot, working
away from it in a spiral.
Zig-Zag: While in auto mode if this key is pressed the robot
will start the zig-zag cleaning mode, covering the floor space
by working in a zig-zag pattern
Home: Press to return the robot to Charging Base.

13
CONNECTING VIA THE APP
Your Robot vacuum cleaner also has the ability to be controlled over Wifi from your smart phone.
The first step is to download the correct app. The IOS version is available from itunes by searching for
"ERC-283" and the Android version is available on the play store by searching for "ERC-283".
Alternatively they can be downloaded using the QR codes below:
Android IOS
Connecting your Robot to your Wifi
Before starting, ensure you have installed the correct app to your phone, and that your phone is
connected to your wifi network. It is advisable to turn off your mobile data while carrying this out.
Move your vacuum close to your router, remove the lid,
and press the pairing button once, so the LED light
flashes Red and Blue

14
Open the app and press on
the plus in the top right
hand corner.
Select Wi-Fi setting at the
bottom of the screen
Enter your wifi password into
the box, and press next (Please
note the password is case
sensitive). This will now take
up to 60 seconds to connect
your Robot to your network.
Click confirm when finished
Controlling your Cleaner
Press the device from the "My
Device" List
You are then presented with all the controls for the device
including specifying cleaning patterns and setting up a cleaning
schedule.

15
CLEANING AND MAINTENANCE
1. Make sure the unit is unplugged before performing any cleaning operation.
2. Before first use and continuing after each use, wipe the unit with a damp cloth and dry thoroughly.
3. Clean all the brushes and empty the rubbish container. Vacuum or wipe the inside of the container
with a cleaning wipe.
4. DO NOT immerse the robot or the power supply in any liquid.
5. Reassemble the unit following the instructions and charge it before the next use.
6. Store the robot in a cool and dry place.
Dust bin and filter cleaning
Basic Cleaning
1. Remove the dust bin
2. Remove the debris filter
3. Empty all dust from the dust bin
4.Use the supplied brush to clean out the dust
filter and the debris filter
Deep Cleaning
1. Carefully separate the dust compartment from the robot body.
2. Gently wash the dust compartment and debris filter.

16
3. Wipe them thoroughly with a cloth and let it rest until completely dry
Wheels and Sensor
1. Check and remove all debris and dirt
2. There are three ground sensors. Please clean them gently using a wet cloth or tissue. Do not use any
solvents as they may damage the sensors.
3. Please check the side brushes for damage and debris. If hair or other debris are trapped please unclick
the brushes and remove them. Please change the side brushes if they are damaged. Only use parts
provided by the manufacturer.
TROUBLESHOOTING
Please read this instruction manual carefully before you send the robot to the service centre
Problem
Cause
Solution
Red error led on
Sensor malfunction or system
jammed
Check the sensors, wheels and top cover
for issues
The Robot cannot
power on
The battery is not installed or is
installed incorrectly
Check if the battery is still in good
condition and installed correctly
Remote control
malfunction
The transparent film is not taken off
The battery is not correctly
installed or the battery strength
is too low
Tear off the transparent film
Check the installation of the battery or
replace the battery
The robot fails to return to the
dock
The dock is not properly placed
There are obstacles between the
dock and the Robot
The robot is stuck or jammed
The dock is not paired with the
dock
Place the dock in a proper location and
leave sufficient clearance space for the
Robot to return to it
Remove any obstacles in front of the dock
Check and clean the Robot’s wheels
Follow the steps to pair the dock
The Robot does not charge
AC power is not plugged in.
The Robot is not correctly docked
The battery is over-heating
Plug the AC jacket onto the dock firmly.
When the robot is docked, please make sure
the Robot is properly placed.
Do recharge for at least 60 minutes until the
battery has cooled down.
Rolling brush or side brush do
not work
Brushes get stuck by debris or
hair
Clean the brushes
The Robot does not start cleaning
after it is fully recharged
The "Auto" function is not set
correctly.
The battery is over-heating
Check the schedule setting section and
reset the "Auto" function
Do recharge for at least 60 minutes until
battery cooled down.

17
The Robot keeps moving
backward or turning around
Cl
iff sensors are blocked or covered by
dust
Wipe all sensors with a dry clean cloth.

18
PRODUCT SPECIFICATIONS
Power supply
Input: 100-240V AC 50-60Hz
Output: 20V DC, 1 A
Rechargeable battery
Li-Po 14.8 V, 1200MAH
Charging time
2.5 hrs
Operating Time
Max 60 min.
Dustbin capacity
0.25 l
Dimension (wxdxh)
270x270x70 mm
Net weight
1.6 kgs
Cleaning r
Disposal: Do not dispose this product as unsorted waste. Collection of such waste must be handled
separately as special treatment is necessary.
Recycling facilities are now available for all customers at which you can deposit your old electrical products.
Customers will be able to take any old electrical equipment to participating civic amenity sites run by their
local councils. Please remember that this equipment will be further handled during the recycling process, so please
be considerate when depositing your equipment. Please contact the local council for details of your local household
waste recycling centres.
ElectrIQ UK SUPPORT
www.ElectriQ.co.uk/support
If the unit still fails to operate call: 0871 620 1057 or complete the online form
Office hours: 9AM - 5PM Monday to Friday
www.ElectriQ.co.uk
Unit J6, Lowfields Business Park
Lowfields Way, Elland
West Yorkshire, HX5 9DA
/