
26
INSTRUCTIONS FOR USE
INSTALLATION
ELECTRICAL CONNECTION
CONNECTING TO THE GAS SUPPLY
REFERENCE TO ITALIAN NATIONAL REGULATIONS
BEFORE USING THE OVEN
SAFEGUARDING THE ENVIRONMENT
PRECAUTIONS AND GENERAL RECOMMENDATIONS
OVEN ACCESSORIES
COOKING TABLE
CLEANING THE OVEN AND ACCESSORIES
TROUBLESHOOTING GUIDE
AFTER SALES SERVICE
DECLARATION OF CONFORMITY CE

27
INSTALLATION
Technical information for the installer
• It is important that all installation procedures be performed by a qualified technician.
• After unpacking the oven to connect it, rest it on its base without damaging it.
• Do not attempt to lift the oven by the handle. Lift at the sides.
• Handling the oven must be done by 2 people.
• Check that the appliance has not been damaged in transit.
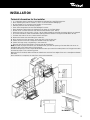
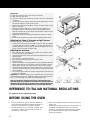
• Oven dimensions and kitchen unit dimensions are shown in the figure below.
• Kitchen units in contact with the oven must be heat resistant (min. 100°C).
• House the oven in the unit cavity, lifting it at the sides and making sure that the supply cable is not trapped.
• For correct ventilation, follow the ventilation opening directions shown in the figure (at least 800 x 90 mm).
• To fasten the oven to the unit, leave the door half-open.
1. Remove the frame cover unscrewing the screws (A).
2. After connection to the gas supply, house the oven in the kitchen unit.
3. Fasten the oven to the unit using the 4 wooden screws (B) supplied.
4. Fasten the hinge covers, retightening in the screws (A).
• The oven can also be fitted under a cook top that we manufacture.
NOTE: To allow for proper ventilation, we recommend that you leave an opening of at least 800 x 90 mm or an
equivalent area in the lower section of the housing.
An additional opening of 5 mm is required between the oven top rim and the cooktop lower rim: This gap must never
be closed by strips or unit reinforcing pieces.
When the oven is installed, make sure that the sides do not touch the front edges of the unit or the adjacent drawers
and doors.
Once installation is complete, the oven floor must not be accessible.
No Contacts

28
INSTALLATION
ELECTRICAL CONNECTION
Installation location
In order for the gas unit to function properly it is essential that the air
necessary for burning the gas flow into the area naturally (see Product
Description Sheet).
The installer must follow the safety rules for the country of installation.
The flow of air into the area must come directly through openings made
in the exterior walls.
These openings must have a free passage section of at least 100 cm
2
(one or more openings may be made).
Products of combustion must be exhausted through a hood connected
to a fume flue or directly outside.
In the event that it is not possible to install the hood, it is necessary
to use an electric ventilation fan installed in the outside wall or window
of the area so long as there is an opening for air to enter the area in
conformity with current regulations.
This electric ventilation fan must have a flow capacity sufficient to
guarantee that 3 to 5 times the volume of air in the room is exchanged
every hour.
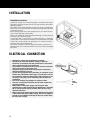
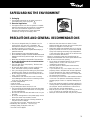
• Regulations require that the appliance is earthed.
• The electrical connection must be made by a qualified
technician in accordance with the manufacturer’s instructions
and in compliance with local regulations.
• The installer is responsible for the correct electrical connection
and for observance of the safety rules.
• The power supply cord must be long enough to connect the
appliance installed in the unit.
• To fulfil the appropriate safety directives, an omnipolar circuit
breaker with a minimum contact gap of 3 mm must be used for
the installation. When connecting with a mains plug this is not
necessary, if the plug can be accessed by the user after the
installation.
• Do not use multiple plug adapters or extension leads.
• After the oven has been installed, the electrical components
must be concealed.
• Replacement of the power supply cord having the same
characteristics as that supplied by the Manufacturer (type HO5
RR-F) must be carried out by the After Sales Service or by a
qualified technician.
• Make sure that the voltage stated on the appliance rating plate
is the same as the power supply voltage. The service number is
located on the righthand front edge of the oven (visible when
the oven door is open).
L
N
Earth
(Yellow/

29
CONNECTING TO THE GAS SUPPLY
• The gas supply system must conform to current local law
(see chapter, “References to National Regulations”).
• The type of gas for which the oven has been adjusted is shown
on the rating plate and on the packing.
• Before making the connection, adjust the oven to the type of
gas in the home.
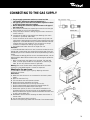
• The connection between the tapered gas connection and the pipe
must be made in one of the following ways:
1. Using a connector without a sealing ring (the oven's connector is
conical: ISO R 7).
2. Interposing the sealing ring supplied (see drawing) (the oven's
connector is cylindrical: ISO R 228).
• For the connection of the oven to the gas mains or cylinder, use
rigid copper or steel pipe with connectors that comply with the local
regulations, or flexible hose tubing in seamless stainless steel that
complies with the local regulations. For connection to the gas
connection interpose the sealing ring (B) supplied.
• The flexible metal hoses must not be longer than 2 m.
Attention:
- If a flexible stainless steel hose is used, it must be installed in such a
manner that it cannot enter into contact with a moving part of the unit,
but passes a point free of obstacles and can be inspected along its entire
length.
- If it becomes increasingly difficult to turn the thermostat knob, call the
authorised After Sales Technical Service who will arrange to replace the
thermostat.
• When finished check that there are no gas leaks. Use soap and
water, or other liquid suitable for the purpose, to check for gas
leaks. Do not use a flame to search for gas leaks.
Warning: The use of flexible rubber tubing attached to the outlet
connector is prohibited because it cannot be inspected.
Adapting to the gas in use
It is possible to use other types of gas by adapting the burner
adjustment as follows:
Oven burner
1. Make sure that the oven is not connected to the electric power
supply.
2. Open the oven door fully.
3. Lift and remove the oven bottom as shown.
4. Remove the burner proceeding as follows:
• Remove the diffusion dish (C) turning the nuts (D).
• Shift the square spark plugs support and thermocouple (E)
• Remove screw (B) and draw off the burner pipe.
• Remove the injector (F) with a 7 mm wrench and replace it in
accordance with the instructions given in the separate Product
Description Sheet (the injector must be blocked with sufficient force
to stop it being drawn off).
5. Reassemble the oven burner following the above instructions in
reverse order.
6. Put the oven bottom back in position.
Be careful of the spark plug cables and the hoses of the thermocouples.
Gas connection
Ring
Flexible tube

30
REFERENCE TO ITALIAN NATIONAL REGULATIONS
See additional sheet, supplied separately.
BEFORE USING THE OVEN
• These instructions are only valid for the destination
countries whose identification symbols are shown on
the cover of the appliance's instruction booklet.
• To make the most of your new oven, read the users
instructions carefully and keep them on hand for
consultation in the future.
• Remove the cardboard protection and any protective
plastic film.
• Remove the accessories from the oven and heat it at
the maximum temperature setting for about 30
minutes to eliminate the smell of protective grease
and insulating materials. Keep the window open
during this operation.
Grill burner
1. Make sure that the oven is electrically connected.
2. Open the oven door fully.
3. Pull out the grill burner located in the top of the oven, proceeding
as follows:
• Unhook the ignition spark plug and the thermocouple bulb from the
grill burner drawing off their securing clips.
• Remove the fastening screw “B” on the grill burner and draw off the
latter to the right.
• Remove the injector “D” with a 7 mm wrench and replace it in
accordance with the instructions given in the separate Product
Description Sheet (the injector must be blocked with sufficient force
to stop it being drawn off).
• Reassemble the burner following the above instructions in reverse
order.
• Be careful of the spark plug cables and the thermocouple hoses.
Adjusting the flame of the oven and grill burners
To adjust the flame, proceed as follows:
• Loosen screw “C” and rotate ring “D” to position “N” for methane
or natural gas and to position “GPL” for cylinder gas, making the
movable pointer on the ring line up with the fixed pointer on the
burner. This will provide a regular flame.
Adjusting the minimum
• Open the oven door (the burner only ignites with the door open).
• Lift and remove the oven bottom.
• Light the oven and let it burn at the maximum temperature for at least
20-30 minutes.
• After ignition, close the oven door.
• Turn the thermostat knob back to minimum (min).
• Remove knob A.
• Insert a screwdriver into hole B parallel to the thermostat stem and
adjust the by-pass to the minimum so that you achieve a low but
stable flame. Perform this operation with the oven door closed.
• Use a flat-head screwdriver on the by-pass screw. It is sufficient to
loosen the screw to adjust the minimum when changing from liquid
gas to methane.
• For functioning with G30/G31 (LPG) the adjustment screw must be
screwed in completely.
Important: after adjusting the burner, check that the minimum flame
is maintained, testing it by repeatedly opening and closing the oven
door. If the flame goes out, adapt the by-pass adjustment.
Once the operations (replacing the injector, adjusting the air and
minimum) have been completed, turn off the oven and apply the new
data plate (showing the type of gas being used) replacing the previous
one and renew the seal with sealing wax or an equivalent material.
Excess air Regular flame Insufficient air

31
SAFEGUARDING THE ENVIRONMENT
1. Packaging
• The packaging material can be 100% recycled, as
confirmed by the recycling symbol .
2. Electrical appliances
• The appliances are built from recyclable or reusable
materials. Disposal must be carried out in accordance
with local environmental regulations for waste
disposal. Before disposing of them make them
unusable by cutting off the supply cable.
PRECAUTIONS AND GENERAL RECOMMENDATIONS
• This oven is designed solely for domestic use, for
cooking food. Any other use is forbidden. The
manufacturer assumes no responsibility for damage
caused by improper or incorrect use.
• The oven must be repaired or adjusted exclusively by a
qualified technician
• Do not expose the oven to atmospheric agents.
• Do not rest heavy weights on the door because these could
damage the oven cavity and the hinges. Do not cling to
the door.
• Never hang any weight on the handle of the oven door.
• Do not cover the bottom of the oven with aluminium
foil or other objects.
• The oven door must close properly. The door seals
must be kept clean.
• Do not pour water directly into the inside of a hot
oven. The enamel coating could be damaged.
• Fruit juice dripping from the baking tray could leave
permanent stains Clean the oven before reusing it.
• Do not drag pots and pans across the bottom of the
oven - risk of scratches.
• Condensation that remains at the end of cooking
could damage the oven and the surrounding kitchen
units over time. We advise you to:
- set lower temperatures;
- cover the food;
- remove the food from the oven;
- dry the damp parts when the oven is cool.
• The front panel and the handle of the oven door warm
up when the appliance is switched on for a long time
at high temperatures.
• Do not touch the oven with wet hands or use it in your
bare feet.
• Do not pull the appliance or the power supply cord to
disconnect them from the mains socket.
• Keep children away from the following elements as
they are sources of danger:
- the oven and its controls, especially during and
immediately after operation, - risk of injury;
- packaging (bags, polystyrene, nails, etc.)
- the oven to be scrapped.
• Make sure that the electrical cables of other
appliances used near the oven do not touch hot parts
and are not trapped in the oven door.
• Some oven models are equipped with an air cooling
system to prevent the front of the oven and cabinet
cavity from reaching excessively high temperatures.
If the cooling fan does not work, do not use the oven
and call the After Sales Service.
Attention: steam and smoke are vented through an
opening located between the control panel and the oven
door. Do not block the vent opening.
• Do not place inflammable material in the oven or
nearby: There is a risk of fire if the oven is
inadvertently switched on.
• Use oven gloves to remove pans and accessories,
when the oven is hot.
• If you use alcohol (e.g. rum, cognac, wine, etc.) in
preparing dishes, remember that alcohol evaporates
at high temperatures. The vapours released by the
alcohol can catch fire when they are in contact with
the oven and grill burners.
• Do not heat up or cook food in heat-sealed containers
in the oven. The pressure that develops inside the
packaging might cause it to explode, damaging the
oven.
• Do not use containers made of synthetic material for
cooking (except for packages specifically designed for
this purpose: see the manufacturer's instructions).
They could melt at high temperatures.
• Keep an eye on the oven if you are using a lot of fat
or oil. Oil and fat can overheat and catch fire!
• Never pull out accessories when they are fully-loaded.

32
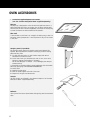
OVEN ACCESSORIES
• Accessories supplied depend on the model
(see. the “Product Description Sheet” supplied separately).
Drip tray
The drip tray is designed to collect fat and food particles when it is
positioned under the grid or as a plate, such as when cooking meat,
chicken and fish with or without vegetables. Pour water in the drip tray
to cover the bottom to reduce smoke and fat spatters.
Wire shelf
It can be used to cook food or as a support for baking trays, cake tins
and other cooking receptacles. It can be placed on any of the runners
in the oven.
Catalytic panels (if provided)
The catalytic panels have a microporous coating that absorbs fat
spatters. We recommend an automatic cleaning cycle after cooking
particular fatty food.
1. To clean the oven heat it to 200°C when empty and leave it
switched on for about an hour.
2. At the end of the cycle and when the oven is cool, use a moist
sponge to remove food residues if necessary.
Do not use detergent or cleaners - risk of damaging the catalytic
enamel coating.
It is possible to purchase catalytic panels separately from After Sales
Service by specifying code AMC 896 852989601000.
To install them:
1. Remove the side grills.
2. Rest the panels against the side of the oven.
3. Reposition the grills and accessories.
Turnspit
Use the turnspit as indicated in the relevant chapter in the “Product
Description Sheet” supplied separately.
Deflector
Use to protect the control panel knobs when grilling with the oven door
open.

33
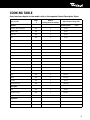
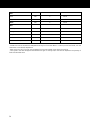
COOKING TABLE
Oven functions depend on the model: refer to the separate Product Description Sheet.
Type of Food
Temp.
°C
Runners
(starting from the bottom)
Approximate cooking time
Desserts Recommended Yours
Raising cakes (sponges) 175 3 35-45
Cheese-cake 190 3 35-45
Fruit pie 190 3 35-45
Pies 190 3 40-45
Pie crust (shortcrust) 190 3 8-10
Bread (1 kg. of flour) 200 3 25-35
Biscuits 190 3 15-20
Choux pastry 200 2 30-35
Applestrudel 200 3 40-50
Lasagna 220 3 40-50
Meat
Roasts (e.g. veal-beef, pork.) 190 2 100-120
Roast beef 200 2 50-70
Meat loaf 200 2 30-40
Poultry
Duck 200 3 90-120
Goose 200 3 120-150
Chicken 200 3 60-70
Turkey (4-6 kg) 180 3 180-220
Wild game
Hare 200 2 60-90
Roe buck thigh 200 2 90-140
Leg of lamb 180 2 90-130
Vegetables
Baked potatoes 220 3 30-40
Vegetable flan 200 3 30-40

34
N.B.:
- Preheat the oven at the maximum temperature setting for 15 minutes. When it is time to put the food inside, turn the
thermostat to the desired temperature.
- When using the “Grill” function, we recommend turning meat several times during the cooking.
- The figures in the table are approximate because the type of cooking and/or the time will depend on the quantity of
food and individual taste.
Fish
Trout 200 3 40-50
Grey mullet 200 3 40-50
Pizza 230 3 10-20
Grill
Porkchops 4 8-10
Sausages 4 10-12
Spicy chicken 3 35-45
Veal roast on the spit 50-60
Chicken on the spit 60-70

35
CLEANING THE OVEN AND ACCESSORIES
• After every use, let the oven cool down sufficiently then clean it to
prevent the build-up of baked-on food residues.
• If the dirt is tough, use a specific oven cleaning product following
the instructions on the packaging.
• Clean the exterior of the oven with a damp sponge and warm water.
• Do not use abrasive cleaners, pan scourers, electric steam
cleaners or inflammable products.
• Clean the glass of the oven door with a suitable liquid detergent.
• Wash the accessories in a dishwasher or in the sink, using an oven
cleaner.
How to remove the oven door
Carry out the operations given below with great care.
The hinges “A” are provided with two movable hook-bolts “B” that
hook onto sector “C” of the hinges, when they door is completely open,
they lock it.
• Lift the door upwards and remove towards the outside, grasping the
sides of the door close to the hinges.
To remount the door:
• Insert the hinges into their grooves.
• Before closing the door, remove the two movable hook-bolts “B”
that were used to hook the two hinges.
• The internal pane of the door can be easily removed unscrewing the
4 side screws.
Cleaning the side guides
To remove the side guides and facilitate cleaning the inside of the
oven, push down lightly on detail “A” as shown, and extract it.
Changing the oven lamp
1. Disconnect the oven from electrical supply.
2. Unscrew the lamp cover.
3. Change the bulb (see N.B. below).
4. Refit the lamp cover.
5. Reconnect the electrical supply to the appliance.
N.B.: Use exclusively 25 W 230 V lamps, type E-14, T 300°C, available
from After Sales Service.

36
TROUBLESHOOTING GUIDE
The burner does not light
• Is the gas supply tap open?
• Is there an interruption in the supply of gas?
• Is the cylinder empty?
• Are the burner openings obstructed?
The burner does not remain lit:
• Light it again with the knob turned to the symbol
representing the maximum temperature.
Electric ignition is not working:
• Is there a power failure?
AFTER SALES SERVICE
Before contacting After Sales Service:
1. Try to solve the problem yourself (see “Troubleshooting
Guide”).
2. Turn off the appliance and restart it to see if the fault
persists.
If after the above checks the oven is still not working
properly, contact the nearest After Sales Service.
Please give:
• A short description of the fault,
• The exact type and model,
• The service number (number after the word “SERVICE” on
the rating plate) located on the righthand front edge of
the oven (visible when the oven door is open). The service
numbers are also indicated on the guarantee booklet,
• Your complete address and phone number.
Repairs made under the guarantee always require the
intervention of the Manufacturer's authorised Service
Centres, as shown in the guarantee conditions.
In the event you need an intervention by technicians not
belonging to the Manufacturer's authorised Service
Centres, make sure you are given a receipt showing the work
performed and make sure that the replacement parts used
were Manufacturer's original parts.
Following these simple rules will guarantee the product's
quality and safety.
DECLARATION OF CONFORMITY CE
• These appliances are intended to come into contact with
foodstuffs and they are constructed in compliance with
Directive 89/109/EEC.
• This oven has only been designed for use as a cooking
device. Any other use (such as heating rooms) is to be
considered improper and, as a consequence, dangerous.
• This oven (Class 3) has been designed, built and sold in
compliance with:
- The safety requirements of “Gas” Directive 90/396/CEE;
- The safety requirements of “Low Voltage” Directive
73/23/EEC;
- The protection requirements of EMC Directive 89/336/EEC.
- The requirement of Directive 93/68/EEC
-
 1
1
-
 2
2
-
 3
3
-
 4
4
-
 5
5
-
 6
6
-
 7
7
-
 8
8
-
 9
9
-
 10
10
-
 11
11


Ask a question and I''ll find the answer in the document
Finding information in a document is now easier with AI
Related papers
Other documents
-
Hotpoint AKG 644/02 IX User guide
-
John Lewis JLRC101 User manual
-
Electrolux RKM624012W User manual
-
-
Glem EF64MEI User manual
-
DeLonghi DEFV908R User manual
-
Baumatic BCD905SS User manual
-
-
Zanussi ZCM660NWC User manual
-
Electrolux EKK925A0OX User manual