Page is loading ...

Users Guide
The PROTEM2 is an integrated software for the management of parameters and measured values, consisting of the following tools.
This software consists of the following tools.
PROTEM2 Base tool --------------------------- Used to set and verify the parameters.
Recipe tool --------------- Used to save the parameters to a computer and transfer the data to the instruments.
Logging tool ------------- Used to visualize the various data and log the data in a CSV format.
Report tool --------------- Used to create a list (report) of parameters and save the data in CSV/HTML format.
Backup tool -------------- Used to make overall management of set values (saving to a computer, transferring to a controller, verifying
the data).
Setting tool for the PZ series --------------- Used to set and check the parameter setting of the PZ series.
Setting tool for the PF900 series ---------- Used to set and check the parameter setting of the PF900 series.
Configuration and Data Management Software for Controllers and Indicators
IMT01D11-E7
Ver. 2.0.3.0
All Rights Reserved, Copyright 2020, RKC INSTRUMENT INC.

i-2
IMT01D11-E7
Microsoft and Windows are registered trademarks of Microsoft Corporation in the U.S. and/or other countries.
Modbus is a registered trademark of Schneider Electric.
Other company names and product names mentioned in this manual are (or may be) trademarks or registered
trademarks of respective companies or organizations.

i-3
IMT01D11-E7
: This symbol is used for important items for operation and handling of the product.
: This symbol indicates supplemental information on installation, handling and operating
procedures.
: This symbol is used to show the reference where details and relating information are
obtained.
In this document a personal computer is referred to as a computer or a PC.
In this document menus and dialog boxes are shown with quotation marks (“ ”), whereas buttons and
tabs are shown with [brackets].
This Software tool enables a user to monitor and set all the set values including those in the initial
setting level. This may cause an unexpected change of the specification. RKC is not responsible for
any damage of the products and the equipment due to the use of this software.
RKC is not responsible for any damage of any kind, including computer virus and unauthorized entry
to the computer and computer networks.
This manual assumes that the reader has a fundamental knowledge of the principles of electricity,
process control, computer technology and communications. It is assumed that the reader has a
fundamental knowledge of the Windows such as terminology and operation. For detailed terminology
and operation, refer to the manuals of the operating system and the PC you use.
The figures, diagrams and numeric values used in this manual are only for purpose of illustration.
RKC is not responsible for any damages and/or injury listed below.
Damages due to the use of this product.
Damages due to unexpected failures in this product.
Damages due to the use of counterfeits of this product.
All other indirect damages.
Unauthorized duplication or modification of the software for purposes other than backup is prohibited.
The information in this manual is subject to change without prior notice.
No portion of this document may be reprinted, modified, copied, transmitted, digitized, stored, processed
or retrieved through any mechanical, electronic, optical or other means without prior written approval
from RKC.
Notice Before Use
Notation in This Manual
TIPS
NOTE
Note

i-4
IMT01D11-E7
1. Before Using This Software -------------------------------------- 1-1
■ Operating Environment ---------------------------------------------- 1-1
■ Models Supported by PROTEM2 --------------------------------- 1-1
■ Procedure to Set up PROTEM2 ---------------------------------- 1-2
2. Installing PROTME2 ------------------------------------------------- 2-1
2.1 Installing PROTEM2 -------------------------------------------- 2-1
2.2 Uninstalling PROTEM2 ----------------------------------------- 2-3
3. Connecting Instruments to PC ---------------------------------- 3-1
3.1 Necessary Products and Cables ----------------------------- 3-1
3.2 Connections for Loader Communication ------------------ 3-2
3.3 Connections for Serial Communication -------------------- 3-6
4. Starting/Ending PROTME2 ---------------------------------------- 4-1
4.1 Starting PROTEM2 ---------------------------------------------- 4-1
4.2 Configuring the Communication ----------------------------- 4-2
4.3 Checking the Operation of Communication- -------------- 4-3
4.4 Ending PROTEM2 ----------------------------------------------- 4-4
5. Getting Started with Base Tool ---------------------------------- 5-1
5.1 Basic Setting for Loader Communication ----------------- 5-1
5.2 Basic Setting for Serial Communication ------------------ 5-4
5.3 Screen Components and Menu Structure --------------- 5-11
5.4 How to Set Data ------------------------------------------------ 5-21
5.5 Saving a Project File ------------------------------------------ 5-24
5.6 Opening a Project File ---------------------------------------- 5-25
6. Getting Started with Data Management----------------------- 6-1
6.1 Recipe Tool -------------------------------------------------------- 6-1
6.1.1 Saving the Set Data in a Recipe File ---------------- 6-2
6.1.2 Transferring the Stored Recipe File
to the Instrument ------------------------------------------- 6-6
6.1.3 Editing the Stored Recipe File ------------------------- 6-7
6.2 Logging Tool ----------------------------------------------------- 6-10
6.2.1 Starting the Logging Tool ------------------------------ 6-11
6.2.2 Pen Setting ------------------------------------------------ 6-12
6.2.3 Logging setting/Display setting ----------------------- 6-14
6.2.4 Starting/Stopping Logging and
Saving the Logged Data ------------------------------- 6-16
6.2.5 Other Functions ------------------------------------------ 6-18
6.3 Backup Tool ----------------------------------------------------- 6-21
6.3.1 Saving All Settings as a Backup File
(Batch Saving) -------------------------------------------- 6-22
6.3.2 Restoring the Backup File to the Instrument
(Batch Setting) -------------------------------------------- 6-24
6.3.3 Verifying Between the Backup File and
the Data in the Ins
trument ----------------------------- 6-26
6.4 Report Tool ------------------------------------------------------ 6-28
6.4.1 Starting the Report and Setting up the Output -- 6-28
6.4.2 Outputting Report Data --------------------------------- 6-30
7. This chapter 7 is not available with PROTEM2 English
Edition
Getting Started With Ramp/Soak Tool
8. Getting Started With Setting Tool for PZ Series ----------- 8-1
8.1 Preparation -------------------------------------------------------- 8-1
8.2 Screen Components and Menu Structure ----------------- 8-4
8.3 Program Setting Example ------------------------------------- 8-9
8.4 Program Setting ------------------------------------------------ 8-11
8.5 Program Operation -------------------------------------------- 8-16
8.6 Trend Graph (Historical Trend) ----------------------------- 8-22
8.7 Data Management --------------------------------------------- 8-27
9. Getting Started With Setting Tool for PF900 Series ------ 9-1
9.1 Preparation -------------------------------------------------------- 9-1
9.2 Screen Components and Menu Structure ----------------- 9-4
9.3 Program Setting Example ------------------------------------- 9-9
9.4 Program Setting ------------------------------------------------ 9-11
9.5 Program Operation -------------------------------------------- 9-17
9.6 Trend Graph (Historical Trend) ---------------------------- 9-23
9.7 Data Management --------------------------------------------- 9-28
A. Appendix ------------------------------------------------------------- A-1
A.1 List of Supported Languages -------------------------------- A-1
Table of Contents

1-1
IMT01D11-E7
■ Operating Environment
To run this Software, we recommend using a PC with the specifications detailed below.
Operating system
Windows 10 (64-bit edition)
[PROTEM2 works only on Windows 10 (64-bit edition) and has not been tested on other versions of Microsoft Windows.]
Firmware .NET Framework 4.5 or later
Memory (RAM) 100MB or more (free memory space)
Hard disk 100MB or more (free disk space)
Display 1024×768 or higher
Others Serial communication port or USB2.0 port
■ Models Supported by PROTEM2
PROTEM2 supports the following models.
Modular Controllers
SRZ System
Extended Communication Modules
Z-COM-A
Digital Controllers
HA series *1
HA400, HA900
Temperature Control Modules
Z-TIO-A/B/C/D
Digital Melt Pressure Controllers
HA series *1
HA430, HA930
Temperature Control Module with
High Resolution
Z-TIO-G
Digital Indicators
AG500
Digital Input/Output Module
Z-DIO-A
Wireless Temperature Sensor
Converters
NWS series *1
NWS-COM
NWS-COM-M1
CT Input Module
Z-CT-A
High Performance Power
Controllers
THV-A1
Modular Controllers
SR Mini HG System
SR Mini System
H-……: SR Mini HG System
M-……: SR Mini System
Power/CPU Modules
H-PCP-A/B/J
M-PCP-A/B
Open Board Temperature
Controllers
B400
Temperature Control Modules
H-TIO-A/B/C/D/E/F/G/H/J
M-TIO-A/B/C/D
Digital Controllers
RB series *2
RB100, RB400, RB500, RB700,
RB900
Temperature Input Modules
H-TI-A/B/C/D
Digital Controllers
RD series
RD100, RD400, RD500, RD700,
RD900
CT Input Modules
H-CT-A
M-CT-A
Digital Controllers
RZ series *2
RZ100, RZ400
Analog Input Modules
H-AI-A/B
M-AI-A/B
Digital Controllers
SA series *1
SA100, SA200
Analog Output Modules
H-AO-A/B
Temperature Controller with
a built-in SSR
SB1
Digital Input Modules
H-DI-A/B
M-DI-A
Melt Pressure Indicator
PG500
Digital Output Modules
H-DO-A/B/C/D/E/G
M-DO-A/B
Intelligent Control Output Distributor
*1
IOPD
Cascade Control Modules
H-CIO-A
Power Controllers
THV-40/THV-10 (150/200A)
THV-10 (20A to 100A)
Speed Control Module
H-SIO-A
Ramp/Soak Program Controllers
*3
PZ400, PZ900
PF900, PF901
Modular Controllers
SRJ *1
J-TI USB Communication Converters
*1
COM-KG (NWS wireless)
Digital Controllers
FB series
FB100、FB400、FB900 Communication Converters
COM-ME series
Digital Controllers
FZ series
FZ110、FZ400、FZ900 Communication Converters
COM-ML series
Digital Controllers
GZ series
GZ400, GZ900
*1 Supported by PROTEM2 Japanese edition only.
*2 Supported by PROTEM2 Japanese and English editions only.
*3 Use Setting tool for the PZ series or the PF900 series which are supported by PROTEM2 (English edition). Base tool (English edition) does
not cover this model.
For the latest information, please check our website.
1. Before Using This Software

1-2
IMT01D11-E7
■ Procedure to Set up PROTEM2
Models supported by
PROTEM2
Installing PROTEM2
Connecting an instrument
and a PC
Starting/Ending PROTEM2
Before using PROTEM2, make sure your model is included in
the models supported by PROTEM2.
Refer to P. 1-1
Install PROTEM2 to your computer after downloading it from
our website.
Refer to P. 2-1
Refer to P. 3-1
Refer to P. 4-1
Check Starting/Ending PROTEM2.
A
rrange for necessary items such as a converter and finish
wiring.
Refer to P. 8-1
This part describes how to run a ramp/soak program on
the PZ series using the Setting tool for the PZ series.
Refer to P. 9-1
This part describes how to run a ramp/soak program on
the PF900 series using the Setting tool for the PF900 series.
1. Before Using This Software
Refer to P. 5-1
This part describes outline of setting up PROTEM2.
To use Base tool
Refer to P. 6-1
This part describes how to save the setting data to your
computer and transfer the data to your instrument as well as
logging method using the Logging tool.
This part also shows how to make a list (report) of setting
parameters.
To conduct data
management of
instruments.
Base tool
To conduct a program
control using the PZ
series.
To conduct a program
control using the
PF900 series.
Setting tool for the PZ
Setting tool for the PF900

2-1
IMT01D11-E7
2.1 Installing PROTEM2
Proceed as follows to install the software.
This procedure is based on Installer version 2.0.3.0 (English edition).
1. Extract the [protem2_2030e.zip] downloaded from our website.
2. Double click WixSetupENG1.msi found in the extracted folder.
3.
4.
(Continued on the next page)
2. Installing PROTEM2
To use this software Microsoft .NET Framework 4.5 or later is required.
NOTE
TIPS
In case any previous version of PROTEM2 is installed in your PC, you can install this version
without uninstalling it.*
* If you have uninstalled the older version, the projects and log files created/changed with the older version will not be deleted by
the uninstallation. Delete those manually, if necessary.
Click [Next]
① Read the Terms of Use of
this software
② Check the check box to indicate “I accept
the terms in the License Agreement”
③ Click [Next]
Double click

2-2
IMT01D11-E7
(Continued from the previous page)
5.
If you wish to change the default installation location, click
[Change…] and select the location of your choice.
Click [Next] after you have changed the installation
location.
6.
The User Account Control (UAC) dialog box will appear
soon after you have started the installation. Click [Yes] to
proceed.
7.
If the installation is successfully finished, the folder
designated in procedure 5 (1) above will be created, the
software will be registered to the start menu (2), and a
short cut will be created on the Desktop (3).
①
② ③
This completes the installation process.
TIPS
TIPS
TIPS
2.1 Installing PROTEM2
Click [Next]
Default folder
Click [Install]
Click [Finish]
Click [Yes]

2-3
IMT01D11-E7
2.2 Uninstalling PROTEM2
To uninstall PROTEM2, follow the Windows program uninstallation procedure.
This completes the uninstallation process of PROTEM2.
2.2 Uninstalling PROTEM2
② Click [Apps]
(Example: Windows10)
④ Click [Uninstall]
③ Click [PROTEM2 ver2.0.3.0_English]
(When User Account Control screen is displayed)
⑤ Click [Uninstall]
⑥ Click [Yes]
① Click here

2-4
IMT01D11-E7
Memo

3-1
IMT01D11-E7
3.1 Necessary Products and Cables
To use PROTEM2, you need to establish a connection to allow Loader communication or Serial communication
between the supported instrument and the PC. Refer to the following table for the communication converter and
cables required for the connection. In this manual, the connection example between the PC and the supported
model is explained using the typical model.
Refer to the Instruction Manual of the relevant model for the details of wiring and connection of the supported
models. The Instruction Manuals of the supported models can be downloaded from the official RKC website.
● List of Necessary Products and Cables
: Supported : Connectable Converters and cables (//: Converter and cable with a circle of the same color mean that they can be used together.)
Communication interface and
available converters/cables
Supported models
Comm. interface USB converters
(RKC)
1,
2,
3
Comm. converters
Comm. cable
(RKC)
1, 5
Serial comm.
Loader comm.
RKC
1
Commercial products
4
RS-232C
RS-422A
RS-485
COM-K2-
COM-KG-
RS-232C/RS-422A
converter: COM-A
RS-232C/RS-485
conv.CD485,CD485V
series
USB/Serial comm.
converter: DL-U232A
USB/Serial comm.
converter: DL-U422T
USB/Serial comm.
converter: DL-U485
W-BF-01-3000
W-BF-02-3000
W-BF-28-3000
W-BV-02-3000
SRZ System Z-COM-A
Z-TIO-A/B/C/D
Z-DIO-A
Z-CT-A
Z-TIO-G
SR Mini HG System
SR Mini System
SRJ * J-TI
B400
FB series FB100
FB400/900
FZ series FZ110
FZ400/900
GZ series GZ400/900
HA series HA400/900
HA430/930
RB series RB100/400/500/700/900
RD series RD100/400/500/700/900
RZ series RZ100/400
SA series * SA100/200
SB1
AG500
PG500
NWS series * NWS-COM, NWS-COM-M1
PZ series ** PZ400/900
PF series ** PF900/901
IOPD *
THV-A1
THV-40
THV-10
COM-KG (NWS wireless) *
COM-ME series
COM-ML series
1
Our USB communication converters, RS-232C/RS-422A converters, and communication cables are all optional and sold separately.
2
Our USB communication converters can be also used as a USB/serial communication converter for RS-422A or RS-485.
3
To use the COM-K2, the USB driver must be installed on the PC.
The USB driver can be downloaded from the official RKC website: https://www.rkcinst.co.jp/english/download-center/
4
If you wish to use a commercial communication converter, you have to provide it by yourself. For example, Data Link products are shown above.
5
W-BF-01 (Spade crimp terminal ←→ Modular connector)
a
W-BF-02 (Modular connector ←→ Modular connector)
a
W-BV-02 (Modular connector ←→ Phoenix 5-pin connector)
a
W-BF-28 (D-sub 9-pin connector ←→ Modular connector)
a
a
The standard length of each communication cable is 3 meters.
* This model is not supported by PROTEM2 (English edition).
** Use Setting tool for the PZ series or the PF900 series which are supported by PROTEM2 (English edition). Base tool (English edition) does not cover this model.
3. Connecting instruments to PC

3-2
IMT01D11-E7
3.2 Connections for Loader Communication
This part of the document will show you an example of setting up the Loader communication using our instrument
with the USB loader communication connector, together with our USB communication converter and the PC.
■ Basic System Configuration
1
To use the COM-K2, the USB driver must be installed on the PC.
The USB driver can be downloaded from our website.
2
The Loader communication supports RKC protocol (based on ANSI X3.28-1976).
3
Device address for the Loader communication is fixed at 0. The device address setting of the instrument is ignored.
4
With the USB power supply (USB bus power) from our USB communication converter, communication can be
established with the instrument connected with the loader communication cable. Note that some instruments
will not operate from the USB bus power. Consult the instruction manual for details.
■ Connection Example
List of devices and cables used in the example
Connection type 1 (P. 3-3) Connection type 2 (P. 3-4) Connection type 3 (P. 3-5)
Instruments with
Loader
communication
connector
SRZ System
(Z-COM,
Z-TIO/DIO/CT,
Z-TIO-G)
FB series
PF series FZ series *
USB
communication
converter
COM-KG-□N
COM-KG-1N COM-KG-3N COM-KG-4N
With Loader communication cable
W-BV-01-1500
(Length: 1.5 m)
With Loader communication cable
W-BV-03-1500
(Length: 1.5 m)
With Loader communication cable
W-BV-05-1500
(Length: 1.5 m)
USB cable (Cable length: 1 m) [Supplied as standard]
PC OS: Windows10 (64 bits) USB port required (USB Ver.2.0)
3.2 Connections for Loader Communication
Communication settings on the PC
(The following values are all fixed)
Communication speed: Depends on the models
Start bit: 1
Data bit: 8
Parity bit: None
Stop bit: 1
Communication port of the PC
USB port: Based on USB Ver. 2.0
Refer to the Instruction Manual of the relevant model for the details of Loader communication of
the supported models.
This digit indicates type of
loader communication
cable. COM-KG (main part)
remains the same in each
case.
* Connection to the LOADER port on the PZ
series is the same as this.
To USB port
USB communication
converter
1
(RKC product)
Controller with the Loader
communication
3, 4
[Max. connection: 1]
USB cable
Loader communication cable
PC
COM-KG
COM-K2
2
USB
To Loader port
Loader Comm.

3-3
IMT01D11-E7
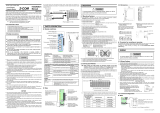
● Connection Example 1: ① SRZ (Z-COM, Z-TIO/DIO/CT, Z-TIO-G)
Z-COM module (used standalone):
Z-COM+(Z-TIO/DIO/CT):
Z-TIO/DIO/CT (stand-alone), Z-TIO-G (stand-alone):
3.2 Connections for Loader Communication
When connected via the Loader port, the instrument is available for communication even when the instrument
power is off. However, measured values such as PV and CT may be uncertain. To do the PV logging, the
instrument needs to be powered on.
TIPS
When the Z-COM module and two or more function modules (Z-TIO/DIO/CT) are connected, the Loade
r
communication is established only with the module to which the Loader communication cable is
connected.
To establish a communication with all modules connected below the Z-COM, you need to supply powe
r
(24Vdc) to the modules.
Z-COM and Z-TIO-G modules cannot be used linked together.
NOTE
When connected via the
Loader port, the instrument is
available for communication
even when the instrument
power is off.
TIPS
When connected via the Loader port, the instrument is available for communication even when the instrument
power is off. However, measured values such as PV and CT may be uncertain. To do the PV logging, the
instrument needs to be powered on.
To establish a communication link with multiple modules (control units), use the Serial communication
(RS-485).
TIPS
W-BV-01-1500
USB port
Loader port
COM-KG-1N
USB
USB cable
Loader Comm.
W-BV-01-1500
USB port
Loader port
COM-KG-1N
USB
USB cable
Loader Comm.
Loader port
W-BV-01-1500
USB port
COM-KG-1N
USB
USB cable
Loader Comm.

3-4
IMT01D11-E7
● Connection example 1: ② FB series (FB100/400/900)
The Loader port of the FB400/900 can be
found also at the bottom of the instrument.
● Connection example 2: PF series (PF900/901)
3.2 Connections for Loader Communication
When connected via the Loader port, the instrument can be powered off. However, measured values such
as PV may be uncertain. To do the PV logging, the module needs to be powered on.
Loader communication is for a 1 to 1 connection between the computer and the controller. To establish a
communication link with the FB controllers, use the Serial communication (RS-422A/RS-485).
TIPS
When connected via the Loader port on the bottom of the instrument, the instrument is available fo
r
communication even when the instrument power is off. However, values such as PV and Pattern monito
r
may be uncertain. To do the PV logging, the instrument needs to be powered on.
Loader communication is for a 1 to 1 connection between the computer and the instrument. To establish a
communication link with multiple instruments, use the Serial communication (RS-422A/RS-485).
TIPS
Loader communication ports of the PF series are located on the front and on the bottom of the
instrument. Both ports cannot be used at the same time. You can only use one of the two at a time.
Be sure to turn ON the PF900/901 when using the Loader communication port on the front panel.
The Loader communication connector on the front panel is different from the one on the bottom of the
instrument. When using the Loader communication port on the bottom of the instrument, use the
W-BV-01-1500 loader communication cable.
NOTE
W-BV-01-1500
USB port
Loader port
COM-KG-1N
FB100
USB
USB cable
Loader comm.
USB
USB cable
W-BV-03-1500
USB port
Loader port (front)
COM-KG-3N
Loader comm.
USB
USB cable
W-BV-01-1500
USB port
Loader port (bottom)
COM-KG-1N
Loader comm.

3-5
IMT01D11-E7
●
Connection example 3: FZ series (FZ110/400/900)
Loader port of FZ400/900 is also on
the front panel.
3.2 Connections for Loader Communication
When connected via the Loader port, the instrument can be powered off. However, measured values such
as PV may be uncertain. To do the PV logging, the instrument needs to be powered on.
Loader communication is for a 1 to 1 connection between the computer and the controller. To establish a
communication link with multiple instruments, use the Serial communication (RS-422A [for FZ400/FZ900
only] or RS-485).
TIPS
W-BV-05-1500
USB port
Loader port (front)
COM-KG-4N
FZ110
USB
USB cable
Loader comm.

3-6
IMT01D11-E7
3.3 Connections for Serial Communication
We will show you an example of setting up the Serial communication using our instrument with the USB loader
communication connector, together with our USB communication converter and the PC.
■ Basic System Configuration
When the serial communication interface is RS-232C:
1
Communication cable, commercial USB/Serial communication converter, and D-sub 9-pin connector must be provided by the customer.
2
Refer to the relevant document for the terminal screw size, recommended tightening torque, and recommended crimp terminals.
When the serial communication interface is RS-422A:
You can use our communication converter (COM-KG and COM-K2) as a USB/Serial communication converter.
1
The Communication cable must be provided by the customer.
2
Refer to the relevant document for the terminal screw size, recommended tightening torque,
and recommended crimp terminals.
Wiring example of when a commercial USB/Serial communication converter is used:
RS-422A
W-BV-02-3000 *
USB cable
3.3 Connections for Serial Communication
TIPS
* W-BV-02-3000 cable (RKC product)
Remove the plastic part before use.
Refer to the Instruction Manual of the relevant model for the details of Serial communication of the
supported models.
*R: Termination resistor (Example: 120 Ω 1/2W)
If communication errors occur frequently due to
the operation environment or the communication
distance, connect termination resistors.
The termination resistor must be provided by the
customer.
To USB port
USB communication
converter
(RKC product)
USB cable
PC
1
2
3
4
5
SG
T (A)
T (B)
R (A)
R (B)
Controller with
serial communication
(RS-422A)
R (A)
R (B)
SG
T (A)
T (B)
Supplied with Serial
communication connector
Pair cable
RS-422A
Twisted pair cable
1
(with shield)
Connected to RS-422A serial
communication terminal
2
Controller with
serial communication
(RS-422A)
R (A)
R (B)
SG
T (A)
T (B)
*R
[Max. connection: 31]
USB
To USB port
USB/Serial communication
converter
(commercially available)
1
Controller with
serial communication
(RS-232C)
USB cable
1
Twisted pair cable
1
(with shield)
PC
Connected to RS-232C serial
communication terminal
2
SG
SD
RD
Short
D-SUB
9-pin connector
1
Pair cable
RS-232C
[Max. connection: 1]
RI (Not used)
CTS (Not used)
RTS (Not used)
DSR (Not used)
GND
DTR (Not used)
TXD
RXD
DCD (Not used)
USB
Controller
(RKC product)
DL-U422T
Blue
Black
Red
Orange
White
Blue
Black
Red
Orange
White
Shield
Twisted pair cable
(with shield)
RS-422A
Controller
(RKC product)
DL-U422T
USB cable
Pair cable

3-7
IMT01D11-E7
When the serial communication interface is RS-485:
You can use our communication converter (COM-KG and COM-K2) as a USB/Serial communication converter.
1
The RS-485 communication cable must be provided by the customer.
2
Refer to the relevant document for the terminal screw size, recommended tightening torque,
and recommended crimp terminals.
Wiring example of when a commercial USB/Serial communication converter is used:
Blue
Black
Red
RS-485
3.3 Connections for Serial Communication
TIPS
*R: Termination resistor (Example: 120 Ω 1/2W)
If communication errors occur frequently due to the
operation environment or the communication distance,
connect termination resistors.
The termination resistor must be provided by the
customer.
To USB port
USB communication
converter
(RKC product)
USB cable
PC
Supplied with Serial
communication connector
Pai
r
cable
RS-485
Twisted pair cable
1
(with shield)
Connected to RS-485
communication terminal
2
*R
[Max. connection: 31]
Controller with serial
communication
(RS-485)
T/R (A)
T/R (B)
SG
Controller with serial
communication
(RS-485)
T/R (A)
T/R (B)
SG
USB
1
2
3
4
5
SG
T/R (A)
T/R (B)
Not used
Not used
Not used
Not used
W-BV-02-3000 *
USB cable
DL-U485
* W-BV-02-3000 cable (RKC product)
Remove the plastic part before use.
Blue
Black
Red
Shield
Not used
Not used
Controller
(RKC product)
Twisted pair cable
(with shield)
Paired
cable
RS-485
DL-U485
USB cable
Not used
Not used
Controller
(RKC product)

3-8
IMT01D11-E7
■ Connection Example
List of devices and cables used in the example
RS-232C connection
(P. 3-8)
RS-422A connection
(P. 3-9)
RS-485 connection
(P. 3-11)
Instruments
with Serial
communication
SR Mini HG System
FB series *
1
(FB400/900 only)
SR Mini HG System
FZ series *
2
(FZ400/900 only)
※2 The configuration of the RS-422A serial
communication terminal of the PZ series
is the same as the FZ series.
SRZ System
(Z-TIO connected)
FZ series *
3
※3 The configuration of the RS-485 serial
communication terminal of the PZ series
is the same as the FZ series.
USB/Serial
communication
converter
DL-U232A (commercially
available)
[Data Link KK]
COM-KG-NN
(RKC product)
USB cable (Cable length: 1 m) [Supplied as standard]
Communication
cable
W-BF-28-3000 (RKC product)
*1 The FB series need D-SUB 9-pin connector
and RS-232C cable (shielded twist pair cable).
W-BV-02-3000 (RKC product)
PC OS: Windows10 (64 bits) USB port required (USB Ver.2.0)
● Connecting over RS-232C: ① SR Mini HG System
* Communication cable for RS-232C, USB/Serial communication converter, and D-sub 9-pin connector must be provided by the customer.
Connector:
When connecting this cable to the
COM-KG, use it as it is for RS-422
A
and disconnect R(A) and R(B) fo
r
RS-485.
Serial communication
connector (supplied)
3.3 Connections for Serial Communication
USB port
DL-U232A *
D-SUB
9-pin connector
*
USB cable *
RS-232C
W-BF-28-3000 (RKC product)
Modular connector
COM.PORT3
Control unit
USB

3-9
IMT01D11-E7
● Connecting over RS-232C: ② FB series (FB400/900 only)
1
Refer to the relevant document for the terminal screw size, recommended tightening torque, and recommended crimp terminals.
2
Communication cable for RS-232C, USB/Serial communication converter, and D-sub 9-pin connector must be provided by the customer.
● Connecting over RS-422A: ① SR Mini HG System
[RS-422A]
Pin No. Signal Symbol
5 Receive R (B)
4 Receive R (A)
3 Send T (B)
2 Send T (A)
1 Signal Ground SG
3.3 Connections for Serial Communication
Func.
DL-U232A
2
D-SUB
9-pin connector
2
Paired cable
Twisted pair cable
2
(with shield)
FB series
FB400/900 Serial comm.
1
RS-232C
Not used
Not used
Not used
Not used
Not used
USB
USB cable
RS-232C
Serial communication terminal
(rear side)
USB port
Not used
FB400
Short
5
4
3
2
1
USB port
Control unit
Modular connector COM.PORT1
RS-422A
W-BV-02-3000 *
(RKC product)
USB cable
USB
Serial communication connector
(Supplied)
COM-KG-NN
Max. 16 units
Blue
Black
Red
Orange
White
Shield

3-10
IMT01D11-E7
● Connecting over RS-422A: ② FZ series (FZ400/900 only)
1
The Communication cable for RS-422A must be provided by the customer.
2
Refer to the relevant instruction manual for the terminal screw size, recommended tightening torque, and
recommended crimp terminals.
3.3 Connections for Serial Communication
USB port
USB cable
USB
COM-KG-NN
Serial communication connector
(supplied)
FZ400 FZ400 FZ400
RS-422A
RS-422A
Serial communication terminal
(rear side)
RS-422A
FZ400/900 Serial comm.
2
、
3
*R: Termination resistor (Example: 120 Ω 1/2W)
If communication errors occur frequently due
to the operation environment or the
communication distance, connect termination
resistors.
The termination resistor must be provided by
the customer.
[Max. connection: 31]
R (A)
R (B)
SG
T (A)
T (B)
Pair cable
Twisted pair cable
1
(with shield)
5
4
3
2
1
FZ series
R (A)
R (B)
SG
T (A)
T (B)
*R
Func.
/