Page is loading ...

OWNER’S MANUAL
Mobile Audio System
• PLL Synthesizer Stereo Radio
• Digital Compact Disc Player
• Cassette Player
• Automatically Memory Storing
•Preset Equalization
• Auxiliary Input Function
• Remote Control
• Undetachable Panel
PLCDCS 200

2
Installation .....................................................................................................3
Wiring Connection ........................................................................................4
4 x 50W System......................................................................................................4
Operation .......................................................................................................5
General Operation ..................................................................................................6
Radio Operation......................................................................................................7
Cassette Operation.................................................................................................7
CDP Operation........................................................................................................8
Remote Control.......................................................................................................8
Specifications................................................................................................9
Trouble Shooting.........................................................................................10
Maintenance................................................................................................11
Caution.........................................................................................................12
Ignition and Interference Noise .................................................................12
CONTENTS

3
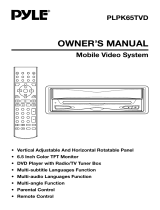
INSTALLATION
Method A
Method B
SUB PANEL
FLANGE NUT
2#BRACKET
MOUNTING
SCREW
DASH PANEL
MOUNTING
SCREW
QUICKIE BOLT
SUB PANEL
FLANGE NUT
QUICKIE BOLT
REAR BUSHING
FACTORY
BRACKET
MOUNTING
SCREW
DASH PANEL
QUICKIE BOLT
STANDARD MOUNTING CONFIGURATION
2#BRACKET
1#BRACKET
“JA” MOUNTING CONFIGURATION
2#BRACKET
2#BRACKET
“JZ” MOUNTING CONFIGURATION
3#BRACKET
2#BRACKET

4
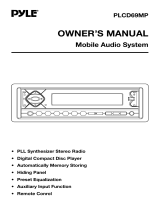
For 4 x 50W System
WIRING CONNECTION
GREEN
GREEN/BLACK
GREY
GREY/BLACK
VIOLET
VIOLET/BLACK
MAIN UNIT
WHITE
WHITE/BLACK
FRONT Lch
SPEAKER
REAR Lch
SPEAKER
FRONT Rch
SPEAKER
REAR Rch
SPEAKER
Rch RED
Lch WHITE
(GREY)
RCA CABLE
Rch RED
Lch WHITE
(BLACK)
TV AUDIO IN
ANTENNA SOCKET
RED
BLUE
POWER
ANTENNA
GROUND (B–)
MEMORY
BACK-UP
IGNITION
SWITCH (B+)
FUSE
BLACK
YELLOW

5
OPERATION
5
28 252624
4
18
27
23
22212019
11
1413 1716
912 10 7 1 6 21538

6
GENERAL OPERATION
Note: In this product design, there has
different sound accompanying with every
button pressed and the sound is
designed differently according to the
customers.
• ON/OFF
Switch on the unit by pressing POWER
button (9). When system is on, press
POWER button (9) again to turn off the
unit.
• OPEN THE FRONT PANEL
Press OPEN button (7) to fold down
the front panel.
• SOUND ADJUSTMENT
Press PUSH SELECT button (10) to
select audio mode shown in the below
sequence.
By rotating the knob (10) clockwise or
counter-clockwise, it is possible to
adjust the desired sound quality.
If adjustment has not been done in
BAS/TRE/BAL/FAD mode, it is
returned to the volume select mode
(initial) 5 seconds later.
Note: Only in fader version, fader is
effective.
• LOUDNESS
Press the LOUD button (3) to loudness
function and display will show
“LOUD”. Press it again to release this
function.
• DISPLAY
Press the DSP button (15) can switch
between frequency or play time display
and clock display.
To set clock, hold down DSP button
(15) until the clock is shown on display
then press TUNE/TRACK/SKIP
button (17) to change hours or
TUNE/TRACK/SKIP button (16) to
change minutes.
• SELECT MODE
Press the MODE button (6) to choose
desired listening mode. (e.g. radio,
CDP, CDC, tape, TV or AUX mode)
• MUTE
Press the MUTE button (2) to silence
the receiver. Press it again to release
the mode.
• LIQUID CRYSTAL DISPLAY
Exhibit current frequency and activated
functions on the display (27).
• EQUALIZATION
Press EQ button (12) to select SOUND
EFFECT as shown in below sequence:
Press EQ button (12) over 1 second,
graphic display type will display on the
LCD and then press
TUNE/TRACK/SKIP button (16) or
TUNE/TRACK/SKIP button (17) to
select graphic display type as follows:
• REMOTE SENSOR
Point the remote control handset to
the remote sensor IR (23).
Press the function keys on the handset
to control the system.
• AUXILIARY INPUT
The unit can be connected to a
portable audio player through the AUX
IN jack (11).
• RESET
RESET button (28) must be activated
with either a ball point pen or thin metal
object. The RESET button (28) is to
be activated for the following reasons:
- Initial installation of the unit when all
wiring is completed.
- All the function buttons do not
operate.
- Error symbol on the display.
OPERATION
VOLUME BASS TREBLE BALANCE FADER
(For Fader Version Only)
NORMAL CLAS POP JAZZ
DNCO1 DNCO2 DNCO3 DNCO4 DNCO5

7
RADIO OPERATION
• BAND SELECTION
At radio mode, press BAND button
(13) to select the desired band.
The reception band will change in the
following order:
• STATION SELECTION
- Manual Tune Up/Down
Repeatedly press the
TUNE/TRACK/SKIP button (16)
or TUNE/TRACK/SKIP button (17)
for manual tuning frequency
downward or upward.
- Seek Tune Up/Down
Press and hold the
TUNE/TRACK/SKIP button (16)
or TUNE/TRACK/SKIP button (17)
for several seconds for auto tuning
frequency downward or upward.
• LOCAL/DISTANT
Press LOC button (1) shortly to select
between local and distant stations.
Local setting for reception of strong
station, and a distant setting for
reception of weaker stations. In local
mode, “LOC” will display.
• MONO/STEREO
At FM radio mode, press MO/ST
button (8) to set the reception between
mono mode and stereo mode. In stereo
mode, when stereo broadcasting
station is received, the “ ” indicator
will appear upon the display.
• AUTOMATIC MEMORY STORING &
PRESET SCAN
- Automatic Memory Storing
Press AS/PS button (14) over 1
second in radio mode, Auto Store is
started. Stations are searched
automatically from next frequency
and detected station is stored into
the preset memory. In case of LOC
state, the first Auto Store is done by
LOC state and if 6 CH is not fully
memorized, the seconds Auto Store
search continued by Distant state.
At the end of Auto Store operation,
mode is change to Preset Scan.
-Preset Scan
Press AS/PS button (14) shortly in
radio mode, Preset Scan is started.
This operation starts from next
preset number and finished at the
same preset number of which last
channel memory stored.
Frequency of preset memory is
displayed with blinking for 5
seconds. Press AS/PS button (14)
again to release this function.
•STATION STORING
Press and release any one of the
preset buttons (18) (1 - 6) shortly,
(1 - 6) preset memory is called (Preset
Call). Press the button for several
secnds, current frequency is stored
into preset memory and preset number
(1 - 6) is displayed (Preset Store).
CASSETTE OPERATION
• PROGRAM BUTTON
These two buttons (25) perform the
dual functions of changing the
direction of tape playback and fast
forward/rewind of the tape.
- Change Tape Playback Direction
Press both buttons together to play
the other side of a tape.
- Fast Forward/Rewind
Press the button with the double
arrows pointing the same direction
as the direction indicator in the LCD
to fast forward; press other button in
the opposite direction to fast rewind.
• EJECT
Push the eject button (24) down to
eject the cassette tape.
• CASSETTE COMPARTMENT
Insert a cassette tape into the cassette
compartment (26). The cassette
mechanism will load it in play mode.
OPERATION
FM1 FM2 FM3 AM1 AM2

8
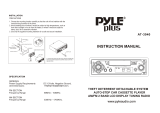
OPERATION
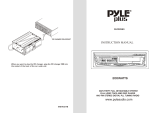
FUNCTION KEYS & CONTROL
1. PWR = Power Button
2. MUT = Mute Button
3. SEL = Select Button
4. VOL = Volume Up Button
5. VOL = Volume Down Button
6. BND = Band Select Button
7. MOD = Mode Button
8. TUNE/SEEK = Tune/Seek Down Button
9. TUNE/SEEK = Tune/Seek Up Button
10.EQ =Preset Equalization Button
11.PRESET = Preset Buttons
12.PAU = Pause Button
13.SCN = Scanning Button
14.RPT = Repeat Button
15.RND = Random Button
REMOTE CONTROL HANDSET
6
9
1
2
8
4 3
11
10
14
7
5
12
13
15
CDP OPERATION
• SELECT TRACKS
Press TUNE/TRACK/SKIP button
(16) or TUNE/TRACK/SKIP button
(17) to
move to the previous track or the
following track. Track number shows on
display.
Hold TUNE/TRACK/SKIP button
(16) or TUNE/TRACK/SKIP button
(17) to fast reverse or fast forward. CD
play
starts from when you release the
button.
•PAUSE PLAYING
Press PAU button (19) to pause CD
player. Press it again to resume play.
• REPEAT THE SAME TRACK
Press RPT button (21) to continuously
repeat the
same track. Press it again to
stop repeat.
• PREVIEW ALL TRACKS
Press SCN button (20) to play first
several seconds of each track on the
current disc.
Press it again to stop intro and listen
to track.
• PLAY ALL TRACKS
Press RND button (22) to play all
tracks on CD in random order. Press
it again to cancel the function.
• EJECT
When the front panel is folded down,
press eject button (4) to stop CD playing
and eject the disc from the disc slot (5).

9
GENERAL
Power Supply Requirements : DC 12 Volts, Negative Ground
Chassis Dimensions : 200 mm (W) x 138 mm (D) x 75 mm (H)
Loading Impedance : 4 - 8 Ω per channel
Maximum Output Power : 4 x 50 Watts
Current Drain : 10 Ampere (max.)
CD PLAYER
Signal to Noise Ratio : More than 55 dB
Channel Separation : More than 50 dB
Frequency Response : 20 Hz - 20 KHz
CASSETTE PLAYER
Tape Speed : 4.76 cm/sec
Fast Forward Time : 180 seconds (C-60 type)
Frequency Response : 50 to 8,000 Hz
Channel Separation : > 35 dB
Crosstalk : > 40 dB
Wow and Flutter : ≤ 0.35% WRMS
RADIO
FM
Frequency Coverage : 87.5 to 107.9 MHz
I.F. : 10.7 MHz
Sensitivity (S/N = 30 dB) : 3 µV
Image Rejection : > 45 dB
Stereo Separation : > 30 dB
AM
Frequency Coverage : 530 to 1710 KHz
I.F. : 10.71 MHz
Sensitivity (S/N = 20 dB) : 32 dBu
SPECIFICATIONS

10
Before going through the check list, check wiring connection. If any of the problems
persist after check list has been made, consult your nearest service dealer.
Symptom Cause Solution
No power. The car ignition switch is If the power supply is properly
not on. connected to the car accessory
circuits, but the engine is not moving,
switch the ignition key to “ACC”.
The fuse is blown. Replace the fuse.
Disc cannot Presence of CD disc inside Remove the disc in the player, then
be loaded or the player. put a new one.
ejected.
Inserting the disc in Insert the compact disc with the
reverse direction. label facing upward.
Compact disc is extremely Clean the disc or try to play a new
dirty or defective disc. one.
Temperature inside the car Cool off or until the ambient
is too high. temperature return to normal.
Condensation. Leave the player off for an hour or
so, then try again.
Cassette tape Presence of a cassette Remove the cassette tape in the
cannot be tape in the player. player, then put in the new one.
loaded or
ejected. The temperature in the car Cool off the inside of the car, then try
is too high. again.
Condensation. Leave the cassette player off for an
hour or so, then try again.
No sound. Volume is in minimum. Adjust volume to a desired level.
Wiring is not properly connected.
Check wiring connection.
Sound skips The installation angle is Adjust the installation angle to less
or sound more than 30 degrees. than 30 degrees.
quality is poor.
The disc is extremely dirty Clean the compact disc, then try to
or defective disc. play a new one.
The cassette is defective. Try another cassette.
The operation The built-in microcomputer Press the RESET button.
keys do not is not operating properly Front panel is not properly fixed into
work. due to noise. its place.
The radio does The antenna cable is not Insert the antenna cable firmly.
not work. The connected.
radio station
automatic The signals are too weak. Select a station manually.
selection does
not work.
TROUBLE SHOOTING

11
MAINTENANCE
For System
The following suggestions help you care
for the product so that you can enjoy it
for years.
1. Keep the product dry. If it does get
wet, wipe it dry immediately.
Liquids might contain minerals that
can corrode the electronic circuits.
2. Keep the product away from dust and
dirt, which can cause premature wear
of parts.
3. Handle the product gently and
carefully. Dropping it can damage
circuit boards and cases, and can
cause the product to work improperly.
4. Wipe the product with a dampened
cloth occasionally to keep it looking
new. Do not use harsh chemicals,
cleaning solvents, or strong
detergents to clean the product.
5. Use and store the product only in
normal temperature environments.
High temperature can shorten the life
of electronic devices, damage
batteries, and distort or melt plastic
parts.
For Tape Player
Periodic cleaning of the tape head and
capstan shaft will ensure good
reproduction of music and trouble-free
operation. Cleaning of the tape head
should be done every 20 to 30 hours of
operation or when the high tones have
become less clear.
1. Use a cassette cleaning cartridge if
available. If one is not available, use
a cotton swab soaked in isopropyl
(rubbing) alcohol.
2. While holding the tape door open,
locate tape head to the right of the
opening and in the centre of the unit.
3. Clean the tape head with the cotton
swab.
4. Clean the capstans and the pinch
rollers with the cotton swab.
5. Allow the tape head, capstans and
pinch rollers to dry before operating.
6. Do not touch the tape with your
fingers; if it becomes lose, wind it
back by twisting a six-sided pencil in
the cassette reel.

CAUTION
1. This unit is designed to operate on
12-volts DC, negative ground
electrical system only. Do not attempt
to install this unit in a vehicle having a
positive ground system.
2. You should not touch the
high-polished playback head with any
metallic or magnetic tools.
3. Your unit has built-in filtering to
eliminate most of the noise that might
come through the power source.
However, with some vehicles,
particularly older models, some
clicking or other unwanted noise
might be present.
IGNITION AND INTERFERENCE NOISE
Interference
Radio reception in a moving environment
(automobile) is very different from
reception in a stationary (home). It is
very important to understand the
difference.
AM reception will deteriorate when
passing through a tunnel or when
passing under high voltage lines. Also,
noise can be picked up from passing
automobiles. Although AM is subject to
environmental noise, it has the ability to
be received at great distance.
This is due to the fact that broadcasting
signals follow the curvature of the earth
and are reflected back by the upper
atmosphere.
FM reception is just the opposite of AM.
It is not subject to environmental noise
and it does not have the ability to be
received at great distances (usually 30
miles). Also, the FM signal can be
blocked by tall buildings, mountains, or
hills.
To reduce the possibility of these
problems, ALWAYS FINE TUNE a station,
and if possible, set the antenna height to
30 inches.
Ignition
The most common source of noise in
reception is the ignition system. This is
normally due to the fact that radio is
placed relatively close to the ignition
system (engine). This type of noise can
be easily detected because it will vary in
intensity of pitch with the speed of the
engine.
Usually, the ignition noise can be
suppressed considerably by using a
radio suppression type high voltage
ignition wire and suppressor resistor in
the ignition system. (Most vehicles
employ this wire and resistor but it may
be necessary to check them for correct
operation.) Another method of
suppression is the use of additional noise
suppressors. These can be obtained
from most CB/Amateur radio or
electronic supply shops.
www.pyleaudio.com
88-C1480-02
/