Page is loading ...

ROCKWELL
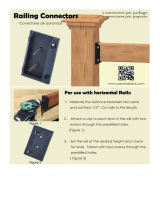
Choose between four door styles with this Door Kit. Our versatile Rockwell
Door Kit is very easy to assemble. All materials and hardware needed to
assemble any of the four styles are included.
Two Panel
Door
Half X
Door
Z Combination
Door
Double X
Door
4-IN-1 DOOR

If any of the slats have been damaged during shipping,
call us at 800-891-8312 and we will expedite replacement
slat(s) or parts as needed. Lay out your Door slats and
parts according to the illustration shown below to
accurately identify which part needs to be replaced, if any.
PLEASE NOTE: ese instructions are specic to a
particular door size and type. Adjustments may be
needed on your part for changes in specications and
measurements, as well as door types that are dierent
from these.
Page 2
We recommend a dry assembly. It is recommended you
not use glue or adhesive of any kind while assembling
your Door.
PLEASE READ these important notifications before proceeding.
If you are having problems installing your Door,
please call Rustica at 1.800.891.8312 and our friendly
representatives will be happy to assist you.

Parts Included
* Quantities will vary depending on Door size. All quantities in this table are for an average-size single Door order.
Two Panel Door
B2
B2
C1
B2
B2 B2 B3
A2
A1
L
A3
B1 B2
D1
D1
D1
D1
A4
A1
R
C2
C2 C2
C2
C2 C2
C3
Description Qty Description Qty
A1 L Side Rail Left 1 C1 C3 Top End Slats 1 each
A1 R Side Rail Right 1 C2 Top Center Slats 6 each*
A2 Bottom Rail 1 B1 B3 Bottom End Slats 1 each
A3 Middle Rail 1 B2 Bottom Center Slats 6 each*
A4 Top Rail 1 D1 6” Timberlocks 6*
E Industrial Hangers 2 F Falcon Door Pull 1
D1
D1
Tools
Needed
Ratchet with socket Drill with Phillips bit
E
F
side
view
front
view
Page 3

B2
B2
C1
B2 B2 B2
B3
A2
A1
L
A3
B1
B2
D1
D1
D1
D1
A4
A1
R
C2
C2 C2
C2
C2
C2
C3
1.
Slide all B slats to the right into A1 R. Next, slide A2, Bot-
tom Rail, up to A1 R and the B Slats. Attach with the bot-
tom, right-hand Timberlock (D1) by hand, then by using
a ratchet. Have someone help keep the door, slats and rails
in place as you attach the Timberlocks. Keep your Timber-
locks straight as they go in to keep your door square.
Assembling Your Door
D1
D1
Page 4
Two Panel Door

Two Panel Door
2.
Slide Center Rail A3 down on top of the B Slats and
into Slat A1 R. If necessary, have someone help keep the
door square as you attach with the Timberlocks. Have all
Timberlocks go in straight, using your hands rst, then
a ratchet.
Slide all C Slats down and to the right into
Center Rail A3 and Side Slat A1 R.
en slide top rail A4 down over
the tops of the C Slats.
3.
Slide Side Slat A1 L over to cover the left edge of
your Door. Insert the Timberlocks by hand, then use
a ratchet to fully tighten. If necessary, have someone
help you hold all slats and rails in place while you are
positioning and fastening A1 L.
4.
B2 B2
C1
B2B2 B2B3
A1
L
A3
B1 B2
D1
D1
D1
D1
A4
A1
R
C2
C2
C2
C2
C2
C2
C3
A2
B2 B2
C1
B2B2 B2B3
A1
L
A3
B1
B2
D1
D1
D1
A4
A1
R
C2
C2 C2
C2
C2 C2
C3
A2
D1
D1
D1
D1
5.
Attach Slat A1 L to the door using the 6” Timber-
locks. Insert by hand, then use a ratchet to tighten.
A1
L
Page 5

Page 6
4.
Slide all C Slats into A1 R and A3 grooves. Once
all of the slats have been positioned, place the A4
Top Rail onto the C slats and in the A1 R grooves.
Fasten A4 into place with a Timberlock, rst with
your hand, then tighten with a ratchet. Be sure
the Timberlock is going straight in and not at an
angle.
Slide Side Slat A1 L into place, attaching with 6”
Timberlocks, tightening by hand. Once you have de-
termined all are in place straight, tighten Timberlocks
with a ratchet.
5.
When the Door is
assembled, place A5,
A6 and A7 (Diagonal
Rails) onto the door
so the predrilled holes
are facing up and so
they form an X that
runs from corner to
corner. Attach using
the 1-1/4” Grabber
Screws and a drill with
a Phillips bit.
Attach the Door Pull
and your Door is
ready to hang.
6.
A1
L
C1
A1
L
C2
C2
C2 C2
C2
C2
C3
A3
A4
Half X Door
Z Combination Door

Page 7
Half X Door
5.
6.
Attach the Door
Pull and your
Door is ready to
hang.
E1
A5
A6
When the Door is assembled, place A5 Rails (Diagonal
Rails) onto the door so the predrilled holes are facing
up and so they run the same way, from corner to cor-
ner. Attach using the 1-1/4” Grabber Screws
and a drill with a Phillips bit.
7.
4.
Slide Top Rail A4 into place, to cover the tops of the C
Slats. Install top Timberlock.
Slide Side Slat A1 L into place, attaching with all three Tim-
berlocks, tightening by hand. Once again, have someone help
you keep all of the Slats straight. Once you have determined all
are in place, tighten Timberlocks with a ratchet.
A4
A1
L
Z Combination Door

Page 8
4.
Slide all C Slats into A1 R and A3 grooves. Once
all of the slats have been positioned, place the A4
Top Rail onto the C slats and in the A1 R grooves.
Fasten A4 into place with a Timberlock, rst with
your hand, then tighten with a ratchet. Be sure
the Timberlock is going straight in and not at an
angle. Fasten by hand, then with a ratchet.
Slide Side Slat A1 L into place, attaching with 6”
Timberlocks, tightening by hand. Once you have
determined all are in place straight, tighten
Timberlocks with a ratchet.
5.
When the Door is
assembled, place
A5, A6 and A7 (Top
Diagonal Rails)
onto the door so
the predrilled holes
are facing up and so
they form an X that
runs from corner to
corner. Attach using
the 1-1/4” Grabber
Screws and a drill
with a Phillips bit.
Repeat for B5, B6,
and B7 (Lower
Diagonal Rails).
Attach the Door Pull
and your Door is
ready to hang.
6.
A1
L
C1
C2 C2
A4
A1
L
B6
B5
B7
A6
A5
A7
A5
A6
B6
B5
B7
A7
Double X Door

e location where you attach your Door Pull is up
to you. We suggest you don’t attach your Door Pull
too close to the edge of your Door or a seam, as this
would weaken the integrity of your Door. Typically
we recommend that the center of your Door Pull be
lined up 3’ from the bottom of the door.”
Installing the Falcon Door Pull
Installing the Industrial Hangers
Hanger Assembly Track Adjustable Spacers
Lag Screws Hex Bolts Acorn Nuts Anti-jump Brackets
1” Washers Grabber Screws
Door Guide
Instructions
Parts Included
Hard Stops or Lag Soft Stops
Page 9

Installing the Industrial Hangers
2
"
• Lay your Door
facing UP on saw horses.
• Pencil a line 2” parallel
from the Door edge (this
marks the proper location
for the Hanger edge).
• Using your Hanger as a guide, line
up your Hanger with the line you just made.
• Holding your Hanger in place, measure a
2-3/8
”
gap between the top of the Door and the
bottom of the Wheel (see below).
• Mark the center of both Hanger holes (these indicate
where you should drill to attach your Hanger to your Door).
• Repeat Step 1 on the opposite Door edge.
1. Measuring and Marking Your Hanger Holes
• Using a drill with a 1/8”
bit, drill a pilot hole all
the way through the Door
where you have marked.
(one pilot hole for each
hole in the Hanger).
• Repeat Step 2 on the opposite
edge of the Door.
Door Edge
Door Front
Door Top
• Lay the Door facing DOWN on the saw horses.
• Using a drill with a 1-1/8” spade bit or Forstner bit
(a Forstner bit is preferred), drill a 7/16” deep hole,
centering your 1-1/8” spade or Forstner bit directly
over the 1/8” pilot hole.
• Repeat Step 3 on the opposite edge of the Door.
2. Drilling Pilot Holes
3. Drilling Countersink Holes 4. Drilling Lag Screw Holes
• Lay the Door facing UPWARDS on the saw horses.
• Using a drill with a 3/8” drill bit, drill all the way
through the Door, through your pilot holes (Step 2).
• Repeat Step 4 on the opposite edge of the Door.
1/8”
1-1/8”
3/8”
Door Edge
Door Front
Door Top
Door Edge
Door Back
Door Top
Door Front
Door Top
Door Edge
Door Top
2-3/8”
1/8”
Page 10

Installing the Industrial Hangers
1. Installing Your Hanger Assembly To Your Door 2. Tightening Your Hanger Assembly
5/8”
• read the Hex Bolts with the
Washers through the back of
the Door.
• Thread the Hanger assembly
through the Hex Bolts on the
front of the Door.
• Holding Hex Bolts in place
using a ratchet with a 5/8”
socket, lightly tighten your
Acorn Nuts by hand.
Hex Bolt
1” Washer
Acorn Nut
• Using a 9/16” wrench for the
Acorn Nut and a ratchet with a
5/8” socket and for the Hex Bolt,
gently tighten, being careful not
to damage your Hanger or Acorn
Nuts.
• Repeat Steps 1 and 2 on the
opposite edge of the Door.
5/8”
9/16”
Measuring for Track Position
}
• Check to see if your floor is level. If your floor rises more than 1/2”
along the length of the Track, you risk your Door rubbing or
sticking at this high point.
• If your floor is not level, measure up from the highest point of your
floor to find your Track hole center position to attach the Track to
your wall.
• To determine where to install your Track, add together 1-5/8”
(space above door) plus 1/2” (oor gap) to the height of
your Door. This measurement is how high up on your wall (from
your floor up) you should install the Track.
• This is where you will mark a horizontal line on your wall parallel
to the finished floor, the same length of your Track.
1. Measuring for Track Position
}
Door Height
1/2”
1-5/8”
1-5/8”
Door Height
1/2”
+
+
=
This 1-5/8” measurement
ensures coverage of your door-
way and makes it so your Track
assembly will not be visible from
the other side of your Door.
# of inches up from nished oor where you will
pencil a horizontal line for your Track. This line will
mark the center of the Track and your penciled
line will be visible trough the Track holes.
Page 11

1. Marking and Drilling Track Holes
• Hold up your Track so that
the marked line from the
previous step is visible
through the Track holes.
• Mark an intersecting line in
the center point of each of
the Track holes.
• Set the Track down.
• Using a drill with 1/4” drill
bit, drill out your marked
Track holes.*
*Be sure you are drilling into
wall studs. If your track holes
are not lining up with your
studs, you will need to install
your Track onto a header. The
header needs be attached to
your wall through the studs.
This will provide the stability
your wall needs to hold the
weight of your Door.
1/4”
2. Hanging Your Track
• e end holes will be
installed with a either a Hard
Stop or a Lag Soft Stop.
• In this order: Adjustable Spacer,
Flat Track, [Hard or Lag Soft]
Stop, 1” Washer, and Lag Screw.
Using a ratchet with a 9/16”
socket, tighten the Lag Screw
most of the way, enough to hold
the Track in place, but allowing
the Track to move.
• Swing the Track up to be
horizontal, and repeat the same
step on the opposite end of the
Track.
• e hardware for the middle holes will
be installed in this order: Adjustable
Spacer, Flat Track, 1” Washer, and Lag
Screw. Using a ratchet with a 9/16” socket,
tighten the Lag Screw most of the way.
• Repeat on all remaining middle Track
holes.
• After all Lag Screws are in, fully tighten
all using your ratchet with socket, being
careful not to over-tighten to avoid
stripping the wall studs.
9/16”
Hard Stop or Lag Soft Stop
• Loosely attach one end of the Track
using a Spacer and a Hard Stop or a
Lag Soft Stop (see below).
• Swing the Track up and loosely
attach the other end, using a Spacer
and a Hard Stop or a Lag Soft
Stop (see below).
• e center holes can now be loosely
attached (see below).
9/16”
3. Hole Installation
Installing the Track
Page 12

2. Door Guide Part 1 3. Door Guide Part 2
• Use your level to plumb* your Door.
• With the Door in the closed
position, place the Door Guide half
way into the Door mortise (the
groove that runs along the bottom
of a wood Door).
• Double check that your Door is
plumb.*
• Hold the Door Guide firmly in
position. Using a drill with a Phillips
bit, install a 1” Grabber Screw to
secure your Door Guide to the floor.
_____________________
*Plumb - perfectly vertical.
• Slide the Door into the
open position exposing
the other edge of the
Door Guide.
• Using a drill with a Phillips
bit, install a second 1”
Grabber Screw.
1. Installing Your Door
4. Aligning Anti-jump Bracket
• Lift your Door up to your
Track at a slight angle.
• Carefully rest both Wheel
grooves onto the top of the
track.
• Guide the Door to the
resting position.
• Place your Anti-jump Bracket
against the outside edge of
your Door.
• Slide the Bracket up until
there is a 1/16” to 1/8” space
between the top of the
Anti-jump Bracket and the
bottom of the Track.
5. Installing Anti-jump Bracket
• Holding the Anti-jump
Bracket rmly in place, drill
Grabber Screws into each
of the two holes in the
Bracket until screw heads are
ush with your Bracket.
Installing this Bracket will
ensure your Door will not
come o its Track.
Installing the Door Guide and Anti-Jump Bracket
Page 13
/