Page is loading ...

www.altronics.com.au
Manufactured in China for Altronic Distributors Pty Ltd
A1100
2 x 15W Bluetooth Amplifier
& Music Player Wallplate
Operating Instructions
General comments
RPT: Repeat function for track playback in SD Card or USB modes. RPT ALL
will play every track on a continuous loop; RPT ONE will play a single track on
a loop.
SLEEP: Press and hold this button on the front panel to place the unit into
standby power. To revive the operation of the wallplate, either press SLEEP
again or press the standby power button on the remote control. When the
wallplate is powered up from standby, the Bluetooth will attempt to re-establish
a pairing with the previously paired device. If the device is within range and
still has Bluetooth active, the two devices will pair automatically, and Bluetooth
mode will be available on the wallplate.
EQ: There for five EQ settings which are activated by repeatedly pressing the
EQ button. The settings cycle through in the following order: NOR (Normal),
ROC (Rock), POP, CLA (Classical), JAS (Jazz). EQ only works for SD Card and
USB modes.
TECHNICAL SPECIFICATIONS
Input Voltage: ............................................................. 110Va.c. or 230Va.c.
Operating Voltage: ................................... 12Vd.c. (Requires Power adapter)
LCD Size: .......................................................................... 34mm X 27mm
Rated power: ...................................................................................... 15W
Audio: ............................................................................ 2 Channels stereo
Audio Formats: ............................................................................ MP3 only
Output impedance: ........................................................................ 8 ohms
Frequency response: ............................................................... 20Hz-20kHz
THD: ................................................................................................ 0.03%
Infrared distance: .............................................................................. <10M
Dimensions: ................................................................... 73 x 116 x 60mm

LCD Icons and data display
Different information is displayed on the LCD for each mode of operation.
The most important detail is shown on the top lines of the LCD. This will
indicate the current mode and the playback information that is relevant to that
mode.
For example, in FM mode, the screen will display the sound volume bars,
as well as the channel number as stored in sequence in the wallplate’s
memory, and the frequency for that stored channel. This FM receiver does not
have RDS so no track information is displayed. You can press PLAY/Pause to
interrupt and restart playback of the channel audio. There is no EQ available
for FM mode.
The information displayed during track playback is very similar in USB/SD
Card modes. ‘RPT ALL’ is indicating that the playback will cycle through all the
songs it can play and return to the first song it found on the list, and keep
playing. ‘NOR’ is the default or ‘Normal’ EQ setting. The number is the
volume level, which goes from zero to 30.
S = SD Card; U = USB. ‘S > 002/017 160kbps’ shows that the wallplate
is in SD CARD mode, is playing track 2 of 17 available, and this is recorded at
a bandwidth of 160kbps. And below these two lines of information, the LCD
will display the Track name and Artist name for the current track. It also
shows the time progressing and the total track duration.
PRODUCT DESCRIPTION
A compact wallplate designed to fit a standard electrical wall box, which
features a 2 x 15W RMS (into 4 ohms) internal amplifier with Bluetooth
wireless receiver. The wallpate uses a class D design amplifier whose
efficiency is greater than 90%. It is ideal for connecting speakers in your
lounge room, kitchen or study. It can stream music directly from your
smartphone or tablet. It also features an FM tuner, auxiliary 3.5mm jack, USB
and SD card inputs for MP3 playback. It could be used in reception areas for
general background music and broadcasting audio advertising in commercial
installations, shops, hotels, offices, restaurants etc. Includes IR remote control.
Requires 12V d.c. power supply.
ADVISORY
This instruction manual is written for the A1100 2x15W Bluetooth Amplifier
and Music Player Wallplate. Please read this manual carefully and retain it for
future reference.
INSIDE THE BOX
1 x Wall plate
1 x Wall box
1 x Extension wire
1 x Manual
1 x Remote Control

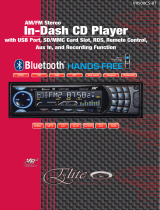
REMOTE CONTROL BUTTONS DESCRIPTION
1. Power
2. MODE (default FM Radio)
3. Mute
4. PREV/NEXT song
5. PLAY/PAUSE
6. VOL-/VOL+
(Press 3+ sec for Volume control)
7. EQ Control
8. 0-9, number pad
9. Repeat
10. USB/SD select
FRONT PANEL CONTROL BUTTONS
1. Power switch
2. LCD Screen
3. EQ Control
(press once to select Normal, Rock,
Pop, Classical, Jazz)
4. VOL- or |<< skip track previous
(Press 3+ secs for Volume control)
5. IR Receiver for remote control
6. AUX Socket
7. Play / PAUSE or FM Scan
(Press 3+ secs to activate scan)
8. Mode switch (default FM Radio) /
Sleep (press 3+ secs)
9. VOL+ or >>| Skip track next
10. SD CARD Slot
11. USB Stick slot
USB/SD
1
2
3
4
5
6
7
8
9
1
2
3
4
5
6
7
8
9
10
11
NOTE: If a user inserts either of the following source input media while
using FM or Bluetooth, USB/SD Card/AUX then the current mode will divert
automatically to the mode for playing whichever media was inserted.
However, if a device has been paired with the Bluetooth, that sync condition
will remain even though the Bluetooth playback may have been overridden
by another media being inserted into the wallplate. See below for
descriptions of screen icons.
Other Modes: AUX or LINE IN
1. Simply insert a stereo 3.5mm jack into the AUX socket on the top edge of
the wallplate to activate LINE IN mode. The words ‘LINE IN’ will appear on
the top line of the LCD. This mode will playback whatever audio is playing
on the source AUX device, which could be a phone, MP3 player, tablet or
PC playing through the headphones or line out.
2. Press MODE button to exit AUX mode and enter another available mode.
Other Modes: USB and SD CARD
1. Simply insert a USB or SD Card into the appropriate socket on the bottom
edge of the wallplate to activate either USB (U) or SD Card (S) playback
mode. The letter ‘U’ or ‘S’ will appear on the top line of the LCD, along
with other information. This mode will playback whatever audio is playing
on the source media
2. Press USB/SD button on the remote control to toggle between these two
media playback modes, when both slots have media inserted.
3. Press MODE button to exit playback and enter another available mode.
NOTE: This Wallplate is fully ‘plug n play’ enabled, meaning that if a media
or auxiliary audio source is inserted into a slot or socket, then that inserted
source will override the playback from whichever mode is currently
operating. I.E. Insert SD Card during FM Radio and SD Card mode will
replace FM mode and the MP3s stored on the card will start playing; Insert
USB during Bluetooth mode, and the USB’s MP3s will start playing; Insert a
stereo jack during SD Card mode playback, and the AUX-Line In mode will
take over and activate. See below for descriptions of screen icons.
10

completed, press the >>| or |<< buttons momentarily to skip to a
Channel (symbol on LCD ‘CH’) stored in memory.
8. In FM Mode, press and hold the >>| or |<< buttons to tune to an FM
frequency that has perhaps not been captured by the scan. This semi
manual search will stop and capture the next strongest signal on the dial,
in whichever direction you choose to tune.
NOTE: If all possible devices are connected and inserted, the MODE button
will cycle through the modes in the following order: FM > AUX (LINE IN on
LCD) > Bluetooth > USB (U) > SD Card (S) > FM. If a device or media is
missing, the MODE button will cycle passed that mode, skipping to the next
mode in the sequence, or to whatever is available. Bluetooth and FM radio
modes are always present and never skipped.
Other Modes: Bluetooth
1. In FM mode, press the MODE button on the remote control or the front
panel. This will firstly engage the Bluetooth mode.
2. Have your Bluetooth enable playback device
(MP3 player or Mobile phone or tablet) set to Bluetooth search mode.
3. When the device ‘MEDIA PLAYER’ appears in the search list, select it.
Pairing of the device with the wallplate will commence.
4. Your device will state when a successful pairing is completed. You may be
requested to enter a pin number. The number is ‘0000’.
5. As soon as the pairing is done and the devices are synced via Bluetooth,
the FM radio will cease playing and you can commence audio playback
from a playlist on your device.
6. Control of the audio playback is largely managed from the device that is
paired. You can increase or decrease audio output from the wall plate by
pressing the VOL- or VOL+ buttons on the front panel or the remote control.
7. A Bluetooth pairing can be disconnected from the source device. If you
reconnect a paired device during the playback of another mode, that mode
will switch off and Bluetooth will commence.
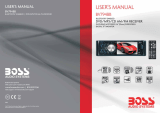
REAR TERMINAL CONTROLS
OPERATING PROCEDURE
Installation
1. Connect the speaker wires to the terminal block as per the label . The
green terminal blocks can be removed quite easily so that the user can
insert their own plugs if they have the correct ones connected to the
speaker wires.
2. Connect the power adapter bare end wires into the terminal block as per
the label .
3. Plug the adapter into the mains power outlet and switch the power on.
4. Connect any media sources into the available slots or socket: USB, SD
Card, Stereo jack for AUX.
5. Move the power switch to the ON position. The LCD will display ‘Welcome
MP3 Player’ and then the volume bars will appear. The first default mode
of operation is FM Radio. It is likely that the first audio emitted from the
speakers will be static.
6. Use either the buttons on the remote control or the front panel to increase
or decrease the volume of the audio output. If you use the front panel at
first (recommended), you will have to press and hold the VOL- or VOL+
buttons (|<< or >>|) for the volume control to begin to change.
7. Press and hold the FM button on the wallplate front panel to initiate a scan
for strong radio station signals. The unit will store in memory any radio
station frequencies which have a strong signal. Once the scan is
R+
R–
L–
L+
12V
+ –
Left and Right speaker
terminal connections as
marked.
DC12V -+: Terminals for
bare ends power adapter
connection.
Check polarity

completed, press the >>| or |<< buttons momentarily to skip to a
Channel (symbol on LCD ‘CH’) stored in memory.
8. In FM Mode, press and hold the >>| or |<< buttons to tune to an FM
frequency that has perhaps not been captured by the scan. This semi
manual search will stop and capture the next strongest signal on the dial,
in whichever direction you choose to tune.
NOTE: If all possible devices are connected and inserted, the MODE button
will cycle through the modes in the following order: FM > AUX (LINE IN on
LCD) > Bluetooth > USB (U) > SD Card (S) > FM. If a device or media is
missing, the MODE button will cycle passed that mode, skipping to the next
mode in the sequence, or to whatever is available. Bluetooth and FM radio
modes are always present and never skipped.
Other Modes: Bluetooth
1. In FM mode, press the MODE button on the remote control or the front
panel. This will firstly engage the Bluetooth mode.
2. Have your Bluetooth enable playback device
(MP3 player or Mobile phone or tablet) set to Bluetooth search mode.
3. When the device ‘MEDIA PLAYER’ appears in the search list, select it.
Pairing of the device with the wallplate will commence.
4. Your device will state when a successful pairing is completed. You may be
requested to enter a pin number. The number is ‘0000’.
5. As soon as the pairing is done and the devices are synced via Bluetooth,
the FM radio will cease playing and you can commence audio playback
from a playlist on your device.
6. Control of the audio playback is largely managed from the device that is
paired. You can increase or decrease audio output from the wall plate by
pressing the VOL- or VOL+ buttons on the front panel or the remote control.
7. A Bluetooth pairing can be disconnected from the source device. If you
reconnect a paired device during the playback of another mode, that mode
will switch off and Bluetooth will commence.
REAR TERMINAL CONTROLS
OPERATING PROCEDURE
Installation
1. Connect the speaker wires to the terminal block as per the label . The
green terminal blocks can be removed quite easily so that the user can
insert their own plugs if they have the correct ones connected to the
speaker wires.
2. Connect the power adapter bare end wires into the terminal block as per
the label .
3. Plug the adapter into the mains power outlet and switch the power on.
4. Connect any media sources into the available slots or socket: USB, SD
Card, Stereo jack for AUX.
5. Move the power switch to the ON position. The LCD will display ‘Welcome
MP3 Player’ and then the volume bars will appear. The first default mode
of operation is FM Radio. It is likely that the first audio emitted from the
speakers will be static.
6. Use either the buttons on the remote control or the front panel to increase
or decrease the volume of the audio output. If you use the front panel at
first (recommended), you will have to press and hold the VOL- or VOL+
buttons (|<< or >>|) for the volume control to begin to change.
7. Press and hold the FM button on the wallplate front panel to initiate a scan
for strong radio station signals. The unit will store in memory any radio
station frequencies which have a strong signal. Once the scan is
R+
R–
L–
L+
12V
+ –
Left and Right speaker
terminal connections as
marked.
DC12V -+: Terminals for
bare ends power adapter
connection.
Check polarity

REMOTE CONTROL BUTTONS DESCRIPTION
1. Power
2. MODE (default FM Radio)
3. Mute
4. PREV/NEXT song
5. PLAY/PAUSE
6. VOL-/VOL+
(Press 3+ sec for Volume control)
7. EQ Control
8. 0-9, number pad
9. Repeat
10. USB/SD select
FRONT PANEL CONTROL BUTTONS
1. Power switch
2. LCD Screen
3. EQ Control
(press once to select Normal, Rock,
Pop, Classical, Jazz)
4. VOL- or |<< skip track previous
(Press 3+ secs for Volume control)
5. IR Receiver for remote control
6. AUX Socket
7. Play / PAUSE or FM Scan
(Press 3+ secs to activate scan)
8. Mode switch (default FM Radio) /
Sleep (press 3+ secs)
9. VOL+ or >>| Skip track next
10. SD CARD Slot
11. USB Stick slot
USB/SD
1
2
3
4
5
6
7
8
9
1
2
3
4
5
6
7
8
9
10
11
NOTE: If a user inserts either of the following source input media while
using FM or Bluetooth, USB/SD Card/AUX then the current mode will divert
automatically to the mode for playing whichever media was inserted.
However, if a device has been paired with the Bluetooth, that sync condition
will remain even though the Bluetooth playback may have been overridden
by another media being inserted into the wallplate. See below for
descriptions of screen icons.
Other Modes: AUX or LINE IN
1. Simply insert a stereo 3.5mm jack into the AUX socket on the top edge of
the wallplate to activate LINE IN mode. The words ‘LINE IN’ will appear on
the top line of the LCD. This mode will playback whatever audio is playing
on the source AUX device, which could be a phone, MP3 player, tablet or
PC playing through the headphones or line out.
2. Press MODE button to exit AUX mode and enter another available mode.
Other Modes: USB and SD CARD
1. Simply insert a USB or SD Card into the appropriate socket on the bottom
edge of the wallplate to activate either USB (U) or SD Card (S) playback
mode. The letter ‘U’ or ‘S’ will appear on the top line of the LCD, along
with other information. This mode will playback whatever audio is playing
on the source media
2. Press USB/SD button on the remote control to toggle between these two
media playback modes, when both slots have media inserted.
3. Press MODE button to exit playback and enter another available mode.
NOTE: This Wallplate is fully ‘plug n play’ enabled, meaning that if a media
or auxiliary audio source is inserted into a slot or socket, then that inserted
source will override the playback from whichever mode is currently
operating. I.E. Insert SD Card during FM Radio and SD Card mode will
replace FM mode and the MP3s stored on the card will start playing; Insert
USB during Bluetooth mode, and the USB’s MP3s will start playing; Insert a
stereo jack during SD Card mode playback, and the AUX-Line In mode will
take over and activate. See below for descriptions of screen icons.
10

LCD Icons and data display
Different information is displayed on the LCD for each mode of operation.
The most important detail is shown on the top lines of the LCD. This will
indicate the current mode and the playback information that is relevant to that
mode.
For example, in FM mode, the screen will display the sound volume bars,
as well as the channel number as stored in sequence in the wallplate’s
memory, and the frequency for that stored channel. This FM receiver does not
have RDS so no track information is displayed. You can press PLAY/Pause to
interrupt and restart playback of the channel audio. There is no EQ available
for FM mode.
The information displayed during track playback is very similar in USB/SD
Card modes. ‘RPT ALL’ is indicating that the playback will cycle through all the
songs it can play and return to the first song it found on the list, and keep
playing. ‘NOR’ is the default or ‘Normal’ EQ setting. The number is the
volume level, which goes from zero to 30.
S = SD Card; U = USB. ‘S > 002/017 160kbps’ shows that the wallplate
is in SD CARD mode, is playing track 2 of 17 available, and this is recorded at
a bandwidth of 160kbps. And below these two lines of information, the LCD
will display the Track name and Artist name for the current track. It also
shows the time progressing and the total track duration.
PRODUCT DESCRIPTION
A compact wallplate designed to fit a standard electrical wall box, which
features a 2 x 15W RMS (into 4 ohms) internal amplifier with Bluetooth
wireless receiver. The wallpate uses a class D design amplifier whose
efficiency is greater than 90%. It is ideal for connecting speakers in your
lounge room, kitchen or study. It can stream music directly from your
smartphone or tablet. It also features an FM tuner, auxiliary 3.5mm jack, USB
and SD card inputs for MP3 playback. It could be used in reception areas for
general background music and broadcasting audio advertising in commercial
installations, shops, hotels, offices, restaurants etc. Includes IR remote control.
Requires 12V d.c. power supply.
ADVISORY
This instruction manual is written for the A1100 2x15W Bluetooth Amplifier
and Music Player Wallplate. Please read this manual carefully and retain it for
future reference.
INSIDE THE BOX
1 x Wall plate
1 x Wall box
1 x Extension wire
1 x Manual
1 x Remote Control

www.altronics.com.au
Manufactured in China for Altronic Distributors Pty Ltd
A1100
2 x 15W Bluetooth Amplifier
& Music Player Wallplate
Operating Instructions
General comments
RPT: Repeat function for track playback in SD Card or USB modes. RPT ALL
will play every track on a continuous loop; RPT ONE will play a single track on
a loop.
SLEEP: Press and hold this button on the front panel to place the unit into
standby power. To revive the operation of the wallplate, either press SLEEP
again or press the standby power button on the remote control. When the
wallplate is powered up from standby, the Bluetooth will attempt to re-establish
a pairing with the previously paired device. If the device is within range and
still has Bluetooth active, the two devices will pair automatically, and Bluetooth
mode will be available on the wallplate.
EQ: There for five EQ settings which are activated by repeatedly pressing the
EQ button. The settings cycle through in the following order: NOR (Normal),
ROC (Rock), POP, CLA (Classical), JAS (Jazz). EQ only works for SD Card and
USB modes.
TECHNICAL SPECIFICATIONS
Input Voltage: ............................................................. 110Va.c. or 230Va.c.
Operating Voltage: ................................... 12Vd.c. (Requires Power adapter)
LCD Size: .......................................................................... 34mm X 27mm
Rated power: ...................................................................................... 15W
Audio: ............................................................................ 2 Channels stereo
Audio Formats: ............................................................................ MP3 only
Output impedance: ........................................................................ 8 ohms
Frequency response: ............................................................... 20Hz-20kHz
THD: ................................................................................................ 0.03%
Infrared distance: .............................................................................. <10M
Dimensions: ................................................................... 73 x 116 x 60mm
/