Page is loading ...

MODEL H8110
9 DRAWER EURO STYLE
WORKBENCH-BIRCH
INSTRUCTIONS
WARNING: NO PORTION OF THIS MANUAL MAY BE REPRODUCED IN ANY SHAPE
OR FORM WITHOUT THE WRITTEN APPROVAL OF GRIZZLY INDUSTRIAL, INC.
Figure 11.
Safety & Limitations
Specifications
Assembly
To assemble the workbench:
1.
Figure 12
2.
Figure 12
E
E
C
E2
E4
E3
Figure 12.
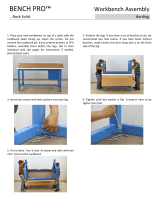
3. Figure 12
4.
Figure 12

E
C
F
E
Figure 13.
5.
Figure 12
6.
Figure 12
7.
Figure 13
8.
Figure 14
E
C
H
F
Figure 14.
9. Figure
15
Steps 1-7
D
E2
E3
D
F
C
Figure 15.
10.
Figure 15
11.
Figure 16
12.
Figure 16
E4
B
E3
E2
E4
Front
Up
Figure 16.
13.
Figure 16

14.
15.
16.
17.
Figure 17
SL
SB
SR
BP
Rotate
with
Screwdriver
to Lock
Figure 17.
SF
E1
E5
Figure 18.
18. Figure 18
20.
Figure 19
21.
Figure
19
22.
Figure 20
Figure 19.
A
G
Flush
Flush
Wood Block
Vise Plate
A
G
Wood Block
Vise Support
Block
Lead Screw
Guide Rod
19.
Figure 19
Wood Block
Vise Support
Block
A
J
23.
Step 21.
Figure 20.

Parts Breakdown and Inventory
Fastener Kit Part Numbers QTY
REF PART DESCRIPTION QTY
Fastener Kit
/