Page is loading ...

MODEL T10157
OAK WORKBENCH
INSTRUCTIONS
WARNING: NO PORTION OF THIS MANUAL MAY BE REPRODUCED IN ANY SHAPE
OR FORM WITHOUT THE WRITTEN APPROVAL OF GRIZZLY INDUSTRIAL, INC.
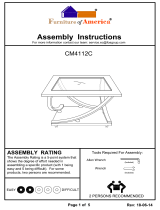
Figure 1.
Features
Inventory
Page 4
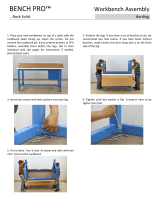
Assembly
Tools Needed Qty
To assemble your workbench:
1.
Figure 2
NOTICE
If you cannot find an item on the inventory
parts list, check the mounting location on
the workbench or examine the packaging
materials carefully. Some items are pre-
installed for shipping purposes.
Figure 2.

2.
Figure 2
3.
Figure 3
Note: Make sure the drawer slides properly
fit with the pre-installed slides underneath the
workbench top, as shown in Figure 4.
Figure 4.
NOTICE
When gluing parts together, wipe off the
excess and allow the glue to completely
dry before proceeding to avoid inadver-
tently gluing the wrong parts in subsequent
steps.
Figure 3.
4.
Figure 5
5.
Figure 5
6.
7.
Figure 6
Figure 5.
Figure 6.

Figure 7.
11.
Figure 7
12.
13.
Figure 8
14.
8.
9.
10.
Figure 7
Note: Make sure that the completed leg
assemblies are all the same length, which will
dictate the height of the finished workbench
(from 32"–39").
Figure 8.

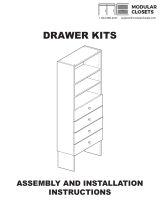
Parts Breakdown and List
1
2
4
5
6
7
8
9
10
11
12
13
14
15
16
17
18
19
20
21
22
23
24
25
26
27
28
29
30
31
27
25
REF PART # DESCRIPTION QTY REF PART # DESCRIPTION QTY
1 PT10157001 VISE LEADSCREW ASSEMBLY 2 17 PT10157017 DRAWER PANEL RIGHT
2
2 PT10157002 TUBE 4 18 PT10157018 DRAWER PANEL BACK
2
4 PT10157004 SCREW ANCHOR M8 X 30 16 19 PT10157019 DRAWER PANEL BOTTOM
2
5 PT10157005 WOOD SCREW M4 X 30 16 20 PT10157020 UPPER LEG
4
6 PT10157006 GLUE TUBE 1 21 PT10157021 LOWER LEG
4
7 PT10157007 BALL BEARING DRAWER SLIDE 4 22 PT10157022 FOOT PAD 1/2"-13 X 4"
4
8 PT10157008 WOOD SCREW M4 X 13 12 23 PT10157023 BOTTOM SHELF
1
9 PT10157009 WORKBENCH TOP 1 24 PT10157024 WOOD SCREW 5/16" X 1"
16
10 PT10157010 VISE FACE 2 25 PFB14 FLANGE BOLT 5/16"-18 X 1/2"
12
11 PT10157011 BENCH STOP BAR 1 26 PB07 HEX BOLT 5/16"-18 X 3/4"
8
12 PT10157012 VISE HANDLE 2 27 PWS003 WOOD SCREW 1/4" X 1-1/2"
20
13 PT10157013 VISE HANDLE CAP 2 28 PT10157028 LEADSCREW PLATE
2
14 PT10157014 BENCH DOG 4 29 PT10157029 LEG SUPPORT
2
15 PT10157015 DRAWER PANEL FRONT 2 30 PW07 FLAT WASHER 5/16"
4
16 PT10157016 DRAWER PANEL LEFT 2 31 PN02 HEX NUT 5/16"
4
/