Page is loading ...

The Qolsys IQ Panel 2 is a 7” touchscreen built with an Android operating system,
providing full security and smart home functionality in an easy to use interface.
INSTALLATION MANUAL
Qolsys IQ Panel 2
Software Version 2.0

INTRODUCTION
ABOUT THIS GUIDE
QOLSYS CONFIDENTIAL AND PROPRIETARY
PAGE OF 2 123
?
This document outlines the basic hardware specifications and software directions to
install and customize the IQ Panel 2. Note that the information presented is not
comprehensive, but is specifically dedicated to those menus, features, and systems
accessible solely to those with the proper installation code. Features accessible to
users and installers alike are outlined in the IQ Panel 2 User Guide. The information
contained is confidential and proprietary, and is solely owned by Qolsys Inc. Any
reproduction, modification or distribution without permission is strictly prohibited.
IQ Panel 2
Power
Supply
Table
Stand
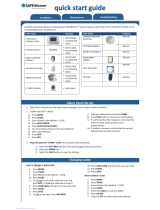
INCLUDED IN BOX
SUPPORT

TABLE OF CONTENTS
PANEL OVERVIEW
5- Exterior Front
6- Exterior Back
7- Interior
INSTALLING THE PANEL
9- Wall Mount Option
10- Table Stand Option
11- Wiring Diagram
12- Powering the Panel
USER INTERFACE
14- Home Screen Overview
15- Message Center
16- Settings Tray
PROGRAMMING
18- Advanced Settings
19- Installation
20- Installer/Dealer Settings
23- System Logs
24- Siren and Alarms
26- Security and Arming
28- Camera Settings
29- Sound
31- Z-Wave Device List
32- Devices
SECURITY SENSORS
33- Security Sensors
34- Auto Learn Sensor
35- Add Sensor
36- Sensor Type
37- Sensor Name
39- Chime Type
40- Sensor Groups
54- Voice Prompts
WI-FI DEVICES
55- Wi-Fi Devices
56- Associated Wi-Fi Clients
57- Qolsys Access Point
Z-WAVE DEVICES
58- Z-Wave Devices
59- Add Device
60- Clear Device
61- Delete Failed Device
62- Remove All Devices
63- Z-Wave Settings
65- Network Wide Inclusion
66- Association
BLUETOOTH DEVICES
67- Bluetooth Devices
68- Add Device
69- Edit Device
70- Delete Device
71- Remove All Devices
72- Settings
SYSTEM TESTS
74- System Tests
76- Wi-Fi Test
77- Sensor Test
78- Cellular Test
79- Image Sensor Config
80- Z-Wave Test
81- Rediscover Network
82- Neighbor Info
83- Counters
85- Z-Wave Diagnostics
86- Wi-Fi Devices Test
87- Panel Glass Break Test
88- Dual Path Test
89- Daughter Cards Test
90- Panel Test
CUSTOMIZATION
92- User Management
93- Dealer Contact
94- Connecting to Wi-Fi
95- Weather
96- Photo Frame
99- Load Images from SD Card
100- Load Help Videos
MAINTENANCE
102- Upgrade Software
103- Upgrade Software Using Wi-Fi
104- Software Update Via SD Card
105- Automatic Software Updates
106- Battery Replacement
TROUBLESHOOTING
108- About
111- Power Down
112- Panel Reboot
113- Hard Reboot
114- Panel Test Troubleshooting
116- Cannot Load Help Videos
LEGAL
117- Important Information
SPECIFICATIONS
120- Specifications

PANEL
OVERVIEW
Warning: This Product should be installed in accordance with the National Fire Alarm Code, ANSI/NFPA 72, (National Fire Protection Association,
Batterymarch Park,Quincy, MA 02269). Printed information describing proper installation, operation, testing, maintenance, evacuation planning, and repair
service is to be provided with this Product. In Canada the product shall be installed in accordance with the Standard for the Installation of Residential Fire
Warning Systems, CAN/ULC-S540.
Warning: For Canadian installations this Product and all sensors associated with it (collectively, the “System”) should be tested once a week. The test shall be
performed also with primary DC power de-energized. For recommended smoke detectors maintenance instructions refer to user manual associated with
compatible Qolsys model QS5110-P840 smoke detector.

PANEL OVERVIEW
EXTERIOR FRONT
QOLSYS CONFIDENTIAL AND PROPRIETARY
PAGE OF 5 123
Panel Camera
User Interface
Microphones
LED Status Light
Page Indicator

PANEL OVERVIEW
EXTERIOR BACK
Optional locking
screws for table
mount
Mounting holes
single, double or
triple “gang” box
compatible
Micro SD
Card Slot
Cooling Vents
Speaker
Rear Access Cover
Siren
QOLSYS CONFIDENTIAL AND PROPRIETARY
PAGE OF 6 123
Speaker
Microphone
Microphone
Optional locking
screw for wall mount

PANEL OVERVIEW
INTERIOR
Panel Battery*
Image Sensor Radio
Z-Wave Plus
Radio
LTE Sim Card
“Tool-less”
Terminal Block
Tamper Switch
Cellular Antenna
The battery should NEVER be disconnected without following proper power-down procedures (page 105)
Failure to comply may result in data corruption, panel failure, and a void of the manufacturer's warranty
*CAUTION
QOLSYS CONFIDENTIAL AND PROPRIETARY
PAGE OF 7 123
Siren
Security RF
Radio
Expansion Slot
Barrel Jack
Power

INSTALLING
THE PANEL

INSTALLING THE PANEL
Insert your thumb or finger
under the opening on the
back cover and firmly pull up
to remove. This cover is not
needed for wall mount.
Press tabs on the bottom of
the panel and pull apart to
remove the back plate.
Mount to the wall using
appropriate hardware
ensuring it’s level.
1. Hang the front of the panel with
the hanging strap on the back plate
as shown above.
2. Make a small hole in the wall
through the bottom right mounting
hole and feed the white RF antenna
into the wall.
IMPORTANT: Not properly routing
the RF antenna in the wall will
greatly reduce RF sensor range.
If there is a gap on the top
because the panel did not
completely close, firmly pinch at
all 4 tab locations to ensure
proper closure. You will hear a
“pop” or “snap” sound when
pinched.
QOLSYS CONFIDENTIAL AND PROPRIETARY
PAGE OF 9 123
WALL MOUNT OPTION
Connect your 5.0 - 5.5v DC Power
supply to the barrel jack or to the
(+/Red) and (-/Black) terminals if
using a custom length wire.
1. At a 60° - 90° angle seat the top
of the panel on the top 4 tabs of the
back plate. Ensure the tabs line up
with the grooves on the panel.
2. Swing the panel downwards to
close while feeding the antenna and
power wire in the wall.
1
2
1
2

INSTALLING THE PANEL
1. With the included power
supply and cable, plug the
barrel connector into the
jack next to the terminals as
shown above.
2. Route the cable under the
hook next to the battery.
3. Route the cable through
the strain relief opening.
Replace the cover by
inserting the top first, then
while making sure the
cable passes under the
opening firmly press down
on the bottom until the
cover “snaps” into place.
QOLSYS CONFIDENTIAL AND PROPRIETARY
PAGE OF 10 123
TABLE STAND OPTION
Insert your thumb or finger
under the opening on the
back cover and firmly pull
up to remove.
1
2
3
Insert table stand dowels
into the 2 upper keyholes.
Slide the stand firmly
upwards until you hear a
“click” from each side.

INSTALLING THE PANEL
WIRING DIAGRAM
QOLSYS CONFIDENTIAL AND PROPRIETARY
PAGE OF 11 123
NOTE: Use only UL/ cUL listed
external siren in UL/cUL listed
installations. Rating:12vDC/
300mA
NOTE: Inputs are used only
for Burglary applications.
IMPORTANT IF USING CUSTOM
LENGTH WIRE: Use 18AWG wire
no longer than 25ft to ensure
sufficient power is received at the
panel.
NOTES
5.0 - 5.5vDC IN
GND
SENSOR 1
GND
SENSOR 2
GND
EXT SIREN
GND
WARNING!
Use 5.0 -
5.5v Power
Supply ONLY
4.7k
4.7k
CLOSED LOOP
CIRCUIT
-
+
EXT SIREN:
Maximum Voltage: 12vDC
Maximum Current: 300mA
5.0 - 5.5vDC IN
BARREL JACK
BARREL JACK FOR
USE WITH SUPPLIED
BARREL CONNECTOR
CABLE ONLY.
STRIPED WIRE IS
POSITIVE (+)

INSTALLING THE PANEL
IMPORTANT IF USING CUSTOM LENGTH WIRE:
Use 18AWG wire no longer than 25ft to ensure
sufficient power is received at the panel.
QOLSYS CONFIDENTIAL AND PROPRIETARY
PAGE OF 12 123
Press and hold the power button on
the right side of the panel for 3
seconds to power up.
POWERING THE PANEL
Connect power supply.
WARNING! Use 5.0 - 5.5v Power Supply ONLY
If using the provided cable, the “striped” wire is (+)

USER
INTERFACE

USER INTERFACE
Header &
Settings Tray
Primary
User
Interface
The home screen is divided into three sections. The header shows the date & time, today’s weather, message center and
the Settings tray. The Primary interface shows arming options and sensor status. The footer shows panic options and
additional pages.
QOLSYS CONFIDENTIAL AND PROPRIETARY
PAGE OF 14 123
Page
Indication and
Emergency
HOME SCREEN OVERVIEW

The header contains the the pull down settings tray, the weather icon, time/date and a message icon in the
upper right portion of the screen where you will find Security Provider messages and contact info, alerts,
video tutorials and FAQ’s
USER INTERFACE
QOLSYS CONFIDENTIAL AND PROPRIETARY
PAGE OF 15 123
This is where you will find the Security Provider’s Contact Information
This is where you will find Video Tutorials to help with common questions
This is where you will find messages from the Security Provider, Panel
Alerts and Alarm Notifications.
MESSAGE CENTER

USER INTERFACE
SETTINGS TRAY
QOLSYS CONFIDENTIAL AND PROPRIETARY
PAGE OF 16 123
To access the Settings tray swipe down on the bar at the top of the screen. The
Settings tray has quick access to system, battery, wi-fi, bluetooth & cellular status as
well as volume control, brightness and other quick settings.
Swipe down
for access
FIND IT

PROGRAMMING

To access the Advanced Settings menu pull down the Settings
tray at the top of the screen, select “Settings” and then
“Advanced Settings”. Enter your dealer, installer or master
code. The code used to enter Advanced Settings determines
the level of access.
PROGRAMMING
FIND IT
QOLSYS CONFIDENTIAL AND PROPRIETARY
PAGE OF 18 123
Swipe down
for access
SETTINGS
ADVANCED SETTINGS
ENTER CODE (1111, 2222)
ADVANCED SETTINGS
INSTALLER MENU (1111)
DEALER MENU (2222)

PROGRAMMING
QOLSYS CONFIDENTIAL AND PROPRIETARY
PAGE OF 19 123
Swipe down
for access
INSTALLATION
SETTINGS
ADVANCED SETTINGS
ENTER CODE (1111, 2222)
FIND IT
INSTALLATION

PROGRAMMING
INSTALLER/DEALER SETTINGS
* Additional options available
only through the Dealer Code.
FIND IT
INSTALLER/DEALER
SETTINGS
Swipe down
for access
INSTALLATION
SETTINGS
ADVANCED SETTINGS
ENTER CODE (1111, 2222)
Setting
Default
Description
Account Number
blank
Security provider account number (up to 10 characters)
Power Management
Enabled
An energy-saving function when running on battery power
only
SIA Power Restoration
Disabled
Turn on or off sensor hold for 60 seconds during power restore
Loss of Supervisory Signals
for Emergency Sensors
4
Select the length in hours (4,12,24) before reporting a loss of
supervision on life safety devices. NOTE: For UL/cUL the
wireless supervision window for Emergency sensors (Smoke,
Heat & CO Detectors) shall be set to 4h.
Loss of Supervisory Signals
for Non Emergency
Sensors
24
Select the length in hours (4,12,24) before reporting a loss of
supervision on security devices.
Loss of Cell Signal Timeout
30
Select the length in minutes (10-120) before reporting a loss in
cellular signal.
Installer/Dealer Settings
Change panel settings like supervisory times, power and cell loss timeout and
SIA settings.
/