AVANT DE RETOURNER CE PRODUIT POUR QUELQUE
RAISON QUE CE SOIT, COMPOSER LE
1-800-544-6986
AVANT D’APPELER, AYEZ EN MAIN LE N° DE CATALOGUE ET LE CODE DE DATE. DANS LA PLUPART DES
CAS, UN REPRÉSENTANT DE BLACK & DECKER PEUT RÉSOUDRE LE PROBLÈME PAR
TÉLÉPHONE. SI VOUS AVEZ UNE SUGGESTION OU UN COMMENTAIRE, APPELEZ-NOUS. VOS
IMPRESSIONS SONT CRUCIALES POUR BLACK & DECKER.
CAUTION: Do not use sensor when red LED flashing.
• While pressing the ON button, slide sensor slowly, (figure E) horizontally across surface of
wall without lifting or tilting. The yellow LED will light when the sensor is approaching the
edge of a stud.
• The green LED will light when an edge of a stud is detected. Stop at this location and using
a pencil make a mark at the tip of the orange pointer. Repeat this operation coming from the
other direction and again mark the spot where the green LED lights.
• Measure between the two marks made on the wall and this center point will coincide with
the center of the stud (figure F).
• Place the stud sensor/level back into the two foot (610 mm) level for storage. NOTE: The
stud sensor /level can only be inserted in one direction. If it does not fit, remove and reverse
the orientation. Do not force it.
CAUTION: Material thickness, type of material, moisture content, and other variables can
effect sensing results. The sensor may detect electric wiring or pipes in the same manner
that studs are detected depending on their location to the wall surface. Use caution when
drilling, nailing or cutting into walls, floors and ceilings which may contain electrical wiring or
pipes. Because studs are normally spaced 16 inches (406 mm) or 24 inches (610 mm)
apart and are usually 1-1/2 inches (38 mm) wide, beware of anything closer together or of
a different width. WARNING: Always turn off the power when working near
electrical wires.
Tips For Optimum Use
• Hold stud sensor straight up and down.
• Avoid materials which have inconsistent density such as:
• Carpeting and padding
• Ceramic floor tile
• Wallpaper containing metallic foils or fibers. Generally, surfaces covered with regular
wallpaper or fabric will scan with no difference in function.
• Walls that are freshly painted and are still damp.
• Excessively thick plaster and lath.
Maintenance
Use only mild soap and damp cloth to clean the tool. Never let any liquid get inside the tool;
never immerse any part of the tool into a liquid.
IMPORTANT: To assure product SAFETY and RELIABILITY, repairs, maintenance and
adjustment (other than those listed in this manual) should be performed by authorized service
centers or other qualified service personnel, always using identical replacement parts.
Accessories
Recommended accessories for use with your tool are available from your local dealer or
authorized service center. If you need assistance regarding accessories, please call:
1-800-544-6986.
WARNING: The use of any accessory not recommended for use with this tool could be
hazardous.
FCC Warning
This device complies with part 15 of the FCC Rules. Operation is subject to the following two
conditions: (1) This device may not cause harmful interference, and (2) this device must
accept any interference received, including interference that may cause undesired
operation.
SERVICE INFORMATION
All Black & Decker Service Centers are staffed with trained personnel to provide customers
with efficient and reliable power tool service. Whether you need technical advice, repair, or
genuine factory replacement parts, contact the Black & Decker location nearest you. To find
your local service location, refer to the yellow page directory under "Tools—Electric" or call:
1-800-544-6986 or visit www.blackanddecker.com
FULL TWO-YEAR HOME USE WARRANTY
Black & Decker (U.S.) Inc. warrants this product for two years against any defects in material
or workmanship. The defective product will be replaced or repaired at no charge in either of
two ways.
The first, which will result in exchanges only, is to return the product to the retailer from
whom it was purchased (provided that the store is a participating retailer). Returns should be
made within the time period of the retailer’s policy for exchanges (usually 30 to 90 days after
the sale). Proof of purchase may be required. Please check with the retailer for their specific
return policy regarding returns that are beyond the time set for exchanges.
The second option is to take or send the product (prepaid) to a Black & Decker owned or
authorized Service Center for repair or replacement at our option. Proof of purchase may be
required.Black & Decker owned and authorized Service Centers are listed under
"Tools-Electric" in the yellow pages of the phone directory.
This warranty does not apply to accessories. This warranty gives you specific legal rights
and you may have other rights which vary from state to state or province to province. Should
you have any questions, contact the manager of your nearest Black & Decker Service
Center. This product is not intended for commercial use.
FREE WARNING LABEL REPLACEMENT: If your warning labels become illegible or are
missing, call 1-800-544-6986 for a free replacement.
Possible Cause
• Weak batteries.
Solution
• Replace with fresh batteries.
Problem
• LEDs do not light.
• Because studs are normally
spaced 16 inches or 24 inches
apart and are 1-1/2 inches wide,
beware of anything closer
together or of a different width.
• LEDs light in too many
places.
• Detects other objects
besides studs.
• Electrical wiring and
metal or plastic pipes
may be near or touching
back surface of wall.
TT
TT
RR
RR
OO
OO
UU
UU
BB
BB
LL
LL
EE
EE
SS
SS
HH
HH
OO
OO
OO
OO
TT
TT
II
II
NN
NN
GG
GG
See ‘Tools-Electric’
– Yellow Pages –
for Service & Sales
Imported by
Black & Decker (U.S.) Inc.,
701 E. Joppa Rd.
Towson, MD 21286 U.S.A.
• Replace with fresh batteries.
• Red LED flashes.
• Weak batteries.
• Start again in different area.
• Confirm by moving farther to
either side.
• Green LED does not
light.
• Stud sensor turned on
over a stud.
• Nothing to detect in that
area.
MISE EN GARDE : lire attentivement toutes les directives. Le non-respect des
directives indiquées ci-dessous peut entraîner des risques de choc électrique, d’incendie ou
de blessures corporelles graves.
CONSERVER CES DIRECTIVES
LIGNES DIRECTRICES EN MATIÈRE DE SÉCURITÉ - DÉFINITIONS
Il est important que vous lisiez et compreniez ce mode d’emploi. Les informations qu’il con-
tient concernent VOTRE SÉCURITÉ et visent à ÉVITER TOUT PROBLÈME. Les symboles
ci-dessous servent à vous aider à reconnaître cette information.
DANGER : Indique une situation dangereuse imminente qui, si elle n’est pas évitée, causera
la mort ou des graves blessures.
AVERTISSEMENT : Indique une situation potentiellement
dangereuse qui, si elle n’est pas évitée, pourrait causer la mort ou de graves blessures.
MISE EN GARDE : Indique une situation potentiellement dangereuse qui, si elle n’est pas
évitée, pourrait causer des blessures mineures ou modérées.
MISE EN GARDE : Utilisé sans le symbole d’alerte à la sécurité, indique une situation poten-
tiellement dangereuse qui, si elle n’est pas évitée, peut résulter en des dommages à la propriété.
Directives de sécurité
• Ne pas faire fonctionner le détecteur de montant dans un milieu déflagrant, en présence de
liquides, de gaz ou de poussières inflammables par exemple.
• Utiliser le détecteur de montant uniquement avec des piles AAA. L’utilisation de toute autre
pile peut provoquer un incendie.
.
MISE EN GARDE : les résultats de détection dépendent de l’épaisseur et du type de
matériau, de la teneur en humidité et d’autres variables. Le détecteur peut repérer les
câblages électriques ou les tuyaux de la même façon que les montants sont détectés selon
leur emplacement relativement à la surface du mur. Être prudent pour le perçage, le
clouage ou la coupe dans les murs, les planchers et les plafonds pouvant contenir des
câblages électriques ou des tuyaux. Les montants étant généralement espacés de 406 mm
(16 po) ou de 610 mm (24 po) et présentent une largeur habituelle de 36 mm (1 1/2 po), être
prudent pour tout ce qui est moins espacé ou de largeur différente.
AVERTISSEMENT : toujours effectuer une mise hors tension au moment de travailler
près des fils électriques.
Fonctionnement -
Utilisation du niveau
Les niveaux Gecko Grip sont pourvus de coussinets coulissants (1) et de coussinets
adhérents non glissants (2). Cette fonction unique est utile lorsque le niveau est utilisé sur
des surfaces verticales.
Utilisation de cette fonction :
• Mettre le niveau sur une surface verticale. Les coussinets coulissants vous permettront
d’aligner facilement la bulle à une position de niveau (centrée entre les deux lignes de la
fiole).
• Exercer une pression sur le niveau pour faire coller les coussinets adhérents à la surface
verticale.
• Tout en tenant le niveau d’une main, utiliser un crayon de l’autre main pour inscrire les
repères d’emplacement nécessaires.
MISE EN GARDE : toujours tenir le niveau. Les coussinets adhérents ne sont pas
conçus pour maintenir le niveau au mur de manière autonome.
REMARQUE : le rendement optimal Gecko Grip est atteint lorsque :
• Les coussinets sont exempts de poussière et de saleté. On peut rétablir le rendement des
coussinets adhérents en les nettoyant avec un chiffon humide.
• La surface est plate ce qui permet aux deux coussinets adhérents d’être en contact avec la
surface.
On utilise les cibles de repère réglables ACCU MARK (BDSL10 uniquement)
Les cibles de repère réglables (6) sont situées aux deux extrémités du niveau. Les cibles
sont utilisées pour transférer ou répéter une mesure d’un endroit à un autre.
Utilisation de cette fonction :
• Aligner les cibles avec les montants muraux de l’objet que vous voulez accrocher au mur
comme le montre la figure A.
• Pour transférer cette mesure à votre zone de travail, s’assurer que la bulle est alignée à une
position de niveau, puis inscrivez les emplacements des montants dans les fentes
pratiquées dans les cibles à l’aide d’un crayon comme le montre la figure B.
• Poser des attaches appropriées au mur, puis accrocher l’objet.
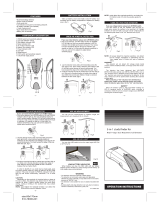
Utilisation du détecteur de montant (BDSL30 seulement)
Pose des piles
• Enlever le petit niveau torpedo (7) du grand niveau de 610 mm (2 pi) comme le montre la
figure C.
• Enlever et éliminer l’étiquette du couvercle du logement des piles.
• Ouvrir le couvercle (10) du logement des piles. Insérer 2 piles neuves AAA de 1,5 volts (non
incluses) et s’assurer de bien respecter la polarité (+) et (-).
• Remettre le couvercle en l’enclenchant en position.
MODE D’EMPLOI
CONSERVER CE MANUEL POUR UN USAGE ULTÉRIEUR.
M
M
ERCI
ERCI
D
D
’
’
A
A
VOIR
VOIR
CHOISI
CHOISI
B
B
LACK
LACK
& D
& D
ECKER
ECKER
!
!
V
V
ISITEZ
ISITEZ
WWW
WWW
.B
.B
LACKAND
LACKAND
D
D
ECKER
ECKER
.
.
COM
COM
/N
/N
EW
EW
O
O
WNER
WNER
POUR
POUR
ENREGISTRER
ENREGISTRER
VOTRE
VOTRE
NOUVEAU
NOUVEAU
PRODUIT
PRODUIT
.
.
NN
NN
ii
ii
vv
vv
ee
ee
aa
aa
uu
uu
AA
AA
cc
cc
cc
cc
uu
uu
MM
MM
aa
aa
rr
rr
kk
kk
GG
GG
ee
ee
cc
cc
kk
kk
oo
oo
GG
GG
rr
rr
ii
ii
pp
pp
––
––
NN
NN
°°
°°
DD
DD
ee
ee
CC
CC
aa
aa
tt
tt
..
..
BB
BB
DD
DD
SS
SS
LL
LL
11
11
00
00
NN
NN
ii
ii
vv
vv
ee
ee
aa
aa
uu
uu
33
33
EE
EE
nn
nn
11
11
GG
GG
ee
ee
cc
cc
kk
kk
oo
oo
GG
GG
rr
rr
ii
ii
pp
pp
––
––
NN
NN
°°
°°
DD
DD
ee
ee
CC
CC
aa
aa
tt
tt
..
..
BB
BB
DD
DD
SS
SS
LL
LL
33
33
00
00