Page is loading ...

Ausgabe/Edition:
06.2010
Änderungsindex
Rev. index: 00.0
Printed in Germany
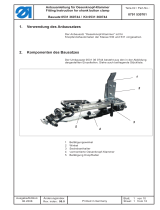
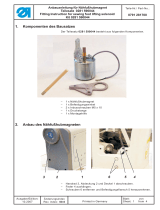
1 Kit components
Before beginning the installation:
Please check whether all the components of the kit have been
correctly delivered.
The kit 0867 591004 consists of the following components:
Component Parts number
1 x Thread tensioner plate 0867 591014
2 x Countersunk screw M4 x 12 9225 201770
1 x Cable harness 9870 867012
1 x Holder M-Control 0867 490154
2 x Chip board screw 3.5 x 17 9207 170227
2 Short description
The kit “Neat Seam Beginning” ensures a short and neatly sewn
needle thread at the seam beginning.
After the first stitch at the seam beginning the needle thread 3 is
locked by the thread clamp 1 and pulled back by the thread puller 2 so
that the needle thread protrudes the material a little bit.
It is possible to set how far the needle thread is being pulled back.
Anbauanleitung für Teilesatz "Sauberer Nahtanfang"
0867 591004
Fitting Instruction for "Neat Seam Beginning"
0867 591004
Teile-Nr./ Part-No.:
0791 867708
Blatt: von
Sheet: 13 from 24
1
3
2

3 Conversion
Caution: Risk of injury!
Turn off the main switch and pull out the mains plug before
performing the conversion task.
The fitting of the kit must be carried out by qualified technicians
only.
3.1 Dismantling the thread tensioner plate
– Unscrew screws 2.
– Fold down the thread tensioner plate 1
– Pull off the compressed-air hoses 3 and 4.
Anbauanleitung für Teilesatz "Sauberer Nahtanfang"
0867 591004
Fitting Instruction for "Neat Seam Beginning"
0867 591004
Teile-Nr./ Part-No.:
0791 867708
Blatt: von
Sheet: 14 from 24
Ausgabe/Edition:
06.2010
Änderungsindex
Rev. index: 00.0
Printed in Germany
21
43

3.2 Effectuating a notch on the keypad
– Unscrew screws 1.
– Take off the keypad 2.
– Effectuate the notch 3 on the keypad (see sketch).
Anbauanleitung für Teilesatz "Sauberer Nahtanfang"
0867 591004
Fitting Instruction for "Neat Seam Beginning"
0867 591004
Teile-Nr./ Part-No.:
0791 867708
Blatt: von
Sheet: 15 from 24
Ausgabe/Edition:
06.2010
Änderungsindex
Rev. index: 00.0
Printed in Germany
21
3

3.3 Mounting the keypad and the new thread tensioner plate
– Run the cables 2 and 3 through the keypad 1.
– Tie the cables with the cable tie 4.
– Connect the compressed-air hoses 5 and 6 to the new thread
tensioner plate 7.
– Fix the keypad 8 using the three screws 9.
–
Fix the new thread tensioner plate 11 using the screws 10
and 12.
Anbauanleitung für Teilesatz "Sauberer Nahtanfang"
0867 591004
Fitting Instruction for "Neat Seam Beginning"
0867 591004
Teile-Nr./ Part-No.:
0791 867708
Blatt: von
Sheet: 16 from 24
Ausgabe/Edition:
06.2010
Änderungsindex
Rev. index: 00.0
Printed in Germany
43 2 1
76 5
12 11 10
98

– Unscrew the cover 2.
– Unscrew the arm cover 1.
– Loosen the screws 3 on the operating panel holder 4.
– Run the cable 5 from the thread tensioner plate behind the
operating panel to the PCB 6.
– Tighten the screws 3 on the operating panel holder 4.
Anbauanleitung für Teilesatz "Sauberer Nahtanfang"
0867 591004
Fitting Instruction for "Neat Seam Beginning"
0867 591004
Teile-Nr./ Part-No.:
0791 867708
Blatt: von
Sheet: 17 from 24
Ausgabe/Edition:
06.2010
Änderungsindex
Rev. index: 00.0
Printed in Germany
43
54
65
21

3.4 Removing the cable
The cable that runs from the output “ST2” on the control unit to the
input “X11” on the PCB must be dismantled and replaced by the
cable harness that is part of the kit.
– Remove the cable tie 1.
– Unscrew the clip 4.
– Pull the plug 2 off the PCB.
– Run the cable 4 downwards through the table top.
– Pull the cable’s plug off the control unit.
Anbauanleitung für Teilesatz "Sauberer Nahtanfang"
0867 591004
Fitting Instruction for "Neat Seam Beginning"
0867 591004
Teile-Nr./ Part-No.:
0791 867708
Blatt: von
Sheet: 18 from 24
Ausgabe/Edition:
06.2010
Änderungsindex
Rev. index: 00.0
Printed in Germany
12
43

Anbauanleitung für Teilesatz "Sauberer Nahtanfang"
0867 591004
Fitting Instruction for "Neat Seam Beginning"
0867 591004
Teile-Nr./ Part-No.:
0791 867708
Blatt: von
Sheet: 19 from 24
Ausgabe/Edition:
06.2010
Änderungsindex
Rev. index: 00.0
Printed in Germany
3.5 Mounting the new cable harness
– Run the new cable harness 2 through the table top cutout to
the machine head.
The plug x1 has to be underneath the table top.
– Connect the plug 1 on the PCB.
– Fix the cable harness onto the machine head by using the
clip 3.
–
Connect the thread clamp to the socket X2 of the cable
harness.
–
Connect the rotary solenoid to the socket X3 of the cable
harness.
3
21
x1
X3 X2

– Connect the big plug ST2 to the bush A of the control unit.
– Connect the small plug B18 to the bush B18.
Anbauanleitung für Teilesatz "Sauberer Nahtanfang"
0867 591004
Fitting Instruction for "Neat Seam Beginning"
0867 591004
Teile-Nr./ Part-No.:
0791 867708
Blatt: von
Sheet: 20 from 24
Ausgabe/Edition:
06.2010
Änderungsindex
Rev. index: 00.0
Printed in Germany
ST2 B18
B 7 7 6
V 8 . .
B 1 8
S M . . .
B
M
B 8 0
E B . . .
B 4 1
M
A

3.6 Mounting the control box
– Run the cable 1 to the control unit 5 trough the cable
channel 2.
– Set the rotary switch 4 inside the box to position “3".
– Connect the plug x1 to the bush 3 on the control box.
– Fix the the box 5 with the additional control by screwing it
underneath the table plate.
Anbauanleitung für Teilesatz "Sauberer Nahtanfang"
0867 591004
Fitting Instruction for "Neat Seam Beginning"
0867 591004
Teile-Nr./ Part-No.:
0791 867708
Blatt: von
Sheet: 21 from 24
Ausgabe/Edition:
06.2010
Änderungsindex
Rev. index: 00.0
Printed in Germany
21
543
5

4 Threading the needle thread
– Thread in the needle thread through threading guide 1.
– Conduct the through the pre-tensioner 2.
– Conduct the thread through the thread clamp 3.
– Conduct the thread through the threading guide 4 on the thread
puller and the eyelets 8 on the thread tensioner plate.
– Conduct the thread though the main tensioners 7 and 6.
– Conduct the thread from above through the tension discs 5.
Anbauanleitung für Teilesatz "Sauberer Nahtanfang"
0867 591004
Fitting Instruction for "Neat Seam Beginning"
0867 591004
Teile-Nr./ Part-No.:
0791 867708
Blatt: von
Sheet: 22 from 24
Ausgabe/Edition:
06.2010
Änderungsindex
Rev. index: 00.0
Printed in Germany
1
2
3
4
8
7
6
5

5 Setting the thread length
The length of the protruding needle thread can be set with the
stroke limitator 1.
The length should be about 5 to 6 mm.
– Loosen screw 2.
– Set the limitation 1.
(Push the stroke limitator to the right, longer thread at seam
beginning)
– Tighten screw 2.
Anbauanleitung für Teilesatz "Sauberer Nahtanfang"
0867 591004
Fitting Instruction for "Neat Seam Beginning"
0867 591004
Teile-Nr./ Part-No.:
0791 867708
Blatt: von
Sheet: 23 from 24
Ausgabe/Edition:
06.2010
Änderungsindex
Rev. index: 00.0
Printed in Germany
2
1

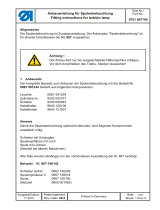
6 Effectuating the settings on the control unit
Prerequisite: Software level 5321 K or higher
Can be checked with parameter 179.
In case the software level is lower than K load a new control
software (see operating instructions for the sewing drive).
The following parameters have to be set on the control unit:
F-13 =1 Thread trimmer on/off
F-100= 2 Number of soft start stitches (change
from 1 to 2)
F-115=250 Softstart speed (change from 400 to 250)
F-116=140 Trimming speed (change from 150 to 140)
F-134 =1 Soft start on/off
F-136=2 Short thread trimmer stitch
F-154=8 Function thread clamp
F-180=45 Reversing angle
F-181=20 Switch-on delay of reverse motor rotation
(change from 0 to 20)
F-182=1 Reverse motor rotation on/off
Note:
The functions “thread clamp” and “neat seam beginning” are not
yet active at the first sewing start after switching on the control
unit.
The functions are activated only after the first thread trimming.
Anbauanleitung für Teilesatz "Sauberer Nahtanfang"
0867 591004
Fitting Instruction for "Neat Seam Beginning"
0867 591004
Teile-Nr./ Part-No.:
0791 867708
Blatt: von
Sheet: 24 from 24
Ausgabe/Edition:
06.2010
Änderungsindex
Rev. index: 00.0
Printed in Germany
/