Page is loading ...

PURE WATER TECHNOLOGIES, LLC | dba Wayde King Water Filtration™ www.KingWaterFiltration.com |
5502 S. Fort Apache Rd. Suite # 100, Las Vegas, NV 89148 | Customer Service Ph: 855.957.2166 | customerservice@kingwaterfiltration.com
4
TYPICAL INSTALLATION AND SYSTEM LOCATION
Whole House Water
Filter System
Installation
The system needs to be
installed by a licensed
plumber in your area.
DOWNFLOW WITH BACKWASH WATER FILTER SYSTEMS
Unpack the control valve from the shipping box. It is recommended
that you keep the original boxes and packing materials

PURE WATER TECHNOLOGIES, LLC | dba Wayde King Water Filtration™ www.KingWaterFiltration.com |
5502 S. Fort Apache Rd. Suite # 100, Las Vegas, NV 89148 | Customer Service Ph: 855.957.2166 | customerservice@kingwaterfiltration.com
5
MUNICIPAL SYSTEM AUTOMATIC CONTROL VALVE PROGRAMMING
Clock MUST be set to 12:01 PM to get into
programming mode.
Step 1: Press and hold one of the up or down arrows until the clock
moves. Set the time to 12:01 PM. Push the Recycle button to set.
(recycle button)
Step 2: Press and hold the up and down buttons at the same time to
get into the Master Programming Mode. A pencil icon lets you know
you are in programming mode.
The code in the upper left shows the portion of the program being changed.
The up and down buttons change the value on the right.
Step 3: Screen upper
left reads DF. Set to GAL
Step 4: Push Recycle.
Set VT to FL tr
Step 5: Push Recycle.
Set CT to tc
Step 6: Push Recycle.
Set NT to ---1
Step 7: Push Recycle.
Set DO to 6
Step 8: Push Recycle.
Set RT to 2:00am
Step 9: Push Recycle.
Set BW to 10
Step 10: Push Recycle.
Set RR to 10
Step 11: Push Recycle.
Wait for time to display…
Step 12: Press and
hold up or down arrow,
this gets time moving. Set
TD to correct time.
Push Recycle to
complete the setup.

PURE WATER TECHNOLOGIES, LLC | dba Wayde King Water Filtration™ www.KingWaterFiltration.com |
5502 S. Fort Apache Rd. Suite # 100, Las Vegas, NV 89148 | Customer Service Ph: 855.957.2166 | customerservice@kingwaterfiltration.com
6
WELL SYSTEM AUTOMATIC CONTROL VALVE PROGRAMMING
Clock MUST be set to 12:01 PM to get into
programming mode.
Step 1: Press and hold one of the up or down arrows until the clock
moves. Set the time to 12:01 PM. Push the Recycle button to set.
(recycle button)
Step 2: Press and hold the up and down buttons at the same time
to get into the Master Programming Mode. A pencil icon lets you know
you are in programming mode.
The code in the upper left shows the portion of the program being changed.
The up and down buttons change the value on the right.
Step 3: Screen upper
left reads DF. Set to GAL.
Step 4: Push Recycle.
Set VT to dF 1b.
Step 5: Push Recycle.
Set CT to tc.
Step 6: Push Recycle.
Set NT to ---1.
Step 7: Push Recycle.
Set DO to 1
Step 8: Push Recycle.
Set RT to 2:00am
Step 9: Push Recycle.
Set BW to 14
Step 10: Push Recycle.
Set BD to 40
Step 11: Push Recycle.
Set RR to 10
Step 12: Push Recycle.
Set BF to OFF
Step 13: Wait for time
to display…
Step 14: Press and
hold up or down arrow,
this gets time moving. Set
TD to correct time.
Push Recycle to
complete the setup.

PURE WATER TECHNOLOGIES, LLC | dba Wayde King Water Filtration™ www.KingWaterFiltration.com |
5502 S. Fort Apache Rd. Suite # 100, Las Vegas, NV 89148 | Customer Service Ph: 855.957.2166 | customerservice@kingwaterfiltration.com
7
CONNECTING WATER FILTRATION SYSTEM TO WATER SUPPLY
• Turn off the main water shutoff valve.
• Open all plumbing fixtures in the house
including all outside faucets in order to
drain the lines of all water.
• Cut and remove a section of the main
incoming water line near where the
system is to be installed. Allow this line
to drain thoroughly (Fig 8).
• If copper piping is used and soldered,
remove the bypass from the valve
assembly and attach your plumbing
adapters to the bypass away from the
valve. This simple step will ensure that
you are not applying heat as you
solder, or pressure as you tighten the
adapters onto the bypass while they
are mounted on the valve body itself.
• Solder a 3” to 5” piece of copper pipe
into Each of the two pipe adapters
away from the valve, then let them cool
before threading each one onto the
yoke or bypass valve (Fig 9).
• Apply thread seal tape onto the male
adapters for the brass bypass valve
when cool, and securely tighten them
to the bypass valve. This is done
before reattaching them onto the rear
of the valve/meter body assembly.
• Close main water supply shutoff valve.
• Open nearest faucet to relieve
pressure and drain plumbing lines.
MINIMUM MATERIALS NEEDED
• ¾” or 1” male thread adapters to plumb
the system
• Wrenches, either open end or
adjustable jaw, sized to fit compression
adapters
• Pipe cutter
• Thread seal tape
• Sandpaper or emery cloth
• Before installing ¾” or 1” fittings to the
inlet and outlet of the bypass valve or
manifold, wrap the threads 3 times
around with thread seal tape. Install ¾”
or 1” fittings.
• Soldering is no longer required to
plumb with copper pipe. Instead, use
¾” or 1” compression fittings. Connect
plumbing as shown below (Fig 10),
choosing appropriate connection for
mechanical/ automatic control valve.
CAUTION: Do not overtighten or
cross-thread.
CAUTION: Install water filter in
direction of arrows.

PURE WATER TECHNOLOGIES, LLC | dba Wayde King Water Filtration™ www.KingWaterFiltration.com |
5502 S. Fort Apache Rd. Suite # 100, Las Vegas, NV 89148 | Customer Service Ph: 855.957.2166 | customerservice@kingwaterfiltration.com
8
TIPS TO AVOID ACCIDENTAL
PROPERTY DAMAGE
INSTALLING A LEAK DETECTOR VALVE
Wayde King Water Filtration Whole Home
Filtration and Conditioning Systems use the
latest technologies available to ensure and
prevent water rupture. However, if manufacturing
guidelines are not followed, water damage can
occur. Causes of flooding include excessive
water pressure, spikes in water pressure, human
tampering, and negligent installation.
To eliminate possible water and property
damage, use the following preventative steps
and devices:
• A licensed plumber should install this unit,
reading and following the Installation and
Operation Guide as well as all notices.
• Install a water pressure regulator/control valve
inline to keep the water inflow pressure at 60
psi or less.
• Keep the water supply line from the extreme
heat or freezing. Temperature at unit location
should be maintained between 35° F and 120°
F.
• Install an inline flood prevention valve/leak
control – instructions at right.
• In addition to having all other safety devices,
use a ball valve to bypass the inflow of water to
the system during vacation.
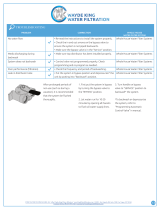
Leak Controllers are specialized water alarm and shut-off systems
that use sensors to detect a water leak. The sensor sounds an
alarm and then shuts off your water. The alarm continues to sound
until the valve is manually reset. By preventing continuous water
flow, mold and property damage are restricted.
Features
• 1” full port ball valve with auto shut-off
• Programmable service reminder indicator
• Water detection sensitivity down to 2ppm TDS (total dissolved
solids)
• 4 AA alkaline batteries
• Automatic daily valve management
• Available port sizes (inlet/outlet) ¾”, 1”, 1-¼” and 1-½”
1. Install leak detector valve into an inlet water line.
2. Move sensor as close to filter as possible. Upon sensing
moisture, controller will engage the shutoff valve and sound
an alarm.
3. Secure controller module to the wall.

PURE WATER TECHNOLOGIES, LLC | dba Wayde King Water Filtration™ www.KingWaterFiltration.com |
5502 S. Fort Apache Rd. Suite # 100, Las Vegas, NV 89148 | Customer Service Ph: 855.957.2166 | customerservice@kingwaterfiltration.com
9
GUIDE FOR REPLACING MEDIA
1. Turn off the water to the unit and unplug from the power source.
2. Disconnect the unit from your plumbing.
3. Carefully unscrew the control valve off the top of the tank.
4. Remove the riser tube from inside the mineral tank.
5. Lay the tank on its side or lay over a trash can to remove media.
6. Rinse the inside of the tank clean with a garden hose, discard old resin, and save the old gravel.
7. Stand media tank upright. Plug a slip cap or put a piece of tape over the top of the distributor/riser tube to prevent media from
entering the tube while loading the media.
8. Place the media funnel in the top of the media tank with the riser tube still inside and centered.
9. Begin replacing media by putting gravel into the tank first. Make sure the riser tube is firmly on the bottom of the tank. If the
riser tube is pulled out of the gravel once the media is added, it is impossible to put it back in without removing the other media
from the tank.
10. Pour resin/media into the funnel, slowly letting it fall down inside the media tank around the riser tube. If you have a twin
alternating system, divide the resin/media equally between the two tanks. The media tank should be approximately 3/4 full.
The media tank should be approximately ¾ full but this can vary based on the media for your specific system.
11. Remove the funnel and the slip plug or tape from the top of the riser tube.
12. Brush any loose resin/media off the top opening of the tank. Clean the top edge with a cloth so the O-ring can seal securely to
the valve base. Lubricate o-ring with clean food grade silicon grease.
13. Look at the bottom of your control valve and locate the upper basket. Inside the basket, the control valve has O-rings that will
seal on the riser tube. Install the valve on top of the media tank, making sure the top of the riser tube inserts inside the opening
of the upper basket. Guide the riser into the O-ring seal and tighten gently. Be careful not to over-torque the valve as the
threads are plastic.
14. Screw the control valve back onto the top of the tank. Be sure to hold the control valve where there will be no damage to the
valve from the pressure you exert from tightening the valve back onto the tank.
15. Reconnect your plumbing to your unit and plug the control valve back in, making sure to set the correct time of day. Turn on
the water to the unit and check for leaks.
16. Leave all faucets turned off inside the house and open a single faucet (such as an outside faucet), letting the water run for 3-5
minutes. This rinses the new resin/media inside the tank, and any particles or color will rinse out through the one open faucet,
and not throughout your home plumbing system.
17. Manually turn your regeneration/backwash control knob slowly through a complete cycle, allowing the water to run through the
unit for a minute or so in each position.
18. Once the regeneration/backwash knob is back in the service position, your unit is in service and ready to operate!
/