Page is loading ...

118
Section 4 - Kitchen installation - Decor end panels and cornice/pelmets
Fixing Fixing
45°
45°
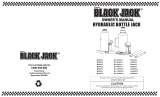
Carefully measure the pelmet and cut to the correct lengths. Only use 45°
mitre joints at corners, if required. Fix with countersunk screws.
NOTE: If you are tiling the wall or fitting a full-height splashback then a gap
should be left where the return pelmet meets the wall to accommodate the
tile / splashback thickness.
Carcase end
Door
Cornice profile
may vary
Carcase end
Door
Cornice profile
may vary 25mm CSK screw
In some installations the fitting of a decor end panel may be required. These
will require cutting to size. Secure from the inside using countersunk screws.
NOTE: Fit the plinth, (if applicable, see page 113), before fitting decor end
panel. Cornice fixing should be carried out after decor end panel is in place.
IMPORTANT: To reduce the risk of damage to cut panels due to moisture
ingress (where they are exposed to moisture) all raw edges must be sealed
using a suitable moisture resistant sealant, such as waterproof varnish or
silicone.
NOTE: To finish the cabinet run at the top, a cut decor end can be used to
create a thin cornice. Secure to the front of the cabinets using 25mm CSK
screws.
NOTE: When using base and wall decor ends, pilot drill the decor end panel
and secure to the side of the cabinet using 25mm CSK screws.
IMPORTANT NOTE:
When using a 12mm thick decor end, use 25mm screws.
For profile kitchens, see Section 2.

119
Section 4 - Kitchen installation - Decor end panels and cornice/pelmets
Fixing Fixing
Section 4 - Kitchen installation - Decor end panels and cornice/pelmets
Carcase end
Door
Cornice profile
may vary
Carcase end
Door
Cornice profile
may vary
Carefully measure the cornice and cut to the correct lengths. Only use 45°
mitre joints at corners, if required.
Drill the cornice at suitable intervals, position the cornice on the top of the
cabinet, (making sure the cornice lines up with doors, decor end panels etc).
Screw into the cabinets using countersunk screws.
NOTE: If you are tiling the wall then a gap should be left where the return
cornice meets the wall to accommodate the tile thickness.
Position a small piece of cornice on top of the cabinet to determine
the position of the fitting. Secure the fitting onto the cabinet using
the screws provided. Gently tighten and check that the cornice is
correctly positioned.
Once cabinets are secured to the wall, position the mitre bonded
cornice sections and gently tighten all the fittings by hand, just
enough to hold the cornice securely.
Position the fittings on all wall cabinets as required, see installation
example below.
Installation example
We recommend one fitting is used above each door on a run of cabinets as
shown below.
NOTE: All corners must be mitre bonded.
45°
45°
25mm CSK screw
Alternative fixing method - Cornice screws
‘x’mm
Door
Cabinet front edge
Cabinet front edge.
1000mm500mm600mm
‘x’mm*
4.5 x 18mm CSK
*Use dimension ‘x’
to align other fittings.
‘x’mm
Door
Cabinet front edge
Cabinet front edge.
1000mm500mm600mm
‘x’mm*
4.5 x 18mm CSK
*Use dimension ‘x’
to align other fittings.
‘x’mm
Door
Cabinet front edge
Cabinet front edge.
1000mm500mm600mm
‘x’mm*
4.5 x 18mm CSK
*Use dimension ‘x’
to align other fittings.
‘x’mm
Door
Cabinet front edge
Cabinet front edge.
1000mm500mm600mm
‘x’mm*
4.5 x 18mm CSK
*Use dimension ‘x’
to align other fittings.
1
3
2

120
Section 4 - Kitchen installation - Thick decor end post
Thick decor end post Thick decor end post
Assembly A
Applications
A
Important Notes:
Ensure packaging is disposed of in a safe
environmentally friendly way
Flat decor end style application (base shown)
Measure and cut the decor end post to the correct height.
Note: Use the installed base/wall/tower cabinet as a guide.
Front Edge
Back Face
Decor End
595/599mm
70mm
70mm
18mm
50mm
505mm
Decor End
Post
Thick decor end post use examples
Decor End
Decor End
Cut sections
Screws (30mm)
KD Block
Note: Quantity of KD blocks
and screws dependent on the
size of decor end being used.
A B
B
C D
C
Plinth
Note: Decor end post is supplied in one length
and will require cutting. Ensure exposed cut ends are sealed
to avoid any moisture ingress using a waterproof varnish or PVA.
Note: Pilot holes need to be drilled before fixing the screws.
Note: Edging strip must be used on exposed
edges of the rails (shaker design).
Tall Wall
FH Wall Tower/Larder
Base
Assembly B, C, D
Decor end fitting
Cut the decor end panels to the correct size depending
on your style application and secure together as shown
in assembly A , B, C or D.
Note: When cutting multiple panels from
a decor end, ensure panel efficiency is considered.
For application ‘A’, use the ‘off-cuts’ of decor end
panels as blocks to secure/space the decor end from
the cabinet.
Fit the decor end to the side of the cabinet
securing through the cabinet using screws.
Note: Decor end post/decor end may require
scribing to the wall.
Decor End
Post
Front Edge
For a framed decor end style application
(base shown)
Note: Cross rails (top/bottom) can
be secured to the decor end using
screws or adhesive
Cross rails
(cut decor end panels)
Spacer section
(Decor end) use scrap
piece*
Decor End Panel
Cross rails (Decor End Panel)
A CB D
Frontal
Spacing
Frontal
Spacing
890mm*
*nominal planning height.
Consideration must be taken
for scribing to the floor as required
455mm70mm 70mm
180mm
Spacer
50mm
50mm
263mm
263mm
263mm
110mm
Note: Drill through the decor end
panel first before fitting the
cross rails.
Note: Make sure the pre finished edges of
the cross rails face the inside of the panel
Back Face Back Face
Decor End
Panel
Decor End
Panel
890mm
50mm
50mm
263mm
263mm
263mm
Cross rails
on
front face
Pre-finished edge
of rail
Pre-finished edge
of rail
90mm
Screws
(30mm)
D
455mm
890mm
Decor End Panel
415 x
90mm
Rail
415 x
90mm
Rail
Scrap*
B C D
Cutting plan for optionsCutting plan for option
455mm
Decor End Panel
Scrap
Scrap
ScrapScrap
415 x
90mm
Rail
415 x
90mm
Rail
720mm
Scrap*
B C
D
1 2 3 4 1 2 3 4

121
Section 4 - Kitchen installation - Thick decor end post
Thick decor end post Thick decor end post
Section 4 - Kitchen installation - Thick decor end post
Assembly A
Applications
A
Important Notes:
Ensure packaging is disposed of in a safe
environmentally friendly way
Flat decor end style application (base shown)
Measure and cut the decor end post to the correct height.
Note: Use the installed base/wall/tower cabinet as a guide.
Front Edge
Back Face
Decor End
595/599mm
70mm
70mm
18mm
50mm
505mm
Decor End
Post
Thick decor end post use examples
Decor End
Decor End
Cut sections
Screws (30mm)
KD Block
Note: Quantity of KD blocks
and screws dependent on the
size of decor end being used.
A B
B
C D
C
Plinth
Note: Decor end post is supplied in one length
and will require cutting. Ensure exposed cut ends are sealed
to avoid any moisture ingress using a waterproof varnish or PVA.
Note: Pilot holes need to be drilled before fixing the screws.
Note: Edging strip must be used on exposed
edges of the rails (shaker design).
Tall Wall
FH Wall Tower/Larder
Base
Assembly B, C, D
Decor end fitting
Cut the decor end panels to the correct size depending
on your style application and secure together as shown
in assembly A , B, C or D.
Note: When cutting multiple panels from
a decor end, ensure panel efficiency is considered.
For application ‘A’, use the ‘off-cuts’ of decor end
panels as blocks to secure/space the decor end from
the cabinet.
Fit the decor end to the side of the cabinet
securing through the cabinet using screws.
Note: Decor end post/decor end may require
scribing to the wall.
Decor End
Post
Front Edge
For a framed decor end style application
(base shown)
Note: Cross rails (top/bottom) can
be secured to the decor end using
screws or adhesive
Cross rails
(cut decor end panels)
Spacer section
(Decor end) use scrap
piece*
Decor End Panel
Cross rails (Decor End Panel)
A CB D
Frontal
Spacing
Frontal
Spacing
890mm*
*nominal planning height.
Consideration must be taken
for scribing to the floor as required
455mm70mm 70mm
180mm
Spacer
50mm
50mm
263mm
263mm
263mm
110mm
Note: Drill through the decor end
panel first before fitting the
cross rails.
Note: Make sure the pre finished edges of
the cross rails face the inside of the panel
Back Face Back Face
Decor End
Panel
Decor End
Panel
890mm
50mm
50mm
263mm
263mm
263mm
Cross rails
on
front face
Pre-finished edge
of rail
Pre-finished edge
of rail
90mm
Screws
(30mm)
D
455mm
890mm
Decor End Panel
415 x
90mm
Rail
415 x
90mm
Rail
Scrap*
B C D
Cutting plan for optionsCutting plan for option
455mm
Decor End Panel
Scrap
Scrap
Scra
pS
crap
415 x
90mm
Rail
415 x
90mm
Rail
720mm
Scrap*
B C
D
1 2 3 4 1 2 3 4
/