Select Blinds CASSETTE User manual

Type
User manual

Select Blinds CASSETTE is a versatile window treatment solution that offers both inside and outside mount options, making it suitable for a wide range of window types and sizes. It features a cassette headrail that conceals the operating system, providing a clean and streamlined look. The included child safety device ensures safe operation, preventing accidents involving cords and chains. Installation is simple and can be completed by non-professionals, with clear instructions and all necessary hardware provided.

Select Blinds CASSETTE is a versatile window treatment solution that offers both inside and outside mount options, making it suitable for a wide range of window types and sizes. It features a cassette headrail that conceals the operating system, providing a clean and streamlined look. The included child safety device ensures safe operation, preventing accidents involving cords and chains. Installation is simple and can be completed by non-professionals, with clear instructions and all necessary hardware provided.

11
max. 800 mm / 31.49 in
max.50 mm
1.96 in max.50 mm
1.96 in
min.40 mm
1.96 in min.40 mm
1.96 in
WARNING
Installation Instructions - Cassette
Read the instructions carefully before assembling and using the product. Assembling process can be completed by non-professionals.
For indoor use only.
Young children can strangle in the loop of pull cords, chains and tapes,
and cords that operate window coverings.
To avoid strangulation and entanglement,
keep cords out of the reach of young children.
Cords may become wrapped around a child’s neck
Move beds, cots and furniture away from window covering cords.
Do not tie cords together.
Make sure cords do not twist together and form a loop.
Inside mount
Outside mount
22
1
Click!
3
Click!
2
1
2
Install the child safety device
as specified in the childsafe
manual.
WARNING
Wall mounted only
Place on chain side
33
1
1
3
2
2
1
2
4
3
1
3
Removal
Only for wall mounting
11
QR
rtube.nl/red233
W-30 mm / 1.18 in
min.15 mm
0.59 in
max. 3,5mm
0.13 in
min.15 mm
0.59 in
Installation
Read the instructions carefully before assembling and using the product.
Assembling process can be completed by non-professionals. For indoor use only.
Young children can strangle in the loop of pull cords, chains and tapes,
and cords that operate window coverings.
To avoid strangulation and entanglement,
keep cords out of the reach of young children.
Cords may become wrapped around a child’s neck
Move beds, cots and furniture away from window covering cords.
Do not tie cords together.
Make sure cords do not twist together and form a loop.
WARNING
INSTALLATION INSTRUCTIONS - STANDARD BRACKETS
22
1
2
33
WARNING
Install the child safety device
as specified in the childsafe
manual.
44
1
2
1
2
Removal
MN180055_20180726
231
23
1
B
C
12
3
A
WARNING
nside
A
nside
B
Outside oun d outside window
C
MN180055_20180726
231
23
1
B
C
123
A
WARNING
nside
A
nside
B
Outside oun d outside window
C
MN180055_20180726
231
23
1
B
C
123
A
WARNING
nside
A
nside
B
Outside oun d outside window
C
MN180055_20180726
231
23
1
B
C
123
A
WARNING
nside
A
nside
B
Outside oun d outside window
C
The Safety Device is a fixed tension device for operating ball-chains that form a continuous loop. This device must be applied in chain loops
that do not have a breakaway design. The safety device prevents free-hanging loops in operating chains. Install the safety device at the maximum
distance possible from the control mechanism to prevent slack in the loop. Upon delivery to the end user, the device must be attached to the chain.
The tensioning device is provided with fasteners for installation to wooden wall substrates. Please read the following information when installing
the tensioning device. For other wall types please use appropriate screws that are suitable for your wall.
WARNING
Position so there is no slack
within the loop.
Mount the safety device.
A: Inside Mount: Fully recessed shade and safety device
B: Inside Mount: Partially recessed shade and safety device
C: Outside Mount: Shade and safety device outside window
Position so there is no slack
within the loop.
Secure mounting bracket. Mount safety device to the
mounting bracket.
Position so there is no slack
within the loop.
Secure mounting bracket. Mount safety device to the
mounting bracket.
INSTALLATION TIPS
Shade will not operate if safety device is
upside down.
Position the chain around the circular side of
the safety device before installing.
Install the safety device so there is no slack
in the chain loop.
Note: On outside mount, the screws will be installed on an angle. This is
normal and the screws may not be flat against the bracket.
11
W-36 mm / 1.42 in
min.18 mm
0.70 in min.18 mm
0.70 in
INSTALLATION MANUAL
WARNING
Installation - Fascia
Read the instructions carefully before assembling and using the product.
Assembling process can be completed by non-professionals. For indoor use only.
Young children can strangle in the loop of pull cords, chains and tapes, and cords that
operate window coverings.
To avoid strangulation and entanglement, keep cords out of the reach of young children.
Cords may become wrapped around a child’s neck
Move beds, cots and furniture away from window covering cords.
Do not tie cords together.
Make sure cords do not twist together and form a loop.
Outside Mount
Inside Mount
Step One:
Use the brackets to mark the screw locations
On outside mount, make your marks so the distance from the outside
edge of the bracket to the outside edge of the other bracket equals your
ordered width
Note: Brackets must be level to each other for the shade to operate properly
(for both inside mount and outside mount)
Step Two:
Recommend you pre-drill the screw holes using a 5/64" drill bit where
you marked the screw locations
Mount the brackets using 2 screws for each bracket
22
Installation
INSTALLATION MANUAL
Step Three:
The idle side attachment should be on the opposite side of the chain
(simply click into the bracket if it is not already attached)
Step Four:
Slide the chain guide onto the clutch
Step Five:
Slide the idle side of the shade on to the idle side connector
Step Six:
Click the control side of the shade the bracket
33
End caps can only be installed when
the blind is installed on the recess.
INSTALLATION MANUAL
Step Seven:
Connect the fascia to the top of the brackets and rotate it down
to click into the bottom side of the brackets
Step Eight:
On outside mount only, attach the bracket endcaps over each bracket
Final Step:
Install the child safety device
CORNICE INSTALLATION
INSIDE MOUNT
NOTE:
Your cornice will have pre-drilled holes.
The brackets for your shade will come installed on the cornice (if the cornice and
shade are ordered together).
Install cornice before installing the shade.
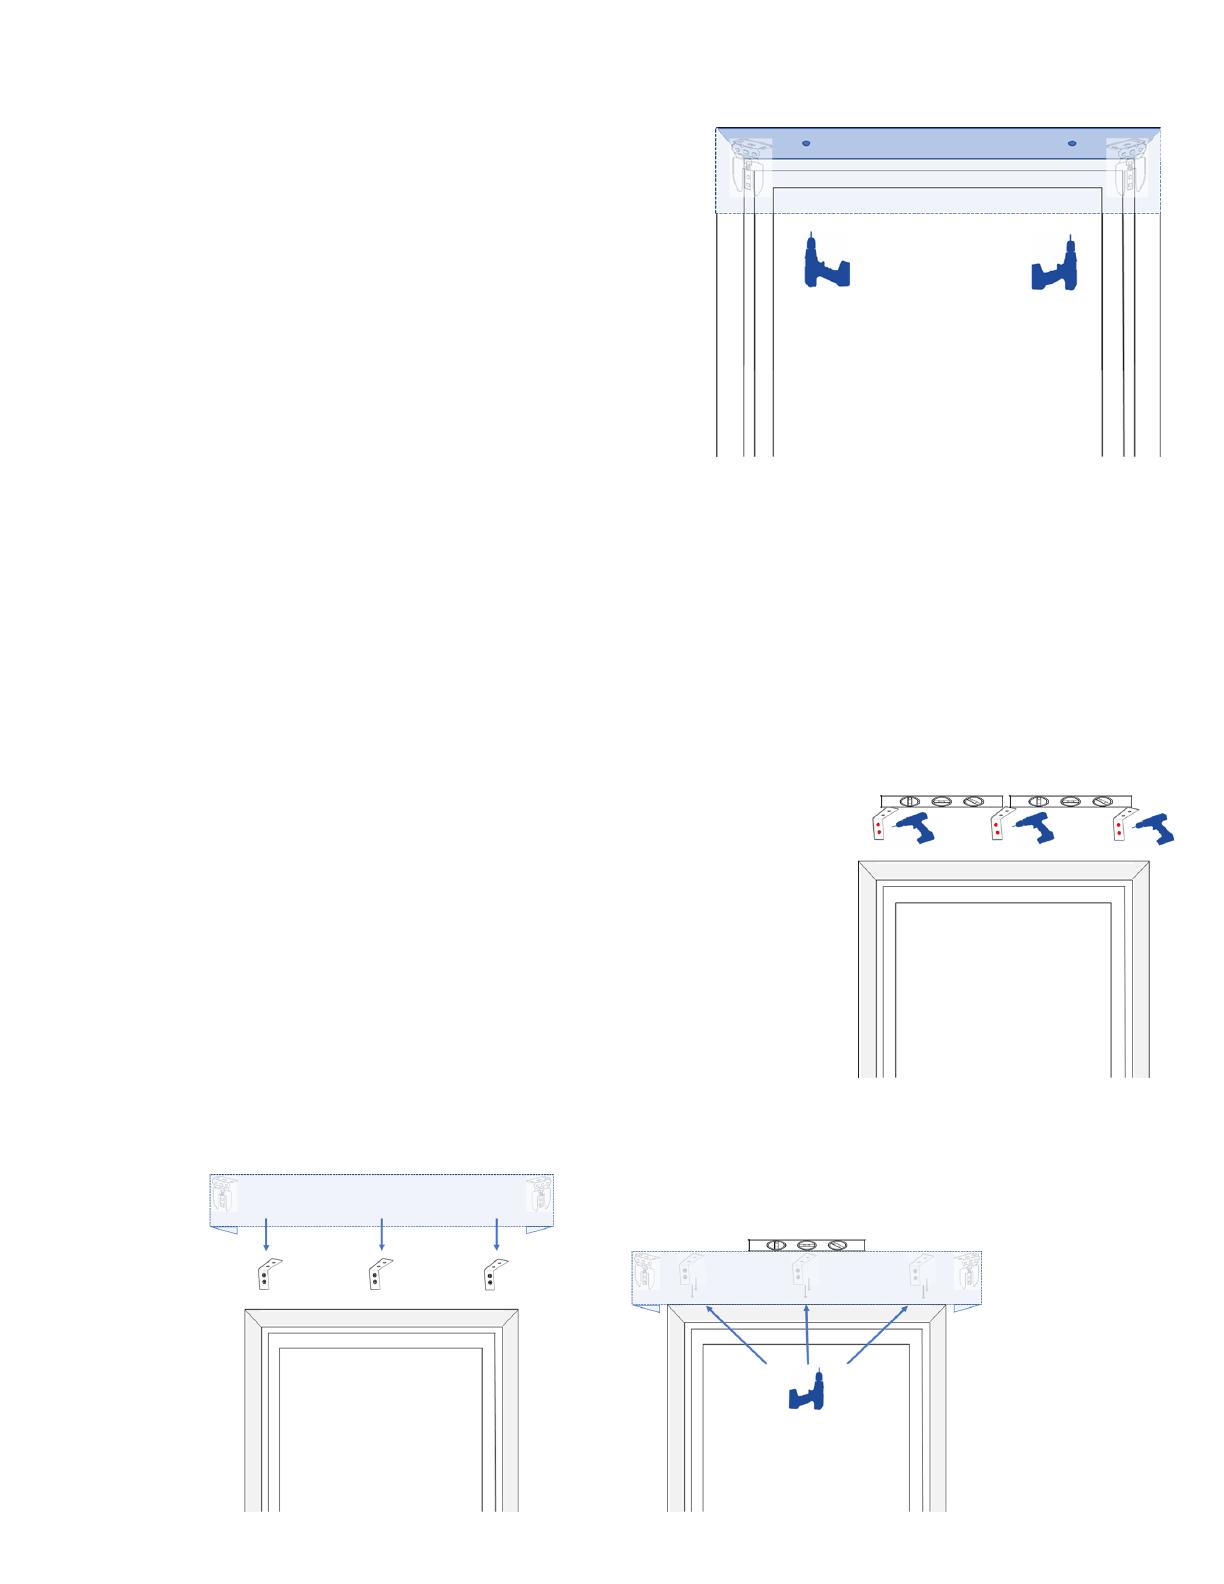
1. Hold the cornice to the top of your window frame and set it back until it is
flush with your wall or until it is touching the back of the window opening.
Be sure the cornice is centered in the opening.
2. Pre-drill holes for your screws through each pre-drilled hole in your cornice.
3. Secure your cornice to the window by screwing through each pre-drilled hole.
4. Once the cornice is mounted, you can then install the shade.
CORNICE INSTALLATION
OUTSIDE MOUNT
NOTE:
The brackets for your shade will come installed on the cornice
(if the cornice and shade are ordered together).
Install cornice before installing the shade.
1. Make sure the surface you intend to install your cornice hardware is sturdy enough to support the
brackets. You will need to screw into wood studs that are strong enough to securely bond with the
included screws or you will need to use fasteners to securely support the brackets. Please note
secure fasteners are not included.
2. Center the cornice over the window opening at your desired height. Mark the position of the ends
of the cornice on the wall. Measure in 6" from each end and using the cornice bracket mark the
screw holes with a pencil. If you have additional cornice brackets, space them evenly between the
outer brackets. Make sure all the mounting brackets are level with one another.
3. Pre-drill the holes for each cornice bracket and then secure the brackets to your mounting surface.
4. Place the cornice on top of the brackets and center it to the window. Check again that the cornice
is level. Hold the cornice in place and screw through the top of each bracket into the cornice.
5. Once the cornice is secured to each bracket, then you can install the shade.
SIDE TRACKS
  • Page 1 1
  • Page 2 2
  • Page 3 3
  • Page 4 4
  • Page 5 5
  • Page 6 6
  • Page 7 7
  • Page 8 8
  • Page 9 9
  • Page 10 10
  • Page 11 11
  • Page 12 12
  • Page 13 13

Select Blinds CASSETTE User manual

Type
User manual

Select Blinds CASSETTE is a versatile window treatment solution that offers both inside and outside mount options, making it suitable for a wide range of window types and sizes. It features a cassette headrail that conceals the operating system, providing a clean and streamlined look. The included child safety device ensures safe operation, preventing accidents involving cords and chains. Installation is simple and can be completed by non-professionals, with clear instructions and all necessary hardware provided.

Ask a question and I''ll find the answer in the document

Finding information in a document is now easier with AI