Cuisinart WM-SW2N User manual
- Category
- Sandwich makers
- Type
- User manual
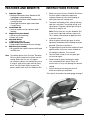
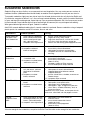
The Cuisinart WM-SW2N Sandwich Grill is a versatile kitchen appliance designed for making delicious sandwiches, omelets, and pastries. With its nonstick cooking plates, you can easily create a variety of hot sandwiches, from classic grilled cheese to inventive combinations of your favorite ingredients. The indicator lights let you know when the grill is preheated and when your food is ready to eat. The lock-down lid ensures that your sandwiches are cooked evenly and the rubber feet keep the grill steady on your countertop.
The Cuisinart WM-SW2N Sandwich Grill is a versatile kitchen appliance designed for making delicious sandwiches, omelets, and pastries. With its nonstick cooking plates, you can easily create a variety of hot sandwiches, from classic grilled cheese to inventive combinations of your favorite ingredients. The indicator lights let you know when the grill is preheated and when your food is ready to eat. The lock-down lid ensures that your sandwiches are cooked evenly and the rubber feet keep the grill steady on your countertop.


-
 1
1
-
 2
2
-
 3
3
-
 4
4
-
 5
5
-
 6
6
-
 7
7
-
 8
8
-
 9
9
-
 10
10
-
 11
11
-
 12
12


Cuisinart WM-SW2N User manual
- Category
- Sandwich makers
- Type
- User manual
The Cuisinart WM-SW2N Sandwich Grill is a versatile kitchen appliance designed for making delicious sandwiches, omelets, and pastries. With its nonstick cooking plates, you can easily create a variety of hot sandwiches, from classic grilled cheese to inventive combinations of your favorite ingredients. The indicator lights let you know when the grill is preheated and when your food is ready to eat. The lock-down lid ensures that your sandwiches are cooked evenly and the rubber feet keep the grill steady on your countertop.
Ask a question and I''ll find the answer in the document
Finding information in a document is now easier with AI
Related papers
-
Cuisinart WM-SW2 User manual
-
-
-
Cuisinart GR-4N User manual
-
-
-
-
-
Cuisinart GR-150P1 User manual
-
