Page is loading ...


IMPORTANT SAFEGUARDS
When using electrical appliances, especially when children are
present, basic safety precautions should always be followed,
including the following:
READ ALL INSTRUCTIONS BEFORE USING.
1. Read all instructions.
2. Do not touch hot surfaces. Use handles and knobs.
3. To protect against electrical hazards, do not immerse cord, plug or
appliance in water or other liquid.
4. Close supervision is necessary when any appliance is used by or
near children.
5. Unplug from outlet when not in use and before cleaning. Allow
to cool before putting on or taking off parts or before cleaning.
6. Do not operate with a damaged cord or plug or after the appliance
malfunctions or has been dropped or damaged in any manner.
Return appliance to the nearest authorized service facility for
examination, repair or electrical or mechanical adjustment.
7. The use of attachments not recommended by the manufacturer
may cause hazards.
8. Keep the cord away from heated surfaces. Do not let the cord
hang over the edge of a table or counter.
9. Do not use outdoors.
10. Do not place on or near a hot gas or electric burner or in a heated
oven.
11. Use extreme caution when moving an appliance containing hot oil
or other hot liquids.
12. To use, plug cord into electric outlet. To disconnect, grasp plug and
remove from outlet. Do not pull on the cord.
13. Do not use the appliance for other than its intended use.
SAVE THESE INSTRUCTIONS
This product is for HOUSEHOLD USE ONLY.
NOTE: This product has a polarized plug (one blade is wider than the other). As a
safety feature, this plug fits in a polarized outlet only one way. If the plug does not fit
into the outlet, reverse the plug and try again. If it still does not fit, contact a qualified
electrician. Do not attempt to defeat this safety feature. A short power supply cord is
provided to reduce the hazards resulting from entanglement or tripping over a longer
cord. An extension cord may be used with care; however, its marked electrical rating
should be at least as great as the electrical rating of the appliance. The extension cord
should not drape over the counter or tabletop, where it can be pulled on by children or
tripped over.
1

Congratulations on the purchase of the GT Xpress 101.
I know you will enjoy this product as much as I do
because it is so easy to use, so versatile and so fast!
Even with today’s busy lifestyle, you will be able to
provide homemade goodness for yourself and your
family!
Finally, everyone can be an expert omelet maker
because all you have to do is add the ingredients –
there’s no turning necessary and the omelets will be evenly browned, puffy
and beautiful. And the specially designed lifting tool will make removal sim-
ple. I know you’ll really enjoy my leftover makeovers – I’ve found the a way
to make those “doggie bags” into something special. There’s no need to run
to the fast food chain on the corner for a Grilled Stuffed Burrito - you can
make them yourself with fresh ingredients in less than 10 minutes! Now
when you’re craving something sweet in the evening and the cookie jar is
empty, you can have chocolate cake with a luscious candy bar filling in just 7
minutes. It will really hit the spot!
I know that after you’ve tried it, you’ll find the GT Xpress 101 indispensable
and you’ll use it every day, so I’ve included plenty of recipes from which to
choose. The key is to keep it out on your counter. You’ll find uses that you
never dreamed of.
Sincerely,
Cathy E. Mitchell
2

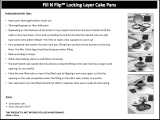
Flexible hinge allows rising during cooking.
Ready light goes out when
the unit is preheated.
Cord Wrap for convenient cord storage.
Stores on end to save space.
Lifting tool for easy removal
of cooked foods.
Cooking wells designed
for single-size portions.
Nonstick finish provides easy cleanup.
3

USE
Before using for the first time, wipe the interior and exterior surfaces of the unit
with a soft, damp cloth to remove any dust that may have accumulated during
packaging. Dry completely with a soft, dry cloth.
We recommend a one-time seasoning of the nonstick surface of the cooking
wells before using to ensure the nonstick release performance of the finish.
After cleaning and drying, brush the top and bottom of the cooking wells lightly
with cooking oil. Wipe excess oil with an absorbent paper towel or dry cloth.
Close the cover.
After the initial seasoning, oil, butter or margarine and nonstick cooking sprays
are not necessary to keep most foods from sticking. Should you desire to use
one or more to add flavor to the food being cooked, use only a small amount
on the upper and/or lower cooking well surfaces to avoid build up.
Plug the unit into a standard 120V outlet. The ready light will illuminate indicat-
ing that the unit is preheating. Unless otherwise indicated in the recipe, allow
the unit to preheat (approximately 2 to 3 minutes).
Prepare the recipe of your choice.
When the ready light goes out indicating the unit is preheated, fill one or both
wells according to the recipe. Close the cover. The light will cycle on and off
during cooking to maintain proper cooking temperature.
When cooking time has elapsed, carefully open the cover and remove the food
using the enclosed lifting tool. We have included a nylon tool for removing
cooked foods from the wells. To avoid damage to the nonstick surface, use
only plastic, nylon, wood or specially designed utensils for nonstick coatings.
Avoid using metal or sharp objects.
Close cover and wait for the light to go out before adding more ingredients or
unplug and allow unit to cool before cleaning and storing.
Never use the appliance with the cover in the open position.
4

CATHY’S TIPS
Cooking surfaces will be hot. Use care not to come in contact with hot sur-
faces.
Do not overfill cooking wells.
If food will rise during cooking (omelets, cakes, muffins, etc.), fill the wells
almost to the top of the lower well to allow space for rising during cooking.
When using a standard measuring cup, 3/4 cup is usually the optimum amount.
If foods are not browned on the top, they have not risen sufficiently to touch
the top surface. Fill the bottom wells almost to the top to ensure proper rising
to the cooking surface.
For sandwiches and other items that will not rise during cooking, use enough
filling to bring the top surface in contact with the cooking surface in the cover.
It is not necessary for the cover to close completely. If food does not come in
contact with the top surface, you may choose to turn the food half way through
cooking to ensure adequate browning on the top and bottom surfaces.
Do not open and close lid frequently during the cooking period as the heat will
be lost and additional cooking time will be required.
Use caution when serving food. Fillings may be very hot.
Cathy finds a 2-cup plastic shaker comes in very handy for mixing “pie” crust,
beating eggs, mixing cake batter, etc.
Foods frequently appear done on the outside before the inside is completely
cooked. Be sure to allow entire cooking time and check inside with a tooth-
pick. In many cases they will continue to cook on the without additional
browning of the outside.
Most of the recipes included provide 2 servings. When cooking for more than
2, wrap the first batch in foil and keep warm on top of the GT Xpress 101 while
the second batch is cooking.
Cook different foods at the same time when serving just 1 or when variety is
desired, like the salmon and rice.
Keep a damp towel handy to wipe out the wells after use.
Unless otherwise stated in the recipe, allow the closed unit to preheat until the
red light goes out before adding ingredients to the cooking wells.
Never use sharp or metal tools when removing foods from the wells as they
may damage the nonstick surface. Use only the enclosed lifting tool or other
tools made of materials suitable for use with a nonstick surface such as nylon,
plastic and wood.
5

CLEANING AND STORAGE
After use and before cleaning or storing, remove plug and wait for the unit to
cool completely. Wipe the inside and the edges of the wells with a damp, soft
cloth. Should egg or filling be difficult to remove, use a cleaning pad marked
safe for nonstick cooking surfaces. Dry with a soft cloth. Do not use harsh or
abrasive cleaners or scouring pads on the nonstick or the exterior surfaces as
they may cause damage.
There is a handy cord wrap on the bottom of the unit for compact and neat
cord storage. The unit is designed to close and stand on the hinged surface
for compact storage.
MAINTENANCE INSTRUCTIONS
This appliance requires little maintenance. It contains no user serviceable
parts. Do not try to repair it yourself. Refer it to qualified personnel at an
appliance repair center if servicing is needed.
6

Breakfast Pigs-in-a-Blanket
8 brown ‘n serve sausages
1 package (6 ounces) complete pancake mix
1 cup water
Place 4 sausages in each well of GT Xpress 101 prior to preheating.
Cook 2 to 3 minutes until light goes out. Remove 2 sausages from
each well.
Meanwhile, mix batter and water in bowl or shaker. Place 1/4 cup
batter in each well over sausages. Cook 7 minutes. Repeat with
remaining sausages and batter.
Serve warm with butter and syrup. Serves 4.
Mixed Berry Corn Pancakes
1 package (8.5 ounces) corn muffin mix
1 egg
2 Tablespoons melted margarine or corn oil
1/2 cup milk
1/2 cup mixed berries (blueberries, raspberries, etc.)
Combine muffin mix, egg, margarine and milk. Stir in berries. Add
3/4 cup of the mixture to each well.
Cook 10 minutes or until well browned and a toothpick inserted into
the center comes out clean. Wrap in foil to keep warm or serve while
making the last pancake. Spoon the remaining batter into the well.
Serve with blueberry, raspberry or maple syrup. Serves 3.
7

French Toast and Ham Wrap
1 egg, lightly beaten
1/4 cup milk
1/2 teaspoon cinnamon
1/4 teaspoon vanilla
2 large slices of cinnamon or raisin bread
2 slices ham
nonstick cooking spray
Combine the egg, milk, cinnamon and vanilla in a shallow bowl.
Soak the bread slices in the mixture and allow the bread to soak up
the liquid. Spray the wells with nonstick cooking spray. Place 1 slice
of ham on each slice of bread and fold lengthwise to enclose the
ham and place one in each well.
Cook 5 minutes or until the bread is nicely brown. Serves 2.
Cinnamon Rolls
1 can (12.4 ounces) refrigerated cinnamon rolls
nonstick cooking spray
Spray top of wells with nonstick cooking spray. Place 2 cinnamon
rolls in each well.
Cook 6 minutes. Repeat with remaining 4 rolls or refrigerate for 24
hours. Frost and serve. Serves 8.
Muffin Mix
1 pouch (6.4 to 6.5 ounces) or one small box (7 to 8.5 ounces) any
type muffin mix
Mix muffin mix according to package directions. Divide batter
between two wells.
Cook 6 to 8 minutes. Serves 2 to 4.
8

Sloppy Joe and Egg Breakfast Pie
1/2 (9-inch) refrigerator pie crust, cut in 2 pieces
1/2 cup cooked or canned sloppy Joes
2 eggs
2 Tablespoons salsa
2 Tablespoons shredded cheddar cheese
2 Tablespoon shredded Monterey jack
Carefully fit one piece of pie crust into each well. Cook 2 minutes.
Spoon 1/2 the meat mixture into the crust leaving room in the center
for the egg. Carefully crack an egg into each shell.
Cook 6 to 7 minutes, to desired doneness. Remove spoon salsa
over each egg and top with the cheeses. Serves 2.
Breakfast “On-the-Go” Burritos
2 (8-inch) flour tortillas
3 brown ‘n serve sausages, thinly sliced
2 eggs, beaten with 2 Tablespoons milk and salt and pepper to taste
2 slices American cheese
Place half the sausage slices in each well of GT Xpress 101 prior to
preheating. Cook 2 to 3 minutes until light goes out. Divide beaten
egg, milk and seasonings between 2 cooking wells. Cook 2 minutes.
Stir slightly to scramble and cook 2 more minutes.
Meanwhile, place one cheese slice in the center of each tortilla. Top
each with half the cooked egg and sausage mixture. Rub a small
amount of water along the perimeter of each tortilla to seal. Fold
each tortilla in half and place one in each cooking well.
Cook 4 minutes and wrap in a napkin to serve. Serves 2.
9

Xpress Breakfast
2 eggs, beaten
2 large English muffins, split and cut in half vertically
2 slice Canadian bacon or pre-cooked smoked bacon or 1 slice ham,
cut in half
2 slice cheese
Pour half the egg into each cooking well. Cook 2 minutes.
Meanwhile, put cheese and bacon or ham on one half of each
English muffin. Remove egg and place over cheese and bacon or
ham. Put on the other half of each English muffin. Put one muffin in
each well. Cook about 2 minutes until cheese is melted and muffin is
toasty. Serves 2.
Biscuit Breakfast Bake
2 large or 4 small refrigerator biscuits
2 whole eggs
1 slice American cheese, cut in half
2 slices pre-cooked bacon, cut in half
Press 1 large or 2 small biscuits together to form a 6-inch oval. Repeat
with remaining biscuit or biscuits. Carefully fit one oval into each well.
Crack an egg, onto each biscuit and top each with half the cheese and
half the bacon.
Cook 7 minutes. Serves 2.
Scrambled Biscuit Breakfast Bake - substitute beaten egg for whole egg.
Canadian Biscuit Breakfast Bake - substitute 2 slices Canadian bacon
or the bacon.
Ham Biscuit Breakfast Bake - substitute 2 slices ham for the bacon.
Sausage Biscuit Breakfast Bake - substitute 4 pre-cooked breakfast
sausages for the bacon.
Low-Cholesterol Biscuit Breakfast Bake - substitute 1/2 cup egg
substitute for the eggs, reduced-fat cheese for the cheese and
Canadian bacon for the bacon.
10

Breakfast Bagel Nosh
1 small or 1/2 large bagel, split and sliced in half vertically
2 eggs
2 slices Canadian Bacon
1 slice American cheese
Fit the bottom half of each bagel into well. Carefully crack an egg
onto each bagel. Top each with half the cheese and half Canadian
bacon and the top of the bagel.
Cook 8 to10 minutes. Serves 2.
Scrambled Breakfast Bagel Nosh – substitute 2 beaten eggs for
whole eggs.
Breakfast Hash
1 cup frozen, shredded hash brown potatoes
1/4 teaspoon garlic powder
2 Tablespoons chopped onions
1/2 cup shredded cheddar cheese
2 fully-cooked frozen breakfast sausage links, chopped
3 eggs, lightly beaten
1/2 teaspoon salt
1/4 teaspoon pepper
Combine all ingredients. Spoon 1/2 of the mixture into each well.
Cook 10 minutes or until well browned. Serves 2.
Vegetarian Breakfast Hash - substitute 2 Tablespoons chopped
broccoli or well-drained chopped spinach, 1 chopped mushroom and
3 chopped grape tomatoes for the sausage.
11

Huevos Ranchero
1 (7-inch) flour tortilla, cut in half
1/2 cup salsa
2 eggs
2 Tablespoons shredded cheddar cheese
Carefully fit half the tortilla into each well. Spoon 1/2 the salsa into
each tortilla cup leaving room in the center for the egg. Crack and
egg into the center of each well.
Cook 8 to 10 minutes to desired degree of doneness. Serves 2.
Steak and Egg Omelet
Leftover Makeover
1 piece of leftover grilled steak, chopped
1/2 leftover baked potato, chopped
sauteed mushrooms, chopped
3 eggs, beaten
2 Tablespoons shredded cheese, optional
Place half the chopped steak, potato and mushrooms in each well.
Pour half the beaten eggs into each well. Top each with 1
Tablespoon cheese.
Cook 7 minutes. Serves 2.
12

Fried Eggs
nonstick cooking spray or 1/4 teaspoon butter or margarine
2 eggs
Salt and pepper
Spray wells with vegetable oil spray. Carefully crack an egg into
each well.
Cook 2 to 3 minutes to desired doneness. Serves 1 to 2.
Tortillas and Eggs
3 eggs
1 Tablespoon milk
1/2 cup shredded cheese (cheddar, Colby, Monterey Jack)
2 Tablespoons crumbled cooked sausage or diced ham
6 large or 4 medium tortilla chips, crushed
Place half the crushed tortilla chips in each well. Pour eggs beaten
with milk over the top of chips, dividing equally between wells. Top
with meat and cheese.
Cook 10 minutes. Serves 2.
Poached Eggs
nonstick cooking spray
1/3 cup water
2 eggs
Salt and pepper
Spray wells lightly with nonstick cooking spray. Pour about half the
water into each well. Allow water come to a boil, about 2 minutes.
Carefully crack an egg into each well.
Cook 2 to 3 minutes to desired doneness. Serves 1 to 2.
13

Veggie and Cheese Omelet
Veggie and Cheese Omelet
3 eggs, lightly beaten
1 Tablespoon milk
1 Tablespoon chopped onion
2 mushrooms, chopped
2 Tablespoon chopped red peppers
1 Tablespoons chopped green peppers
1 slice cheese, chopped
1/4 teaspoon garlic powder
1/2 teaspoon salt
1/4 teaspoon pepper
Combine all ingredients. Pour half the mixture into each well.
Cook 10 minutes or until omelets are puffy and well browned and knife
inserted in the center comes out clean. Serves 2.
Cholesterol-Free Omelets - substitute 1/2 cup egg substitute for the eggs
and fat-free cheese for the cheese.
Spinach and Feta Omelets - substitute 1/2 cup chopped fresh or
well-drained cooked spinach for peppers and 2 Tablespoons of feta
cheese for the sliced cheese.
Western Omelet - substitute 2 Tablespoons chopped ham for the cheese.
Egg Foo Yong - substitute 2 Tablespoons beans sprouts for peppers.
Add 2 Tablespoons chopped, cooked shrimp, chicken or pork and 1/2
teaspoon soy sauce.
14

Asparagus and Beef Rollups
2 (4-ounce) thinly sliced top round sandwich steaks, pounded
2 slices Swiss cheese
4 asparagus spears, trimmed
hollandaise sauce
Place one piece of cheese on each piece of pounded beef. Add 2
asparagus spears to each. Roll up jellyroll fashion. Place the rolls
seam side down into the wells.
Cook 7 minutes or until well browned. Serve with hollandaise or your
favorite sauce. Serves 2.
Asparagus and Savory Beef Rollups - substitute 2 Tablespoons
Garlic Spread (page 39) for Swiss cheese. Spread half on each
steak. Omit hollandaise sauce.
Crab Stuffed Mushrooms
6 medium-size mushroom, stems removed
1/2 cup crabmeat
1 Tablespoon mayonnaise
1 teaspoon mustard
1/4 teaspoon garlic powder
1/4 teaspoon onion powder
Combine the crabmeat, mayonnaise, mustard, garlic powder and
onion powder. Spoon the mixture into mushroom caps. Place 3
stuffed mushrooms in each well.
Cook 7 minutes.
15

16
Meat Lovers Omelet
3 eggs lightly beaten with 1 Tablespoon milk
2 pre-cooked sausage links, cut into slices
1/4 cup diced ham
1 Tablespoon sliced mushrooms
1 Tablespoon chopped green pepper
1/2 cup shredded cheese (mozzarella, cheddar, Monterey jack, etc)
Add sausage, ham, mushrooms, pepper and cheese to the egg and
milk mixture. Stir well. Divide between two wells.
Cook 10 minutes or until knife inserted into center comes out clean.
Serves 2.
Seafood Stuffed Salmon
2 skinless salmon filets
2/3 cup cooked shrimp or crabmeat or mixture of both, finely
chopped
Slice salmon filets vertically without going all the way across, to form
pockets for stuffing. Stuff each with half the chopped seafood. Place
one half in each well.
Cook 6 to 8 minutes. Serves 2.
Seafood Stuffed Sole - substitute 2 large filet of sole for salmon.
Spread filling on one half of each filet and fold in half. Place one
half in each well.

17
Egg, Cheese and Canadian Bacon Bake
4 slices Canadian bacon
2 eggs
2 Tablespoons shredded cheddar cheese
Carefully place 2 slices of Canadian bacon into each well. Crack
one egg into each well.
Cook 7 to 8 minutes. Sprinkle with cheese. Serves 2.
Scrambled Egg, Cheese and Canadian Bacon Bake - substitute
beaten eggs for whole eggs.

Roasted Red Pepper Turkey, Ham and Cheese Wraps
2 (8-inch) red roasted pepper-flavored flour tortillas
1/2 Tablespoon sun-dried tomato mayonnaise
2 slices ham
2 slices turkey
12 baby spinach leaves
2 thin slices red onion, separated into rings
2 slices Swiss cheese
Spread half the mayonnaise on each tortilla. Top each with half the
remaining ingredients. Fold in sides and roll. Place one in each well.
Cook 7 to 8 minutes or until tops are well browned. Serves 2.
Monte Cristo Sandwich
4 slices Italian bread
2 teaspoons mayonnaise
2 teaspoons mustard
2 slices ham
2 slices Swiss cheese
1 egg, lightly beaten
3 Tablespoons milk.
1/8 teaspoon each onion powder, garlic powder and pepper
nonstick cooking spray
Spread the bread with mayonnaise and mustard. Place cheese and
ham on bread. Top with the second slice of bread. Combine egg,
milk and seasonings. Dip each sandwich into the mixture allowing
the bread to soak up all the liquid. Spray the wells with nonstick
cooking spray. Carefully fit the sandwiches into the wells.
Cook 5 minutes or until the bread is golden brown. Allow the
sandwiches to cool for a few minutes before serving because the
filling is extremely hot. Serves 2.
18

Reuban Wrap
2 (8-inch) flour tortillas
2 teaspoons deli mustard
8 thin slices corned beef
2 thin slices Swiss cheese
2 Tablespoons well-drained sauerkraut
Spread half the mustard on each tortilla. Top each with half the
corned beef, Swiss cheese and sauerkraut. Fold in sides of tortilla
and roll. Place one wrap in each well.
Cook 7 to 8 minutes or until tops are well browned. Serves 2.
Grilled Turkey Bacon Ranch Rollup
2 (8-inch) flour tortillas
4 Tablespoons ranch dressing
fresh spinach leaves
4 to 6 slices deli turkey
4 slices pre-cooked bacon
2 slices cheese (Monterey jack, provolone, etc.)
Spread with half the dressing on each tortilla. Top each with half
spinach, turkey, bacon and cheese. Fold in sides and roll. Place
one in each well.
Cook 7 to 8 minutes. Serves 2.
Greek Pitawich
1 (6-inch) pita bread, sliced in half vertically forming two pockets
1/4 cup artichoke hearts, chopped
2 Tablespoons Greek olives, chopped
1 small tomato, chopped
1/4 cup crumbled feta cheese
Mix artichoke hearts, olives, tomato and cheese together in a small
bowl.
Divide the mixture in half, and stuff into each pocket. Place one half
in each well.
Cook 2 to 3 minutes, until cheese is melted. Serves 2.
19
/