Page is loading ...

INTELLIGENT LIGHTING CONTROLS, INC.
5229 Edina Industrial Boulevard
Minneapolis, Minnesota 55439
Phone 952 829 1900
FAX 952 829 1901
1-800-922-8004
USER GUIDE
Version 1A
10/18/17
Class A FCC Device Statement
Warning: Changes or modifications to this unit not expressly
approved by the party responsible for compliance could
void the user’s authority to operate this equipment.
Note: This equipment has been tested and found to comply
with the limits for a Class A digital device, pursuant to Part 15
of the FCC Rules. These limits are designed to provide reason-
able protection against harmful interference when the equip-
ment is operated in a commercial environment. This equip-
ment generates, uses, and can radiate radio frequency ener-
gy and, if not installed and used in accordance with the
instructions, may cause harmful interference to radio commu-
nications. Operation of this equipment in residential area is
likely to cause harmful interference in which case the user will
be required to correct the interference at his own expense.

ILC Apprentice 3 User Manual
Version 1A 10-18-17
Structure
The major components making up the
controller are:
• enclosure
• control transformer
• CPU board with integral keypad/display
• Input board(s)
• Output board(s)
• lighting relays
Enclosure – The enclosure is rated NEMA 1.
It contains a line voltage section for the
control transformers and lighting relays and
a low voltage section. Enclosures are avail-
able in 4 sizes to accommodate 4, 8, 16,
or 32 relays.
Transformer – A 40 VA multi-tap control
transformer, 120/277 VAC or optional
120/347 VAC that provides the 24 VAC
input to power the controller electronics
and input/output board(s).
CPU Board – The CPU board provides
the controller’s intelligence and memory.
Major components include:
• Keypad/display – 4-line LCD display and six
durable, comfortable push buttons.
•Power Supply – converts the 24 VAC input
to the +5, -5 and +12 VDC required by the
controller logic and communications circuits.
A power switch provides the means of ener-
gizing/de-energizing all controller electronics.
•Communications – USB port, add-on card
expansion socket.
•Override Switches – push button override
switches turn relays all ON or all OFF.
•Microprocessor – executes the computer
code and coordinates all controller functions
including the controller real time clock.
•Flash Memory – contains the controller
operating system and basic tasks.
• the EEProm memory– store the user-entered
operating parameters.
•Real time clock – maintains time and date for
up to 30 days without power.
Input Board(s) – Each input board provides
four (4) switch inputs.
Major components include:
•Switch Inputs – can accept input from either
2- or 3-wire momentary or maintained dry
contact devices. Each switch input features
a switch pilot LED output, which can be pro-
grammed to track the state of a single relay,
relay group or preset. The inputs are optically
isolated, noise- and surge-resistant. A switch
and pilot may be located up to 1500 feet
from the controller, provided you use a mini-
mum of 18 gauge wire.
Output Board(s) – Each output board provides
four (4) relay outputs.
Major components include:
•Relay Outputs – Each optically isolated out-
put switches its associated lighting relay ON
and OFF. Each output has an associated LED.
The LED lights when the output switches the
relay ON.
•Relay –
1-Pole Relay Option: Single-pole relay capa-
ble of controlling lighting loads up to 16 Amp
@ 347VAC.
2-Pole Relay Option: Two-pole relay capable
of controlling lighting loads up to16 Amp @
347VAC per pole.
Overview
The ILC Apprentice 3 lighting controller is a microprocessor-based, programmable
lighting controller capable of advanced lighting control in a master-slave application.
It is an economical controller that can link up to 48 control points and has the capability of using
hardwired or LightSync™data line switches. You can program the switch inputs to control any or
all of the relay outputs. The controller features ILC 1PR and 2PR relays with latching contacts.
This User Guide outlines the capabilities of the controller and its add on modules.
The ILC Apprentice 3 is UL and FCC approved for commercial applications.

Section 1 Controller Description
1.0 Section Overview .......................................................................... 1-1
1.1 Controller Architecture.................................................................. 1-2
1.1.1 Enclosure................................................................................ 1-2
1.1.2 Transformer ............................................................................ 1-2
1.1.3 CPU Board.............................................................................. 1-3
1.1.4 Input Board(s) ........................................................................ 1-4
1.1.5 Output Board(s)..................................................................... 1-4
1.1.6 Programming Buttons/Display ............................................. 1-8
1.1.7 Lighting Relays....................................................................... 1-8
1.2 I/O Options...................................................................................... 1-9
1.2.1 Voice/DTMF Module ............................................................. 1-9
1.2.2 DMX 512 Module ................................................................... 1-9
1.2.3 N2 Module.............................................................................. 1-9
1.2.4 MODBUS Module................................................................... 1-9
1.2.5 BACnet Module..................................................................... 1-9
1.2.6 LonWorks Module ................................................................. 1-9
1.2.7 TCP/IP Interface .................................................................... 1-9
1.2.8 Modem Interface.................................................................. 1-9
1.3 Lighting Controller Network........................................................... 1-10
1.3.1 Communications Protocol and Transmission Media ......... 1-10
1.3.2 Network Architecture ........................................................... 1-10
1.3.3 Device Nodes........................................................................ 1-10
Section 2 Installation
2.0 Section Overview .......................................................................... 2-1
2.1 Pre-Installation Checks .................................................................. 2-2
2.2 Mounting the Controller ................................................................ 2-2
2.2.1 Location ................................................................................. 2-2
2.2.2 Environmental Considerations............................................. 2-2
2.2.3 Distance From Hardwired Control Devices ........................ 2-2
2.3 Wiring the Controller ...................................................................... 2-2
2.3.1 Wire the Control Transformer ............................................... 2-2
2.3.2 Connect Line and Load ....................................................... 2-2
2.3.3 Wire Switch Inputs ................................................................. 2-2
2.4 Pre-Power Checks.......................................................................... 2-5
2.4.1 Check Controller Power Input ............................................. 2-5
2.4.2 Verify Supply Voltage ............................................................ 2-5
2.4.3 Double-Check Connections................................................ 2-5
4.4.4 External Monitoring and Control ......................................... 2-5
2.5 Power-Up and Check Out............................................................. 2-5
2.5.1 Power-Up the Controller....................................................... 2-5
2.5.2 Verify the Lighting Relays...................................................... 2-5
2.5.3 Perform Initial Programming Procedures............................ 2-5
2.5.4 Verify the Switching Function............................................... 2-5
2.5.5 Verify the Timer Functions..................................................... 2-5
ILC Apprentice 3 User Manual
Version 1A 10-18-17
Table of Contents

Table of Contents
ILC Apprentice 3 User Manual
Version 1A 10-18-17
Section 2 Installation, continued
2.6 Troubleshooting.............................................................................. 2-6
2.6.1 Controller Will Not Power-Up................................................ 2-6
2.6.2 Lighting Relay(s) Will Not Function....................................... 2-6
2.6.3 Switch Input Will Not Function.............................................. 2-6
2.6.4 Timers Will Not Function Properly ......................................... 2-6
2.6.5 Entire Input or Output Board(s) Will Not Function .............. 2-6
Section 3 Programming
3.0 Section Overview .......................................................................... 3-1
3.1 Hidden Menu Choices................................................................... 3-2
3.2 Clear All Memory............................................................................ 3-3
3.3 Configuring the Apprentice 3 Network ....................................... 3-5
3.4 Relay Output Operations .............................................................. 3-6
3.5 Switch Operations.......................................................................... 3-11
3.6 Switch Pilot operations................................................................... 3-20
3.7 How to Set the Controller Clock ................................................... 3-22
3.8 Disable Daylight Savings Time ...................................................... 3-24
3.9 Adjust Daylight Savings Time Settings .......................................... 3-26
3.10 Time-Based Operations ............................................................... 3-28
3.11 Blink Alert/Alarms.......................................................................... 3-43
3.12 Off Hours Sweeps ......................................................................... 3-45
3.13 Input Active Times ........................................................................ 3-47
3.14 Preset Operations ......................................................................... 3-49
3.15 Edit Names.................................................................................... 3-52
3.16 How to Enter or Change a Password ......................................... 3-54
3.17 How to View the Firmware Revision ........................................... 3-56
3.18 Add-On Modules.......................................................................... 3-58
3.19 How to Enter the Photoccell Filter (Scan Rate)......................... 3-59
Section 4 LightSync Device Switching
4.0 Section Overview .......................................................................... 4-1
4.1 Installation ....................................................................................... 4-1
4.2 How to Control Relays With a LightSync Switch ......................... 4-13
4.3 LightSync Switch Status.................................................................. 4-18
4.4 LightSync Switch Pilots ................................................................... 4-20

Table of Contents
ILC Apprentice 3 User Manual
Version 1A 10-18-17
Section 5 Appendix
A. Voice/DTMF Add-On Module......................................................... A-1
A.1 Overview .................................................................................. A-1
A.2 Voice/DTMF Control Features................................................. A-2
A.3 Voice/DTMF Control Setup ..................................................... A-2
B. BACnet Communications ............................................................... B-1
B.1 Overview ................................................................................. B-1
B.2 Hardware .................................................................................. B-1
B.3 Hardware Setup ...................................................................... B-2
B.4 Configuration .......................................................................... B-3
B.5 Point Map ................................................................................. B-4
C. PC Control via USB Port................................................................... C-1
C.1 USB Programming Control and Monitoring .......................... C-1
C.2 USB Setup ................................................................................. C-1
D. 0-10V Dimming Output ................................................................... D-1
D.1 Overview,Hardware................................................................ D-1
D.2 Programming ........................................................................... D-1
E. DMX Control Feature ....................................................................... E-1
E.1 Overview................................................................................... E-1
E.2 Objectives................................................................................. E-1
E.3 Programming Example............................................................ E-4
L. LonWorks Communications............................................................. L-1
B.1 Overview ................................................................................. L-1
B.2 Hardware .................................................................................. L-2
B.3 Hardware Setup ...................................................................... L-3
B.4 Point Map ................................................................................. L-4
M. MODBUS Communications............................................................ M-1
M.1 Overview.................................................................................. M-1
M.2 Structure................................................................................... M-1
M.3 Transmission Modes................................................................. M-1
M.4 Transmission Mode Characteristics ....................................... M-3
M.5 Hardware Setup...................................................................... M-3
M.6 Required Parameter Entries ................................................... M-3
M.7 Framing .................................................................................... M-3
M.8 Supported Commands .......................................................... M-3
M.9 Additional Functions............................................................... M-3
M.10 Additional Information ......................................................... M-3
N. N2 Communications ....................................................................... N-1
N.1 Overview .................................................................................. N-1
N.2 Hardware Setup....................................................................... N-1
N.3 Point Map................................................................................. N-1
O. Latitude and Longitude listings...................................................... O-1
P. Photo Control Applications ............................................................. P-1
P.1 Overview ................................................................................... P-1
P.2 LightSync™ Model ................................................................... P-2
P.3 Installation ................................................................................. P-3
P.5 Programming Example ............................................................ P-4
Q. LightSync MZD Dimmer station ...................................................... Q-1
Q.1 Programming........................................................................... Q-1

Section 1
Controller Description
ILC Apprentice 3 User Manual
Version 1A 10-18-17
12VAC
12VAC
CT
ILC APPRENTICE 3
MON 08/07/17
04:19:44 PM
EDIT (C) 2017 ILC
ALL OFF OFF ON
POWER
77013466A
ALL ON
Controller Description

Section 1 Controller Description
1.0 Section Overview .......................................................................... 1-1
1.1 Controller Architecture.................................................................. 1-2
1.1.1 Enclosure................................................................................ 1-2
1.1.2 Transformer ............................................................................ 1-2
1.1.3 CPU Board.............................................................................. 1-3
1.1.4 Input Board(s) ........................................................................ 1-4
1.1.5 Output Board(s)..................................................................... 1-4
1.1.6 Programming Buttons/Display ............................................. 1-8
1.1.7 Lighting Relays....................................................................... 1-8
1.2 I/O Options...................................................................................... 1-9
1.2 I/O Options...................................................................................... 1-9
1.2.1 Voice/DTMF Module ............................................................. 1-9
1.2.2 DMX 512 Module ................................................................... 1-9
1.2.3 N2 Module.............................................................................. 1-9
1.2.4 MODBUS Module................................................................... 1-9
1.2.5 BACnet Module..................................................................... 1-9
1.2.6 LonWorks Module ................................................................. 1-9
1.2.7 TCP/IP Interface .................................................................... 1-9
1.2.8 Modem Interface.................................................................. 1-9
1.3 Lighting Controller Network........................................................... 1-10
1.3.1 Communications Protocol and Transmission Media ......... 1-10
1.3.2 Network Architecture ........................................................... 1-10
1.3.3 Device Nodes........................................................................ 1-10
Controller Description – Table of Contents
ILC Apprentice 3 User Manual
Version 1A 10-18-17

Objectives
In this Section you will learn about the
structure and configuration of the ILC
Apprentice II Controller.
Overview
The ILC Apprentice 3 is a microprocessor-
based lighting controller. You can program
the ILC Apprentice 3 to control lighting relays
in response to switch signals sensed by its
inputs and/or by time-based scheduling.
The ILC Apprentice 3 is UL approved and
FCC certified for commercial applications.
Section 1 – Controller Description
ILC Apprentice 3 User Manual 1-1
Version 1A 10-18-17
Controller Description

1.1 Controller Architecture
The major components making up the
controller are: (See Figure 1.1.)
• enclosure
• control transformer
• CPU board
• input board(s)
• output board(s)
• display/keypad
• lighting relays
1.1.1 Enclosure - The enclosure is rated
NEMA 1. Enclosures are available in 4 sizes to
accommodate 4, 8, 16 or 32 inputs, outputs,
and lighting relays. See (Table 1-1.) The ILC
Apprentice 3 is shipped to the job-site as a
complete assembly. (See Figure 1-1, which
illustrates a ILC Apprentice 3 4.)
1.1.2 Transformer - A multi-tap transformer,
120/277 VAC or optional 120/347 VAC that
provides the 24 VAC input to power the
controller electronics.
Controller Description
ILC Apprentice 3 User Manual 1-2
Version 1A 10-18-17
Model # of Relays
& I/O Points Width Height Depth
Apprentice 3 4 4 14 Inches 12 Inches 4 Inches
Apprentice 3 8 8 14 Inches 16 Inches 4 Inches
Apprentice 3 16 16 14 Inches 24 Inches 4 Inches
Apprentice 3 32 32 16 Inches 42 Inches 4 Inches
Table 1.1 – ILC Apprentice 3 Configurations

1.1.3 CPU Board – (See Figure 1.2.) The CPU
board provides the controller’s intelligence,
memory, and communications capabilities.
Major components include:
• Power Supply – converts the 24 VAC input
to the +5, -5 and +12 VDC required by the
controller logic and communications
circuits. A power switch provides the means
of energizing/de-energizing all controller
electronics.
• Communications – USB on-board port.
• Micro-Processor – executes the computer
code and coordinates all controller func-
tions including the controller real time clock.
• Override Switches – provided with All ON/All
OFF override pushbuttons.
• Flash Memory – contains the controller
operating system and basic tasks.
• EEProm memory– store the user-entered
operating parameters.
• Real time clock – maintains time and date
for up to 30 days without power.
Controller Description
ILC Apprentice 3 User Manual 1-3
Version 1A 10-18-17
77013452 REV A
97103452 REV
12VAC
12VAC
CT
ILC APPRENTICE 3
MON 08/07/17
04:19:44 PM
EDIT (C) 2017 ILC
ALL OFFOFFON
POWER
77013466A
ALL ON
77013469A
1 ON
1 PILOT
1 OFF
1 COM
3 ON
3 OFF
3 COM
3 PILOT
2 ON
2 PILOT
2 OFF
2 COM
4 ON
4 OFF
4 COM
4 PILOT
LOAD
N.O.
LINE
77013551 REV A
77013551 REV A
LOAD
N.O.
LINE
77013551 REV A
LOAD
N.O.
LINE
77013551 REV A
LOAD
N.O.
LINE
Enclosure USB Port
Figure 1.1 – ILC Apprentice 3 4 Controller
Grounding Lug
CPU Board
Fishpaper
Barrier
Standoff
Control
Transformer
120/277 VAC
Controller Description
Add-on Module (optional)RJ-45 Data IN/OUT
Connections
LCD
Display
Programming
Buttons
All ON/All OFF
Overrride
Buttons
Input Board
Output Board
Power ON/OFF
Relay Board
Switch Inputs
and Pilot
Outputs

Controller Description
ILC Apprentice 3 User Manual 1-4
Version 1A 10-18-17
1.1.4 Input Board(s) – Each Input board adds
four (4) switch inputs and pilot outputs. The
inputs are all optically isolated. Additional
boards can be added to the enclosure to
provide a network capacity of up to 48
switch inputs. (See Figure 1.3, which illustrates
a ILC Apprentice 3 8. Major components
include:
• Switch Inputs – The ILC Apprentice 3 is
designed to accomplish a wide variety of
switch input types. Each switch input has an
associated switch pilot LED output which
can be programmed to track the state of a
selected relay, relay group, or preset. See
the Table 1.2 (next page)for a description of
switch input types.
1.1.5 Output Board(s) – Each Output board
provides four (4) relay outputs that connect
to ILC 1PR or 2PR latching Relay boards.
Major components include:
• Relay Outputs - each output switches its
associated lighting relay ON and OFF.
Each output has an associated LED (light
emitting diode). The LED lights when the
output switches the relay ON.
12VAC
12VAC
COM
12VAC
12VAC
COM
+
+
-
-
C2
77013549A
J2
J1
+
1
3
2
4
+
-
-
77013469A
1 ON
1 PILOT
1 OFF
1 COM
3 ON
3 OFF
3 COM
3 PILOT
2 ON
2 PILOT
2 OFF
2 COM
4 ON
4 OFF
4 COM
4 PILOT
ILC Apprentice 3 Input Board
ILC 1PR Latching Relay
Switch inputs and pilot outputs
(4 per board)
Relay outputs
(4 per board)
77013551 REV A
LOAD
N.O.
LINE
ILC Apprentice 3 Output Board
Power supply
connection
Ribbon cable
connector
Connection to
Output Board
Status LED
(4 per board)

Controller Description
ILC Apprentice 3 User Manual 1-5
Version 1A 10-18-17
Momentary ON/OFF:
When momentary contact
is made between ON
and COM, relay outputs
controlled by this input
are turned ON. When
momentary contact is
made between OFF
and COM relay outputs
controlled by this input
are turned OFF.
Momentary Push- Button:
When momentary contact
is made between ON
and COM, relay outputs
controlled by this input
are turned ON and OFF
alternately each time
contact is made.
Photo Sensor Inputs:
ILC Apprentice controllers
can be connected to either
momentary or maintained
output photo sensors as
shown below.
Maintained ON/OFF:
When contact is made
between ON and COM
relay outputs controlled by
this input are turned ON.
When contact is broken
between ON and COM,
relay outputs controlled by
this input are turned OFF.
Maintained Multi-Way:
When contact is either
made or broken between
the ON and COM, relay
outputs controlled by this
input will be toggled
between ON and OFF
conditions. This function is
similar to that of standard
3- and 4-way switches.
Timed ON/Cleaning Switch:
When momentary contact
is made between COM
and ON, relay outputs
are turned ON. When
contact is broken, a timed
ON duration is started from
5-999 minutes. Contact
between OFF and COM will
turn relays OFF.
ON
COM
OFF
ON
COM
OFF
ON
COM
OFF
ON
COM
OFF
MOMENTARY
Set Preset:
When momentary contact
is made between ON and
COM, the selected preset
will be activated.
ON
COM
OFF
MOMENTARY
ON
COM
OFF
MOMENTARY
Two-Step Group:
When the switch is
activated, group A (relay
outputs) turn ON and
group B (relay outputs)
turn OFF. When the input
is
activated again, group A
turn OFF and group B turn
ON. The pattern repeats
with successive switch
activations.
ON
COM
OFF
MOMENTARY
Input Disable:
When contact is made
between ON and COM,
selected input or inputs
will be ignored.
Four-Step Group:
The first time the switch is
activated, group A (relay
outputs) turn ON and
group B (relay outputs)
turn OFF. The second time
the switch is activated,
group A turn OFF and
group B turn ON. The
third time, both groups
turn ON. The fourth time,
both groups turn OFF. The
fifth actuation begins a
repeat of the 4 steps.
ON
COM
OFF
MOMENTARY
MAINTAINED MAINTAINED
ON
COM
OFF
MAINTAINED
Timer Disable:
While contact is made
between ON and COM,
selected timer or timers
will be ignored.
ON
COM
OFF
MAINTAINED
Output Override:
While contact is made
between ON and COM,
relay outputs controlled by
this input are turned ON,
OFF or held in their current
state and all other control
commands are ignored.
All inputs/timers are
ignored for controlled
relay outputs.
ON
COM
OFF
MAINTAINED
ON
COM
OFF
ON
COM
OFF
MOMENTARY
Programmed as “Momentary”
MAINTAINED
Programmed as “Maintained
ON/OFF input”
MOMENTARY
Fire Alarm System Inputs:
ILC Apprentice controllers
can be easily connected to
building Fire Alarm Systems
to force selected controlled
lighting circuits to the ON,
OFF or HOLD state and lock
out all other forms of con-
trol when a Fire Alarm sig-
nal is present (contacts
CLOSED).
Motion Sensor Inputs:
ILC Apprentice controllers
can be connected to either
momentary or maintained
output motion sensors as
shown below.
Dry Contact Interface:
Virtually any control sys-
tem or device can be inter-
faced to a ILC Apprentice
controller through the use
of a simple dry contact
interface utilizing any of
the available switch types.
Please consult factory for
any special requirements.
ON
COM
OFF
ON
COM
OFF
ON
COM
OFF
MAINTAINED
Programmed as
“Output Override input”
MOMENTARY
Programmed as “Momentary”
MAINTAINED
Programmed as “Maintained
ON/OFF input”
Force Timer:
A switch input can be
mapped to force a ILC
Apprentice Timer
activation.
ON
COM
OFF
MAINTAINED
HID Bi-Level:
Operation of Bi-level HID
Ballasts. First contact
between COM and ON will
turn ON power and
High/Low relay.
(High/Low relay is locked
ON for 15 minutes for
warm up period)
Additional activations of
ON terminal will toggle
High/Low relay. Contact
between OFF and COM
will turn relays OFF.
ON
COM
OFF
MOMENTARY
NOTE: Switch Enable-Disable: Inputs may be enabled or disabled based on Time of day
Table 1.2 – ILC Apprentice 3 Switch Input Types
Controller Description

Controller Description
ILC Apprentice 3 User Manual 1-6
Version 1A 10-18-17
Figure 1.2 – Apprentice 3 CPU Board and I/O
77013452 REV A
97103452 REV
8VAC
8VAC
CT
ILC APPRENTICE 3
MON 08/07/17
04:19:44 PM
EDIT (C) 2017 ILC
A
LL OFF OFF ON
P
OWER
77013466A
A
LL ON
77013469A
1 ON
1 PILOT
1 OFF
1 COM
3
ON
3 OFF
3 COM
3 PILOT
2 ON
2 PILOT
2 OFF
2 COM
4
ON
4 OFF
4 COM
4 PILOT
77013551 REV A
LOAD
N.O.
LINE
77013551 REV A
LOAD
N.O.
LINE
77013551 REV A
LOAD
N.O.
LINE
77013551 REV A
LOAD
N.O.
LINE
Switch inputs
and pilot outputs
Line
Relay output
status LED
4-line LCD display
12 VAC
Center tap
12 VAC
Terminal block for
processor transformer
Add-on Module
(optional)
24 VAC
USB Port
Main power switch
Data cable
to I/O board 1-Pole or 2-Pole
Relay Board
Power LED
Programming
buttons
Programming
buttons
RJ 45 Connectors for
data line devices
All ON/All OFF
override pushbuttons
Load

Controller Description
ILC Apprentice 3 User Manual 1-7
Version 1A 10-18-17
77013452 REV A
97103452 REV
J
9
12VAC
1
2VAC
CT
ILC APPRENTICE 3
M
ON 08/07/17
04:19:44 PM
E
DIT (C) 2017 ILC
ALL OFF OFF ON
P
OWER
7
7013466A
ALL ON
77013469A
1
ON
1 PILOT
1 OFF
1 COM
3 ON
3 OFF
3 COM
3 PILOT
2
ON
2 PILOT
2 OFF
2 COM
4 ON
4 OFF
4 COM
4 PILOT
77013551 REV A
LOAD
N.O.
LINE
77013551 REV A
LOAD
N.O.
LINE
77013551 REV A
LOAD
N.O.
LINE
77013551 REV A
LOAD
N.O.
LINE
LOAD
N.O.
LINE
77013551 REV A
77013551 REV A
LOAD
N.O.
LINE
77013551 REV A
LOAD
N.O.
LINE
77013551 REV A
LOAD
N.O.
LINE
++
++
--
--
C2C2
77013549A77013549A
12VAC
COM
12VAC 12VAC12VAC
COMCOM
12VAC12VAC
J2J2
J1J1
++
1
3
2
4
++
--
--
Figure 1.3 – ILC Apprentice 3 08 with standard 4-inputs
Controller Description

Controller Description
ILC Apprentice 3 User Manual 1-8
Version 1A 10-18-17
12VAC
12VAC
CT
ILC APPRENTICE 3
MON 08/07/17
04:19:44 PM
EDIT (C) 2017 ILC
ALL OFF OFF ON
POWER
77013466A
ALL ON
Figure 1.4 – ILC Apprentice 3 Programming Buttons and Display
4-line, 32-character Display Screen
Scrolling Buttons
Selection Buttons
(Used to select
displayed options)
1.1.6 Programming Buttons/Display - (See
Figure 1.4.) The ILC Apprentice provides
you with programming buttons and a LCD
display to enable programming and view
controller data.
1.1.7 Lighting Relays -
1-Pole Relay Option: Single-pole relay capa-
ble of controlling lighting loads up to 16 Amp
@ 347VAC.
2-Pole Relay Option: Two-pole relay capable
of controlling lighting loads up to 16 Amp @
347VAC per pole.
The relays are connected to the output
board by means of a four-pin push-on con-
nector held in place with a retaining screw.

1.2 I/O Options
The ILC Apprentice 3 controller can be
equipped with the following add-on
devices:
1.2.1 Voice/DTMF Module – You can equip
the controller with a DTMF (Dual Tone Multi
Frequency) interface, which allows you to
activate switch inputs via commands from a
touchtone telephone.
(See Appendix A.)
1.2.2 DMX 512 Module – Provides for direct
control of ON/OFF lighting or other loads from
any DMX 512 control device. Any of the avail-
able 512 DMX control channels may be
mapped to control individual relays. (See
Appendix B.) This DMX module can also be
mapped to the remote mount 0-10V Dimmer
output modules (See appendix D.)
1.2.3 N2 Module – Provides for direct control
of control devices in building automation sys-
tems using N2 protocol . (See Appendix N.)
1.2.4 MODBUS Module – Provides for direct
control of control devices in building automa-
tion systems using MODBUS protocol . (See
Appendix M.)
1.2.5 BACnet Module – Provides for direct
control of control devices in building
automation systems using BACnet protocol
(See Appendix B)
1.2.6 LonWorks Module – Provides for direct
control of control devices in building
automation systems using LonWorks protocol
(See Appendix L)
1.2.7 TCP/IP Interface – Provides a TCP/IP
interface with the configuration software
over a LAN or WAN.
1.2.8 Modem Interface – Provides a modem
interface over an analog phone line with the
configuration software.
Controller Description
ILC Apprentice 3 User Manual 1-9
Version 1A 10-18-17
Controller Description

Controller Description
ILC Apprentice 3 User Manual 1-10
Version 1A 10-18-17
1.3 Lighting Controller Network
ILC Apprentice II controllers can be net-
worked together in a Local Area Network
(LAN) to form a comprehensive lighting con-
trol system for a faciltity.
1.3.1 Communications Protocol And
Transmission Media – Devices that operate
on ILC’s LightSync CAT-5 data line include
Apprentice II lighting controllers, LightSync
switches, photocells, inputs, and occupancy
sensor inputs. A standard 24 gauge CAT-5, 5E
or 6 cable is used for the data line and pro-
vides both data and power to these
devices. See Figure 1.5 which details cable
specifications. The cable terminates to ports
on each Apprentice 3 controller (or expan-
sion panel) as shown in Figure 1.7. The total
data line end to end distance may not
exceed 3000 feet without the addition of a
Power Supply Repeater (PSR) (See Figure 1.6
and 1.8) to the data line. Only a PSR will
extend the data line. A PSR has one incoming
and two outgoing RJ45 ports to split the line
into two different directions. See Figure 1.8 for
an example of possible project layout.
1.3.2 Network Architecture
The network can consist of a Master (stan-
dard) panel and a number of Expansion pan-
els that add up to a maximum of 48 relay out-
puts. The Master panel is always Node 1 and
controls the Expansion panels. The Expansion
panels are adddressed with a unique node
address ranging from 2 to C. The data line
exits the Master panel’s RJ-45 OUT port and
enters the IN port of the Expansion panel.
As an alternative to programming from the
Master Controller Keypad, programming may
be done from a personal computer (PC)
equipped with proprietary ILC Apprentice 3
Pro software. See Appendix C for details.
1.3.3 Device Nodes – Apprentice 3 Networks
also feature Device Nodes. These are data
switches, photocells and other input devices
connected to the CAT-5 data line. (See Figure
1.8). There can be a maximum of up to 64
device nodes in a the lighting control network.
There are limitations to the distance data
can travel over CAT-5 cable without loss,
and distance limitations due to voltage drop
associated with cable length and number of
devices on the LightSync data line. These
limitations are addressed by the addition of
a Power Supply Repeater, Power Supply or
LightSync Hub (see Figure 1.6), depending
on the application. The specific use of these
devices depends on the project layout.
Each controller will power up to 8 device
nodes without a Power Supply Repeater
(PSR), Power Supply (PS) or LightSync Hub
(HUB). Each of these will supply power to an
additional 20 devices. If "T" connections are
required, or if data needs to be extended, a
PSR is necessary. A LightSync Hub (See Figure
1.9) provides “home run” wiring capability.
Consult factory for details.
Each device node is addressed via address
dials that are part of the device. Possible
addresses for device nodes are 01-40 in HEX
code allowing 64 LightSync devices. These
are a different set of addresses from the con-
troller node addresses.
If your project features device nodes,
consult Section 4 for details.

Figure 1.5 – Data Cable Requirements
Data Cable Requirements
Definitions:
Category 5 Cable (UTP-Unshielded Twisted Pair)- A 4 pair high performance cable that consists of
twisted pair conductors, used mainly for data transmission. Basic CAT-5 cable was designed for
characteristics of up to 100 MHz. NOTE: The twisting of the pairs gives the cable a certain amount of
immunity from the infiltration of unwanted interference.
Category 5E Cable (Enhanced)- Same as Category 5, except that it is made to somewhat more
stringent standards (see comparison chart below). The Category 5E standard is now officially part
of the 568A standard. Category 5 E is recommended for all new installations, and was designed for
transmission speeds of up to 1 gigabit per second.
Below you will find a list of the required properties your selected cable must meet. You will also find a
list of cables, which meet these criteria from several different manufacturers. At your option you
may utilize one of the below-suggested cables or have your cable supplier provide you with a suit-
able alternative, which meets the listed criteria.
Category 6 Cable- Same as Category 5E, except that it is made to a higher standard (see
comparison chart below). Category 6 is now part of the 568A standard.
Standard 24-gauge Data Cable Performance Specification Chart:
Parameter Category 5 Category 5E Category 6
Specified frequency range 1-100 MHz 1-100 MHz 1-250 MHz
Attenuation 24 dB 24 dB 36 dB
NEXT 27.1 dB 30.1 dB 33.1 dB
Power-sum NEXT N/A 27.1 dB 30.2 dB
ACR 3.1 dB 6.1 dB -2.9 dB
Power-sum ACR N/A 3.1 dB -5.8 dB
ELFEXT 17 dB 17.4 dB 15.3 dB
Power-sum ELFEXT 14.4 dB 14.4 dB 12.3 dB
Return loss 8 dB 10 dB 8 dB
Propagation delay 548 nsec 548 nsec 546 nsec
Delay Skew 50 nsec 50 nsec 50 nsec
Suggested Manufacturers and Data Cables:
Manufacturer Part Number Cable Type Phone
Belden 7854A CAT-5 non-plenum 800 235 3361
1583A CAT-5E non-plenum
7811A CAT-5 plenum
1585A CAT-5E plenum
General 2137113 CAT-5 non-plenum
5133299E CAT-5E non-plenum
5131413 CAT-5 plenum
6131278 CAT-5E plenum
Hitachi 38696-8 CAT-5 non-plenum
38993-8 CAT-5E non-plenum
39419-8 CAT-5 plenum
38891-8 CAT-5E plenum
If you have any questions or would like our engineers to approve your cable selection please feel
free to contact our applications department at 1-800-922-8004.
Contact
Cassidey
Technolgies
(800 464 9473),
manufacturer,
or local
distributor
Controller Description
ILC Apprentice 3 User Manual 1-11
Version 1A 10-18-17
Controller Description

Controller Description
ILC Apprentice 3 User Manual 1-12
Version 1A 10-18-17
Figure 1.6 – LightSync Network Cable Run Distance Detail
LightSync™Network Cable Run Distance Detail
Devices that operate on ILC’s LightSync CAT-5 , 5E, 6 data line include LightSync switches, photocells,
and interfaces like the LightSync LSIM and LSOS8I. A standard CAT-5 , 5E, 6 cable is used for the data
line and provides both data and power to these devices. There are limitations to the distance data
can travel over CAT-5 , 5E, 6 cable without loss, and distance limitations due to voltage drop associat-
ed with cable length and number of devices on the LightSync data line. These limitations are
addressed by the addition of a Power Supply Repeater, Power Supply or LightSync Hub (see chart),
depending on the application. The specific use of these devices depends on the project layout.
There are four main areas of limitation to be addressed:
1. Total Data Line Overall Distance: The total data line end to
end distance may not exceed 3000 feet without the
addition of a PSR to the data line. Only a PSR will extend the
data line.
2. Total number devices (Apprentice 3 panels and LightSync
devices): Total number of devices without a PSR is 32. A PSR
will add 31 more devices (PSRs are counted as a device).
3. Total number of LightSync devices powered: No Apprentice
3 controller panel can power more than eight (8) LightSync
devices on the data line without a PS, PSR or LightSync Hub
(each can power up to 20 additional LightSync devices).
4. Total Power Cumulative Distance: The cumulative distance
from each device to its power supply may not exceed 2000
feet if powered by a Apprentice 3 panel, or 3000 feet if
powered by a PS, PSR or LightSync Hub.
25 feet
Total cumulative distance is equal to the
total of the run to EACH device,
25 + 50 +50 = 125 feet in this example
ILC Power and Data Repeating Devices
A Power Supply Repeater (PSR) is both a power supply and data repeater and its primary purpose is to
repeat data and provide a bridge to another data line capable of 3000 feet end to end. This device
also has one incoming and two outgoing RJ45 ports to split the line into two different directions. The PSR
also adds power to LightSync devices for an additional 3000 cumulative feet.
A Power Supply (PS) provides additional power as needed to the LightSync data line. This is the
most efficient option to compensate for voltage drop from multiple LightSync devices on the data
line. Note that a PS provides power only and does not repeat data.
A LightSync Hub (HUB) is a device that allows a home run configuration by providing RJ45 ports for
up to 20 LightSync devices, supplying power and data up to 1500 feet per each port.
ILC Power and Data Total Data (end No. of LightSync Cumulative Power
Repeating Device to end) Distance Devices Powered Distance
Apprentice 3 Panel 3000 feet 8 2000 feet
Power Suppy (PS) N/A 20 3000 feet
Power Supply 3000 feet 20 3000 feet
Repeater (PSR) (combined)
LightSync Hub 1500 feet 20 total 1500 feet
(HUB) per port per port
3000 feet end to end
1000 feet
PSR
2000 feet
Up to 20 addi-
tional devices
PSR
AP 3 16
AP 3 04
25 feet
Counts as 2
AP 3 08

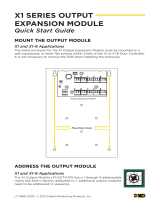
Figure 1.7 – CAT-5 Termination and Expansion Node Address Detail
-
--
+
++
-
+
--
++
ADDRESS
77013550A
-
OFF ON
-+ +
POWER
IN OUT
C
B
D
9
8
7
6
4
5
A
3
2
F
1
E
0
8 wire CAT-5 cable RJ 45 Male Connector
--
++
OUT
• Each networked Apprentice 3 expansion panel must be given a
unique 1-digit node address using the addressing switch noted
above. Settings from 2 to C can be used to address up to
12 panels in a network.
• A 2-digit address code system is used with LightSync
data line devices.
• Apprentice 3 panels and LightSync device addresses are unique.
• Document and record node address in the supplied area for future
reference (it will be needed for programming).
Addressing Switch
(Address A shown as
an example)
Controller Description
ILC Apprentice 3 User Manual 1-13
Version 1A 10-18-17
Controller Description
/