Page is loading ...

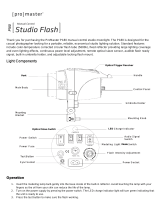
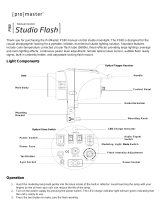
Thank you for purchasing the ProMaster SM180 Manual Control Studio Lighting Kit. The SM180
Monolight is designed for the casual photographer looking for a reliable, economical studio lighting solution.
Standard features include color-temperature corrected circular flash tube (5600k), ProMaster/Bowens style
reflector providing large lighting coverage, even lighting effects and accessory compatibility, continuous
power level adjustment, remote wireless RF and optical slave operation, audible flash ready signal, built-in
umbrella holder, and adjustable locking flash mount.
Light Components
Operation
1. Insert the modeling lamp bulb
gently into the base inside of the
built-in reflector. Avoid touching
the lamp with your fingers as the
oil from your skin can reduce the
life of the lamp.
2. Turn on the monolight by moving
the Power/Modeling Light Mode
Switch to the FLASH ONLY
position ̶ or to the FLASH AND
MODELING LIGHT position
=
.
The Flash Ready indicator light
will turn green indicating that the
unit is ready to use.
3. Press the test button to make sure
the flash is working.
4. To use the modeling light, the
Power/Modeling Light Mode
Switch must be set to the FLASH
AND MODELING LIGHT position
=
. Press the Modeling Light Selector Button, the indicator light will glow green and the modeling light will be
fixed at full power. Press the Modeling Light Selector Button until the green indicator light is off and the
modeling light intensity will be controlled by the Flash Intensity Adjustment knob.
5. Use the Flash Intensity Adjustment knob to select desired exposure.
6. Link the flash unit to your camera using a synch cord, the built-in optical slave sensor, or the radio trigger 4-
channel built-in RF trigger.
7. To turn the Audible Ready Signal on, press the Audible Signal Switch and the indicator light next to the switch
will glow green. When the switch is in this position, the light will emit an audible signal when the light is fully
charged and ready to fire again. Press the Audible Signal Switch until the indicator light is off and the Audible
Signal will be disabled.
8. To trigger the monolight from another flash, turn the Optical Slave on by pressing the Slave Mode Switch until
the indicator light next to the switch glows green. In this mode, the light will be triggered by an on-camera flash
or other studio light. Note that the amount of ambient light can impact the reliability of the optical trigger. To use
the light in the normal mode, press the Slave Mode Switch until the indicator light next to the switch is off.

9. The SM180 has a built-in RF radio trigger function. The light is supplied with a camera-mounted trigger to use
with this function. To use the RF trigger mode, be sure that the optical slave mode is off (see #8 above). Set the
desired channel on the light using the Wireless Channel Selector switch. Be sure that the switch on the trigger
is set to the same position. The trigger comes with one 23A – 12 volt battery preinstalled. Mount the trigger to
the hot shoe of your camera. When you release the shutter on your camera, the light will fire. Alternately, you
can press the test button on the trigger to fire the light. This trigger will fire multiple lights as long as they are
within the transmit/receive signal range and they are set to the same channel as the trigger. If the trigger does
not fire your light, be sure to check the following:
A) Ensure that the light and the trigger are set to the same channel (both sets of switches in the same
position).
B) Some cameras may require you to adjust your camera to trigger an external flash instead of the internal
flash.
C) Check the battery, a low or dead battery may keep the trigger from sending a signal to the light.
10. The SM180 is protected by a 5A fuse located in the Fuse Compartment. If your light fails to power up, unplug
the flash from the power source, gently pry the fuse holder out of the fuse compartment and check to make sure
that the fuse is good.
Safety Precautions
1. Before using the flash, make sure that your lighting equipment is plugged into a 110 volt AC power source.
2. Do not expose your lighting equipment to sunlight, moisture, dust, dirt, rain or water.
3. Any exposure to chemical solutions, gasoline, grease, oil, paint, or detergents can result in permanent damage
to your equipment.
4. Do not insert any metal objects into your lighting equipment.
5. Do not touch or handle equipment with wet hands or allow your equipment to be in contact with water.
6. Be sure to disconnect from the power supply when the light is not in use.
7. Do not attempt to repair your lighting equipment yourself.
8. Avoid rapid continuous firing of your flash. Continued rapid firing may cause excessive heat build up and
potential damage to your unit.
Specifications
Power: 180 watt second (joule) at full power
Color Temperature: 5600k ± 100k
Guide Number: 151’ / 46m @ 100 ISO
Modeling Lamp: 75 watt / 120 volt G6.35 Bipin Halogen Lamp
Power Setting: Continuous, 1/16
th
to full power
Optical Slave: Built-in, effective up to 35’ / 10m depending on conditions
Wireless Trigger: 4 Channel
Recycling Time: .5 to 2 seconds
Power Input: AC110 - 130 volt, 60Hz
Fuse: 5 Amp – 5A 250V
Weight: 2 lb. 3 oz. approx.
Size: 7 ½” L x 4 ¾” Ø x 7 ½” H (approx. with bracket collapsed)
One Year Unconditional Guarantee
If for any reason, this ProMaster product fails within ONE YEAR of the date of purchase, return this product to your
ProMaster dealer and it will be exchanged for you at no charge. ProMaster products are guaranteed for ONE FULL
YEAR against defects in workmanship and materials. If at any time after one year, your ProMaster product fails under
normal use, we invite you to return it to ProMaster for evaluation.
Code 6826
Made in China
www.promaster.com
Fairfield, CT 06825
/