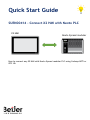
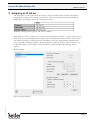
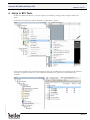
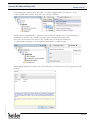
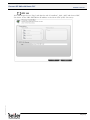
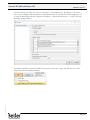
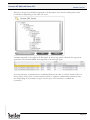
Beijer Electronics SUEN00414 enables seamless communication between X2 HMIs and Nexto Xpress/modular PLCs using Codesys ARTI or OPC UA protocols. With this device, you can effortlessly integrate and exchange data between your HMI and PLC, creating a powerful control system for your industrial applications. The SUEN00414 supports all X2 HMI models and all Nexto Xpress and modular variants, providing you with a versatile solution for your automation needs. Enjoy the convenience of remote monitoring and control, real-time data exchange, and enhanced efficiency with Beijer Electronics SUEN00414.
Beijer Electronics SUEN00414 enables seamless communication between X2 HMIs and Nexto Xpress/modular PLCs using Codesys ARTI or OPC UA protocols. With this device, you can effortlessly integrate and exchange data between your HMI and PLC, creating a powerful control system for your industrial applications. The SUEN00414 supports all X2 HMI models and all Nexto Xpress and modular variants, providing you with a versatile solution for your automation needs. Enjoy the convenience of remote monitoring and control, real-time data exchange, and enhanced efficiency with Beijer Electronics SUEN00414.


-
 1
1
-
 2
2
-
 3
3
-
 4
4
-
 5
5
-
 6
6
-
 7
7
-
 8
8
-
 9
9
-
 10
10
-
 11
11
-
 12
12
-
 13
13
-
 14
14
-
 15
15
-
 16
16
-
 17
17


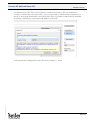
Beijer Electronics SUEN00414 enables seamless communication between X2 HMIs and Nexto Xpress/modular PLCs using Codesys ARTI or OPC UA protocols. With this device, you can effortlessly integrate and exchange data between your HMI and PLC, creating a powerful control system for your industrial applications. The SUEN00414 supports all X2 HMI models and all Nexto Xpress and modular variants, providing you with a versatile solution for your automation needs. Enjoy the convenience of remote monitoring and control, real-time data exchange, and enhanced efficiency with Beijer Electronics SUEN00414.
Ask a question and I''ll find the answer in the document
Finding information in a document is now easier with AI
Related papers
-
Beijer Electronics SER0040 Nexto Xpress Communication User guide
-
-
Beijer Electronics X2 User manual
-
-
-
Beijer Electronics X2-BoX2 User guide
-
Beijer Electronics Genset Sample User guide
-
Beijer Electronics SER0011 User guide
-
Beijer Electronics SER0050 User guide
-
Beijer Electronics SER0055 User guide
Other documents
-
 DAUDIN Beijer HMI User manual
-
Altus BCS-NX5210 Installation guide
-
 Nexto Di VIDEO STORAGE-Air User manual
-
 Elonex 500EB Datasheet
-
BeiJer X2 to BFI – iX Script Module User guide
-
BeiJer GN-9372 User manual
-
weintek cMT-CTRL01 User manual
-
CARLO GAVAZZI XAP10RSEXX User manual
-
Contec CPS-PC341MB-ADSC1-9201 Reference guide
-
 Irai Virtual Universe Pro 2.0 Operating instructions


