Page is loading ...

MODEL H3099
DELUXE VIOLIN KIT
OWNER'S MANUAL
COPYRIGHT © AUGUST, 2003 BY GRIZZLY INDUSTRIAL, INC. REVISED JULY, 2007 (BL)
WARNING: NO PORTION OF THIS MANUAL MAY BE REPRODUCED IN ANY SHAPE
OR FORM WITHOUT THE WRITTEN APPROVAL OF GRIZZLY INDUSTRIAL, INC.
#DS5538 PRINTED IN JAPAN


SECTION 1: SAFETY ....................................................................................................................... 2
SECTION 2: INTRODUCTION ........................................................................................................
3
Components ............................................................................................................................... 4
Supplies/Tools ............................................................................................................................ 5
Spool Clamps .............................................................................................................................
5
SECTION 3: ASSEMBLY .................................................................................................................
6
Purfling Inlay ..............................................................................................................................
6
Bass Bar .....................................................................................................................................
7
Body ........................................................................................................................................... 7
Neck To Body .............................................................................................................................
8
Tailpiece Saddle .........................................................................................................................
9
End-Pin ....................................................................................................................................... 9
Finishing ................................................................................................................................... 10
Peg Tuners ...............................................................................................................................
11
Bridge ....................................................................................................................................... 11
Sound Post ...............................................................................................................................
12
Fingerboard .............................................................................................................................. 13
String Slots ...............................................................................................................................
13
Tailpiece ................................................................................................................................... 14
Chin Rest .................................................................................................................................
14
Installing Strings .......................................................................................................................
14
SECTION 4: REFERENCE INFO ...................................................................................................
15
General ..................................................................................................................................... 15
Notes ........................................................................................................................................ 16
Notes ........................................................................................................................................ 17
Warranty & Returns ..................................................................................................................
18
Table of Contents

-2-
H3099 Deluxe Violin Kit
SECTION 1: SAFETY
These instructions assume that you are intimately familiar with the safe operation and use of
woodworking machinery and woodworking tools, and understand the techniques used to repro
-
duce this project. If you do not qualify for both of these criteria, STOP building this project for
your own safety. Read and understand the owners manual for the machinery you intend to use,
take a woodworking class or visit your local library for more information. Woodworking machinery
and tools are inherently dangerous because they use sharp edges that can and will cause serious
personal injury including amputation and death. Do not underestimate the ability of these tools and
machinery to cause injury. Never operate any tool without all guards in place and always wear
approved safety glasses. For your own safety, please heed this warning.
Always wear safety glasses or goggles when operating equipment. Everyday glasses or
reading glasses are not safety glasses. Be certain the safety glasses you wear meet the
appropriate standards of the American National Standards Institute (ANSI).
Because there are various ways to cut and join wood, you can make substitutions for the methods
stated in this plan. We try to suggest the easiest methods possible. However, only you know your
skills with each piece of machinery. Never compromise your safety by using a cutting method
with which you are not comfortable. Instead, find an alternative approach that will yield the same
result.

H3099 Deluxe Violin Kit
-3-
SECTION 2: INTRODUCTION
Foreword
We are proud to offer the Model H3099 Deluxe
Violin Kit. This
kit is part of a growing Grizzly fam-
ily of fine
woodworking products. When assem-
bled according to the guidelines set forth in this
manual, you can expect years of enjoyment from
this violin.
The specifications, drawings, and photographs
illustrated in this manual represent the Model
H3099 when the manual was prepared. However,
owing to Grizzly’s policy of continuous improve
-
ment, changes may be made at any time with no
obligation on the part of Grizzly.
For your convenience, we always keep current
Grizzly manuals available on our website at www.
grizzly.com. Any updates to your machine will be
reflected in these manuals as soon as they are
complete. Visit our site often to check for the lat
-
est updates to this manual!
If you have any comments regarding this manual,
please write to us at the address below:
Grizzly Industrial, Inc.
C
/O Technical Documentation Manager
P.O. Box 2069
Bellingham, WA 98227-2069
Email: [email protected]
We stand behind our products. If you have any
service questions or parts requests, please call or
write us at the location listed below.
Grizzly Industrial, Inc.
1203 Lycoming Mall Circle
Muncy, PA 17756
Phone: (570) 546-9663
Fax: (800) 438-5901
E-Mail: [email protected]
Web Site: http://www.grizzly.com
Contact Info

-4-
H3099 Deluxe Violin Kit
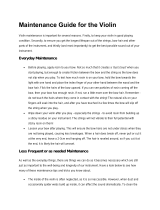
Components
1 PH3099001 Carved Top
2 PH3099002 Carved Back & Sides
3 PH3099003 Carved Neck
4 PH3099004 Fingerboard (Mounted To Neck)
5 PH3099005 Bass Bar (Not Shown)
6 PH3099006 Tuning Peg
7 PH3099007 Sound Post Setter
8 PH3099008 Nut (Mounted To Neck)
9 PH3099009 Bridge
10 PH3099010 Sound Post
11 PH3099011 Strings
12 PH3099012 Chin Rest With Bracket
13 PH3099013 End Pin
14 PH3099014 Purfling
15 PH3099015 Tailpiece With Tailgut
16 PH3099016 Tailpiece Saddle
17 PH3099017 Fine Tuner
18 PH3099018 Case (Not Shown)
19 PH3099019 Bow
20 PH3099020 Rosin
REF PART # DESCRIPTION
Figure 1. Component layout.
1
2
3
4
6
7
8
9
10
11
20
19
12
13
14
15
16
17

H3099 Deluxe Violin Kit
-5-
The majority of the wooden components in this kit
are fully machined from the factory and are ready
for assembly. A small amount of drilling, sanding
and light machining will need to be performed to
complete the violin.
Recommended Tools:
—Small Hammer
—Coping Saw
—Assortment Of Files
—Assortment Of Chisels
—End-pin Reamer
—Spool Clamps
—Lightweight Saw
—
1
⁄16" Drill Bit & Drill
—Purfling Cutter Or Rotary Tool
—Curved Scraping Tool
—Steel Ruler
—Tape Measure
Recommended Supplies:
—Wood Glue
—Violin Varnish
—Medium Drying Instant Adhesive
—Double-Sided Tape
—Rubber Bands
—Sandpaper: #150, #220, #320 Grits
Supplies/Tools
Spool clamps are simple and inexpensive to
make. Make 18 spool clamps using 1" diameter
dowel pieces,
1
⁄4"-20 x 3" bolts, and
1
⁄4"-20 wing
nuts (
Figure 2).
Spool Clamps
Figure 2. Spool clamp.

-6-
H3099 Deluxe Violin Kit
The top and back violin pieces need to be routed
to accept the purfling inlay. The use of a purfling
inlay tool is highly recommended to obtain clean,
professional looking results. Consult a musical
instrument tool supplier for more information.
Figure 3 shows the purfling locations.
To inlay the purfling:
1. Using a pencil or marking gauge, mark the
locations where the purfling grooves need to
be routed.
2. Using a sharp chisel or purfling inlay tool,
rout out the grooves for the purfling inlay.
3. Cut and dry-fit the purfling inlay pieces.
Note—Wipe the purfling inlay pieces with a
warm, damp cloth to help bend the pieces
around tight curves. DO NOT submerse the
purfling inlay pieces into water or they will
delaminate.
4. Using wood glue, secure the purfling inlay
pieces into the grooves routed into the top
and back pieces.
5. Once the glue has dried, sand and scrape
the purfling smooth with the rest of the top
and back pieces.
6. Using #220 grit sandpaper, final sand the
entire violin body pieces. Be careful NOT to
over-sand the corners or other delicate trim-
work.
Purfling Inlay
SECTION 3: ASSEMBLY
Figure 3. Purfling inlay locations.
4mm
1.5mm
Enlarged Cross-
Section View
2mm

H3099 Deluxe Violin Kit
-7-
To shape and attach the bass bar:
1. Dry fit the the bass bar on the back of the
top piece, at the location shown in
Figure
4. Note—The thickest part of the bass bar is
positioned towards the butt of the violin.
— If the bottom of the bass bar aligns cor
-
rectly with the top piece, then proceed to
the step 3.
— If the back of the bass bar does not align
correctly with the top piece, then proceed
to the next step.
2. Tape a piece of #220 grit sandpaper to the
bottom of the bass bar and lightly move it
back and forth on the mounting location to
close any gaps.
3. Using several clamps, secure the bass bar to
the violin top piece with wood glue. Continue
when the assembly is dry.
Bass Bar
Figure 4. Bass bar location.
To attach the top piece to the violin body:
1. Using a steel ruler, measure the width of the
side at several locations around the violin
body.
— If there are NO variations in measure
-
ments, then proceed to step 3
.
— If there are variations in measurements,
then proceed to the next step
.
2. Sand the top edge of the violin body on a
piece of #150 grit sandpaper applied to a flat
table surface. Note—
Repeat step 1 often.
3. Using the spool clamps, dry-fit the top piece
to the violin body to ensure there are no
gaps.
4. Secure the top piece to the violin body with
wood glue. Continue when the assembly is
dry.
Body
16mm
Top Piece
Bass Bar
A"
B"
20.5mm
A" = B"

-8-
H3099 Deluxe Violin Kit
There are several critical measurements that
must be maintained when attaching the neck to
the body. If these measurements are not main
-
tained, the violin will not perform to its fullest
potential. Figure 5 and the bullets below sum-
marize these measurements.
• The neck and fingerboard centerlines must
align with the centerline of the body.
• The nut/fingerboard joint must be 130mm
from the front edge of the violin body.
• The back of the fingerboard must be 6mm
above the top of the violin body at the neck/
body joint.
• The distance between the top of the violin
body at the bridge location and the projected
line from the top surface of the fingerboard
must be 27mm.
• The neck to body joint must be tight and
secure against the heel cap extension from
the back violin piece.
To attach the neck to the body:
1. Using a pencil, mark the outline of the neck
against the side of the violin body and the
heel cap extension. Note—The neck heel
is probably longer than it needs to be. If so,
carefully cut or file the heel at an angle to
allow the above measurements to be main-
tained.
2. Using a chisel or sharp knife, remove small
amounts of material from the violin body
(Figure 6). Removing too much material, or
removing it too fast, could cause irreparable
damage. Note—The final depth of the mor
-
tise should be 5 to 6mm. Make sure the criti
-
cal measurements are maintained first and
foremost!
3. Dry-fit the neck to body joint. If the mortise
was cut correctly, the neck will fit snugly into
the body without being overly tight, and all
the critical measurements will be met.
4. Using a c-clamp and a large rubber band or
string, secure the neck to the body with wood
glue. The c-clamp goes around the back of
the heel cap extension and the top of the
fingerboard. The rubber band or string goes
around the neck and the butt of the violin.
Note—Verify all critical measurements.
5. Once the assembly is dry, gently “break” the
fingerboard away from the neck. The finger
-
board must be removed before the finish can
be applied to the violin.
Neck To Body
Figure 5. Critical neck measurements.
Figure 6. Neck mortise.
130mm
Violin
Front
Neck
Mortise
6mm
Heel Cap
Extension
27mm

H3099 Deluxe Violin Kit
-9-
To install the tailpiece saddle:
1. Using a knife or chisel, cut a
3
⁄16" wide X 1
5
⁄8"
long X
1
⁄8" deep mortise in the top piece, just
above the end-pin hole.
2. Using a file or sandpaper, form a raised
ridge along the center length of the tailpiece
saddle. Note—The ridge must be
3
⁄16" above
the violin top piece.
3. Secure the tailpiece saddle into the violin top
with wood glue.
4. Once the assembly is dry, use files and
sandpaper to shape the tailpiece saddle
edges flush with rest of the violin top (
Figure
7).
Tailpiece Saddle
Figure 7. Installed tailpiece saddle.
To attach the end-pin:
1. Using a 7mm drill bit, drill out the hole for the
end-pin.
2. Using a 1:30 ratio end-pin reamer, ream the
hole to accept the end-pin. Note—
Remove
the end-pin before continuing. Re-install after
the finish has been applied to the violin.
End-Pin
Butt Of Violin
Tailpiece
Saddle

-10-
H3099 Deluxe Violin Kit
The violin peg tuners have been sized and the
string holes have been drilled at the factory. The
correct arrangement in the pegbox is shown in
Figure 8. Note—All of the peg tuners are identi-
cal.
Peg Tuners
Finishing Tips:
• Always work in a well ventilated area
when using finishing materials.
• Wear an ANSI-approved respirator mask
and safety glasses when using finishing
materials!
• Fabricate hooks from wire hangers to sus-
pend the violin components during the finish
-
ing process.
• Several thinner coats usually produce a nicer
finish than one heavy coat. Note—
Always
follow the finish manufacturer’s instructions.
• Dust particles suspended in the air will settle
on wet finishes, resulting in less than satis
-
factory results. To avoid this problem:
1. Leave the room where the finishing will
take place completely undisturbed for 24
hours prior to applying the finish.
2. Have the violin components positioned for
the finish application upon entering the
room.
3. Avoid making unnecessary movements
upon entering the finish room.
4. Apply the finish to the desired violin parts
and immediately leave the finish room.
5. DO NOT return to the room until the
specified drying time has elapsed.
• Always follow the finish manufacturer’s
instructions.
Finishing
Figure 8. Peg tuner and string arrangement.
1st
4th
3rd
2nd

H3099 Deluxe Violin Kit
-11-
To fit the bridge:
1. Place the bridge on the violin top, centered
between the inside notches of the f-holes
(Figure 9). Note—When viewed from the
side, the flat side of the bridge should face
the butt of the violin and the tapered side
should face the front (
Figure 10).
2. Using a steel ruler, check the height of the
bridge in relation to the top surface of the fin
-
gerboard. The E-string location on the bridge
must be 2.5 to 3mm above the fingerboard.
The G-string location on the bridge must be
4.5mm above the fingerboard.
— If both of these conditions are present,
then continue with step 4
.
— If either of these conditions are NOT pres
-
ent, then continue with the next step.
Bridge
Figure 9. Bridge location.
E-string
Location
G-string
Location
Figure 10. Correct bridge thickness
(Cross-Section Side View)
3. If the bridge only needs to be adjusted 1mm
or less, tape a piece of #220 grit sandpaper
to the bottom of the bridge and lightly move
it back and forth on the mounting location. If
the bridge needs to be adjusted more than
1mm, remove a small amount of material
from both the top and bottom of the bridge.
4. Using sandpaper, reduce the thickness of
the bridge until the top is 1.3mm thick and
the base is 4mm thick (
Figure 10).
4mm
1.3mm
Butt Of Violin

-12-
H3099 Deluxe Violin Kit
To re-attach the fingerboard to the neck:
1. Remove any dried glue from the mating sur-
faces of the fingerboard and neck.
2. Dry-fit the fingerboard and make sure the
nut/fingerboard joint is 130mm from the edge
of the violin top.
3. Using clamps, secure the fingerboard to the
neck with wood glue. Continue when the
assembly is dry.
Fingerboard
To make the string slots:
String spacing on the nut must be 16.3mm from
center-to-center between the outside strings and
5.43mm from centers between the individual
strings (
Figure 12).
String spacing on the bridge must be 33.5mm
from center-to-center between the outside strings
and 11.3mm from centers between the individual
strings (
Figure 12).
The bottoms of the slots must be 0.3mm above
the fingerboard surface plane and the width of
the slots must be
1
⁄2 the diameter of each string
(Figure 12). Begin making the slots with a sharp
knife and finish them with files that match the
diameters of the strings.
String Slots
Figure 11. Sound post location.
The sound post placement greatly affect the over-
all volume and tone of the violin.
To install the sound post:
1. Stick the pointed end of the sound post setter
into the sound post, about
2
⁄3 of the way to
the top.
2. Carefully lower the sound post through the
treble side f-hole. Note—DO NOT use glue
to secure the sound post.
3. Place the sound post towards the center of
the violin and then use the other end of the
sound post setter to pull the sound post to
its final position, 3 mm behind the location of
the bridge treble foot (
Figure 11). Note—The
end grain of the sound post must be perpen
-
dicular to the grain direction of the violin top
piece.
Sound Post
Sound Post
3mm

H3099 Deluxe Violin Kit
-13-
Figure 12. String slots.
16.3mm
Nut
Bridge
Fingerboard
Surface
Plane
5.43mm
33.5mm
11.3mm
0.3mm
To install the tailpiece:
1. Insert the end-pin into the end-pin hole.
2. Remove one of the brass nuts from the tailgut
and thread the tailgut through the tailpiece.
Rethread the brass nut onto the tailgut.
3. Install the fine tuner to the tailpiece as shown
in Figure 13.
4. Slide the tailgut over the end-pin. Note—The
end of the tailpiece should align over the end
of the top piece (
Figure 13).
Tailpiece
Figure 13. Tailpiece.
End-pin
Tailgut
Fine Tuner

-14-
H3099 Deluxe Violin Kit
To install the chin rest:
1. Remove the two screws from the chin rest
mounting bracket assembly, and thread them
into the pre-drilled holes on the chin rest as
shown in
Figure 14.
Chin Rest
Figure 16. Chin rest placement.
To install the strings:
1. Center the bridge between the inner two f-
hole notches and string the violin to pitch.
Installing Strings
Chin rest
Mounting
Bracket
Chin rest
2. Thread the two barrels attached to the brack-
et onto the screws mounted to the chin rest
as shown in
Figure 15.
Tip—Use a 1.5mm hex wrench to adjust the
barrels.
Figure 14. Screws installed onto chin rest.
3. Place the chin rest bracket and chin rest over
the tailpiece and end-pin (
Figure 16) at the
end of the violin body
.
Figure 15. Bracket attached to screws and chin
rest.
4. Adjust the chin rest bracket assembly as
needed so the chin rest fits snugly onto the
violin.
Note—Over-tightening the bracket will dam-
age the violin body.
Screws
Barrels
Bracket

H3099 Deluxe Violin Kit
-15-
If you need parts or help in assembling your
product, call the service department at (570) 546-
9663. Trained service technicians will be glad to
help you.
If you have any comments regarding this manual,
please write to Grizzly at the address below:
Grizzly Industrial, Inc.
C
/O Technical Documentation
P.O. Box 2069
Bellingham, WA 98227-2069
We recommend you keep a copy of our cur-
rent catalog for complete information regarding
Grizzly's warranty and return policy. If you need
additional technical information relating to this
product, or if you need general assistance or
replacement parts, please contact the Service
Department at the location listed below.
Grizzly Industrial, Inc.
1203 Lycoming Mall Circle
Muncy, PA 17756
Phone: (570) 546-9663
Fax: (800) 438-5901
E-Mail: [email protected]
Web Site: http://www.grizzly.com
.
General
SECTION 4: REFERENCE INFO

-16-
H3099 Deluxe Violin Kit
Notes

H3099 Deluxe Violin Kit
-17-
Notes

-18-
H3099 Deluxe Violin Kit
Grizzly Industrial, Inc. warrants every product it sells for a period of 1 year to the original purchaser from the
date of purchase. This warranty does not apply to defects due directly or indirectly to misuse; abuse; negli
-
gence; accidents; repairs or alterations; assembly, finishing or modification of kits; or lack of maintenance.
This is Grizzly’s sole written warranty and any and all warranties that may be implied by law, including any
merchantability or fitness, for any particular purpose, are hereby limited to the duration of this written war
-
ranty. We do not warrant or represent that the merchandise complies with the provisions of any law or acts
unless the manufacturer so warrants. In no event shall Grizzly’s liability under this warranty exceed the
purchase price paid for the product and any legal actions brought against Grizzly shall be tried in the State
of Washington, County of Whatcom.
We shall in no event be liable for death, injuries to persons or property or for incidental, contingent, special,
or consequential damages arising from the use of our products.
To take advantage of this warranty, contact us by mail or phone and give us all the details. We will then
issue you a “Return Number,’’ which must be clearly posted on the outside as well as the inside of the
carton. We will not accept any item back without this number. Proof of purchase must accompany the
merchandise.
The manufacturers reserve the right to change specifications at any time because they constantly strive to
achieve better quality equipment. We make every effort to ensure that our products meet high quality and
durability standards and we hope you never need to use this warranty.
Please feel free to write or call us if you have any questions about the machine or the manual.
Thank you again for your business and continued support. We hope to serve you again soon.
Warranty & Returns
/