Page is loading ...

COPYRIGHT © FEBRUARY, 2004 BY GRIZZLY INDUSTRIAL, INC.
WARNING: NO PORTION OF THIS MANUAL MAY BE REPRODUCED IN ANY SHAPE
OR FORM WITHOUT THE WRITTEN APPROVAL OF GRIZZLY INDUSTRIAL, INC.
JOB #5466 PRINTED IN JAPAN
BANJO KIT
MODEL H3124
INSTRUCTION MANUAL

WARNING
Some dust created by power sanding, sawing, grind-
ing, drilling, and other construction activities contains
chemicals known to the State of California to cause
cancer, birth defects or other reproductive harm.
Some examples of these chemicals are:
• Lead from lead-based paints.
• Crystalline silica from bricks, cement, and
other masonry products.
• Arsenic and chromium from chemically treated
lumber.
Your risk from these exposures varies, depending on
how often you do this type of work. To reduce your
exposure to these chemicals: work in a well ventilated
area, and work with approved safety equipment, such
as those dust masks that are specially designed to fil-
ter out microscopic particles.

SECTION 1: SAFETY ................................................................................................................................2
SECTION 2: INTRODUCTION....................................................................................................................3
SECTION 3: PARTS INVENTORY ............................................................................................................4
SECTION 4: SANDING ..............................................................................................................................5
Supplies/Tools......................................................................................................................................5
Wooden Rim ........................................................................................................................................5
Neck ....................................................................................................................................................6
Fingerboard..........................................................................................................................................6
Bridge ..................................................................................................................................................6
SECTION 5: FINISHING ............................................................................................................................7
Wooden Rim ........................................................................................................................................7
Neck ....................................................................................................................................................7
SECTION 6: ASSEMBLY ..........................................................................................................................8
Bracket Hook Lugs ..............................................................................................................................8
Tone Ring ............................................................................................................................................8
Banjo Head ..........................................................................................................................................9
Neck ..................................................................................................................................................10
Coordinator Rod ................................................................................................................................10
5th String Nut ....................................................................................................................................11
5th String Peg ....................................................................................................................................11
Tuning Machines................................................................................................................................12
Tailpiece ............................................................................................................................................12
Winding Strings ..................................................................................................................................13
Bridge Placement ..............................................................................................................................13
String Height ......................................................................................................................................14
Tuning ................................................................................................................................................15
SECTION 7: REFERENCE INFO ............................................................................................................16
General ..............................................................................................................................................16
Aftermarket Accessories ....................................................................................................................16
Notes..................................................................................................................................................17
Warranty & Returns............................................................................................................................18
Warranty Card....................................................................................................................................19
TABLE OF CONTENTS

-2-
H3124 Banjo Kit
SECTION 1: SAFETY
These instructions assume that you are intimately familiar with the safe operation and use of
woodworking machinery and woodworking tools, and understand the techniques used to repro-
duce this project. If you do not qualify for both of these criteria, STOP building this project for
your own safety. Read and understand the owners manual for the machinery you intend to use,
take a woodworking class or visit your local library for more information. Woodworking machinery
and tools are inherently dangerous because they use sharp edges that can and will cause serious
personal injury including amputation and death. Do not underestimate the ability of these tools and
machinery to cause injury. Never operate any tool without all guards in place and always wear
approved safety glasses. For your own safety, please heed this warning.
Always wear safety glasses or goggles when operating equipment. Everyday glasses or
reading glasses are not safety glasses. Be certain the safety glasses you wear meet the
appropriate standards of the American National Standards Institute (ANSI).
Because there are various ways to cut and join wood, you can make substitutions for the meth-
ods stated in this plan. We try to suggest the easiest methods possible. However, only you know
your skills with each piece of machinery. Never compromise your safety by using a cutting method
with which you are not comfortable. Instead, find an alternative approach that will yield the same
result.

H3124 Banjo Kit -3-
We are proud to offer the Model H3124 Banjo Kit.
This kit is part of a growing Grizzly family of fine
woodworking products. When assembled accord-
ing to the guidelines set forth in this manual, you
can expect years of enjoyment from this banjo.
We are pleased to provide this manual with the
Model H3124. It was written to guide you through
assembly, review safety considerations, and
cover general information. It represents our effort
to produce the best documentation possible.
If you have any comments regarding this manual,
please write to us at the address below:
Grizzly Industrial, Inc.
C
/O Technical Documentation
P.O. Box 2069
Bellingham, WA 98227-2069
Most importantly, we stand behind our products.
If you have any questions or parts requests,
please call or write us at the location listed below.
Grizzly Industrial, Inc.
1203 Lycoming Mall Circle
Muncy, PA 17756
Phone: (570) 546-9663
Fax: (800) 438-5901
E-Mail: [email protected]
Web Site: http://www.grizzly.com
The specifications, drawings, and photographs
illustrated in this manual represent the Model
H3124 as supplied when the manual was pre-
pared. However, owing to Grizzly’s policy of con-
tinuous improvement, changes may be made at
any time with no obligation on the part of Grizzly.
For your convenience, we always keep current
Grizzly manuals available on our website at
www.grizzly.com
. Any updates to products will be
reflected in these manuals as soon as they are
complete. Visit our site often to check for the lat-
est updates to this manual!
SECTION 2: INTRODUCTION

1 PH3124001 Wooden Rim
2 PH3124002 Brass Tone Ring
3 PH3124003 Banjo Head
4 PH3124004 Tension Hoop
5 PH3124005 Bracket Hook Assembly
5-1 PH3124005-1 Bracket Hook Lugs
5-2 PS56M Phlp Hd Scr M4-.7 X 16
5-3 PLW02M Lock Washer 4mm
6 PH3124006 Bracket Hooks
6-1 PH3124006-1 Bracket Hook Nuts
7 PH3124007 Coordinator Rod
7-1 PW01M Flat Washer 8mm
7-2 PW04M Flat Washer 10mm
8 PH3124008 Neck with Top and 5th String Nuts
8-1 PHTEK15 Tap Screw #10 X 2
9 PH3124009 Pegs with Nuts and Washers
10 PH3124010 Truss Rod Cover with Screws
11 PH3124011 5th String Peg
12 PH3124012 Tailpiece
13 PH3124013 Bridge
14 PH3124014 Strap Hook
15 PH3124015 Strings
16 PH3124016 T-wrench
17 PH3124017 Truss Rod Wrench
18 PH3124018 Adjustable Wrench
19 PH3124019 Tailpiece Lug
REF PART # DESCRIPTION
-4-
H3124 Banjo Kit
SECTION 3: PARTS INVENTORY
Figure 1. Boxed components.
Figure 2. Hardware Bag.
Figure 3. Peg Bag.
8
15
1
2
4
3
18
7
12
17
7-1
11
9
13
7-2
16
8-1
19
10
14
6
5-1
5-2
6-1
5-3

-5-
The majority of the wooden components in this kit
are fully machined from the factory and are ready
for assembly. A small amount of sanding and fin-
ishing will need to be performed to complete the
banjo.
Recommended Tools & Supplies:
• Finishing Supplies
• #180, #240, and #320 Aluminum-Oxide
Sanding Paper
• Sanding Block
• Paste Filler
• ”000” Grade Steel Wool
• Masking Tape
• Razor Blade
• Razor Saw
• Long Shank Eye Screws
• Tack Cloth
• Coping, Jig, or Scroll Saw (Optional)
• Drill
• 4mm or
5
/
32" drill bit
• Hammer
The banjo wooden rim has been rough sanded at
the factory; however, no finish has been applied.
To sand the wooden rim:
1. Wear an ANSI-approved respirator and
safety glasses when sanding wood!
2. Using either an electric palm sander or a
sanding block, sand the wooden rim with
#180 grit aluminum-oxide sanding paper until
there is a consistent scratch pattern on the
entire surface. Note—When hand sanding,
always sand in the same direction as the
wood grain.
3. Sand the wooden rim with a #240 grit sand-
ing paper until there is a consistent scratch
pattern on the entire surface.
4. Sand the wooden rim with a #320 grit sand-
ing paper until there is a consistent scratch
pattern on the entire surface.
5. Wipe the wooden rim with a damp cloth.
Wiping the workpiece with a damp cloth
before the final sanding helps to “raise” the
wood grain; thus, allowing the “raised” grain
to be sanded smooth.
6. Once the wooden rim is dry, repeat step 4.
7. Fill the wood pores with a paste filler accord-
ing to the manufacturer’s instructions.
8. When the paste filler is dry, use “000” grade
steel wool to remove the residue and polish
the wood surface.
9. Wipe the wooden rim with a tack cloth to
remove all remaining sanding dust.
Wooden Rim
H3124 Banjo Kit
Supplies/Tools
SECTION 4: SANDING

-6-
H3124 Banjo Kit
Like the wooden rim, the banjo neck has been
rough sanded at the factory. Personalize the fret-
board and neck headstock with additional cutting,
inlay, or design work before final sanding. Note—
Take your time and consider testing your designs
in scrap wood before performing the work on the
actual fretboard and headstock.
To sand the banjo neck:
1. Wear an ANSI-approved respirator and
safety glasses when sanding wood!
2. Perform any custom cutting, inlay, or design
work to the neck headstock.
3. Using the sanding technique described in the
previous sub-section, sand the entire banjo
neck, EXCEPT for the frets and fretboard.
Note—Sanding the fretboard and frets will
affect the playability of the banjo, and could
lead to unrepairable damage.
The fingerboard requires no sanding. Note—
Sanding the fingerboard will affect the playability
of the banjo, and could lead to unrepairable dam-
age.
Bridge
The bridge has been rough sanded at the factory.
Final sand the bridge as described in the
Wooden Rim sub-section.
FingerboardNeck

H3124 Banjo Kit -7-
Finishing supplies are not included with the banjo
kit. Note—The wooden rim and neck are made of
mahagony wood. Clear finishes such as lacquer
look exceptionally stunning and glossy on this
wood.
To finish the wooden rim:
1. Wear a NOISH/OSHA approved respirator
with particulate and gas/vapor filters,
safety glasses, and rubber gloves, when
using finishing materials!
2. Always work in a well ventilated area
when using finishing materials.
3. Thread a long shank screw eye into one of
the holes in the wooden rim.
4. Hold the screw eye and apply several thin
coats of the finish. Multiple thin coats usually
produce a nicer finish than one heavy coat.
Note—Always follow the finish manufactur-
er’s instructions.
5. Hang the wooden rim to dry.
Painting/Finishing Tips:
Dust particles suspended in the air will settle on
wet finishes, causing less than satisfactory
results. To avoid this problem:
• Leave the finishing room undisturbed for 24
hours prior to applying the finish.
• Avoid making unnecessary movements upon
entering the finish room.
• Apply the finish to the desired banjo parts and
immediately leave the finish room.
• DO NOT return to the room until the specified
drying time has elapsed.
To finish the neck:
1. Wear an NOISH/OSHA approved respira-
tor with particulate and gas/vapor filters,
safety glasses, and rubber gloves, when
using finishing materials!
2. Always work in a well ventilated area
when using finishing materials.
3. Mask off the fretboard. Use a small stick of
wood to carefully press all the masking tape
edges securely to the banjo fretboard. The
finish coat can seep under these edges,
especially near corners, uneven edges, and
places where the frets meet the fingerboard.
4. Form a piece of wire into a U shaped hanger
with hooks on both ends.
5. Thread the hooks through the upper peg-
holes and hang the neck in the finish room.
6. Apply several thin coats of the finish. Multiple
thin coats usually produce a nicer finish than
one heavy coat. Note—Always follow the fin-
ish manufacturer’s instructions.
7. Hang the neck in a dust free room to dry.
8. When finishing is complete, remove the
masking tape from the fretboard.
9. Carefully scrape any excess finish off the
fretboard with a razor blade.
NeckWooden Rim
SECTION 5: FINISHING

-8-
H3124 Banjo Kit
The bracket hook lugs provide a secure anchor
for the bracket hooks.
To install the bracket hook lugs:
1. Slide the M4-.7 X 16 Phillip head screws with
4mm lock washers through the holes on the
centerline of the wooden rim and thread the
bracket hook lugs onto the screws as shown
in Figure 4.
2. Rotate the bracket hook lugs until the holes
face up and tighten the screws.
3. Attach the strap hook with the remaining
screw and lock washer into the hole that is
off center.
The tone ring transmits vibration from the banjo
head into the rim. It is essential to shaping the
sound of the instrument.
To install the tone ring:
1. Use a razor blade to scrape excess finish out
of the groove in the wooden rim.
2. Test the fit of the ring. It should fit snug onto
the wooden rim.
3. Install the tone ring with the flat side down as
shown in Figure 5.
Figure 4. Installing the bracket hook lugs.
Figure 5. Installing the tone ring.
Tone RingBracket Hook Lugs
SECTION 6: ASSEMBLY

H3124 Banjo Kit -9-
To install the banjo head:
1. Press the banjo head onto the tone ring.
2. Place the tension ring over the banjo head.
See Figure 6.
Figure 6. Installing the tension hoop.
Figure 7. Finger tightening the bracket hook nuts.
Figure 8. Tightening the bracket hook nuts.
Banjo Head
3. Drop the bracket hooks over the tension ring
and through the bracket hook lugs.
4. Thread the bracket hook nuts and 4mm lock
washers onto the bracket hooks and finger
tighten as shown in Figure 7. Note—The
bracket hook nuts install with the flat side
toward the bracket hook lugs.
5. Ensure that the head is seated squarely on
the rim, and the bracket hooks are perpen-
dicular to the tension hoop.
6. Use the included wrench to tighten the brack-
et hook nuts. Proceed clockwise, tightening
each nut
1
⁄2 turn as shown in Figure 8.
7. If the surface of the tension hoop is higher
than the fingerboard surface, tighten the
bracket hooks until the surfaces are equal.

-10-
H3124 Banjo Kit
To attach the neck to the banjo rim:
1. Place the neck fretboard-side-down on a non
marring surface and insert the coordinator
bolt into the heel of the neck.
2. Thread the #10 X 2 tap screw into the neck
and through the coordinator bolt as shown in
Figure 9.
To install the coordinator rod:
1. Thread the remaining nut and a washer into
the center of the coordinator rod.
2. Thread the coordinator rod through the hole
in the rim from the inside. Note—The washer
needs to be between the nut and the banjo
rim.
3. Thread the tailpiece lug and a washer onto
the coordinator rod. Make sure the coordina-
tor rod does not block the hole in the tailpiece
lug.
4. Thread the coupler onto the coordinator rod
and the coordinator bolt, as shown in Figure
10, and finger tighten only.
Coordinator Rod
Neck
Figure 9. Installing the coordinator bolt.
Figure 10. Installing the coordinator rod.
3. Attach the neck to the rim by feeding the
coordinator bolt through the large hole in the
banjo rim, and threading the large bolt and
washer tightly against the rim. Tighten with
the included adjustable wrench.
5. Tighten the coordinator rod nuts and washer
against the banjo rim.
Coupler
Coordinator Rod
Coordinator Rod Nut
Coordinator Rod Nut
Coordinator Bolt

H3124 Banjo Kit -11-
the 5th string nut is installed in the banjo neck just
above the 5th fret. It is necessary to cut a very
shallow slot in this nut to guide the 5th string. The
slot should be deep enough so the 5th string does
not slide out, but a buzz will occur when the
instrument is played if it is cut deeper than the
height of the 5th fret.
To cut the 5th string slot in the nut:
1. Use a razor saw or a small jewelers file to
carefully cut a slot that is .01" (.25mm) deep
or less .
2. Slide the 5th string in the slot. The 5th string
should be flush with the top of the nut.
3. Carefully cut the slot deeper if the string is
not flush with the top of the nut.
Figure 11. 5th string nut.
The 5th string peg is the smallest of the tuners
and is made to be force fitted into the peg hole.
To install the 5th string peg:
1. Clean any excess finish out of the peg hole.
2. Remove the knob and plastic washer from
the 5th string peg.
3. Put a few drops of wood glue on the 5th
string peg and insert it into the peghole with
the tuning post towards the fretboard.
4. Place the T-wrench over the 5th string peg,
shown in Figure 12, and carefully drive the
5th string peg into the peghole with a ham-
mer. Note—Place a non-marring support
under the banjo neck before tapping.
5th String Peg
Figure 12. Inserting the 5th string peg.
5. Replace the plastic washer and knob on the
5th string peg.
5th String Nut
5th String Nut

-12-
H3124 Banjo Kit
To install the tuning machines:
1. Slide the tuning machines through the back
of the headstock.
2. Place the washer and barrel nut over the tun-
ing post and tighten with a 10mm socket.
Figure 13. Tuning machines installed in the
back of the headstock
To install the tailpiece:
1. Insert the tailpiece screw through the tail-
piece lug.
2. Set the tailpiece on the tensioning hoop, as
shown in Figure 14, and tighten the nut
against the tailpiece lug.
Figure 14. Tightening tailpiece screw into lug.
Tailpiece
Tailpiece
Tailpiece Lug
Tuning Machines

H3124 Banjo Kit -13-
Install the banjo strings loosely. The bridge must
be installed and adjusted before the strings can
be tightened and tuned.
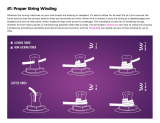
To install the banjo strings:
1. Place the end of the string with the loop over
the hooks on the tailpiece. The 1st string is
farthest to the right, then 2nd, 3rd, 4th, and
5th farthest to the left as shown in Figure 15.
Figure 15. String placement.
5th String 1st String
2. Pull the strings through the tailpiece holes
and up to the tuners. Do not overlap the
strings.
3. Route the 5th string to the inside of the 5th
string nut and down to the 5th string peg.
4. Route the strings to the inside of the tuning
posts and through the peg holes. Note—
Allow enough string slack to allow 2-3 com-
plete winds around the tuning peg.
5. Turn the tuning knobs to tighten the strings.
Note—DO NOT completely tighten the
strings at this time.
Bridge Placement
To place the bridge:
1. Lay the bridge flat on the banjo head and
slide it under the strings.
2. Slowly tilt the bridge up under the strings.
Loosen the strings if it is difficult to raise the
bridge.
3. Slide the strings into their slots and tighten.
4. The bridge location is 696mm (27.4") if mea-
sured from the nut and 348mm (13.7") if
measured from the 12th fret. See Figure 16.
Figure 16. Bridge placement.
5. Finalize the position of the bridge by lightly
touching the 1st string directly above the
twelfth fret and plucking the string to play a
harmonic note.
6. Now pluck the string while holding it against
the twelfth fret. If this note is sharper than the
note played in step 5, move the 1st string
side of the bridge toward the tailpiece. If this
note is flat in comparison, move the bridge
toward the neck.
7. This can also be done with an electronic
tuner by tuning the harmonic note to be
exactly in tune and then adjusting the bridge
until the note played in step 6 is also in tune.
Winding Strings

-14-
H3124 Banjo Kit
String Height
Correct string height is crucial to prevent fret buzz
and maximize playability. The string height is
measured from the top face of the fret and the
bottom face of the string.
To check the string height:
1. Measure the string heights at the 12th fret
from the peghead (Figure 18). The string
should be
1
⁄8" above the fret. Note—Use a
steel ruler with a resolution of
1
⁄64".
2. Measure the string heights at the 22nd fret.
The string should be
9
⁄64" above the fret.
Note—The 22nd fret is the closest to the
banjo body.
3. Turn the coordinator rod to adjust the string
height as shown in Figure 19. Note—DO
NOT adjust string height more than
1
⁄16". This
may cause damage to the banjo rim.
4. If the strings need to be adjusted more than
1
⁄16", shim the bottom of the neck to increase
string height, or shim the top to decrease the
string height.
Figure 17. String height measurement.
String Height
String
Fret
Fingerboard
Figure 18. Correct 12th fret string heights.
Figure 19. Adjusting string height.
12th Fret
String Heights:
1
⁄8"
Lower String
Height
Raise String
Height
Banjo Body

H3124 Banjo Kit -15-
Tuning
Tuning is the most important concept of playing a
banjo. If the banjo is not in tune with itself, or the
other instruments in an ensemble, the resulting
music will not sound pleasing to the ear. Banjo
players use many different tunings, but the most
common (“G”) is shown in Figure 20.
G
D
G
B
D
5
4
3
2
1
D - 4th string (one octave
lower than the 1st string)
G - 3rd string (one octave
lower than the 5th string)
Figure 20. Standard tuning notes.
Important issues to consider when tuning a
banjo:
• Get into the habit of tuning the banjo every
time it is picked up to be played.
• Always tune the strings “up.” The final tuned
tension of each string should be reached
while tightening the string, not loosening it. If
the string is tensioned too far, loosen the ten-
sion and tune ”up” again.
• The easiest way to tune a banjo is using an
electronic tuner such as the Grizzly H3097
Chromatic Tuner shown on page 16.

-16-
H3124 Banjo Kit
If you need parts or help in assembling your
banjo, or if you need operational information, call
the service department at (570) 546-9663.
Trained service technicians will be glad to help
you.
If you have any comments regarding this manual,
please write to Grizzly at the address below:
Grizzly Industrial, Inc.
C
/O Technical Documentation
P.O. Box 2069
Bellingham, WA 98227-2069
We recommend you keep a copy of our current
catalog for complete information regarding
Grizzly's warranty and return policy. If you need
additional technical information relating to this
banjo, or if you need general assistance or
replacement parts, please contact the Service
Department at the location listed below.
Grizzly Industrial, Inc.
1203 Lycoming Mall Circle
Muncy, PA 17756
Phone: (570) 546-9663
Fax: (800) 438-5901
E-Mail: [email protected]
Web Site: http://www.grizzly.com.
Figure 21. Model H3097 Chromatic Tuner.
Aftermarket
Accessories
General
SECTION 7: REFERENCE INFO

H3124 Banjo Kit -17-
Notes

Grizzly Industrial, Inc. warrants every product it sells for a period of 1 year to the original purchaser from
the date of purchase. This warranty does not apply to defects due directly or indirectly to misuse; abuse;
negligence; accidents; repairs or alterations; assembly, finishing or modification of kits; or lack of mainte-
nance. This is Grizzly’s sole written warranty and any and all warranties that may be implied by law, includ-
ing any merchantability or fitness, for any particular purpose, are hereby limited to the duration of this writ-
ten warranty. We do not warrant or represent that the merchandise complies with the provisions of any law
or acts unless the manufacturer so warrants. In no event shall Grizzly’s liability under this warranty exceed
the purchase price paid for the product and any legal actions brought against Grizzly shall be tried in the
State of Washington, County of Whatcom.
We shall in no event be liable for death, injuries to persons or property or for incidental, contingent, spe-
cial, or consequential damages arising from the use of our products.
To take advantage of this warranty, contact us by mail or phone and give us all the details. We will then
issue you a “Return Number,’’ which must be clearly posted on the outside as well as the inside of the car-
ton. We will not accept any item back without this number. Proof of purchase must accompany the mer-
chandise.
The manufacturers reserve the right to change specifications at any time because they constantly strive to
achieve better quality equipment. We make every effort to ensure that our products meet high quality and
durability standards and we hope you never need to use this warranty.
Please feel free to write or call us if you have any questions about the machine or the manual.
Thank you again for your business and continued support. We hope to serve you again soon.
Warranty & Returns
H3124 Banjo Kit -18-
/