Page is loading ...

Violin Owner’s Guide
Parts Of the Violin
Scroll
Tuning Pegs
Tuning Pegs
Strings: G,D,A,E
Fingerboard
Bridge
Tailpiece
Chin Rest
Belly
Waist
F Holes
Sound Post
Fine Tuners
Getting Started
Your violin must be assembled and tuned
prior to playing. Violins are delicate instruments
and can be damaged easily. Handle with
care.
Violin Contents
1. Windsor Violin
2. Horsehair Bow
3. Protective Case
4. Bridge
5. Rosin
NOTE: Other contents may be included depending on
the package option purchased
1.
2.
3.
4. 5.
NOTE: The bridge is wrapped in tissue paper and located under the tailpiece
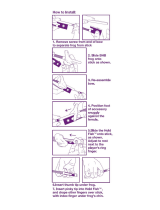
Bridge Fitting
The bridge is very important in transmitting the sound of your violin. It is held in place by the tension of the strings
over the top edge.
• Loosen the strings and place the feet of the bridge between the two notches on the inside of the F holes. The
highest side of the bridge goes under the low G string (the thickest string).
• Tilt the bridge up under the strings toward the tailpiece and set at a 90 degree angle. The bridge should be
centered as you look down the violin fingerboard from the scroll.
• Align the strings so that they are evenly spaced on the bridge prior to tightening the strings.
• The fine tuners should be screwed halfway in to allow for later tuning adjustments.
• Tighten pegs by turning clockwise and • Tighten pegs by turning clockwise and pushing the tapered pegs into the peg box as you are turning in order to
hold the bridge in place. Tighten each string a bit at a time to avoid them snapping and the bridge collapsing or
twisting.
• If the pegs slip after tuning try undoing, pulling the peg out and with the rosin supplied or dry soap, rub onto the
peg where it rubs against the hole. Then re-insert as above and re-tune (tuning instructions on the reverse).
• If the bridge begins to tilt forward you can very carefully pull it back with both hands while resting the lower bout
of the violin on your stomach.

Tuning Your Violin
Preparing The Bow
The tuning pegs are used to tune your strings when they are at least half a note out of tune, and the fine tuners for
smaller adjustments to then reach the correct pitch.
The bow must be tightened and rosined in order that it causes friction and ‘grabs’ the strings to produce a sound.
To prepare your bow follow the steps below.
Correctly tightened bow
Slightly curved and optimally spanned
Incorrectly tightened bow
This bow is over spanned
To tighten the bow, turn the screw clockwise so that the hair has tautness. Do not over-tighten (see below)
Stick
Pad
Screw
Hair
Frog
The Bow
The Rosin
Note: The rosin supplied may differ in shape
and packaging
The strings from the thickest to the thinnest are: G-D-A-E and each string should be tightened a small amount at
a time to prevent bridge movement - do not tighten one string all the way to the correct pitch.
If you have a tuner, pluck the string with your finger until you are near the correct pitch. Once you are within 1-2
notes of the correct pitch, use the fine tuner to adjust each string. If the fine tuner becomes too loose or too tight,
screw back to halfway and adjust the peg until closer to the desired pitch.
• On first use of the rosin, roughen the surface of it with sandpaper or cut parallel lines across it until there is some
powder on the surface.
• Slowly draw the bow hair over the rosin from the frog to the tip of the bow and back again, repeating until enough
rosin has coated the hair. The hairs should look white and if ‘pinged’, will emit white dust. On a new bow, you may
have to repeat this process for apporoximately 5-10 minutes.
• Try placing the bow on your strings and play a few open notes. If you produce a nice clear tone the bow has been
rosined adequately. rosined adequately.
• If there is no tone or volume emitting from the strings, the bow is not grabbing the strings enough to generate
a tone. Try applying more rosin.
• If there is a scratchy tone - the rosin has been over applied but this will wear off during play.
• Apply more rosin as necessary each time you play.
• To optimise the life of the bow, loosen the hairs after playing by turning the screw anti-clockwise. Do not over-
loosen.
• It is quite normal for hairs on the bow to become very loose or snap. Any broken hairs can be removed by pulling • It is quite normal for hairs on the bow to become very loose or snap. Any broken hairs can be removed by pulling
either at the frog or tip of the bow.
/