Acoustical Systems AXIOM Owner's manual
- Category
- Audio turntables
- Type
- Owner's manual

reference tonearm
owner’s manual
©
the AXIOM
picture by
Harry Ralston

picture by
Moritz Teichmann

The AXIOM is the result of my more than 30 years
of intimate research and preoccupation with analog
playback - the interaction of the record groove with
the cartridge and tonearm in specically.
The AXIOM is the true reference tonearm I always
wanted for my own use.
An universal tonearm, which nally offers all and
every option of alignment – while ensuring the best
possible mechanical guidance for any cartridge.
Taking into account the paramount importance of
energy transfer in relation to effective moving mass.
Resulting in a level of performance only obtainable,
when each and every aspect of the analog audio
tracking process is attended with utmost consequence
and attention to every minute detail.
A level of performance, which does transcendent prior
frontiers and opens new levels of musical realism in
recorded music.
My thanks and congratulations to you for choosing
the AXIOM.
We do share the real passion for music and I am
condent that the AXIOM will allow you to hear and
enjoy your favorite records like you have never done
before. Each and every AXIOM is assembled and
precisely ne-tuned by me only.
The AXIOM is entirely manufactured and assembled
in Bavaria, Germany.
Please do get yourself accustomed to the following
manual. Make sure you familiarise yourself with each
and every aspect of the AXIOM’s options. Your time
will be rewarded with outstanding performance.
To the benet of your whole analog set-up - and
ultimately your enjoyment of recorded music.
With kind regards,
D. D. Brakemeier
A brief word
by the designer

4
General note:
Technical data and specications are subject to
change without prior notice.
version 10/2014

5
Content
Technical features & general design 6
Alignments 6
Unpacking the AXIOM 7
Mounting the AXIOM 8
Setting up the AXIOM 9
Balancing the AXIOM 11
Antiskating 11
Setting vertical tracking force 12
Setting horizontal operation point 12
Aligning the AXIOM 13
The genuine alignment template
for the xed head version AXIOM only 14

6
Technical features
& general design
The AXIOM is a 12” pivot tonearm featuring
double nano-gimbal bearings.
It can be operated in static balanced, full
dynamic balanced (with specic cartridges
only) and hybrid balanced mode.
The AXIOM is a full lateral balanced design.
The AXIOM features an unique compound arm
wand - a combination of surface hardened
Titanium and Carbon ber pipes blocked
together and internally damped by an all new
design concept. A concept newer before applied
in tonearm design. Resulting in unmatched fast
energy transfer and total absence of any para-
sitic resonances in the tonearm itself.
The AXIOM was designed to explore the
possibilities of analog playback to the utmost
degree. To accomplish the best possible analog
playback performance, the AXIOM offers an
unique complete bundle of alignment options.
Alignments
Leveling the bearing axis
The AXIOM can be precisely leveled by
the user, independent from the turntable or
mounting surface.
SRA/VTA adjusted at the
cartridge
In the AXIOM the important alignment(s) of
VTA / SRA can be made right at the cartridge
– without altering the static parameters of the
tonearm, while preserving the other set align-
ments and leaving the arm wand always in
horizontal level.
Tracking force during play
Vertical tracking force can be set by static
means (adjust counterweight and/or trim weight
position relative to bearing point) as well as by
magnetic force.
It is possible to adjust VTF very precisely
during actual play. This is done by adjusting
the height of the magnetic counter bar in
relation to the back shaft of the AXIOM.
The optic nano spindle attending the
movement is so ne, that it takes 4 full
revolutions to move the magnetic bar
just 1 mm in height. It is possible to precisely
ne adjust tracking force/stylus pressure by
as little as 1/100 mN.
Dynamic anti-skating
Skating compensation – or anti-skating –
adjustment in the AXIOM is dynamic and
follows the tangential geometry of the AXIOM.
It too can be adjusted during play.
Tonearm height – VTA
Tonearm height can be adjusted on the main
VTA-tower of the AXIOM.
One full turn of the large top knob does adjust
height by precisely 1 mm.
Two (2) variants
The AXIOM is available in 2 standard variants.
u with xed standard
EIA ½” mounting slots
u with SME-compliant
detachable headshell mount
In the SME-variant it is possible to adjust
overhang, effective length and azimuth even for

7
integrated headshell designs like EMT-Tondose,
Ortofon-SPU, FR-7 and similar designs.
Both versions do feature the same technical
design and unique options for alignments.
The 2 variants do however differ in their
mounting distance, pivot to spindle distance
and resulting effective length.
Tangential alignment
It is of course possible to align the AXIOM
to the standard tangential curves of Baerwald,
Stevenson or Loefgren in any version and
standard.
The absolute best possible performance
however is obtained only by aligning the
AXIOM to the new UNI-DIN tangential curve.
It’s geometric design is based on the UNI-DIN.
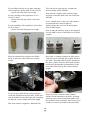
Unpacking the AXIOM
Please make sure that all parts are present
by unpacking the AXIOM and all its tools and
accessories.
The AXIOM suitcase
contains the following:
the• AXIOM tonearm
the • AXIOM’s accessory box
The AXIOM’s accessory box
contains these components:
(1) very short st screw driver 8.0 x 25 - •
(1) T-shaped Allen key driver 2.5 x 100
(1) Main Tungsten counter weight with •
attached POM holder for trim weight
(3) tubular trim weights approx.
10 x 30 mm each - different weight
and color -
(2) Lateral balance weight sets - •
(1) stainless steel, (1) aluminum
**for SME-bayonet version: (1) Lateral
weight set tungsten HD17**
(1) lock screw for lateral weight assembly •
(1) metal screwdriver •
(with selection of blades inside)
(4) 90° Allen wrenches - •
metric sizes 0.89, 1.27, 1.5 and 2.0
(1) small diameter spirit level •
for use on tonearm bearing pivot
(1) 4.2 mm drill •
(non-metric countries only)
(1) M5 tap and die •
(non-metric countries only)
(3) special M5 mounting screws with •
- (1) 30 mm length
- (1) 40 mm length
- (1) 50 mm length
(3) hardened stainless steel mounting •
washers with 29 mm diameter each
- (1) 8 mm, (1) 14 mm and
(1) 20 mm strong
- (1) 34 mm diameter stainless steel
cover plate with rubber ring on down
size
(1) cover plate for mounting point •
Please check the AXIOM package careful and
make sure all the above listed components are
present.

8
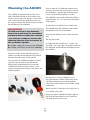
Mounting the AXIOM
The AXIOM is mounted with (1) M5 screw
and (1) hardened stainless steel washer only.
In the accessory box you nd (1) 4.2 mm drill
and (1) M5 tap and die. With these tools you
do create the single M5 thread needed to mount
the AXIOM on your turntable.
IMPORTANT
The M5 thread (or 5 mm diameter
hole if the material of the turntable’s
armboard does not allow for a thread
- for instance: wood) has to have the
following distance from the center of
the turntable’s spindle:
u AXIOM with xed mounting head: 233 mm
u AXIOM with SME-bayonet head: 266 mm
Please use a M 4.2 mm drill and a M5 tap
and die to create the M5 thread in the desired
distance from the center of the spindle.
Now do take the AXIOM and hold it in place
vaguely at the spot above the M5 thread.
Please check approximately how much the
AXIOM has to be elevated so that it’s arm
wand is horizontal level and 6-8 mm above the
turntable platter.
Now do take the (3) hardened stainless steel
washers. Select the one most likely to elevate
the AXIOM to a suitable horizontal position
relative to the turntable platter’s surface.
The AXIOM’s arm wand’s underside shall be
approximately 1/3” or 8 mm above the surface
of the platter.
If in doubt, start with the 8 mm washer rst.
This should bring the AXIOM to the needed
horizontal level on most turntables.
Now take the stainless steel washer and look
at it.
The top side is at.
It’s underside has a distinctive - if only 2/10
mm high - rim at the edge. Do put the washer in
the indention underneath the mounting area on
the AXIOM.
Do take the (1) 30 mm length M5 screw.
Put it through the suitable center hole on the
AXIOM’s mounting area and through the
center hole in the stainless steel washer sitting
underneath.
Make sure the (1) short st screw driver 8.0 x
25 is within your reach.
Do put the whole AXIOM assembly right on
top of the M5 thread and secure in place by
screwing down the M5 screw.

9
Don’t use maximum force, just make sure it
has an easy x and can still be moved in the
horizontal plane.
The AXIOM is now sitting in place. Now do
take an UNI-P2S, a SMARTractor or an other
precision tool to determine the exact pivot to
spindle distance of a tonearm.
On top of the AXIOM’s bearing house is a
12 mm stainless steel plate with a small center
hole. This center hole clearly marks the pivot
center of the AXIOM.
Do slightly rotate the AXIOM till the pivot
center shows exactly the correct distance from
the spindle - the P2S-value is:
u AXIOM with xed mounting head: 288 mm
u AXIOM with SME-bayonet head: 308 mm
In resting position, the inside of the AXIOM’s
headshell mount should be approx. 3.5” or 8.5
cm away from the outer rim of the turntable’s
platter.
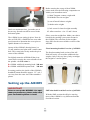
Setting up the AXIOM
IMPORTANT
Prior to set-up the AXIOM - for opti-
mum perpormance, please make sure
your turntable’s platter is level!
Before starting the set-up of the AXIOM,
please make sure the following components are
within your immediate reach:
- (1) Main Tungsten counter weight with
POM holder for trim weights
- (2) sets of lateral balance weights
- (3) tubular trim weights
- (1) lock screw for lateral weight assembly
- 90° Allen wrenches - size 1.5 and 2.0 mm
Select your trim weight rst. Make your choice
based on the cartridge you want to mount in
the AXIOM. The selection of trim weights
does differ for the two available versions of the
AXIOM.
Fixed-mounting headshell version of AXIOM:
The xed-mounting head version of the AX-
IOM will rarely ever need the additional trim
weights. Only with very heavy body caetridges
this might be a useful option.
SME-detachable headshell version of AXIOM:
With the SME-version the effective moving
mass of the AXIOM is very different from the
xed-head version.
stainless steel
brass
aluminum

10
For any MM-cartridge or any other cartridge
with compliance greater than 13x10(-6) dyne:
- please select the steel trim weight.
For any cartridge with compliance of 9 to
13x10(-6) dyne:
- please select the gun metal / brass trim
weight.
For any cartridge with compliance of less than
9x10(-6) dyne:
- please select the tungsten trim weight.
Place the selected trim weight in the POM-
block on the lower end of the main counter
weight.
Lock it in place with the left end (pointing to-
wards the AXIOM’s bearing) barely visible out-
side the POM block and the right end extending
towards the rear by almost half of the length.
The main counter weight has a attened side.
This side has to point inward - towards the
main assembly of the AXIOM.
Now take the complete main counterweight
and slide it onto the shaft at the rear end of the
AXIOM.
Leave enough room on the rear of the shaft to
accommodate the lateral weight set.
Lightly tighten the set screw in the tungsten
main counterweight.
Now do take the stainless steel (or the tungsten
set with SME-version of AXIOM) set of lateral
weights.
One of the 2 cylinders features an Allen screw.
Undo this screw and slide the cylinder off the 4
mm shaft. This 4mm shaft is rmly attached to
the other cylinder. Take the shaft with cylinder
and insert it through the horizontal hole at the
end of the shaft carrying the counter balance
weight.
Please do insert it with the xed cylinder -
which is rmly attached to the shaft - pointing
outwards, away from the turntable platter and
the AXIOM’s main assembly. Now do move the
cylinder as close as possible to the main shaft.
stainless steel
brass tungsten

11
Do x the lateral shaft in this position by rmly
screw the lock screw into the rear end 3 mm
thread - till it can’t move no further and xes
the lateral shaft rmly in place.
Next please slide the other small cylinder onto
the free part of the short shaft. Do x it in place
- right at the end of the shaft, so that the shaft
ends with the cylinder - with the small M3
invert Allen screw.
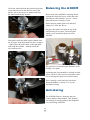
Balancing the AXIOM
Please look at the AXIOM’s mounting board.
Around the single M5 screw, which xes the
AXIOM on your turntable, you see 3 invert
Allen M4 screws forming a circle.
Please take the small spirit level and the T
-shaped 2.5 Allen key driver.
Do place the spirit level right on top of the
small bearing cover plate - the same plate
which covers and marks the pivot of the
AXIOM.
The spirit level is matching the diameter of the
bearing cover plate.
Assuming that your turntable is already leveled,
please use the 3 Allen screws around the center
screw to bring the spirit level to dead center.
This is usually a swift and easy procedure.
When the bubble is centered - so is your
AXIOM’s bearing.
Antiskating
The AXIOM features a dynamic and non-
contact skating compensation. This dynamic
anti-skating is corresponding to the tangential
curve following UNI-DIN.
!
!

12
Correct balanced and aligned, the AXIOM will
display very little skating force at all. Many
audiophiles do prefer to go without anti-skating
compensation.
To minimize any negative effects implied by
anti-skating, the skating compensation on the
AXIOM is dynamic and can’t be set too strong.
Please take the 1.27 mm Allen key and attend
the small Allen screw barely visible on the top
right backside of the AXIOM’s bearing house.
Do screw it inwards, till there are only about
12 mm left to see outside the small metal block
holding the Allen screw.
Setting the vertical
tracking force
Please use a precise tracking force gauge.
If you do use a LOMC with strong magnets,
make sure that you know the derivation implied
by the cartridges magnets to the reading on the
stylus force gauge.
Setting the tracking force in hybrid mode:
Mount your cartridge and do set the main
counter weight and the trim weight thus, that
you arrive at about 75 to 80% of the desired or
recommended tracking force for your cartridge.
IMPORTANT
Make sure that you set minimum
70% of the total desired tracking
force by setting the counter weight(s).
To set the rest of the tracking force do use the
T-shaped Allen key or any Allen key with 2.5
metric standard. Set your stylus on the stylus
gauge and attend the invert Allen screw on top
of the main side cylinder next to the bearing
house.
While turning the screw you will note that the
small assembly on the rear side of the main
cylinder is moving upwards or downwards.
Increasing VTF:
Turn the Allen key ANTI-clockwise.
The tracking force reading will increase and
the small part cylinder carrying the magnetic
counter-assembly will move upwards.
Decreasing VTF:
Turn the Allen key clockwise.
The tracking force reading will decrease and
the small part cylinder carrying the magnetic
counter-assembly will move downwards.
Do set a tracking force at or barely above the
recommended minimum tracking force for your
cartridge.
Setting the horizontal
operation point
Now do loose the small knob-screw on the
inward pointing side of the AXIOM’s large
VTA-tower.
!
!

13
Do only turn it for 1 revolution maximum to
release. Now you can attend the large top
knob and set precise horizontal level for the
AXIOM’s arm wand.
This procedure shall only be used to ne-tune
the horizontal height!
Do retight side screw after setting is done.
It is of course possible - if not the intention nor
with any positive effects for the performance
of your analog front-end - to use the top VTA-
knob to adjust SRA or VTA.
If possible these cartridge-related alignments
should always be done at the cartridge itself,
to leave all other parameters of the tonearm as
stable and unchanged.
Please don’t alter tonearm height for more than
4-8 mm maximum. The general height adjust-
ment is done by selecting the correct stainless
steel washer underneath the mounting board.
The top knob on the VTA-tower is used for
precisely ne-tune the arm wand to horizontal
level only!
Do set the VTA-tower that the arm wand of the
AXIOM is 100% horizontal (i.e. parallel to the
record surface) when the stylus is in the groove.
This isn’t essential for general performance, but
it is essential to extract the last bit of minute
detail in your records grooves.
Common VTA/SRA is set at the cartridge
itself - easily done in the AXIOM with xed
mounting head, as it features the unique
SRA/VTA mechanism of the Arché headshell.
Setting SRA/VTA is a matter of personal taste.
VTA/SRA can only be set “groove-compliant”
- i.e. depending on the cutting angle used to cut
the lathe and plates for the particular record.
These angles do alter over periods and between
labels considerably.
You will nd a “common ground”-adjustment
for most of your favorite records.
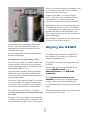
Aligning the AXIOM
To maximize the performance possible with
the AXIOM, please make sure to align it to
UNI-DIN tangential curve.
It’s geometrical design is in conjunction with
UNI-DIN.
For the SME-version of the AXIOM do use
either a SMARTractor© or an
UNI-Protractor© with UNI-DIN
template©.
For the xed head version of the
AXIOM please do use the genuine template
coming with your xed head AXIOM only.
For illustration please see pictures on following
pages.
When the alignment is done, please put back all
tools in the accessory-box.
Now enjoy your records.
!
!

14
SMARTractor©
Make sure to take full advantage of the unique
alignment options featured in the SME-version
of the AXIOM.
You can - by altering/adjusting the overhang
as well as the azimuth - even align integrated
headshell designs like the Fidelity Research
FR-7, Ortofon SPU, Ikeda Musa/Suprema or
EMT “Tondosen”.
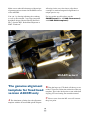
The genuine alignment
template for xed head
version AXIOM only
A The aluminum cylinder xes the alignment
template with the 20 mm POM spindle adapter.
!
Allowing for the very rst time to align these
cartridges to modern tangential alignments in a
unique precise way.
For best results possible please use the
SMARTractor© or the UNI-Protractor©
with UNI-DIN template©.
B Turn the large top VTA knob, till the top cover
of the VTA tower reaches the underside of the top
template. This is the ideal point to start with when
aligning VTA and setting arm wand horizontal.
C Please screw down the M3 screw till it meets
the pivot point.

15
Now enjoy your records.
A
This is the special AXIOM template as it looks
when fully assembled.
There is no error possible during assembly, as
all the parts do only t and joint in one specic
way.
First select 1 of the (3) 20 mm POM spindle
adapters. Choose the one which ts over your
turntable’s spindle without play. Now take the
UNI-DIN/AXIOM mirrored template and do
press the spindle adapter through the center
hole. Put the aluminum cylinder on top of the
POM spindle adapter. Now put this small as-
sembly on the turntable’s spindle.
Next please do assemble the 2 acrylic templates
with the 2 distance holders, 2 black knurled
knobs and 2 countersunk bolts - check back
with picture. Now put the assembled 2 acrylic
templates and interlink them with the small
assembly of mirrored template, POM spindle
adapter and aluminum cylinder. Make sure the
mirrored template meets the acrylic cut-out
“frame” at all 3 sides.
C
B
POM
spindle adapters (3)
UNI-DIN/AXIOM
mirrored template
aluminium
cylinder
acrylic template I
acrylic template II
distance
holder (2)
black
knurled
knob (2)
countersunk
bolt (2)
M3
screw

16
copyright & design: D.D. Brakemeier
Manufactured and assembled in Germany
for further infomations:
www.acoustical-systems.com
Distributed by:
-
 1
1
-
 2
2
-
 3
3
-
 4
4
-
 5
5
-
 6
6
-
 7
7
-
 8
8
-
 9
9
-
 10
10
-
 11
11
-
 12
12
-
 13
13
-
 14
14
-
 15
15
-
 16
16


Acoustical Systems AXIOM Owner's manual
- Category
- Audio turntables
- Type
- Owner's manual
Ask a question and I''ll find the answer in the document
Finding information in a document is now easier with AI
Related papers

Other documents
-
 E.A.T. C-Sharp Instructions For Use Manual
-
 Mark Levinson 515 Owner's manual
-
 Kuzma 190927 User manual
-
Axiom 12-in-1 USB-C HUB User manual
-
 Kuzma 4Point User manual
-
 KLAUDIO KD-ARM-MP12 User manual
-
 Kuzma 220522 User manual
-
suprema BioEntry W2 Template
-
 Kuzma 110513 User manual
-
Audio Note 9" 'V/II' tonearm setup User manual


