Page is loading ...

Assembly InstructionsAssembly Instructions
Tools Tools
RequiredRequired
0192314 Page 1 of 5
Assembly InstructionsAssembly Instructions
Important
Before you begin, read and comply with all safety and operating instructions,
and ensure all parts and correct quantities are included.
Any parts damaged during shipment must be reported within 5 days of receipt.
To report information regarding missing parts or damage, to purchase parts
or accessories, or if you have any questions, please contact us.
www.spectrumfurniture.com
800-235-1262, 715-723-6750
Thank you for purchasing Spectrum products!
Acrylic Divider Panels forAcrylic Divider Panels for
Evolution Esports DeskEvolution Esports Desk
Starter - 37372Starter - 37372
Adder - 37373Adder - 37373
(2) 0159066
Side acrylic
divider 30”W
x 24”H
(2) 0159148
Bracket
(2) 0192262
Tape disk
.045” x 1.5” dia
Note: When multiple desks are attached together in
rows, the starter kit installs on the leftmost desk.
(1) 0159072
Rear acrylic
divider 44”W
x 24”H
(2) 0190174
#8 x 3/8”
PHSM
(1) 0159166
Bracket
(2) 0192262
Tape disk
.045” x 1.5” dia
(1) 0159150
Bracket
(1) 0159149
Bracket
37373 - Adder37372 - Starter
(4) 0101382
#14 x 7/8”
PHSM
(1) 0159066
Side acrylic
divider 30”W
x 24”H
(1) 0159072
Rear acrylic
divider 44”W
x 24”H

0192314 Page 2 of 5
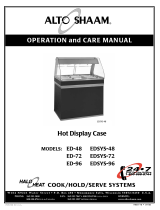
Figure 1
Rear divider
1. Attach 0159148 bracket to worksurface1. Attach 0159148 bracket to worksurface
1. Attach the bracket to the left side of the worksurface with (2) #14 x
7/8” PHM screws as shown. Figure 1.
0159148
Bracket
(2) #14 x 7/8”
PHSM screws
Figure 2
2. Attach rear divider2. Attach rear divider
1. Loosen the (2) chair rail screws and pull the chair rail away from the
desk about 1/4”. Figure 2.
2. Set the rear divider notches over the chair rail screws in between the
chair rail and leg frames.
3. Retighten the chair rail screws to secure the divider. (Do not
overtighten screws.)
Worksurface
Figure 3
3. Attach left side divider3. Attach left side divider
1. Apply one tape disk to the left-side of the bracket. Press and hold to
the bracket for 30 seconds to secure. Figure 3.
2. Insert the left side divider tabs into the rear divider slots and push
down slightly to lock into place.
3. With the left side divider level with the worksurface, press and hold to
the tape for 30 seconds to secure.
Side divider
Tape disk
Press
here
Worksurface

0192314 Page 3 of 5
4. Attach divider at seam 4. Attach divider at seam
Adder(s) and row of connected desks required - (skip to step 5 if no adders)Adder(s) and row of connected desks required - (skip to step 5 if no adders)
1. Locate the seam between two desks.
2. From under the worksurfaces, remove the existing unit-to-unit
bracket and (4) screws. Figure 4.1.
3. Place the 0159149 bracket against the worksurface with the bend
pointing downward, and re-install the unit-to-unit bracket with the
removed screws.
4. Attach the 0159150 bracket to the 0159149 bracket with (2) #8 x 3/8”
PHSM screws.
Figure 4.1
(1) 0159150
Bracket
(1) 0159149
Bracket
Existing
unit-to-unit
Bracket
(4) Existing
#14 x 7/8”
PHSM screws
(2) #8 x 3/8”
PHSM
Worksurface #1 Worksurface #2
Seam between
two desks
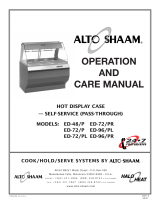
5. Apply one tape disk to the right side of the 0159150 and 0159166
brackets. Press and hold to each bracket for 30 seconds to secure.
Figure 4.2.
6. Insert the side divider tabs into the desk #2 rear divider slots and
push down slightly to lock into place.
7. With the side divider level with the worksurface, press and hold to the
0159150 bracket tape for 30 seconds to secure.
8. Install the 0159166 bracket into the upper rear divider slot of desk #1,
and press and hold to the side divider for 30 seconds to secure.
Note: Repeat this step for each additional desk using adder components.
Figure 4.2
Side divider
Tape disk
Tape disk
(1) 0159166
Bracket
2
1
3
Desk #1 Desk #2
(1) 0159150
Bracket
Press
here
Press
here

0192314 Page 4 of 5
Side divider
Press
here
Worksurface
Figure 5
6. Attach right side divider6. Attach right side divider
1. Insert the side divider tabs into the right rear divider slots and push
down slightly to lock into place. Figure 6.
2. With the side divider level with the worksurface, press and hold to the
tape for 30 seconds to secure.
Figure 6
5. Attach 0159148 bracket to worksurface5. Attach 0159148 bracket to worksurface
1. Attach the bracket to the right side of the worksurface with (2) #14 x
7/8” PHM screws as shown. Figure 5.
2. Apply one tape disk to the left side of the bracket. Press and hold to
the bracket for 30 seconds to secure
0159148
Bracket
(2) #14 x 7/8”
PHSM screws
Worksurface
Tape disk
7. Retighten chair rail screws7. Retighten chair rail screws
1. Retighten the chair rail screws to secure the divider.
(Do not overtighten screws.) Figure 7.
Chair rail
screws
Figure 7
Note: Do not ex or place excessive force on
the acrylic divider panels to avoid damage.

0192314 Page 5 of 5
925 FIRST AVENUE, CHIPPEWA FALLS, WI 54729 / 800-235-1262 / 715-723-6750 / WWW.SPECTRUMFURNITURE.COM925 FIRST AVENUE, CHIPPEWA FALLS, WI 54729 / 800-235-1262 / 715-723-6750 / WWW.SPECTRUMFURNITURE.COM
© 2020 Spectrum Industries Inc., All rights reserved.
Altuglas International 03-30-20 Page 1 of 1
Cleaning Recommendations for Plexiglas® Acrylic Sheet
Altuglas International routinely provides information on Cleaning Plexiglas® acrylic sheet and
the Chemical Resistance of Plexiglas® acrylic sheet to various chemicals. Altuglas
International does not provide any recommendation regarding disinfecting Plexiglas®
acrylic sheet.
Altuglas International recommends to CLEAN Plexiglas® acrylic sheet using soap and water.
Here is a link to our PLEXIGLAS® SHEET: Handling and Maintenance guidelines:
https://www.plexiglas.com/export/sites/plexiglas/.content/medias/downloads/plexiglas-expert-
pdf/Fabrication-Guidelines-Plexiglas-Handling-and-Maintenance.pdf
Wash Plexiglas® sheet with a mild soap or detergent and a lukewarm water solution. Use a clean
soft cloth or sponge and as much solution as possible. Rinse well. Dry by blotting with a damp
cloth or chamois.
Plexiglas® acrylic sheets have excellent CHEMICAL RESISTANCE to ammonia based and
chlorine based cleaners under ambient conditions for relatively short durations. Do not use
cleaners that contain alcohol. The chemical resistance of Plexiglas® acrylic sheet will vary with
the stress level, temperature, reagent, duration of exposure and specific Plexiglas® acrylic sheet
used in the application. Altuglas International recommends that parts made from Plexiglas®
acrylic sheets be tested with all reagents under appropriate conditions for the end-use application.
Differences between Cleaning and Disinfecting a surface1.
Cleaning refers to the removal of germs, dirt, and impurities from surfaces. Cleaning does not kill
germs, but by removing them, it lowers their numbers and the risk of spreading infection.
Disinfecting refers to using chemicals to kill germs on surfaces. This process does not necessarily
clean dirty surfaces or remove germs, but by killing germs on a surface after cleaning, it can
further lower the risk of spreading infection.
1 Cleaning and Disinfecting definitions copied from the CDC website: Clean & Disinfect; Interim Recommendations for US
Households with Suspected/Confirmed Coronavirus Disease 2019
(https://www.cdc.gov/coronavirus/2019-ncov/prepare/cleaning-disinfection.html) March 24, 2020. Altuglas International has never
tested any procedure or product to disinfect Plexiglas® acrylic sheet and has not independently verified any information provided
on the CDC website.
The statements, technical information and recommendations contained herein are believed to be accurate as of the date hereof. Since the
conditions and methods of use of the product and of the information referred to herein are beyond our control, Altuglas
International/Arkema expressly disclaims any and all liability as to any results obtained or arising from any use of the product or reliance
on such information; NO WARRANTY OF FITNESS FOR ANY PARTICULAR PURPOSE, WARRANTY OR MERCHANTABILITY
OR ANY OTHER WARRANTY EXPRESS OR IMPLIED, IS MADE CONCERNING THE GOODS DESCRIBED OR THE
INFORMATION PROVIDED HEREIN. The information provided herein relates only to the specific product designated and may not be
applicable when such product is used in combination with other materials or in any process. The user should thoroughly test any
application before commercialization. Nothing contained herein constitutes a license to practice under any patent and it should not be
construed as an inducement to infringe any patent and the user is advised to take appropriate steps to be sure that any proposed use of the
product will not result in patent infringement. Plexiglas® is a registered trademark belonging to Arkema.
Altuglas International – Sheet Division
Applications Development Lab
100 Route 413
Bristol, PA 19007
/