Page is loading ...

General
CONTRACTOR SERIES BASEBOARD RADIATOR
CONTRACTOR SERIES
Installa
tion Guide
Myson Inc./Rettig USA
45 Krupp Drive, P.O. Box 1460, Williston, VT 05495
www.mysoncomfort.com
It is assumed that the installer has the appropriate technical knowledge
related to building codes, standard trade practices, and proper use of the tools of the trade.
Failure to flush system of debris and flux may cause premature radiator failure, which can result in leaks and
property damage NOT covered under the Myson Warranty.
Step 1 Fill and vent the system.
Step 2 Run the system for two (2) hours at full temperature with all radiator valves in the open position.
Step 3
Shut off and drain the system while the water is still hot.
Step 4 Refill the system.
Step 5 Reheat, vent, and balance the system.
Step 6 Once the radiator is filled with water the system should be left filled.
Step 7 System should be checked for leaks on seasonal start-ups. Leaks must be repaired
as automatic system fill valves allow fresh water/oxygen into the system attacking
radiators internally.
DESIGN AND LAYOUT CONSIDERATIONS:
Myson radiators should only be used with recirculation pump closed loop hydronic heating systems such as 2 pipe
reverse return, 2 pipe direct return, 1 pipe monoflo or homerun piping systems. Series loop piping is not
recommended. Myson radiators are not for use in gravity or steam systems. Position your radiator away from your
circulator pump to avoid either excess pressure that could force water out the air vent or excess suction that could
draw air into the system. The suggested location for your Myson radiator, where possible, is below a window
where it can minimize downdrafts from glazed areas. Mounting the radiator a minimum of 4 inches off the floor
willaprovideaforaadequateaconvection.
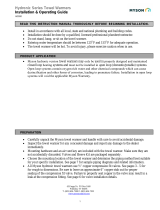
Myson Contractor Series radiators are supplied with a drain plug, vent plug, mounting brackets and TRV insert.
Standard Connections:
6 x internal thread G 1/2“ BSP side 4 corners plus 2 bottom right
Maximum positive operating pressure: 145 psi
Maximum operating temperature: 230° F
2"
1
3
/
16
"
figure
1
V
ALVE ROUGH-IN:
The Myson Contractor Series
radiator is
intended
to be install
ed
using
the
bottom
right
1/2" connections.
The supply MUST be connected to the left hand connection as you face the radiator in order
for the internal thermostatic valve to work. (see
figure 1 for recommended connection)
A variety of optional TRV heads (M30 x 1.5 thread) are available from Myson. A manual adjustment cap is provided.
NOTE: All nylon paint plugs must be removed and replaced with an appropriate metal plug, vent or valve!!
Other connection configurations are shown below. Vent should be located at top corner opposite supply.
NOTE: The last 2 diagrams shown (lower side supply and return) will result in an approximate 10% lower output.
ALTERNATE CONNECTIONS: When using Myson radiator valves in the side connections to install your
radiator add the following distance from the end of the radiator to the center of your Supply/Return pipe for
each valve: For LKD16AN valves add 1-3/4" --- For FF16WAC / FF16LAC valves add 1-5/8".
In addition to the LKD and FF valves the following BSP male sweat adapters as well as valves are available from
Myson for use with your Contractor Series radiators: HV-S or HV-A valves for bottom connections only:
(102-82-53 adapters are required in conjunction with the HV valves).
MOUNTING: Myson Contractor Series radiators are supplied with MNCLK200-EZ wall brackets. These brackets
may be positioned anywhere along the length of the radiator to accommodate wall framing locations.
For more detailed bracket installation dimensions and mounting positions please consult the
assembly instructions included with the mounting brackets.
For
the correct installation of radiators it is essential that the mounting of the radiator to the wall is carried out
in such a way that it is suitable for intended use AND predictable misuse.
SAFETY PRECAUTIONS
Radiators are hot when in use, and as such, present a risk of burns to users on prolonged contact. The
temperature of a radiator is dependent on the temperature of the system water, as set by the system installer
or user. Installers and users should take all necessary steps to minimize the risks of burns. If the risk is
significant, consideration should be given to installing low surface temperature radiators, or to placing guards in
front of the radiators.
SYSTEM START-UP
DEC 2018

CV and RCV Type 21 and Type 22 models
Myson Inc./Rettig USA 45 Krupp Drive, P.O. Box 1460, Williston, VT 05495 www.mysoncomfort.com
CONTRACTOR SERIES BASEBOARD RADIATOR
Specification Data
PANEL RADIATORS
Order Code
CV/RCV Type 21
Nominal
Length
(mm - inches)
Output*
Weight
(
l
bs)
Water
Content
(gals)
CV21/RCV21-600
CV21/RCV21-700
CV21/RCV21-800
CV21/RCV21-900
CV21/RCV21-1000
CV21/RCV21-1100
CV21/RCV21-1200
CV21/RCV21-1400
600 - 23
5
/
8
700 - 28
3
/
8
800 - 31
1
/
2
900 - 36
1
/
4
1000 - 39
3
/
8
1100 - 43
5
/
16
1200 - 47
1
/
4
1400 - 55
1
/
8
14.3/18.0
17.2/21.6
21.9/27.6
19.1/24.0
23.8/30.0
26.2/33.0
33.4/42.0
28.6/36.0
1346
1573
2022
1796
2248
2472
3147
2698
CV21/RCV21-1800
CV21/RCV21-2000
CV21/RCV21-2300
1800 - 70
7
/
8
2000 - 78
3
/
4
2300 - 90
9
/
16
42.9/54.0
47.6/60.0
54.8/69.0
4046
4496
5172
CV21/RCV21-1600
1600 - 63
38.1/48.0
3598
CV21/RCV21-2600
CV21/RCV21-3000
2600 - 102
3
/
8
61.9/78.0
76.8/90.0
5842
6742
3000 - 118
1
/
8
0.39
0.47
0.60
0.52
0.66
0.72
0.92
0.79
1.05
1.18
1.51
1.31
1.71
1.97
*
Outputs are based on EAT of 68
0
F. For outputs based on other AWT and/or
other EAT please consult our radiator correction chart.
Order Code
CV21 - XXXX
CV22 - XXXX
RCV21 - XXXX
7
7
/
8
7
7
/
8
7
7
/
8
RCV22- XXXX
7
7
/
8
N
o
m
i
n
a
l
H
e
i
g
h
t
(inches)
Btuh/ft at
180
0
F AWT**
684
902
684
902
Weight
(lbs/ft)
Water
Content
(
gals/ft)
397
523
397
523
0.
2
0
0.
2
0
0
.
2
0
Btuh
/ft at
140
0
F AWT**
Specifications per Linear Foot
**
Outputs are based on a delta T of 20
0
F
and EAT of 68
0
F.
3"
5
7
/
8
"
type CV 21 type CV 22
min. 4"
3
3
/
4
"
4
1
/
8
"
2
3
/
8
"
7
7
/
8
"
type RCV 21 type RCV 22
type CV 21
type CV 22
type RCV 21
type RCV 22
min. 4"
3
3
/
4
"
4
1
/
8
"
5
7
/
8
"
7
7
/
8
"
min. 4"
3
3
/
4
"
4
1
/
8
"
5
7
/
8
"
7
7
/
8
"
2
3
/
8
"
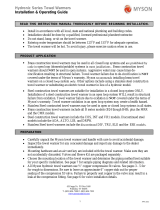
CV Baseboard and RCV Baseboard - wall brackets
1"
2
3
/
4
"
1"
4"
1"
2
7
/
8
"
3"
min. 4"
3
3
/
4
"
4
1
/
8
"
5
7
/
8
"
7
7
/
8
"
1"
4
1
/
8
"
5
7
/
8
"
5
7
/
8
"
7
7
/
8
"
7
7
/
8
"
min. 4"
min. 4"
CV Baseboard and RCV Baseboard - pedastal
2
3
/
4
" / 2
7
/
8
"
4" / 4
1
/
8
"
Height 200mm - 7
7
/
8
in
Order Code
CV/RCV Type 22
Btuh @
180
0
F AWT
Output*
1063
1243
1597
1419
1776
1953
2486
2131
3196
3552
4086
2842
4615
5326
Btuh @
160
0
F AWT
Output*
781
912
1173
1042
1304
1434
1825
1565
2347
2608
3000
2087
3388
3910
Btuh @
140
0
F AWT
CV22/RCV22-600
CV22/RCV22-700
CV22/RCV22-800
CV22/RCV22-900
CV22/RCV22-1000
CV22/RCV22-1100
CV22/RCV22-1200
CV22/RCV22-1400
CV22/RCV22-1800
CV22/RCV22-2000
CV22/RCV22-2300
CV22/RCV22-1600
CV22/RCV22-2600
CV22/RCV22-3000
Output*
Weight
(
l
bs)
Water
Content
(gals)
1776
2075
2668
2370
2964
3251
4150
3968
5336
5939
6818
4758
7706
8894
Btuh @
180
0
F AWT
Output*
1403
1639
2108
1873
2342
2568
3279
3135
4215
4692
5386
3759
6088
7026
Btuh @
160
0
F AWT
Output*
1030
1204
1547
1375
1719
1886
2407
2301
3095
3445
3954
2760
4469
5159
Btuh @
140
0
F AWT
7.26
9.14
8.47
10.41
540
713
540
713
Btuh/ft at
1
60
0
F
A
WT**
Wall Bracket
Pedastal Stand
Number of wall or pedastal
brackets per radiator length
up to 1600mm: 2 brackets
1600 - 2400mm: 3 brackets
over 2400mm: 4 brackets
0.39
0.47
0.60
0.52
0.66
0.72
0.92
0.79
1.05
1.18
1.51
1.31
1.71
1.97
16.7/20.5
20.0/24.6
25.6/31.5
22.3/27.4
27.8/24.2
30.6/37.6
38.9/47.9
33.4/41.0
50.0/61.5
55.6/68.4
63.9
/78.6
44.5/54.7
72.3/88.9
83.4/102.5
0
.
2
0
All dimensions are nominal
MAINTENANCE &
CLEANING
1 Once operating, avoid the introduction of fresh water and oxygen to the system to prevent corrosion.
2 An occasional wiping with a
damp cloth using a non-abrasive detergent can protect the finish of your
Myson radiator.
3 The use of abrasive cleaners will damage the surface of your radiator and void the manufacturer’s warranty.
10
10
10
/