Page is loading ...

Caller ID Speaker Phone
Instruction Manual
JT-P532
Please read this manual carefully before operating and save it for future reference.
Have a question? Please visit http://www.jWIN.com
GETTING STARTED
Thank you for purchasing the JT-P532 Caller ID Speaker Phone. Please read and
follow the instructions in this manual carefully to ensure that your product operates
correctly.
General Features
• FSK System Caller ID Speaker Phone w/ call waiting
• Redial, flash, functions
• Three One-Touch Number Memory
• Ten Two-Touch Number Memory
• Message Memory (up to 90 messages)
• Digital Incoming Call Display (15 digits for name/14 digits for number)
• LCD screen (Six levels of brightness adjustment)
• Real-time Clock Display
• VIP Function
• Mute Function
• Tone/Pulse Mode Selection
• Flash Time Selection (100-900mS)
• Low Battery Indicator
• Ringer Volume Control
• Handset Volume Control
• Speaker Phone Volume Control
• Wall-mounting capability
• Simple and easy to use
• Supports four (4) languages (English, Spanish, French, and Italian)
In the Package
• Corded phone
• Stand
• Warranty card
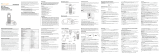
Location of Controls on the Handset
1. LCD Screen 11. ▲ Button
2. STORE Button 12. ▼ Button
3. Ringer Light 13. VOL Button
4. VIP/LCD Button 14. DEL Button
5. Handset Jack 15. DIAL Button
6. FLASH Button 16. Numeric keypad
7. M1 (Memory 1) Button
17.
Button
8. M2 (Memory 2) Button 18. Indicator Light
9. M3 (Memory 3) Button 19. REDIAL/P Button
10. MUTE Button
Getting Your Telephone Ready for Use
1. Choose a desired location for the unit (mounted or on a flat, level surface).
2. Adjust the removable tab located above the speaker on the base of the phone.
i. The tab slides for easy removal.
ii. For wall mounted units, the side of the tab with the lip must be situated
toward the top of the base to allow the handset to hang on the base without
falling. The lip fits into the opening under the earpiece on the handset.
iii. For flat, level placement, the side of the tab with the lip should be situated
toward the bottom of the base to allow smooth removal of the handset from
the base.
3. Plug one end of the coiled telephone cord into the jack on the handset, and the
other into the matching jack on the left side of the unit’s base.
4. Plug one end of the flat telephone cord into the jack in the rear of the unit’s base
(marked TEL-LINE), and the other end into the wall jack which supplies
telephone service.
Installing the Batteries
The JT-P532 requires three (3) AA batteries.
1. Remove the battery compartment cover at the bottom of the unit.
2. Carefully install three (3) AA batteries by observing the polarity direction shown
in the battery compartment.
3. Replace the cover.
Notes:
• Whether installing batteries for the first time or replacing them, do not mix old
and new batteries, nor should alkaline, standard (zinc-carbon), or rechargeable
(nickel-cadmium) batteries be used together.
• When not using the phone for a long period of time, remove the batteries to
prevent possible leakage and corrosion. Keeping the phone powered by an
optional AC adapter will preserve all data and settings in the phone’s memory.
Description of the Display
The JT-P532 features a three-line LCD. The top line displays basic information; the
middle line shows the telephone number of the incoming call; and the bottom line
displays the name of the caller. Also included on the display is helpful information
such as:
• The word, “LOW” appears on the screen when the battery power is low.
• The word, “NEW” appears on the screen when there are new incoming calls.
• The word, “CALL#” indicates the total number of incoming calls received.
• Hour: Minute Morning/Afternoon Day/Month are displayed. For example: “10:15
AM 21/03” (Year is not displayed)
• When there has been no operation on the telephone for more than 20 seconds,
the LCD will only display the time and date, amount of received calls and
amount of incoming calls.
• The JT-P532 can store up to 90 incoming calls. Once 90calls have been
received, the oldest call will automatically erase when a new call is received.
OPERATIONAL INSTRUCTIONS
Basic Setup
Note: Please be sure the telephone lines are connected well and batteries or AC
adapter are installed before starting setting.
1. HOW TO ENTER THE SETUP MODE
• Long Press (Approx. 4 seconds) [DIAL] to enter setup menu.
• The LCD display will appear as shown here, however, you must use [▲]or
[▼]to select from the menu including Select Language, Local Area Code,
Regional AC’s (Area Codes), and Date/Time Setting.
• Press [DEL] to exit setting manually or it will exit automatically if no
selection is made after 20 seconds.
2. SET DATE / TIME
• When the LCD displays “DATE / TIME”, press [DIAL] to enter this function.
• Press [▲] or [▼] to set the month.
• Press [DIAL] to confirm.
• Use the same procedure to set the day hour, and minute.
3. SET AREA CODE
• When the LCD displays “LOCAL AREA CODE”, press [DIAL] to enter this
function.
• Use [▼] or [▲] to select the each digit of area code or simply dial the
numbers.
• Press [DIAL] to confirm each digit.
• Use the same procedure to set the rest digits.
4. REGIONAL ACs (Area Codes)
• When the LCD displays “REGIONAL AC’S-1”, press [DIAL] to enter.
• Use [▼] to select the first digit of the regional area code or simply dial the
numbers.
• Use [▲] to advance to the next digit
• Press [DIAL] to confirm each digit.
• Store up to two (2) regional area codes.
5. SET LANGUAGE
• When the LCD displays “SELECT LANGUAGE”, press [DIAL] to enter
menu.
• Use [▲] or [▼] to select the desired language, ENGLISH (English),
ESPANOL (Spanish), FRANCAIS (French), ITALIANO (Italian).
• Press [DIAL] to confirm your choice.
6. T/P DIAL MODE
• When the LCD displays “T/P DIAL MODE,” press [DI AL] to enter this menu.
•
Press [▲] or [▼] to choose TONE (T) or PULSE (P).
• Press [DIAL] to confirm.
7. EXIT MENU
• When the LCD displays, “EXIT SETUP,” press [DIAL] to exit the setup
menu.
8. LCD ADJUSTMENT
• Press [VIP/LCD] to adjust the brightness of the LCD screen.
• There are six (6) levels of brightness (Level 3 is the default setting)
9. SAVING NUMBERS IN THE PHONEBOOK
• Press [STORE]
• Press [▲] or [▼] to scroll phone listings
• Press [STORE] again to enter phone number
• Enter number you wish to save.
• Press [STORE] again to save number. Cursor will blink below the number
• Enter the name of the person whose number you entered.
• Press [STORE] again to save.
• Press [STORE] once more to exit phonebook menu.
10. FLASH TIME SELECT
• Press [STORE] followed by [FLASH], “FLASH=600MS,” will display on the
screen.
• Press [▲] or [▼] to select a suitable flash time
(100/200/300/400/500/600/700/ 800/900MS).
• Press [STORE] again to confirm and exit the setting.
11. RINGER VOLUME CONTROL
• When phone is not in use or when there is an incoming call ringing, press
[VOL] to adjust the ringer volume from 1 to 3.
Note: “ ” is minimum and “ ” is maximum.
12. HANDSET VOLUME CONTROL
• Pick up the handset
• Press [VOL] to adjust the handset volume from 1 to 4.
13. SPEAKER PHONE VOLUME CONTROL
• Press [
] and [VOL].
• Adjust the speaker phone volume from 1 to 4.
Basic Instructions for Making a Phone Call
1. Remove the handset from base and listen for dial tone.
2. Listen for a dial tone to indicate that the phone is connected.
3. Dial the number you wish to call using the number pad.
Basic Instructions for Receiving a Phone Call
Telephone will ring to alert the user of an incoming call.
1. Lift the handset, hold earpiece to your ear and speak into the mouthpiece.
2. To hang up, return the handset to the base at the conclusion of call.
Using the Last Number Redial Function
1. Remove the handset from base and listen for dial tone.
2. Use the [REDIAL/P] button redial the last number dialed (typically most helpful
when the line is busy).
Receiving Caller ID Information
1. Incoming Call Display.
• When there is an incoming call, the LCD will display the number, area
code, name, time and date of the call.
2. Make note of the following indicators.
• “UNKNOWN NUMBER”
• “BLOCKED NUMBER”
• “MESSAGE WAITING”
Reviewing the Caller ID List
Press [▲] or [▼] to review incoming calls (up to 90 calls).
VIP Function
1. When reviewing the caller ID list using [▲] or [▼], press [VIP] to store a specific
number from the list into the VIP record.
2. Press [VIP] again to cancel the VIP function.
Note: The number cannot be deleted from the caller ID list once it has been saved to
the VIP record.
Erasing Data from the Caller ID List
1. Press [▲] or [▼] to find the number you wish to erase.
2. Press [DEL] to erase the number from the list.
3. Press [DEL] for approximately 3 seconds for the LCD to show “ERASE ALL?”
4. Press [DEL] again to erase the entire caller ID list.
Calling a Number from the Caller ID List
1. With the handset is on the hook, press [▲] or [▼] to find the number.
2. Press [DIAL] once; the LCD will display “PICK UP OR ADJ,” (for a 10 digit
number) or “PICK UP PHONE.” (for a 7 or 11 digit number).
3. Pick up the handset and the number on the display will automatically dial.
4. With the handset off the hook, press [▲] or [▼] to find the number.
5. Press [DIAL] once. For 7 and 11 digit numbers, the number will automatically
dial. For 10 digit numbers, the phone will add the number “1” automatically as
the first digit.
Storing One-Touch Memory
1. While the handset is on the hook, press [M1], [M2] or [M3].
2. The LCD will show “E1”, “E2” or “E3”
3. Press [STORE] to enter.
4. Input the number you wish to save.
5. Press [STORE] again to confirm.
Note: Press [DEL] to cancel the current number while entering.
Dialing from One-Touch Memory
1. Pick up the handset or press [
].
2. Press [M1], [M2] or [M3] to dial the number automatically.
Storing Two-Touch Memory
1. While the handset is on the hook, press [STORE].
2. The LCD will display “M0-M9”
3. Select and press the number from the keypad 0-9
4. Press [STORE] to enter
5. Input the desired telephone number
6. Press [STORE] to confirm and advance to Name Input mode.
7. Input the name using the letters on the phone keypad (For example, to enter
the letter “C,” press the number 2 three times).
8. Press [STORE] again to confirm.
Note: Press [DEL] to cancel the current number or name while entering.
Dialing from Two-Touch Memory
1. Pick up the handset or press [
].
2. Press [DIAL] and number (0-9). The number in memory will dial automatically.
Using the Flash Function
1. Ask the calling party to hold.
2. Press and release [FLASH].
3. Dial the number or extension to which the call is directed.
4. When the intended call recipient answers, announce the call and hang up.
5. If there is a busy signal or no answer, press and release [FLASH] to re-
connect to the calling party.
Pause Function
1. Press [STORE] and [REDIAL/P].
2. The LCD will display “PAUSE=4S.”
3. Press [▲] or [▼] to select pause time from 1/2/3/4/5/6/7/8/9S (1-9 seconds).
4. Press [STORE] to confirm and exit.
Placing a Call on Hold
1. Press the [MUTE].
2. The LCD will display “MIC MUTE.”
3. Music will play indicating that the caller is now on hold.
4. If you place the handset back into the receiver, the music will play through the
speaker on the main unit base until the call is picked up.
5. If you simply put the handset down without placing it back on the receiver, the
music will play through the earpiece until the call is picked up again.
6. To return to the original call, press [MUTE] again or press [
] and resume
the call as normal.
USER SAFETY GUIDE
YOU CAN HELP TO PROTECT THE ENVIRONMENT!
Please remember to respect the local regulations. Hand in the non-working
electrical equipment to an appropriate waste disposal center.
Important Safety Instructions
When used in the directed manner, this unit has been designed and manufactured to
ensure your personal safety. However, improper use can result in potential electrical
shock or fire hazards. Please read all safety and operating instructions carefully
before installation and use. Be sure to keep these instruction manual handy for future
reference. Take special note of all warnings listed in these instructions and on the
unit.
• Read and understand all instructions in this manual.
• Unplug this telephone from wall jack before cleaning with a damp cloth.
• Do not use liquid or aerosol cleansers to clean this product.
• Do not use this telephone near water (e.g. a bath tub, a sink, or pool).
• To reduce the risk of electric shock, do not push objects through any slots of the
phone or disassemble the telephone. Pushing objects in the telephone or
opening (or removing) covers exposes wires and poses serious risks.
• Do not disassemble and/or reassemble this telephone yourself. Contact
technical support when a technical service is required.
• Do not place this telephone on a bed, rug, or on any similar surface or near a
heat source. The phone openings for ventilation that must not be blocked or
covered.
• Do not place this phone on an unstable cart, stand, or table as it may fall,
resulting in damage.
• Avoid using this telephone during electrical storms to prevent the risk of electric
shock from lightning.
• Unplug this phone from the phone jack and refer to Customer Support if the
following conditions occur:
o When it is exposed to rain or water
o When it fails to operate normally
o When it is dropped or its case is damaged
o When it exhibits a distinct change in performance
• Do not use this telephone to report a gas leak in the vicinity of the leak.
• Follow all safety instructions and use this telephone with caution when installing
or modifying telephone lines.
o Do not install telephone wire during a lightning storm
o Only install telephone jacks in dry locations unless the jack is specifically
designed for wet locations
• Avoid touching un-insulated telephone wires or terminals unless the telephone
line is disconnected at the network interface.
TEL: 1-866-807-5946
website: www.jwin.com
© 2009 jWIN Electronics Corp. All rights reserved. No portion of this printing
material or product enclosed herewith including design, shape and graphics,
may be not reproduced or transmitted in any form without the expressed
written consent of jWIN Electronics Corp. by any means, electronics or
mechanical, including photocopy, recording or information storage and
retrieval system. Any unauthorized distribution or reproduction of this printing
material or product, or any portion there of, will be prosecuted to the fullest
possible extent of the law.
Printed in China
1
2
3
4
5
6
7
8
9
10
11
12
13
14
15
16
17
18
19
/