Page is loading ...

Thank you for purchasing a Panasonic Wireless Video Intercom System.
Please read these Operating Instructions before using the unit and save for future reference.
Wireless Video Intercom System
Operating Instructions
Model No. VL-SW102BX
VOICE
CHANGER
PAGE
BRIGHT/
SET
(
HOLD 3 SEC
)
VOLUME
CAMERADOOR
DOOR KEY
OFF
TALK
VL-SW102BX_OI.indb 1 2006/06/12 15:33:13

Table of Contents
2
Important Information
Important safety instructions ......................................................................................................... 4
Additional safety information ......................................................................................................... 5
LBattery ............................................................................................................................................................................ 5
For best performance ..................................................................................................................... 6
LBefore using ................................................................................................................................................................... 6
LLocation/avoiding noise .................................................................................................................................................. 6
LEnvironment ................................................................................................................................................................... 6
LTapping ........................................................................................................................................................................... 6
LUsing near medical equipment ....................................................................................................................................... 6
LPrivacy and rights of portrait .......................................................................................................................................... 7
Product names used in these Operating Instructions ................................................................. 7
Preparation
Accessory information ................................................................................................................... 8
LIncluded items ................................................................................................................................................................ 8
LAdditional/replacement accessories ............................................................................................................................... 8
LCompatible Panasonic PBXs ......................................................................................................................................... 8
Location of controls ........................................................................................................................ 9
LDoor station .................................................................................................................................................................... 9
LMain monitor station ..................................................................................................................................................... 10
LMonitor display (Main monitor station) ......................................................................................................................... 12
LSub monitor station ...................................................................................................................................................... 13
LCharger ........................................................................................................................................................................ 15
LMonitor display (Sub monitor station) ........................................................................................................................... 16
Charging the sub monitor station ................................................................................................ 18
Setting the date and time .............................................................................................................. 20
Doorphone
Answering a call ............................................................................................................................ 21
LIf it is difficult to hear the visitor’s voice due to noise (Press-to-talk mode) .................................................................. 22
LSpeaking with the modified sound of your voice (Voice changer) ................................................................................ 22
LAnswering a call by voice sensor (Voice answer mode) .............................................................................................. 22
LTransferring a call ......................................................................................................................................................... 23
LWhen receiving another call during a call or while monitoring ..................................................................................... 24
Monitoring the outside (Door station monitor) ........................................................................... 25
Camera (optional)
Features of the camera ................................................................................................................. 26
Monitoring the view from the camera (Camera monitor) ........................................................... 27
Answering a call from the camera ............................................................................................... 28
LWhen receiving another call during a call or while monitoring ..................................................................................... 29
Recording
Recording an image ...................................................................................................................... 30
LAuto recording .............................................................................................................................................................. 30
LManual recording ......................................................................................................................................................... 31
Viewing recorded images ............................................................................................................. 32
LProtecting the recorded images ................................................................................................................................... 32
LRecorded images taken by the door station ................................................................................................................. 33
LRecorded images taken by the camera ....................................................................................................................... 34
Erasing an image ........................................................................................................................... 35
VL-SW102BX_OI.indb 2 2006/06/12 15:33:15

Table of Contents
3
Intercom
Talking between the main monitor station and the sub monitor station ................................. 36
LMaking an intercom call from the main monitor station ................................................................................................ 36
LMaking an intercom call from the sub monitor station .................................................................................................. 37
Programming
Changing the function settings (Function list) ........................................................................... 38
LChanging the settings .................................................................................................................................................. 38
LFunctions of the main monitor station .......................................................................................................................... 39
LFunctions of the sub monitor station ............................................................................................................................ 39
LFunctions of the camera (optional) ............................................................................................................................... 40
LOther functions ............................................................................................................................................................. 41
Changing the ringer tone .............................................................................................................. 43
Adjusting the volume .................................................................................................................... 44
LRinger volume .............................................................................................................................................................. 44
LSpeaker volume ........................................................................................................................................................... 44
Assigning the door station or the camera to receive calls (RINGER SELECTION) ................ 45
Using {DOOR KEY} button ........................................................................................................... 46
LSetting {DOOR KEY} button ........................................................................................................................................ 46
LUsing {DOOR KEY} button .......................................................................................................................................... 46
Setting the contact closure (CONTACT CLOSURE SELECTION) ............................................. 47
Expanding the System
Expanding your system with optional units ............................................................................... 48
Adding a sub monitor station (REGISTRATION/CANCELLATION) ...........................................
50
LRegistering the sub monitor station to the main monitor station (REGISTRATION) .................................................... 50
LCanceling the registration (CANCELLATION) .............................................................................................................. 51
Adding a camera (REGISTRATION/CANCELLATION) ................................................................ 52
LRegistering the camera to the main monitor station (REGISTRATION) ....................................................................... 52
LCanceling the registration (CANCELLATION) .............................................................................................................. 53
Setting a repeater (REGISTRATION/CANCELLATION) ............................................................... 54
LRegistering the repeater to the main monitor station (REGISTRATION) ..................................................................... 54
LCanceling the registration (CANCELLATION) .............................................................................................................. 55
Help
Troubleshooting ............................................................................................................................ 56
Cleaning ......................................................................................................................................... 59
Battery replacement ...................................................................................................................... 60
General Information
Technical data about this product ............................................................................................... 61
Index
Index ............................................................................................................................................... 62
VL-SW102BX_OI.indb 3 2006/06/12 15:33:15

Important Information
4
Important safety instructions
1) Read these instructions.
All the safety and operating instructions should be read before the appliance is operated.
2) Keep these instructions.
The safety and operating instructions should be retained for future reference.
3) Heed all warnings.
All warnings on the appliance and in the operating instructions should be adhered to.
4) Follow all instructions.
All operating and use instructions should be followed.
5) Do not use this apparatus near water.
For example, near a bathtub, wash bowl, kitchen sink, or laundry tub, in a wet basement, or near a swimming pool, and
the like.
6) Clean only with dry cloth.
Do not use liquid cleaners or aerosol cleaners. Use a dry cloth for cleaning.
7) Do not block any ventilation openings.
Install in accordance with the manufacturer’s instructions.
Slots and Openings in the cabinet are provided for ventilation and to ensure reliable operation of the product and to
protect it from overheating. The openings should never be blocked by placing the product on a bed, sofa, rug, or other
similar surface.
8) Do not install near any heat sources such as radiators, heat registers, stoves, or other apparatus (including amplifiers)
that produce heat.
This product should not be placed in a built-in installation such as a bookcase or rack unless proper ventilation is
provided or the manufacturer's instructions have been adhered to.
9) Protect the power cable from being walked on or pinched particularly at plugs, convenience receptacles, and the point
where they exit from the apparatus.
10) Only use attachments/accessories specified by the manufacturer.
11) Unplug this apparatus during lightning storms or when unused for long periods of time.
This will prevent damage to the product due to lightning and power-line surges.
12) Refer all servicing to qualified service personnel. Servicing is required when the apparatus has been damaged in any
way, such as power- supply cord or plug is damaged, liquid has been spilled or objects have fallen into the apparatus, the
apparatus has been exposed to rain or moisture, does not operate normally, or has been dropped.
SAVE THESE INSTRUCTIONS
VL-SW102BX_OI.indb 4 2006/06/12 15:33:16

Important Information
5
Additional safety information
1. Use only the power source marked on the unit. If you are not sure of the type of power supplied to your home, consult
your dealer or local power company.
2. Use only the specified AC adaptor.
3. Do not tamper with the plug.
4. Make sure the plug is securely inserted.
5. Do not touch the plug with wet hands.
6. Do not place objects on the power cable. Install the unit where no one can step or trip on the cord.
7. To reduce the risk of electric shock, do not disassemble this unit. Take the unit to an authorized service center when
service is required. Opening or removing covers may expose you to dangerous voltages or other risks. Incorrect
reassembly can cause electric shock when the unit is subsequently used.
8.
Unplug this unit from power outlets and refer servicing to an authorized service
center
when the following conditions occur:
A. If smoke rises, or an unaccustomed noise or smell is discharged from the unit.
B. If metal objects have been dropped inside the main monitor station.
9. Do not put your ear(s) near the speaker, as loud sounds emitted from the speaker may cause hearing impairment.
10. Only a qualified technician is allowed to connect a power cable to the unit.
Contact an authorized service center.
11. Do not make any wiring connections when the power supply is turned on.
12. Never install wiring during a lightning storm.
13. In order to turn off the power of this product, disconnect the plug or use the main disconnect device that is installed.
14. When existing chime wires are used, it is possible that they contain AC voltage. Electric shock or unit damage could
result. Contact an authorized service center.
15. Never touch the inside of the main monitor station. High voltage is present.
16. Be sure to install the unit as specified to endure the mass.
17. If the wiring is outdoors, use a protection tube or a surge protector.
18. If the wiring is underground, do not make any connections underground.
19. WARNING - To reduce the risk of fire or electric shock, do not expose this apparatus to rain or moisture.
20. WARNING - Unplug this unit from power outlets if it emits smoke, an abnormal smell or makes unusual noise. These
conditions can cause fire or electric shock. Confirm that smoke has stopped and contact an authorized service center.
Battery
To reduce the risk of fire or injury to persons, read and follow these instructions.
L�Use only the battery(ies) specified.
L�Do not dispose of the battery(ies) in a fire. They may explode. Check with local waste management codes for special
disposal instructions.
L�Do not open or mutilate the battery(ies).
Released electrolyte may be toxic if swallowed.
L�
Exercise care when handling the battery(ies). Do not allow conductive materials such as rings, bracelets or keys to touch the
battery(ies), otherwise a short circuit may cause the battery(ies) and/or the conductive material to overheat and cause burns.
L�Charge the battery(ies) provided, or identified for use with the product only, in accordance with the instructions and
limitations specified in this manual.
VL-SW102BX_OI.indb 5 2006/06/12 15:33:16

Important Information
6
For best performance
Before using
L�It is prohibited to disassemble or modify this unit. Contact the dealer where you purchased this unit for repair.
L�When power fails, this unit cannot be used.
L�For the recorded image:
The recorded image may be lost when:
– Mishandled
– Electric shock or radio wave interference occurs.
– The power is turned off during use.
(We might not be held responsible for the damage.)
Location/avoiding noise
L�The main monitor station, the sub monitor station and the camera use radio waves to communicate with each other. For
maximum distance and noise-free operation, we recommend the following:
– Placing the unit away from electrical appliances such as:
• TVs.
• personal computers.
• Microwave ovens.
• Wireless LAN appliances.
• Other sub monitor stations.
• Other cameras (optional).
• If you use the sub monitor station near a microwave oven which is being used, noise may be heard. Move away from the
microwave oven and closer to the main monitor station.
For places to install the main monitor station and the door station, see the Installation Guide included separately.
Environment
L�Keep the unit away from electrical noise generating devices, such as fluorescent lamps and mortors.
L�The unit should be kept away from excessive smoke, dust, high temperature and vibration.
L�The unit should not be exposed to direct sunlight.
L�Do not place heavy objects on top of the unit.
L�When you leave the unit unused for a long period of time, unplug it from the power outlet.
L�The unit should be kept away from heat sources such as heaters, kitchen stoves, etc. It should not be placed in rooms
where the temperature is less than 0 °C or greater than 40 °C. Damp basements should also be avoided.
L�The maximum calling distance (approx. 100 m) may be shortened when the unit is used in the places:
– Where there are following obstacles between the main monitor station and the sub monitor station:
• Metal doors or metal shutters.
• Heat insulation including aluminium foil.
• Concrete walls or walls made of galvanized iron sheet.
• When using the sub monitor station on the different floor or house in the same grounds from where the main monitor
station has been installed.
• Many walls.
L�Operating near 2.4 GHz electrical appliances may cause interference. Move away from the electrical appliances.
Important:
L�When you move the sub monitor station from a cold place to a warm place, wait a little while to let the sub monitor station
adapt to the change in environment before use. In this case, condensation such as the formation of dew may occur,
resulting in error or malfunction.
Tapping
This unit uses digital wireless technology so that a call is rarely intercepted. However, calls may be tapped by a third party
because the unit also communicates using radio waves.
L�“Tapping” means that the other party intercepts a radio message intentionally or accidentally by using a receiver.
Using near medical equipment
L�Consult the manufacturer of any personal medical devices, such as pacemakers or hearing aids, to determine if they are
adequately shielded from external RF (radio frequency) energy. (The unit operates in the frequency range of 2.4 GHz to
2.48 GHz, and the power output level can range from 0.03 to 0.175 watts.) Do not use the unit in health care facilities if any
regulations posted in the area instruct you not to do so. Hospitals or health care facilities may be using equipment that could
be sensitive to external RF (radio frequency) energy.
VL-SW102BX_OI.indb 6 2006/06/12 15:33:17

Important Information
7
Privacy and rights of portrait
When installing or using the door station or the camera (optional), please take into consideration the rights of others with
regard to privacy.
L�It is generally said that “Privacy” means the ability of an individual or group to stop information about themselves from
becoming known to people other than those whom they choose to give the information. “Rights of portrait” means the right
to be safe from having your own image taken and used indiscriminately without consent.
Product names used in these Operating Instructions
For plain explanation, the product names used in these Operating Instructions are described as follows.
Product figure
CAMERA
VL-W600
DOOR
DOOR KEY
VOICE CHANGER
VOLUME
PAGE
BRIGHT
SET
(
HOLD 3 SEC
)
CHARGE
OFF
TALK
Description in
these Operating
Instructions
(
Product name)
Main monitor station
(Main monitor)
Sub monitor station
(Wireless monitor)
Repeater
(Repeater)
Door station
(Door station)
Camera
(Wireless camera)
*
1
Only available for certain countries. Please contact the dealer where you purchased the Wireless Video Intercom System.
*
1
*
1
VOICE
CHANGER
PAGE
BRIGHT/
SET
(
HOLD 3 SEC
)
VOLUME
CAMERADOOR
DOOR KEY
OFF
TALK
VL-MW102
VL-SW102BX_OI.indb 7 2006/06/12 15:33:21

Preparation
8
Accessory information
Included items
For the sub monitor station
1 2 3
4 5 6 7
No. Item Quantity Notes
1
AC adaptor 1
Cord length: Approx. 1.8 m
2
Battery 1
------
3
Battery cover 1
------
4
Charger 1
------
5
Charger stand 1
------
6
Wood screws 2
For the charger. (3.5 mm x 18 mm)
7
Washers 2
For the charger.
LAccessories for installing the main monitor station and the door station are described in the Installation Guide included.
Additional/replacement accessories
Accessory items Order number
Wireless monitor (called sub monitor station) VL-W600BX (same as the included sub monitor station)
Repeater VL-FAN1BX
DECT adaptor VL-GD001CE, VL-GD001E
Rechargeable nickel metal hydride (Ni-MH) battery HHR-P103
Door station
Only available for certain countries. Please contact the dealer
where you purchased the Wireless Video Intercom System.
Wireless camera (called camera)
Compatible Panasonic PBXs
This unit can be used with Panasonic PBXs (page 49). Please consult your dealer for compatible PBX information.
This unit is compatible with the following Panasonic PBXs*
1
:
KX-TDA30BX
KX-TDA100BX
KX-TDE100BX
KX-TDA200BX
KX-TDE200BX
KX-TDA600BX
KX-TDE600BX
KX-NCP500BX
KX-NCP1000BX
*
1
As of Dec, 2008.

Preparation
9
Location of controls
Door station
A
B
C
D
E
A Camera
L�When a visitor presses the call button, the camera on the door station will turn on and an image of the visitor will be
shown on the monitor displays of both the main monitor station and the sub monitor station.
B Microphone
C Call button
L�The call button is lighted with a blue LED light while the power is on.
L�When a visitor presses the call button, a ringer tone will ring at the main monitor station and the sub monitor station.
D Speaker
E Water drain hole
L�This hole allows rain water to drain. Do not cover it.
VL-SW102BX_OI.indb 9 2006/06/12 15:33:24

Preparation
10
Main monitor station
VO
IC
E
CHANGER
PA
GE
BRIGHT/
SET
(
HOLD 3 SE
C
)
VO
LUME
CAM
ERA
DOOR
DOOR KEY
O
FF
TA
LK
VIDEO
OUTPUT
VL-MW102
A
C
D
E
F
G
I
B
M
N
O
P
Q
H
J
K
L
Note:
LFor information about the rear view, refer to page 5 on the Installation Guide.
VL-SW102BX_OI.indb 10 2006/06/12 15:33:29

Preparation
11
A Monitor display (page 12)
B {DOOR KEY} button
L�Allows you to open the door when connecting the door opener (sold separately) to the main monitor station (page 46).
C Speaker
D {OFF} button
L�Press to end an operation.
L�Press during standby to display the information display.
E Talking indicator
L�Lights up while you are talking.
F TALK indicator
L�Flashes while the door station or the sub monitor station is calling. Lights up solid during a call.
G {TALK} button
L�Press to answer a call and/or speak to a visitor (page 21).
H Navigator key
{▼} {▲}
L�Adjusts the ringer volume for the door station (page 44).
L�Adjusts the speaker volume (page 44).
L�Selects the desired item or image.
{◄} {►}
L�Adjusts the ringer volume for the camera (optional) (page 44).
{D}
L�Records an image (page 30).
L�Views the recorded image (page 32).
L�Flashes when unviewed images from the door station or the
camera (optional) remain in memory (page 30).
I Microphone
L�Do not cover when you talk.
J {VIDEO OUTPUT} jack (Supports the NTSC standard)
L�If you connect the jack to a TV set using an RCA pin cord (sold separately), the video (picture) image displayed on the
main monitor station can be automatically output to the TV set.
However, the larger the TV screen connected to the jack, the poorer the image quality will be.
K Connector cover
L Connector
L�Do not connect anything.
M {PAGE} button
L�Press to page the sub monitor station (page 23, 36).
N {BRIGHT/SET} button
L�Press to adjust the brightness of displayed images.
– The display brightness is changed as follows each time you press the button. 5 levels are available.
Dark
Bright
Default setting
L�When you press and hold the button for about 3 seconds, the function setting display appears (page 38).
O {VOICE CHANGER} button
L�Press to modify the sound of your voice heard by a visitor (page 22).
P {CAMERA} button
(This button functions only when the optional camera is registered to the main monitor station.)
L�Press to monitor the sound and image taken by the camera (page 27).
Q {DOOR} button
L�Press to monitor the sound and image taken by the door station (page 25).
VL-SW102BX_OI.indb 11 2006/06/12 15:33:31

Preparation
12
Monitor display (Main monitor station)
The following displays are examples for description purposes, and they may differ from the actual display.
L�The monitor display is turned off during standby. When you press {OFF}, the information display appears.
<Display during operation>
A Indicates which device is calling, monitoring, or in a call.
Also indicates which device took the image while viewing it.
B Indicates which device is calling while talking or monitoring
(page 24, 29).
C Indicates that the “Press-to-talk” mode is on (page 22).
D Indicates the operation of the navigator key.
(The display varies depending on the operation.)
E Indicates the current setting of the ringer volume for the
door station or the camera (optional).
When the ringer volume is set to “OFF”, “ ” is
displayed.
F Appears when unviewed images from the door station or
the camera (optional) remain in memory.
G Appears when the date and time has not been set (page
20).
Note:
L�Images on the monitor display:
A referenced image taken by the camera (optional) is displayed every 3 seconds. (The displayed image is not a moving
picture.)
{OFF}
Navigator key
DOOR2 P SAVE
BACK OK ♪
DOOR1
A B C D
D
Press {D}.
Press {◄}.
<Information display>
E
F
G
Press {►}.
VL-SW102BX_OI.indb 12 2006/06/12 15:33:34

Preparation
13
CAMERA
VL-W600
DOOR
DOOR KEY
VO
ICE CHANGE
R
VO
LUME
PA
GE
BRIGHT
SET
(
HOLD 3 SEC
)
CHARGE
OFF
T
ALK
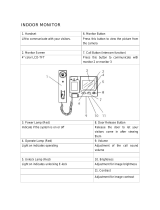
Sub monitor station
N Front view
A Monitor display (page 16)
B {DOOR KEY} button
L�Allows you to open the door when the door opener (sold
separately) is connected to the main monitor station
(page 46).
C {PAGE} button
L�Press to page the main monitor station or another sub
monitor station (page 23, 36).
D {BRIGHT/SET} button
L�Press to adjust the brightness of displayed images.
– The display brightness is changed as follows each
time you press the button. 5 levels are available.
Default setting
u
Dark
Bright
L�When you press and hold the button for about 3
seconds, the function setting display appears (page 38).
E {OFF} button
L�Press to end an operation.
L�Press during standby to turn on the monitor display.
F Microphone
G {TALK} button
L�Press to answer a call and/or speak to a visitor (page
21).
H TALK indicator
L�Flashes while the door station or the main monitor
station is calling. Lights up solid during a call.
I Talking indicator
L�Lights up while you are talking.
J CHARGE indicator
L�Lights up while charging. Turns off when charging is
complete.
A
M
D
C
E
F
H
G
N
L
B
K
J
K Navigator key
{▼} {▲}
L�Adjusts the ringer volume for the door station (page 44).
L�Adjusts the speaker volume (page 44).
L�Selects the desired item or image.
{◄} {►}
L�Adjusts the ringer volume for the camera (optional) (page 44).
L�Press to move the displayed image right or left slightly.
{D}
L�Records an image (page 30).
L�Views the recorded image (page 32).
L {VOICE CHANGER} button
L�Press to modify the sound of your voice heard by a visitor (page 22).
M {CAMERA} button
(This button functions only when the optional camera is registered to the main monitor station.)
L�Press to monitor the sound and image taken by the camera (page 27).
N {DOOR} button
L�Press to monitor the sound and image taken by the door station (page 25).
I
VL-SW102BX_OI.indb 13 2006/06/12 15:33:38

Preparation
14
N Rear view
O
R
P
Q
O Speaker
P Charge contacts (Metallic parts)
Q Battery cover
L�Open to replace the battery.
R Antenna (built-in)
L�Do not cover the antenna with your hand when using the sub monitor station. (Radio waves may weaken.)
VL-SW102BX_OI.indb 14 2006/06/12 15:33:40

Preparation
15
Charger
L�To assemble the charger stand, see page 18.
A
B
C
A Charger
B Charge contacts (Metallic parts)
C Charger stand
Approx. 50 mm
Wall mount template for the charger
N Mounting the charger on the wall
L�The charger stand is not required.
1 Mount onto the wall, directing the wood
screws into the slots on the charger.
2 Slide the charger down until it is secure.
Charger
Wood screws
(included)
Washer (included)
2.5 mm – 3 mm
Wall
Approx. 50 mm
VL-SW102BX_OI.indb 15 2006/06/12 15:33:41

Preparation
16
CAMERA
VL-GM002
DOOR
DOOR KEY
VOICE CHANGER
VOLUME
PAGE
BRIGHT
SET
(
HOLD SET
)
CHARGE
OFF
TALK
Monitor display (Sub monitor station)
The following display is example for description purposes, and it may differ from the actual display.
L�The monitor display is turned off during standby. When you press {OFF}, the information display appears.
{OFF}
Navigator key
A B C D E F
G
H
I
J
K
A Indicates the battery level.
Estimated operating time after charging the
battery for 7 hours.
L�Continuous operating time: Approx. 2.5 hours*
L�Standby time: Approx. 200 hours*
(When the sub monitor station is off the charger
and is not in use after the battery is fully
charged.)
L�While “OUT OF RANGE” is displayed (page
17), the standby time is shortened.
*
When surrounding temperature is 20 °C.
Recharge the battery immediately.
�While in use:
L�2 beeps sound every 4 seconds and a call is
disconnected within about 60 seconds.
During standby:
L�“RECHARGE BATTERY” is displayed.
(The battery needs to be recharged.)
B Indicates which device is calling, monitoring, or in a call.
Also indicates which device took the image while viewing
it.
Door station 1
(When using an additional door station,
“ ” is displayed.)
Main monitor station
Sub monitor station 1
(When using multiple sub monitor stations,
“ ” – “ ” is displayed.)
Camera 1 (optional)
(When using multiple cameras,
“ ” – “ ” is displayed.)
C Indicates which device is calling while talking or
monitoring.
Door station 1
(When using an additional door station, “ ”
is displayed.)
Camera 1 (optional)
(When using multiple cameras,
“ ” – “ ”
is displayed.)
D Indicates that the “Press-to-talk” mode is on (page 22).
VL-SW102BX_OI.indb 16 2006/06/12 15:33:49

Preparation
17
E Indicates that the door is opened when the door opener
(sold separately) is connected to the main monitor station
(page 46).
F Indicates the level of the reception.
Use within this range.
Strong
Weak
L�When the sub monitor station is out of range of the main
monitor station, “ ” flashes and “OUT OF RANGE” is
displayed. (Move closer to the main monitor station.)
G Indicates the registration number of the sub monitor
station.
H
Indicates that the ringer volume for the door
station is set to “OFF”.
Indicates that the ringer volume for the
camera (optional) is set to “OFF”.
I
Appears when unviewed images from the
door station remain in memory.
Appears when unviewed images from the
camera (optional) remain in memory.
J
When you have not answered a call from the
camera (optional) while talking or monitoring,
its registration number is displayed. (When
using multiple cameras, “ ” – “ ” is
displayed.)
K Indicates the operation of the navigator key.
(The display varies depending on the operation.)
Note:
L�Images on the monitor display:
A refreshed image taken by the door station or the camera
(optional) is displayed every 3 seconds. (The displayed
image is not a moving picture.)
Press {D}.
Press {►}.Press {◄}.
VL-SW102BX_OI.indb 17 2006/06/12 15:33:52

Preparation
18
Charging the sub monitor station
1 Insert the battery.
A Align the terminals and insert.
B Close the battery cover.
Terminals
A
B
2 Assemble the charger stand.
A Plug the connector of the AC adaptor into the jack on the charger.
L�You can pull out the AC adaptor cord to the left or right side.
B Attach the charger stand.
A
B
3 Plug the AC adaptor into the power outlet (100 – 240 V AC).
4 Place the sub monitor station on the charger and charge the battery.
While charging: The CHARGE indicator lights up.
When charging is complete: The CHARGE indicator turns off.
LAt the first time of charging or after battery replacement, it takes about 7 hours to complete charging.
LIf you use the sub monitor station while charging, the charging time becomes longer.
L�Locate the charger where “OUT OF RANGE” is not displayed on the sub monitor station.
(The charging time becomes longer where the sub monitor station is out of range of the main monitor station.)
The charger can also
be mounted onto the
wall (page 15).
Power outlet
( 100 – 240 V AC, 50/60 Hz)
AC adaptor
Charge contacts
(Metallic parts)
Charge contacts
(Metallic parts)
CHARGE indicator
VL-SW102BX_OI.indb 18 2006/06/12 15:33:54

Preparation
19
Important:
L�If the charge contacts become soiled, clean the charge contacts (page 59).
L�When the sub monitor station is off the charger or the AC adaptor is disconnected for 1 week or more, remove the battery in
order to maintain the battery performance and prevent the battery from discharging.
– Recharge the battery before using the sub monitor station again.
N To remove the charger stand
Pressing the tab, pull the charger stand to detach.
Tab
VL-SW102BX_OI.indb 19 2006/06/12 15:33:54

Preparation
20
Setting the date and time
This unit has a recording function. The date and time will not be recorded when recording unless they are set. You can set the
date and time using the main monitor station.
{OFF}
{SET}
{D}
{
▲
} {
▲
}
{
▲
} {▲}
1 During standby, press and hold {SET} for about 3 seconds.
2 Select “OTHER” by pressing {▼} or {▲}.
3 Press {D} then select “TIME AND DATE” by pressing {▼} or {▲}.
4 Press {D} then set the current date and time.
{
▲
} {
▲
}: Select the location for hour/minute/day/month/year.
{
▲
} {▲}: Select numbers.
(You can scroll numbers quickly by pressing and holding
{
▲
} or {▲}.)
(Example)
5 Press {D} after finishing the setting.
L�The screen in step 3 is displayed.
6 Press {OFF}.
Note:
L�Time may shift about 60 seconds per month.
VL-SW102BX_OI.indb 20 2006/06/12 15:33:59
/